Primary Events
About Events
In GAA, Events store information about events in which a unit suffers a loss of power generation capacity. GAA uses two types of Events:
- Primary Event: Stores information about the primary cause of an event. When something goes wrong in a unit, you will record information about the event as a Primary Event. Primary Events are linked to the GAA Unit that represents the unit at which the event occurred.
- Contributing Event: Stores additional information about the event, such as a secondary cause. All Contributing Events are linked to a Primary Event. Therefore, to create a Contributing Event, you must have already created the Primary Event to which it will be linked. When you create a Contributing Event, all necessary fields will be populated automatically with values in the Primary Event to which it is linked.
Each event that occurs will be represented by at least a Primary Event. Depending on the event, one or more Contributing Events may need to be created and linked to the Primary Event. Together, the Primary Event and all the Contributing Events that are linked to it represent a single event.
Because Primary Events and Contributing Events are similar in that they share many of the same fields and behave the same way, throughout this documentation we refer to them collectively as Events. Where necessary, we make a distinction between the functionality of Primary Events and Contributing Events. Wherever that distinction is not made, you can assume that all Events function the same way.
About Event Spanning Multiple Years
Sometimes an event will start in one year and end in the next year. A single Event record, however, cannot span multiple years because the year in the Event Start field must match the year in the Event End field. This means that if a given event starts in one year and ends in the next year, you must create two Event records to represent that event.
For example, if an event started December 15, 2016 and ended January 15, 2017, you would create two Primary Event records with the following event dates to represent that event.
| Original Event | Primary Event in 2016 | Primary Event in 2017 | |
|---|---|---|---|
| Event Start | December 15, 2016, 5:00 A.M. | December 15, 2016, 5:00 A.M. | January 1, 2017 12:00 A.M. |
| Event End | January 15, 2017 1:00 P.M. | December 31, 2016 11:59 P.M. | January 15, 2017 1:00 P.M. |
About Event Start and Event End Dates
The value in the Event Start and Event End fields identify the way in which an event contributes to the NERC GADS Event Report 07 or NERC GADS Performance Report 05. This topic describes how these fields contribute to the reports in various scenarios.
Scenario 1: Event start and end date are known
In this scenario, the Event Start field contains the actual date when the event started and the End Date field contains the actual date when the event ended. The actual date can be a date of the past or current date. The following will be true in this scenario:
- The Start Date is Estimated? check box must be cleared.
- The End Date is Estimated? check box must be cleared.
- The NERC GADS Event Report 07 includes the event.
- The NERC GADS Performance Report 05 includes the effect on performance due to this event.
Scenario 2: Start date is known but event end date is unknown
In this scenario, the Event Start field contains the actual date when the event started, but the End Date field contains no value to indicate when the event might end. The actual date can be a past date or the current date. The following will be true in this scenario:
- The Start Date is Estimated? check box must be cleared.
- The End Date is Estimated? check box must be cleared.
- The NERC GADS Event Report 07 includes the event with no value in the Event End field.
- The NERC GADS Performance Report 05 includes the event with the end of month as the value in the Event End field. The report also includes the effect on performance due to this event.
Scenario 3: Start date is known but event end date is estimated
In this scenario, the Event Start field contains the actual date when the event started but the End Date field contains an estimated date in future when the event might end. The actual date can be a past date or the current date. The following will be true in this scenario:
- The Start Date is Estimated? check box must be cleared.
- The End Date is Estimated? check box must be selected.
- The NERC GADS Event Report 07 includes the event with no value in the Event End field.
- The NERC GADS Performance Report 05 includes the event with no value in the Event End field. The report also includes the effect on performance due to this event.
Scenario 4: Start and End date of an event are estimated
In this scenario, the Event Start field contains the estimated date in future when the event will start and the End Date field contains an estimated date in future when the event might end. The following will be true in this scenario:
- The Start Date is Estimated? check box must be selected.
- The End Date is Estimated? check box must be selected.
- The NERC GADS Event Report 07 does not include the event.
- The NERC GADS Performance Report 05 does not include the event.
About Events with Only One Cause
Some types of events have only one possible cause. In Events where the value in Capacity Event Type field identifies a single-cause event, the Cause Code System, Cause code Component, and Cause Code fields will be disabled and populated automatically with the appropriate cause code. The following table lists these Capacity Event Type values and their corresponding Cause Code values.
| Capacity Event Type | Cause Code System | Cause Code Component | Cause Code |
|---|---|---|---|
| IR (Inactive Reserve) | Inactive State | Inactive State | 0002 (Inactive Reserve) |
| MB (Mothballed) | Inactive State | Inactive State | 9991 (Mothballed Unit) |
| RS (Reserve Shutdown) | External | Economic | 0000 (Reserve Shutdown) |
| RU (Retired) | Inactive State | Inactive State | 9990 (Retired Unit) |
About Event Types
This topic describes the event types that are defined for a GAA Unit that reports to NERC and a GAA Unit that reports to CEA.
Event Types for a GAA Unit that Reports to NERC
Each Primary and Contributing Event can be either in Inactive State or Active state. Each Primary or Contributing Event must be classified using a value in the Capacity Event Type field.
-
Inactive State: Indicates the state in which a unit is unavailable for service for an extended period of time for reasons not related to the equipment. There are three types of events in an Inactive state:
- IR (Inactive Reserve): The unit could not generate power but can do so after some repairs. You can create this event only as a Related Event to a Reserve Shutdown Event when the duration of the event is more than 60 days.
- MB (Mothballed): The unit could not generate power but can do so after some repairs with an appropriate notification period. You can create this event only as a Related Event to an Outage Event when the duration of the event is more than 60 days.
- RU (Retired): The unit could not generate power and will never do so in the future.
-
Active State: Indicates the state in which a unit is available to generate power. There are four types of events in an Active state:
-
Outage Events: The unit could generate no power during the event. If a Primary Event or Contributing Event contains one of the following values in the Capacity Event Type field, it is considered an outage event:
- U1 (Unplanned (forced) Outage - Immediate)
- U2 (Unplanned (forced) Outage - Delayed)
- U3 (Unplanned (forced) Outage - Postponed)
- MO (Maintenance Outage)
- PO (Planned Outage)
- ME (Maintenance Outage Extension): This event type will be available only when you create a Related Event.
- PE (Planned Outage Extension): This event type will be available only when you create a Related Event.
- SF (Startup Failure): This event type will be available only when you create a Related Event.
-
Derate Events: The unit could produce power during the event, but at a reduced capacity. If a Primary Event or Contributing Event contains one of the following values in the Capacity Event Type field, it is considered a derate event:
- D1 (Unplanned (forced) Derating - Immediate)
- D2 (Unplanned (forced) Derating - Delayed)
- D3 (Unplanned (forced) Derating - Postponed)
- D4 (Maintenance Derating)
- DM (Maintenance Derating Extension): This event type will be available only when you create a Related Event.
- PD (Planned Derating)
- DP (Planned Derating Extension): This event type will be available only when you create a Related Event.
-
Reserve Shutdown Events: The unit can produce power during the event, but is generating no power due to lack of demand. You must not report a Reserve Shutdown. If a Primary Event or Contributing Event contains the following value in the Capacity Event Type field, it is considered an Reserve Shutdown event:
- RS (Reserve Shutdown)
-
Non-Curtailing Events: The unit could produce power during the event, although an equipment or a major component was removed for maintenance, testing, or other purposes. If a Primary Event or Contributing Event contains the following value in the Capacity Event Type field, it is considered an Non-Curtailing event:
- NC (Noncurtailing Event)
-
Outage Events: The unit could generate no power during the event. If a Primary Event or Contributing Event contains one of the following values in the Capacity Event Type field, it is considered an outage event:
Event Types for a GAA Unit that Reports to CEA
Each Primary Event can be either in Commercial Service State or Not in Commercial Service state. Each Primary Event must be classified using a value in the Capacity Event Type field.
-
Not in Commercial Service State: Indicates the state in which a unit is unavailable for commercial service for an extended period of time, to perform repairs that will improve the performance of the unit and extend the life of the plant. The following are the events types that are associated with a unit in the Not in Commercial Service state:
-
30-1 (Not-in-Commercial Service (NICS) (Decommissioned))
-
30-2 (Not-in-Commercial Service (NICS) (Mothballed))
-
30-3 (Not-in-Commercial Service (NICS) (Refurbishment))
-
30-4 (Not-in-Commercial Service (NICS) (Deferred))
-
-
Commercial Service State: Indicates the state in which a unit is available for commercial service. The following are the event types that can be associated with a unit in the Commercial Service state:
- 11-1 (Operating (O) in a Synchronous Condenser Mode)
- 11-2 (Operating (O) in Spin no Load Mode)
- 12 (Operating under a Forced Derating (OFD))
- 12-1 (Operating under a Forced Derating (OFD) (Synchronous Condenser))
- 12-2 (Operating under a Forced Derating (OFD) (Spin No Load))
- 13 (Operating under a Scheduled Derating (OSD))
- 13-1 (Operating under a Scheduled Derating (SD) (Synchronous Condenser))
- 13-2 (Operating under a Scheduled Derating (SD) Spin no Load)
- 14 (Available but not Operating (ABNO))
- 14-1 (Available but not Operating (ABNO) (Synchronous Condenser))
- 14-2 (Available but not Operating (ABNO) (Spin No Load))
- 15 (Available but not Operating (Forced Derating) (ABNO-FD))
- 15-1 (Available but not Operating (Forced Derating) (ABNO-FD) (Synchronous Condenser))
- 15-2 (Available but not Operating (Forced Derating) (ABNO-FD) (Spin No Load))
- 16 (Available but not Operating (Scheduled Derating) (ABNO-SD))
- 16-1 (Available but not Operating (Scheduled Derating) (ABNO-SD) (Synchronous Condenser))
- 16-2 (Available but not Operating (Scheduled Derating) (ABNO-SD) (Spin no Load))
- 21-1 (Forced Outage (FO) (Sudden Forced Outage))
- 21-2 (Forced Outage (FO) (Immediately Deferrable Forced Outage))
- 21-3 (Forced Outage (FO) (Deferrable Forced Outage))
- 21-4 (Forced Outage (FO) (Starting Failure Outage))
- 22 (Forced Extension of Maintenance Outage (FEMO))
- 23 (Forced Extension of Planned Outage (FEPO))
- 24 (Maintenance Outage (MO))
- 25 (Planned Outage (PO))
About Entity ID in Events
The Entity ID field in all Events is generated automatically, but the fields that are used to generate the values are different for Primary Events and Contributing Events.
-
The value in the Entity ID field for each Primary Event is unique to all Primary Events that are linked to a given Generation Unit. The Entity ID in Primary Events is generated automatically using the following format:
<Event ID> ~ <Cause Code Description> ~ <Capacity Event Type>
...where:
- <Event ID> is the value in the Event ID field.
- <Cause Code Description> is the value in the Cause Code field.
-
<Capacity Event Type> is the value in the Capacity Event Type field.
The value in the Event ID field in Primary Events is generated using the following format:
<Unit ID> ~ <Reporting Year> ~ <Event Number>
...where:
- <Unit ID> is the value in the Unit ID field.
- <Reporting Year> is the value in the Reporting Year field.
- <Event Number> is the value in the Event Number field. If the value in the Event Number field is fewer than four digits, zeros will be added in front of the value so that the event number in the Event ID field will be four digits.
-
The value in the Entity ID field in Contributing Events identifies the Primary Event to which the Contributing Event is linked. The values in the Entity ID field in all Contributing Events that are linked to a given Primary Event will match one another. The Entity ID in Contributing Events is generated using the following format:
<Primary Incident ID> ~ <Capacity Event Type> <Cause Code>
...where:
- <Primary Incident ID> is the value in the Primary Incident ID field.
- <Capacity Event Type> is the value in the Capacity Event Type field.
The Primary Incident ID field is populated automatically with the value in the Event ID field in the Primary Event for which the Contributing Event exists. The value in the Primary Incident ID field for all Contributing Events will match the value in the Event ID field in the Primary Event to which they are linked.
For example, suppose the following diagram.
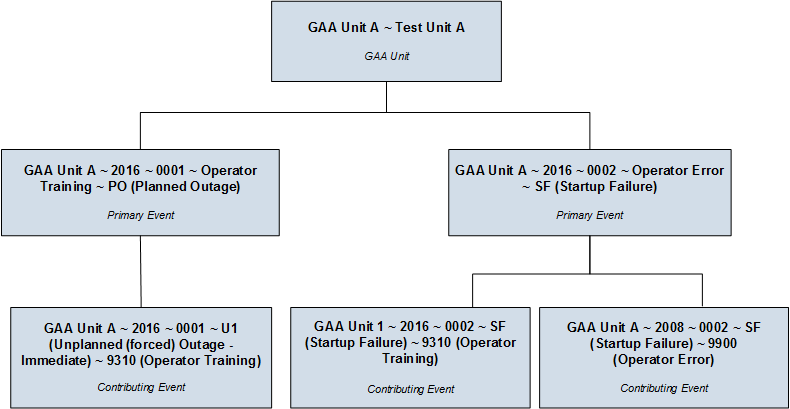
The Entity ID of the first Primary Event begins with GAA Unit ~ 2016 ~ 0001. You can identify the Contributing Event that is linked to this Primary Event because its Entity ID also begins with GAA Unit ~ 2016 ~ 0001.
The Entity ID of the second Primary Event begins with GAA Unit ~ 2016 ~ 0002. This event is linked to two Contributing Events, both of which begin with GAA Unit ~ 2016 ~ 0002, which allows you to determine that both Contributing Events are linked to the second Primary Event.
About Sorting Primary Events
When you create a Primary Event for a unit, an event number is created and stored in the Event Number field, which is included in the Event ID. The value in the Event Number field corresponds to the order in which the record was created for that particular unit for that year, which is determined based on the value in the Event Start Date field. So, for example, if the record is the third record that you have created for a unit for 2016, the event number will be 3 (three).
In the following image, the formatted values from the Event Number field in both Primary Events are highlighted.

Throughout the year, however, Primary Events may be created in an order that does not reflect the order in which the events occurred. For example, an event might occur on January 12, 2016, but you might not create the record to capture the event data until January 15, 2016. When events are not recorded immediately after they occur, the values in the Event Number field in the Primary Events may get out of order.
| Event Occurs | Record is Created | Event Number Assigned |
|---|---|---|
| January 1, 2016 | January 1, 2016 | 1 |
| January 2, 2016 | January 2, 2016 | 2 |
| January 3, 2016 | January 6, 2016 | 4 |
| January 4, 2016 | January 4, 2016 | 3 |
In this example, one event occurred each day, beginning January 1 and ending January 4. On January 1 and January 2, a record was created immediately after the event occurred. On January 3, however, a record was not created immediately after the event occurred. Another event occurred on January 4, and the data was immediately entered into a record. It was not until January 6 that a record was created to record the event from January 3.
In other words, the order in which the records were created does not reflect the order in which the events occurred. GE Digital APM automatically sorts the events in a chronological order so that they reflect the event order based on start date rather than creation date.
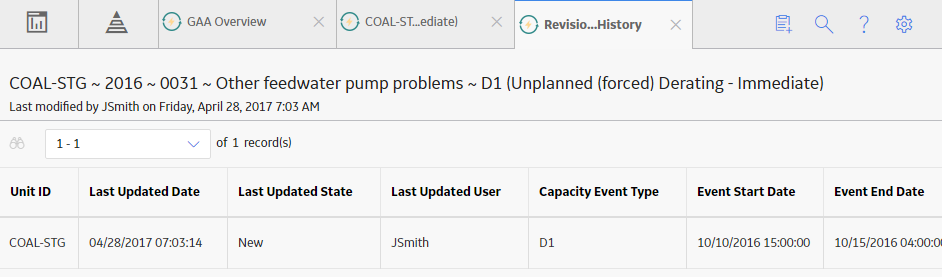
About Revision History
Using the Revision History feature, you can keep track of the revisions made for a Primary Event in a GAA Unit. When you modify a value in the Primary Event or delete the Primary Event, a Revision History record for that event is created.
In the list of Revision History records, the records are listed in descending order based on the value in the Last Updated Date field.
About Accounting for Daylight Saving Time Adjustments
If an event occurs during a time period when Daylight Saving Time (DST) begins or ends, and your plant exists in a part of the country where DST is observed, you will probably want to adjust the values in these fields to account for the DST adjustment.
For example, in 2007, DST in the United States started at 2:00 A.M. on March 11. As a result, observers of DST lost one hour of daylight (e.g., a clock that read 4:00 A.M. on March 11 would have read 3:00 A.M. on March 10). Because DST started at 2:00 A.M., observers were required to set their clocks forward one hour at that time. So at 2:00 A.M., you had to set your clock to 3:00 A.M. even though an hour had not actually passed.
With that in mind, suppose an event occurred at 11:00 P.M. on March 10, 2007 and ended at 4:00 A.M. on March 11, 2007. By the clock, it would appear that the event lasted five hours. In reality, the event lasted only four hours because DST added an hour to the clock even though that hour did not actually occur.
If you allow the GE Digital APM system to take DST into account, the calculations will account for power for the four hours that the event lasted according to real linear time. To do so, you must select the Use Daylight Saving Time check box in Plant datasheet.
If you do not allow the GE Digital APM system to take DST into account, the calculations will account for power for the five hours the event lasted according to the clock.
Access a Primary Event
Procedure
- Select one of the following tabs:
- Events Under Review: Select this tab if you want to view an event that is not in an Approved state.
- Approved Events: Select this tab if you want to view an event that is in an Approved state.
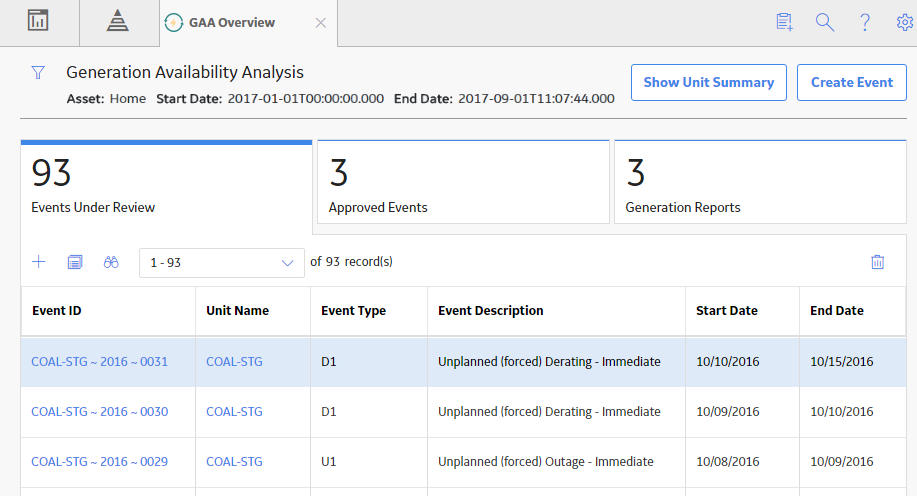
A list of Primary Events available in the database appears based on the tab that you selected. The following columns appear in the section:
- Event ID
- Unit Name
- Event Type
- Event Description
- Start Date
- End Date
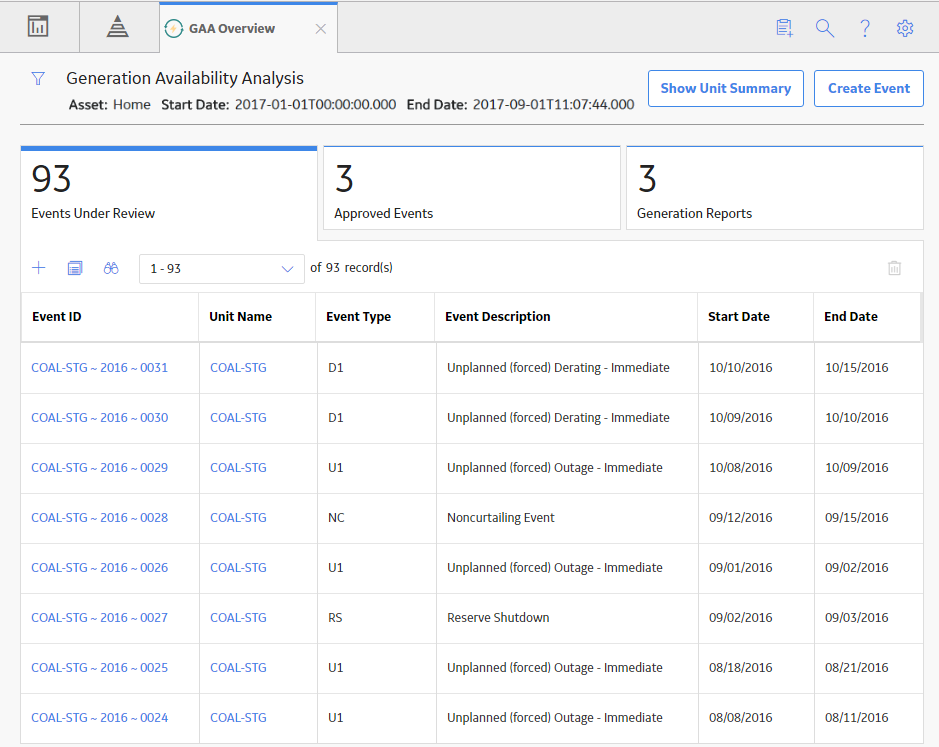
- In the Event ID column, select the link for the Primary Event that you want to view.
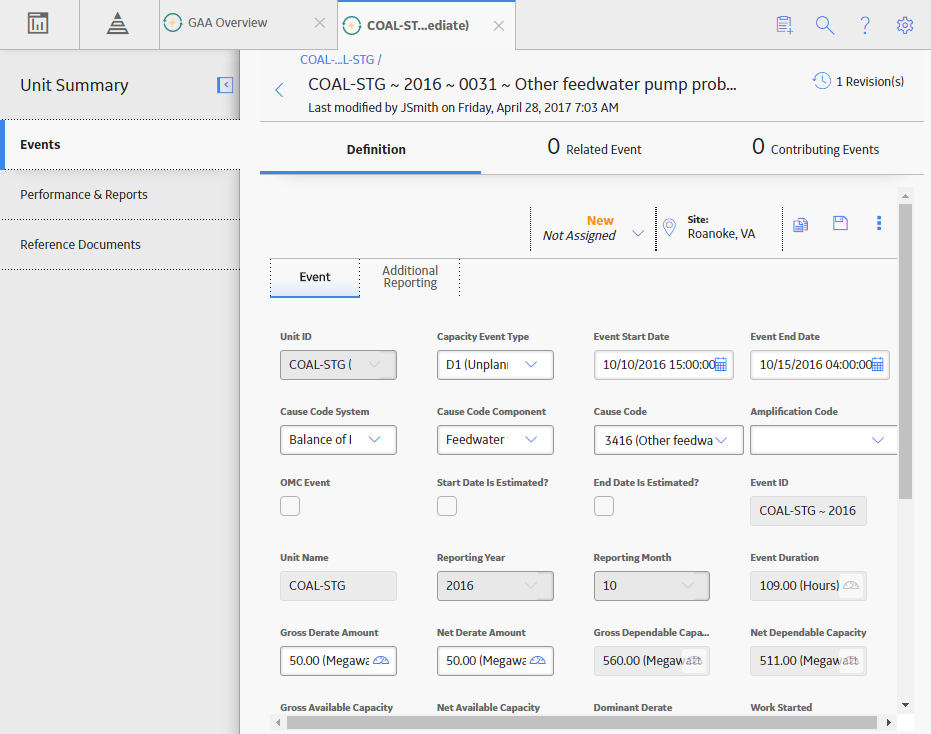
The Events workspace appears, displaying the Definition, Related Event, and Contributing Events tabs. The Definition tab is selected by default, displaying the datasheet for the selected Primary Event.
Note: The Related Event and Contributing Events tabs appear only if the value in the Primary Regulatory Body field for the associated GAA Unit is North American Electric Reliability Corporation (NERC).You can view the Revision History for the Primary Event by selecting
 . The number to the right of represents the total number of revisions made for the selected Primary Event.
The following image shows the workspace for a Primary Event that is associated with a GAA Unit in which the value in the Primary Regulatory Body field is North American Electric Reliability Corporation (NERC).
 Note: As needed, you can modify the values in the available fields, and then select
 to save your changes. Note: At this point, you can also access the list of Primary Events associated with the GAA Unit to which the selected Event is associated.
Access a List of Primary Events Associated with a GAA Unit
Procedure
- Select
 .
. A list of Primary Events associated with the GAA Unit to which the selected Event is associated appears.
The following image shows the list of Primary Events that are associated with a GAA Unit in which the value in the Primary Regulatory Body field is North American Electric Reliability Corporation (NERC).
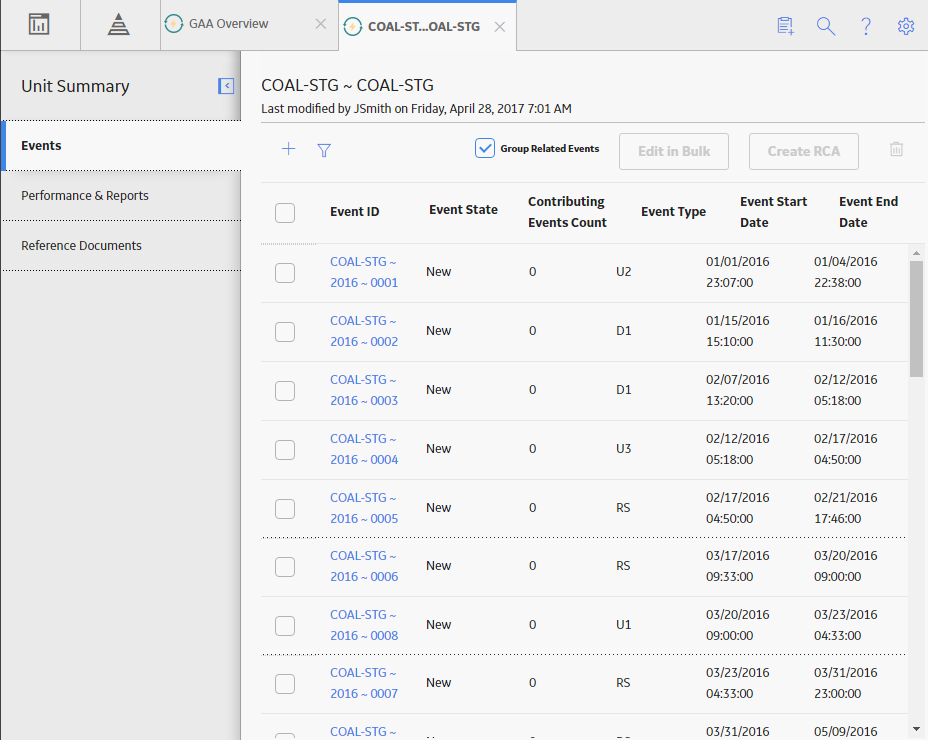 Note: By default, the Related Events on this page are grouped together. You can clear the Group Related Events check box to remove this grouping.
In the Events workspace for the GAA Unit, the following information related to each Event appears:
- Event ID : Contains the value from the Event ID field for the Event. You can select the link in the Event ID column to access the selected event.
- Event State: Contains the state of the event.
- Contributing Events Count: Contains the number of Contributing Events.
- Event Type : Contains the value that you entered in Capacity Event Type field to identify the type of event.
- Event Start Date : Contains the value that you entered in the Event Start field to indicate the date and time that the event started.
- Event End Date : Contains the value that you entered in the Event End field to indicate the date and time that the event ended.
- Associated RCA : Contains the value that you entered in the Analysis Name field when creating the RCA for the Event.
- Associated eLog: Contains the value that you entered in the Headline field when creating the eLog entry for the Event.
Note: The Associated RCA and Associated eLog columns only appear if the license for RCA and eLog is active and you have the required privileges.The Primary Events are sorted in the descending order based on the value in the Start Date field. You can also sort the information in the grid based on the Event ID, Event Code, Event Start Date, and Event End Date.
By default, the Primary Events are filtered based on the date range provided on the GAA Overview page. You can select
 to filter the Primary Events based on a different date range by entering values in From and To cells. Note: If you want to modify multiple Primary Events, select check box next to one or more Primary Events that you want to modify, and then select Edit in Bulk. The Event Creation page appears. You can modify the values in the available fields, and then select to save your changes.
Access the Revision History of a Primary Event
Procedure
- In the upper-right corner of the Events workspace, select .
The Revision History page appears, displaying a list of Revision History records for the selected Primary Event. The Revision History records contain information from the fields defined in the Primary Event and Primary Event History families.
 Note:
Note:To view the revision history of a deleted Primary Event:
- Access the Catalog page.
-
Navigate to the folder \\Public\Meridium\Modules\Generation Management\Queries.
-
In the Name column, select Primary Event History Result Grid.
The Enter Parameter Values window appears.
- In the Primary Event Entity Key box, enter the Event Key of the Primary Event that you want to access.
-
Select Done
.On the Primary Event History Result Grid page, the revision history for the deleted Primary Event appears.
Access a Reference Document
About this task
This topic describes how to access the list of reference documents via the Unit Summary workspace. You can also access the list of reference documents when accessing a GAA Unit.
Procedure
- In the pane, select Reference Documents.
The Reference Documents workspace appears, displaying a list of reference documents that are linked to the selected GAA Unit.
Note: The file that was used for importing existing data and the log file that was generated during the data import will be added as reference documents for the selected Unit.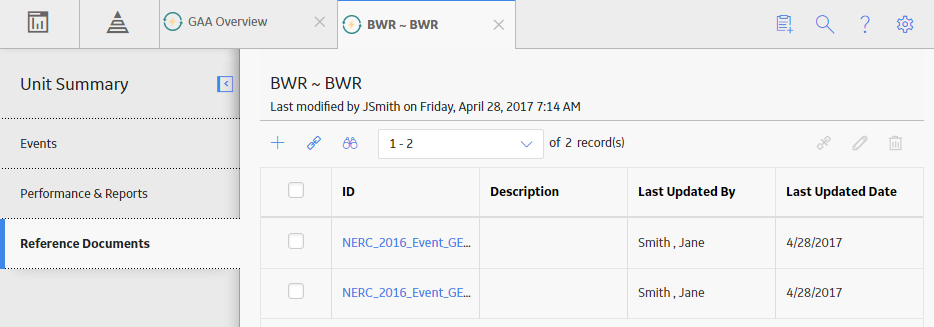 Tip: For more information, refer to the Reference Documents section of the documentation.
Create a Primary Event
About this task
Procedure
- Create a Primary Event with detailed information: Use this method when detailed information for an event is available
- Select the Events Under Review tab.
A list of Primary Events available in the database appears.
- In the upper-left corner of the Events Under Review section, select
 .Note:
You can also create a new Primary Event by:
-
Accessing a list of Primary Events associated with a GAA Unit. After accessing the list, select , and then select Create New Event.
- Selecting the Create Event button in the upper-right corner of the GAA Overview page, as described in the next section.
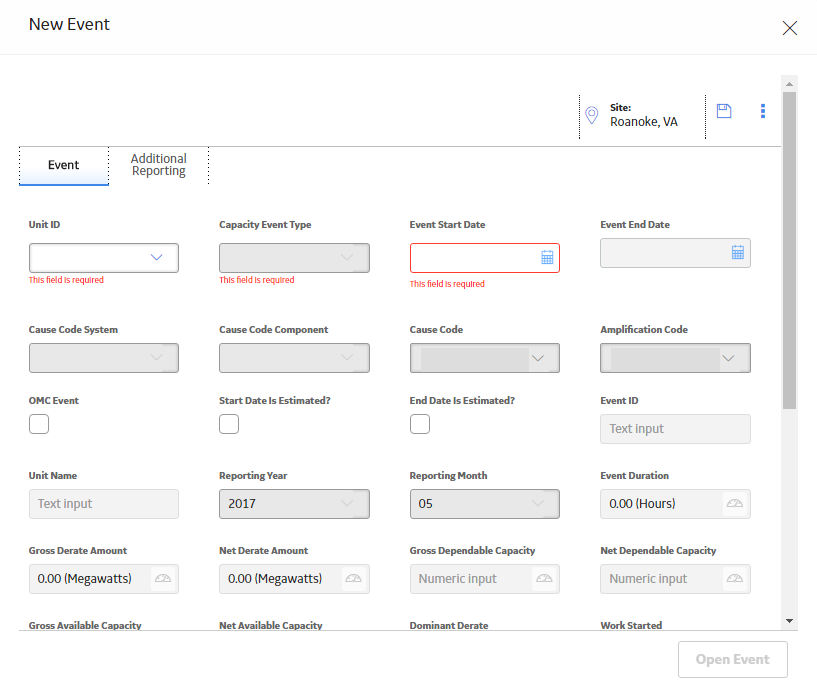
The New Event window appears, displaying a blank datasheet.
-
Accessing a list of Primary Events associated with a GAA Unit. After accessing the list, select
- Select .
The new Primary Event is saved. You can select Open Event to access the event.
- Select the Events Under Review tab.
- Create a Primary Event with basic information: Use this method when you want to add multiple events with basic information, such as Unit ID, Event Start date, Capacity Event Type
- In the upper-right corner of the page, select Create Event.
The Event Creation page appears.
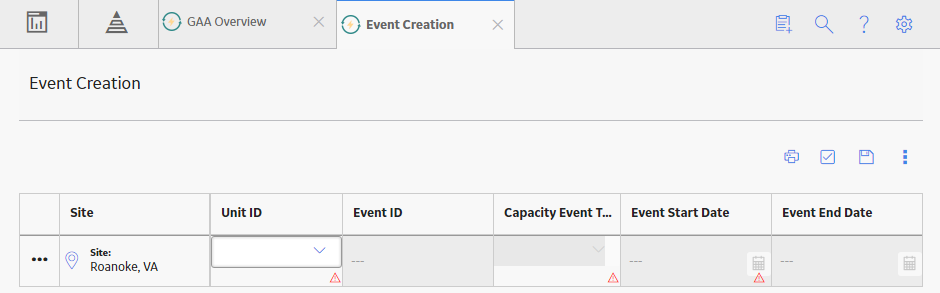
- Select .
The new Primary Event is saved. You can repeat the above steps to add additional Primary Events.
- In the upper-right corner of the page, select Create Event.
Results
- The newly created Primary Event is linked to the GAA Unit identified by the value that you selected in the Unit ID field.
- An APM Event may also be created and linked to the Primary Event, depending on the value in the APM Event Creation field in the linked GAA Unit.
What to do next
Change the State of a Primary Event
About this task
This topic describes how to change the state of a Primary Event, while assigning the state of the event to the appropriate user.
Procedure
-
Access the Primary Event for which you want to change the state.
The current state of the event appears in upper-right corner of the Definition section.
Note: The images in this procedure show the workspace for a Primary Event that is associated with a GAA Unit in which the value in the Primary Regulatory Body field is North American Electric Reliability Corporation (NERC). The Related Event and Contributing Events tabs appear only if the value in the Primary Regulatory Body field for the associated GAA Unit is North American Electric Reliability Corporation (NERC).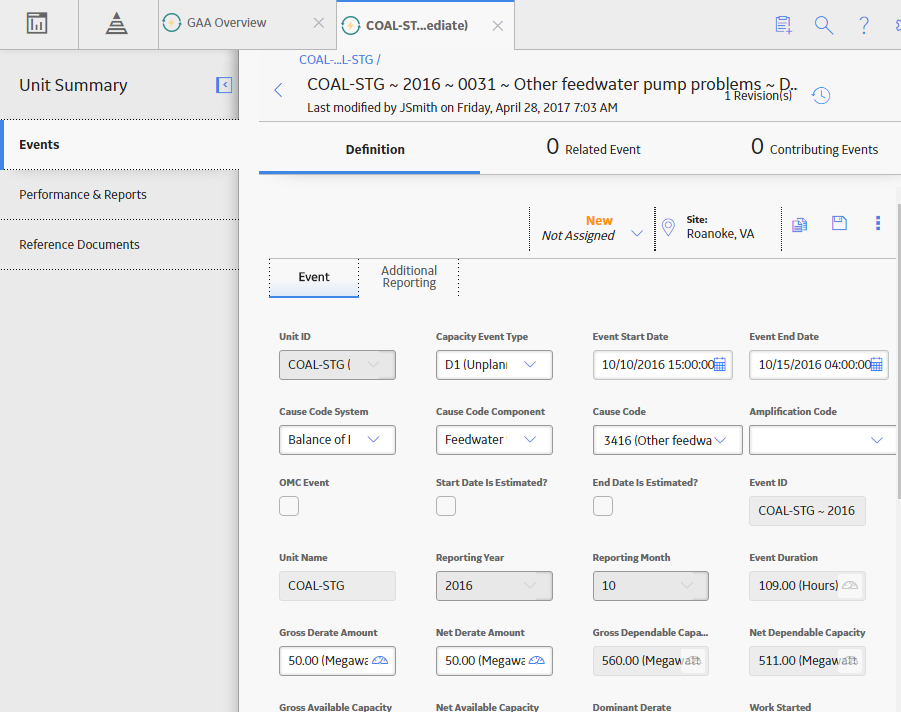
- In the Definition section, select the button that indicates the current state of the event. For example, if the current state of the analysis is New, select the New button.
A menu appears, displaying a list of operations that you can perform on the event to change its state.
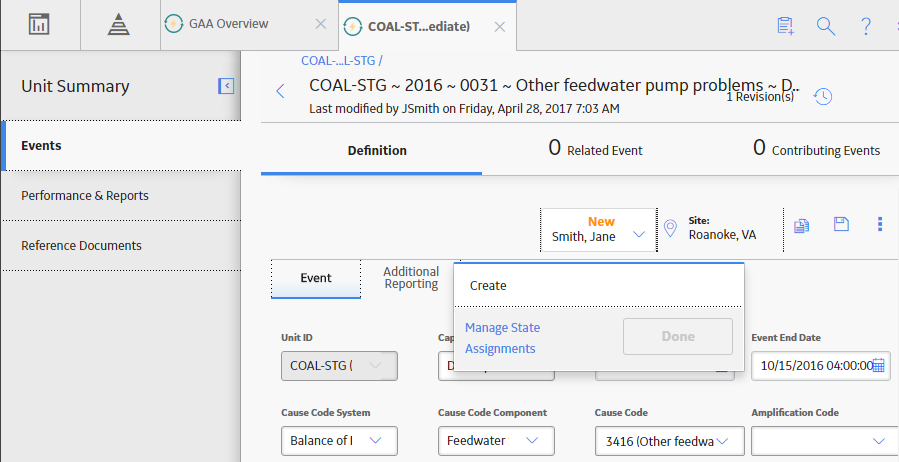
- Select the necessary operation that will change the state of the event, and then select Done. For example, if you want to change the state of the event from New to In Progress, select Create, and then select Done.Note: You can view the states assigned to various users by selecting the Manage State Assignments. If not already done, you can assign the next state of the event to the appropriate user, and then select Done.
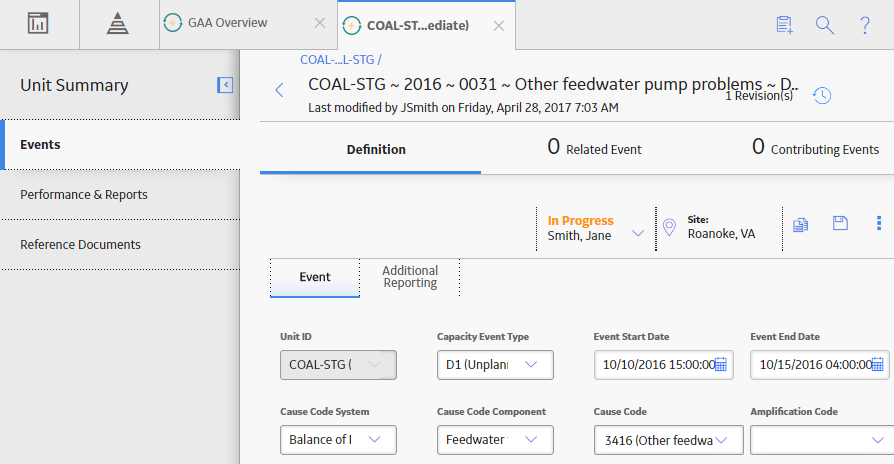
The state of the event is changed.
Copy a Primary Event
About this task
This topic describes how to copy a Primary Event. You can also create a new Primary Event.
Procedure
- Select the Events Under Review tab.
A list of Primary Events that are in progress appears.
- In the upper-left corner of the section, select
 . Note: You can also copy a Primary Event by accessing a list of Primary Events associated with a GAA Unit. After accessing the list, select, and then select Copy Existing Event.
 The Copy Primary Event window appears.
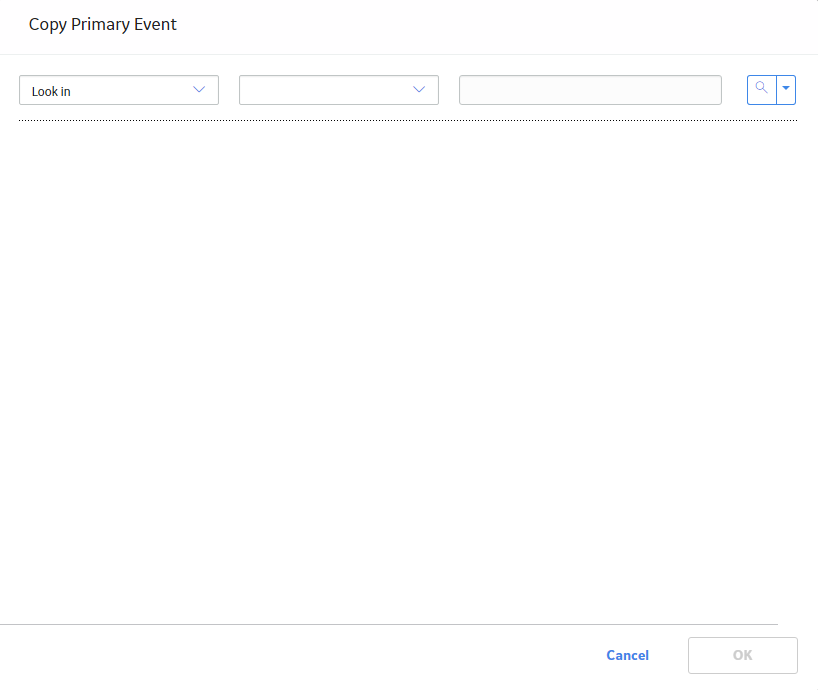
- In the Look in box, select Primary Event.
A list of Primary Events available in the database appears.
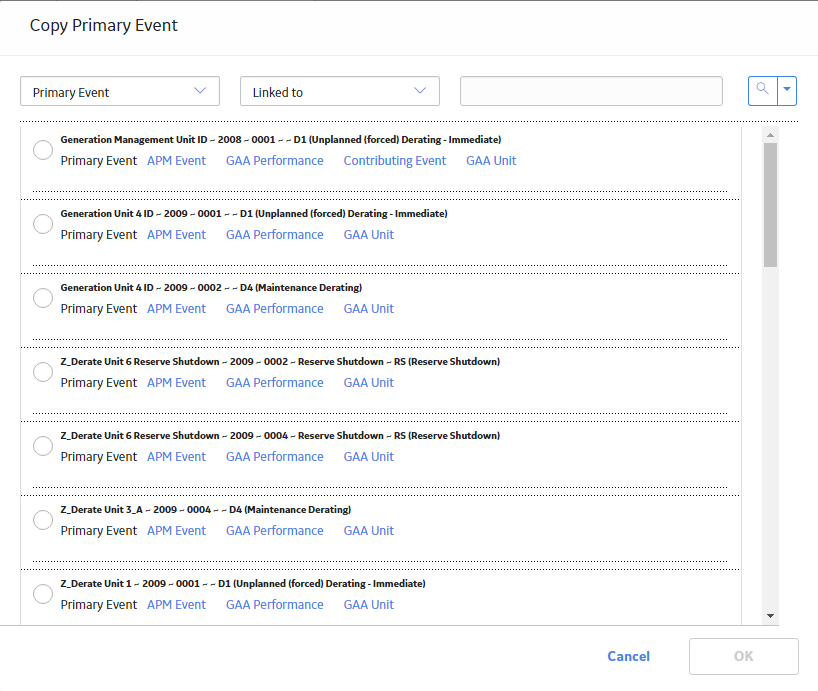
- Select the row containing the Primary Event that you want to copy, and then select OK.
The Copy Primary Event dialog box appears, asking you to confirm that you want to copy the selected Primary Event.
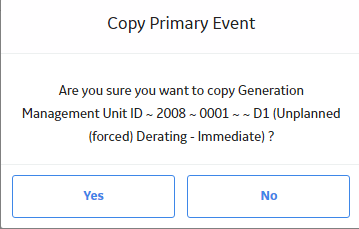
- Select Yes.
The Create copy of Event window appears, displaying the datasheet for the copied Primary Event.
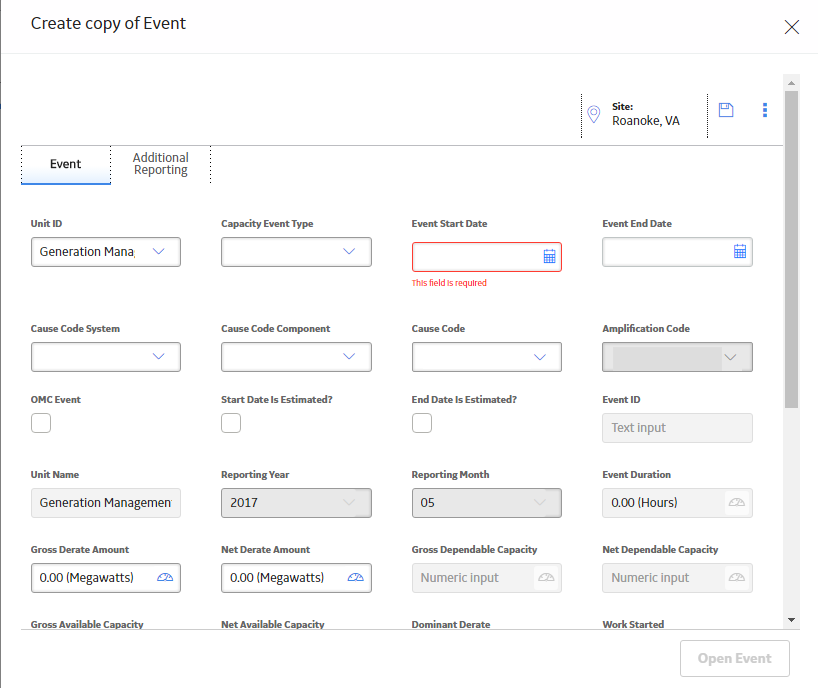
- As needed, modify values in the available fields, and then select .
The selected Primary Event is copied. You can select Open Event to access the event.
Results
When you copy a Primary Event:
- Value in the Unit ID field represents:
- The GAA Unit to which the Primary Event is associated when you copy a Primary Event from the Events Under Review tab.
- The current GAA Unit to which you are copying the Primary Event when you copy a Primary Event by accessing a list of Primary Events associated with a GAA Unit.
- Values in the following fields that exist in the original Primary Event will be copied to the new Primary Event:
- Capacity Event Type
- Cause Code System
- Cause Code Component
- Cause Code
- Amplification Code
- Verbal Description
Note:If you modify the Unit ID and the new Unit ID belongs to:
- Unit Type same as the copied Unit, the values in the Cause Code, Cause Code Component, Cause Code System, and Amplification Code fields will be copied.
- Unit Type different than the copied Unit, the values in the Cause Code, Cause Code Component, Cause Code System, and Amplification Code fields will be cleared.
- Values in the following fields are cleared:
- Event Start: You must enter a value in this field manually. When you do so, the value in the Reporting Month field is updated based on new value in the Event Start field.
- Event End: You can enter a value manually in this field.
Delete a Primary Event
About this task
You cannot delete a Primary Event that is in Approved state.
Procedure
- Select the Events Under Review tab.
A list of Primary Events that are in progress appears.
- Select the row containing the Primary Event that you want to delete.
 Note: You can also delete a Primary Event by accessing a list of Primary Events associated with a GAA Unit.
 - In the upper-right corner of the section, select
 .
.The Delete dialog box appears, asking you to confirm that you want to delete the selected Primary Event.
 Note:
Note:If you delete a Primary Event by accessing a list of Primary Events associated with a GAA Unit, the Delete Primary Event dialog box appears. You can:
- Select All events in Linked Set, if you want to delete the Primary Event and all the associated Related Events.
- Select Only Last Related Event, if you want to delete only the last associated Related Event.
The above options will appear only if the Primary Event has associated Related Events.
Results
- All the associated Contributing Events are deleted.
- Relationship with the associated Event and GAA Unit is removed.