Overview
Overview of the Cognitive Analytics Module
Many companies face challenges when trying to utilize their asset performance data. It is difficult to trust the data or to complete effective reliability analyses because the quality of the data is often compromised due to missing or incorrectly classified information.
Cognitive Analytics provides tools to input your asset data and the corresponding work history events and then to transform that data into a standardized, classified format. Using Cognitive Analytics, you can create a cognition to classify your historic, transactional data. Cognitions classify data by using logic to identify fields from your data to populate the Cognitive Analytics classification of your data. Additionally, Cognitive Analytics utilizes machine learning algorithms to find patterns in your unstructured data to continuously improve the classification process.
When your asset performance data is classified in a standard format, you can more effectively:
- Compare asset performance between sites.
- Complete advanced analytics on event characteristics to identify improvement opportunities and to produce reliability metrics.
- Participate in benchmarking activities to measure asset reliability and performance against industry norms.
Cognitive Analytics Workflow
This workflow provides the basic, high-level steps for using this module. The steps and links in this workflow do not necessarily reference every possible procedure.
-
Create a query to return the historical records for your assets, stored in Work History or Equipment records.
Tip: See the Cognitive Analytics Data Model. - Create a cognition that will use the query to classify your data.
-
Design the cognition, which includes adding nodes and connections that represent the inputs of historical data, logic, and outputs of classified data.
Note: Interaction with the design canvas, such as adding and moving nodes, is not available on touch-screen devices. - Activate the cognition.
- Execute the cognition or configure a schedule for cognition execution.
- Use the classified data that is produced by the cognition for metrics and additional analytics.
Access the Cognitive Analytics Overview Page
Procedure
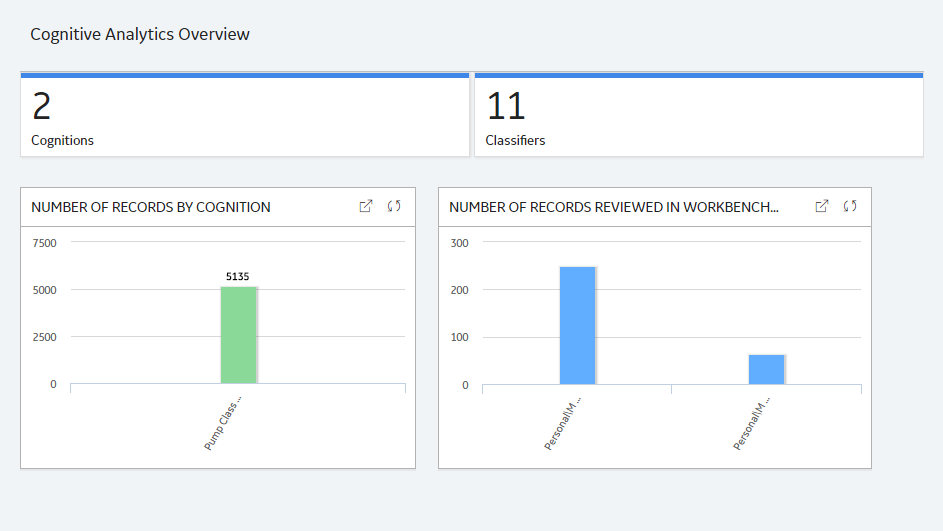
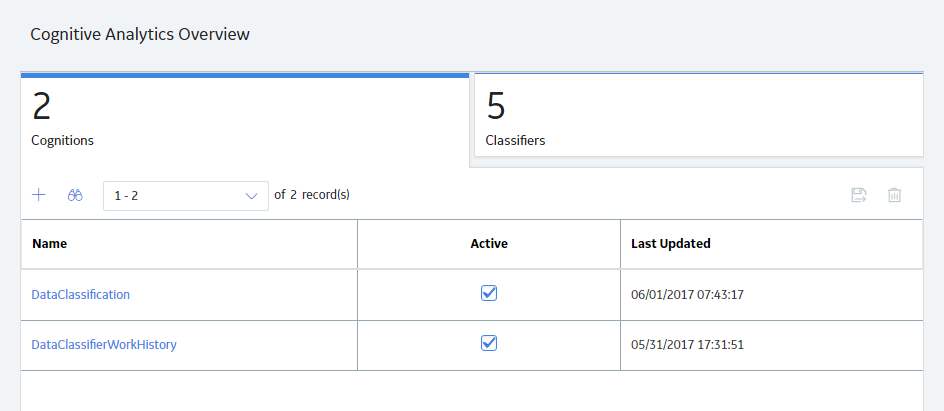
The tabs at the top of the page summarize the number of available cognitions and classifiers. You can select a tab to view one of the following lists:
- Cognitions : Displays a list of cognitions.
- Classifiers : Displays a list of Machine Learning and Fuzzy Logic scripts (i.e., classifiers) and General Scripts that are stored under a Public\ catalog folder or are stored under your Personal\ catalog folder.
The Cognitive Analytics Overview page also displays the following graphs:
- Number of records by Cognition : Displays the number of records classified per cognition, for the 10 cognitions with the most records.
- Number of records reviewed in workbench by classifier : Displays the number of records trained in the Test Results workspace of the Scripts page per machine learning classifier. You can select a bar in the graph to open the corresponding script.
Manage Cognitions
This topic provides a list of all procedures related to cognitions, as well as links to the related concept and reference topics.
Create a Cognition
Procedure
- Select the Cognitions tab.
The Cognitions section appears.
- Select
 .
.The Details workspace of a new cognition appears in a new tab.
- In the upper-left corner of the workspace, select
 .
.A new cognition is created, and you can now design the cognition.
What to do next
Access a Cognition
About this task
These steps describe how to access a cognition from the Cognitive Analytics Overview page. You can also search for a cognition using the GE Digital APM search tool.
Procedure
- Select a cognition's name in one of the lists.
The cognition opens, displaying the Details workspace.
Tip: As needed, you can modify the values in the available fields, and then select to save your changes.
Copy a Cognition
About this task
You can create a new cognition by copying an existing cognition.
Procedure
-
Access the cognition that you want to copy, then, in the upper-left corner of the workspace, select
 .
.-or-
In the Cognitions list on the Cognitive Analytics Overview page, select the row containing the cognition that you want to copy, and then select
in the upper-right corner of the workspace.The Save Cognition As window appears.
What to do next
Design a Cognition
Before you begin
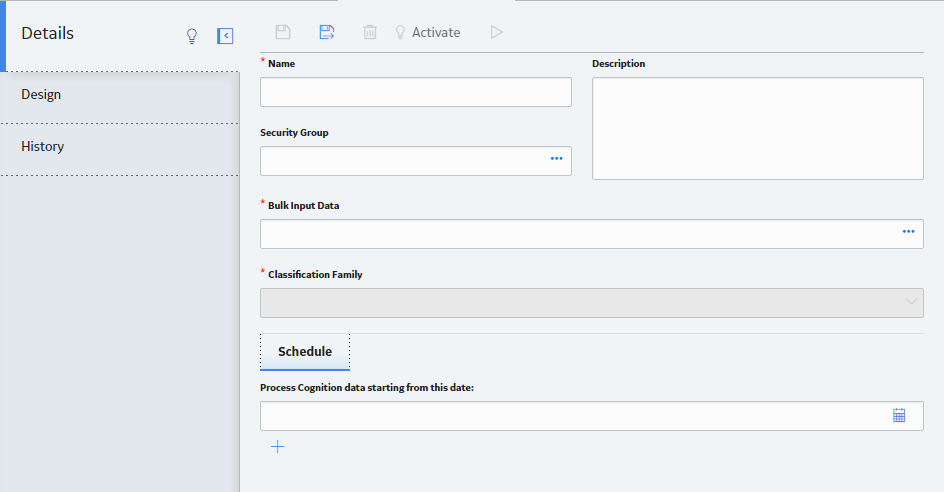
-
Important: In the Details workspace, values must be entered in the Bulk Input Data box and in the Classification Family box so that the Inputs and Outputs drop-down lists are populated.
Procedure
- Select Design.
The Design workspace appears.
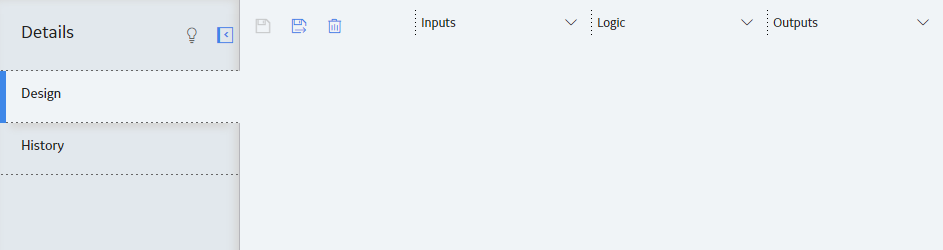
- At the top of the workspace, select Outputs, and then select an output field.
A node for the output field appears on the design canvas.
 Note: Some output fields are mapped automatically with input fields that have matching field names and data types.
 - At the top of the workspace, select Inputs, and then select an input field.
A node for the input field appears on the design canvas.
 Note: If you are connecting to a Logic node, you can add as many input fields as needed.
 - If the values in the input field already meet the requirements of the classified data expected for the output field and you want to create a direct mapping, connect the input field node to the output field node.
In the Outputs drop-down list, a check mark appears next to the output field to signify that the field has been mapped.
-or-
If the values in the input field require additional logic to classify the data and you want to create a logic-based mapping:
-
At the top of the workspace, select Logic, and then select one of the available nodes.
The selected node appears on the design canvas.
-
Hover over the node, and then select
 .
.The selected node's properties window appears on the design canvas.
-
On the properties window, configure the node's properties.
-
As needed, add additional input fields or Logic nodes.
-
Connect all the input fields to the selected node(s), and then connect the selected node(s) to the output field node.
In the Outputs drop-down list, a check mark appears next to the output field to signify that the field has been mapped.
Note: If the data source that provides the input fields is modified so that input fields that had been successfully mapped are no longer available, then the icon will appear next to those output fields in the Outputs drop-down list to signify that the mapping has been lost. To correct the mapping, modify the data source to restore the missing input fields, or select new input fields for the mapping.
 -
- At the top of the workspace, select .
The cognition is saved.
What to do next
Activate or Deactivate a Cognition
Before you begin
Procedure
- At the top of the Details workspace, either the
 button or the
  button is displayed.
- If the button is displayed, the cognition is active. To deactivate the cognition, select this button.
-
If the
button is displayed, the cognition is not active. To activate the cognition, select this button.Note: You can activate a cognition only if it contains no validation errors.
- If the
- On the toolbar, select .
The cognition is saved.
Results
- If you activated the cognition, it can be executed, either manually or via an automated schedule.
- If you deactivated the cognition, it cannot be executed in any manner.
Delete a Cognition
Procedure
-
Access the cognition that you want to delete, and then in the upper-left corner of the workspace, select
 .
.-or-
In the Cognitions list on the Cognitive Analytics Overview page, select the row containing the cognition that you want to delete, and then select
in the upper-right corner of the workspace.A confirmation message appears.
Manage Cognition Execution
This topic provides a list of all procedures related to executing cognitions, as well as links to the related concept and reference topics.
Execute a Cognition
Before you begin
Procedure
- In the Details workspace, select
 .
.A message appears, stating that your cognition has been submitted. The cognition processes the data provided and stores it as classified data.
What to do next
- Use the classified data that is produced by the cognition for metrics and additional analytics.
Access Cognition History
About this task
You can access the History workspace to see the status of in-progress and past executions of the cognition.
Procedure
- Select History.
The History workspace appears.
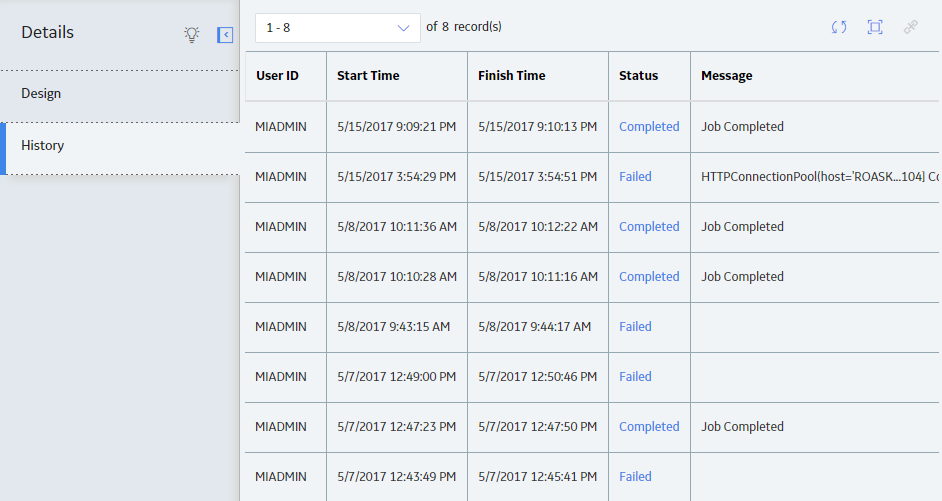
The History workspace displays the following information:
- User ID : The GE Digital APM user who executed the cognition.
- Start Time : The date and time at which the execution of the cognition started.
- Finish Time : The date and time at which the cognition finished executing.
- Status : The status of the execution of the cognition.
- Message : A message providing details about the execution, such as the number of errors that occurred during execution.
- Job ID: The ID for the execution of the cognition in the GE Digital APM system.
- Yarn ID: The ID for the execution of the cognition in Hadoop YARN.
Tip: You can select to update the information in the History workspace.
Configure Scheduled Execution
Before you begin
Procedure
- In the Details workspace, in the Schedule section, select .
The Edit Schedule window appears.

- In the upper-left corner of the workspace, select .
The cognition is saved.
Results
- When the cognition is active, the cognition will be executed based on the defined schedule.
Cancel Cognition Execution
Procedure
- In the grid, select the row for the job to be canceled, and then select
 .
.The execution of the cognition for the selected job is canceled.
About Cognitive Analytics
This topic provides a listing of all overviews and high level explanatory information to help you understand Cognitive Analytics.
About Cognitions
A cognition lets you design the logic needed to classify your historic, transactional data into a standardized format. When designing a cognition, you will use a design canvas to map the fields from your historic, input data to the fields of your selected, output classification family.
The mappings between input and output fields can be direct so that the value in the input field is written directly to the output field. Alternatively, the mappings can contain classification logic that is determined by the arrangement and use of the various Logic nodes. Classifier and Script nodes also allow you to use Python scripts in cognition mappings to leverage machine learning algorithms in the classification process.
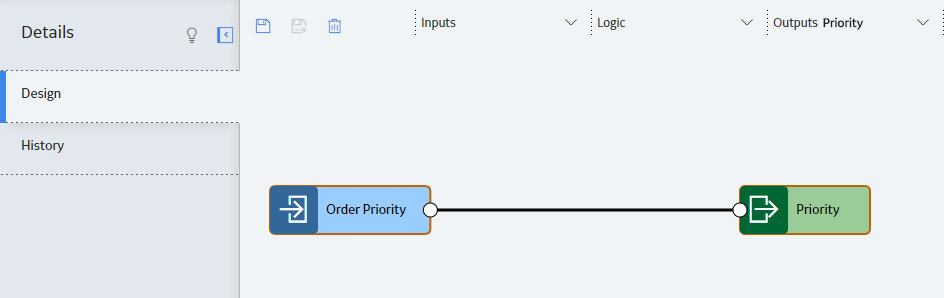
Example: Direct Mapping
The following image shows an example of a direct mapping within a cognition.

The Work Order Priority input field node is directly mapped to the Priority output field node. When the cognition is executed, values in the Work Order Priority field for the various work history events will be written directly into the Priority field for the corresponding, classified versions of the work history events.
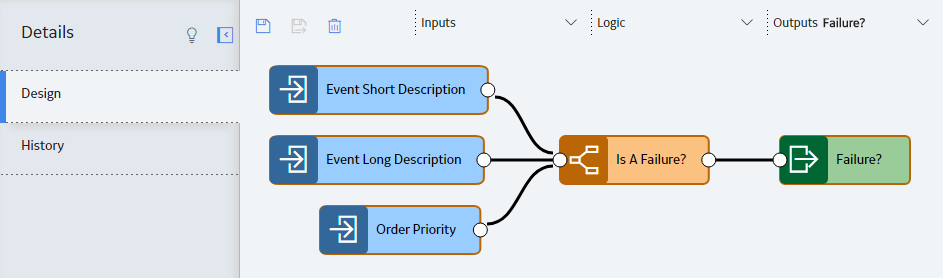
Example: Mapping with Classification Logic
The following image shows an example of a mapping with classification logic within a cognition.
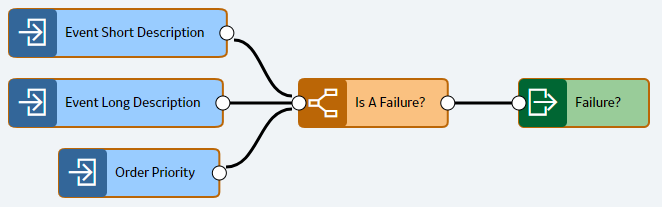
The mapping is made of nodes and connections that define the classification logic for this output field. Specifically, the nodes in the mapping represent:
-
The input fields from your input data that contain historic, transactional data.
In this example, the Event Short Description, Event Long Description, and Order Priority Description nodes are the input fields.
-
The Logic nodes that add specific logic to classify the input data into a standardized format before it is written to the output field.
In this example, the Is A Failure? Classifier node is using the isAFailure.py script to produce a classification prediction of a standard value that is based upon the data provided in the input fields.
-
The output field in the selected classification family that stores your classified data.
In this example, the Failure? node is the output field.
When the cognition is executed, the data in the input fields for the various work history events is processed by the Is A Failure? Classifier node, and the classification prediction is stored in the Failure? field for the corresponding, classified versions of the work history events.
About Cognition Execution
When a cognition is executed, the input data is processed according to the classification logic designed in the cognition. You can manually execute a cognition, or you can configure a cognition to be executed according to a schedule. Each time a cognition is executed, the results are recorded on the History workspace.
If you want to configure a scheduled cognition to only classify records that have changed since the last, successful execution, you can add a query prompt to a date field, such as the Event Start Date field, to pass a date parameter to the query that supplies your input data so that the query only returns records created or updated since that date.
If a cognition that uses a query prompt on a date field is configured to be executed according to a schedule and a date is entered in the Process Cognition data starting from this date: box in the Details workspace, on the first execution, the cognition will only classify records from the input data after the date entered. After each subsequent, successful execution, the date from the Last Scheduled Execution field will be automatically populated in the Process Cognition data starting from this date: box, and then the cognition will only classify records that have changed since the last scheduled execution.
If a cognition that uses a query prompt on a date field is configured to be executed according to a schedule and the Process Cognition data starting from this date: box in the Details workspace is blank, on the first execution, the cognition will classify all records from the input data. After each subsequent, successful execution, the date from the Last Scheduled Execution field will be automatically populated in the Process Cognition data starting from this date: box, and then the cognition will only classify records that have changed since the last scheduled execution.
If a cognition is executed manually and the query supplying the input data has a query prompt on a date field, the value in the Process Cognition data starting from this date: box in the Details workspace is passed as a date parameter, and the query will only return records that satisfy the query prompt's logic.
About Cognition Security
Cognitions are governed by two levels of security that determine the types of changes, if any, a user can make to a cognition.
Cognitive Analytics Security Groups are the broadest category of security; a user must be in one of those groups to access or modify any cognition. The second level of security is individual cognition security, whereby permission to a specific cognition is limited to users who are members of one of the Cognitive Analytics Security Groups and an additional Security Group identified in the Security Group field in the Details workspace of the cognition.
If no specific security settings are configured for an individual cognition, all users who are members of one of the Cognitive Analytics Security Groups can access and modify the cognition.
Once you configure an additional Security Group to the individual cognition's security settings, users who are members of one of the Cognitive Analytics Security Groups but are not members of the additional Security Group can access the cognition, but they cannot modify it.
About Logic Nodes
You can use the following nodes to apply a variety of conditions, calculations, and logic to the values represented by input nodes in the cognition.
About Case Nodes in Cognitive Analytics
A Case node is a node that you can use in a cognition to set up scenarios in which the output values of the node are changed automatically based on specific input values. Throughout this documentation, we refer to each defined scenario as a Case.
Each Case within the Case node has one Case value and one output value. If the input value for the Case node matches a Case value, the GE Digital APM system will use the corresponding output value defined for that Case.
There are two types of Cases in the Case node, which we refer to as the If Case and the Default Case throughout this documentation:
- If Case: The type of Case that is executed if the input value matches a Case value that you specify. You can define one or more If Cases for a given Case node.
- Default Case: The Case that is executed by default if the input value does not match any of the Case values that you specified. There is only one Default Case for a given Case node.
Node Properties
The Properties window for a Case node contains the items that are described in the following table.
|
Item |
Description |
Notes |
|---|---|---|
| If box | Specifies the field that provides the input value(s) you want to compare to each Case value in the Equals box in order to determine the output(s) of the Case node. | None |
| Equals box | Specifies the Case value of the If Case to be executed when matching the input value from the field that was chosen in the If box. | You can use the and buttons in the Equals box row to add or delete If Cases in the Case node. When you add or delete an If Case, the corresponding Use box is added or deleted. |
| Use box | Specifies the output for the corresponding Case value found in the Equals box. | None |
| Default box |
Specifies the output of the Default Case. The Default Case will be executed if the input value from the field that was chosen in the If box does not match any Case values defined in the Equals boxes. | You cannot delete the Default Case from the Case node. |
Example
Consider the following nodes and connections in which values from a numeric-based Order Priority input field are converted to text by the Order Priority Case node. The values are then written to the Event Priority output field.

As shown in the following image, you can use the Properties window of the Order Priority Case node to indicate that the output value of the Case node will differ depending on the values associated with the Order Priority input field.
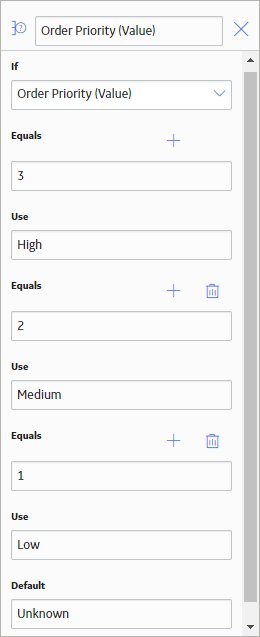
In this example, the following output values would be produced by the Case node:
|
Input Value from Order Priority Input Field |
Output Value from Order Priority Case Node |
|---|---|
| 1 | Low |
| 3 | High |
| 7 | Unknown |
| 1 | Low |
| 2 | Medium |
About Classifier Nodes in Cognitive Analytics
A Classifier node is a node that you can use in a cognition to return a prediction and a prediction score by a Fuzzy Logic or Machine Learning script (i.e., a classifier) created outside the cognition by using the Scripts tool.
The inputs for a Classifier node must correspond to the type of inputs expected by the script.
The output of a Classifier node is determined by the Fuzzy Logic or Machine Learning script, which produces a tuple of values output (i.e., both the output to use as the predicted value and the output to use as the score of a predicted value).
Node Properties
The Properties window for a Classifier node contains the items that are described in the following table.
|
Item |
Description |
Notes |
|---|---|---|

| Specifies the Fuzzy Logic or Machine Learning script that will run when the cognition is executed. | Select to browse to the Fuzzy Logic or Machine Learning script that you want to add to the Script node. Scripts developed by Meridium, Inc. are available in the \\Public\Meridium\Modules\Cognitive Analytics\Scripts\ Catalog folder. |
| Standard List Reference Field |
Specifies values that identify sub-sets of the script’s Standard List (e.g., Equipment Class values). |
This field is optional and enabled only when a Fuzzy Logic script has been specified. When the cognition is executed, values in the specified field are compared to List Reference values in Classifier Standard List records to determine which sub-set(s) of the script’s Standard List to use. |
Example
Consider the following nodes and connections.
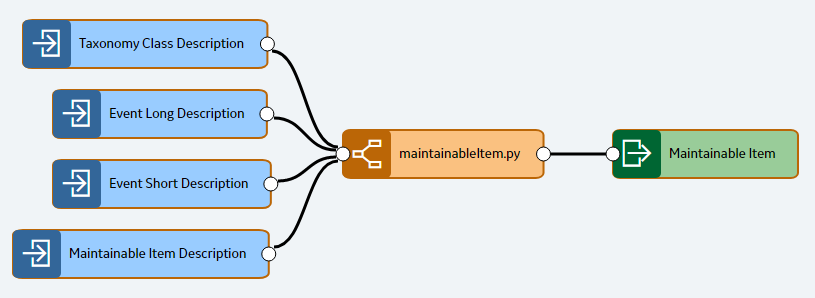
The maintainableItem.py Classifier node receives values from the Taxonomy Class Description, the Event Long Description, the Event Short Description, and the Maintainable Item Description input fields, and then uses the maintainableItem.py script to classify the values.
The Maintainable Item output field receives the predicted value produced by the maintainableItem.py script.
The following image shows what the Properties window looks like for the maintainableItem.py Classifier node.
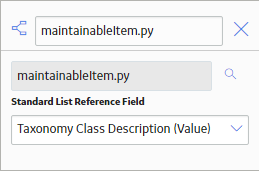
In this example, the Taxonomy Class Description input field is selected in the Reference box and is used to pass List Reference values to the maintainableItem.py script. The values from the Taxonomy Class Description input field will limit the predictions produced by the script to the sub-sets of Standard Values that correspond to the List References in the Maintainable Item Standard List.
About Comparison Nodes in Cognitive Analytics
A Comparison node is a node that you can use to compare a value from a predecessor node with a manually entered value. Comparison nodes use operators to determine which value should be used as the output value. The following operators are available:
- Equal
- Not Equal
- Greater Than
- Greater Than or Equal To
- Less Than
- Less Than or Equal To
Each Comparison node requires at least one input, which must be a single value. Boolean, character, and numeric data types are acceptable data types for the input values.
Node Properties
The Properties window for each Comparison node contains the items that are described in the following table.
|
Item |
Description |
Notes |
|---|---|---|
| If box | The value from a predecessor node that will be compared. | If the predecessor node is a Classifier node, you can select either the prediction or the score of the prediction. |
| Is box | The symbol that corresponds with the comparison operation that is performed by the node. | None |
| To box | The manually entered value that is being compared against the value from the predecessor node. | The value that you specify should correspond to the type of input chosen in the If box (e.g., if you chose the prediction's score in the If box, you should enter a number between 0 and 1). |
| Use box | If the comparison is true, the available values from predecessor nodes to use as the output value. | None |
| Else box | If the comparison is not true, the available values from predecessor nodes to use as the output value. | None |
Example
The following example illustrates how you can use a Comparison node to specify the output value based on a comparison of the input value with a manually entered value. Consider the following nodes and connections.
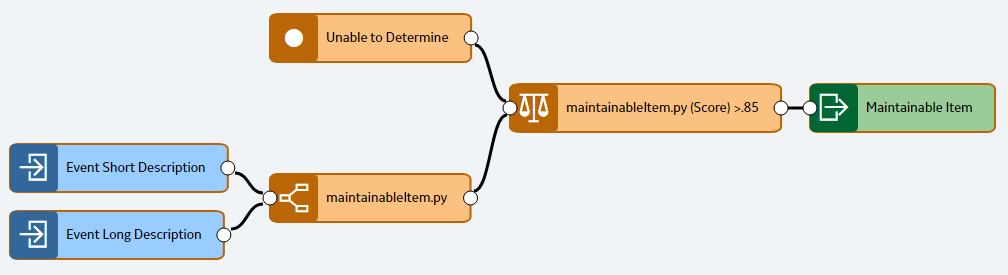
The maintainableItem.py Classifier node receives values from the Event Long Description and Event Short Description input fields, and then uses the maintainableItem.py script to classify the values.
The maintainableItem.py (Score) > .85 Comparison node receives the predicted target value and its score from the maintainableItem.py Classifier node to determine which value to write to the Maintainable Item output field. The maintainableItem.py (Score) > .85 Comparison node also receives a value from the Unable to Determine Constant node.
The following image shows what the Properties window looks like for the maintainableItem.py (Score) > .85 Comparison node.
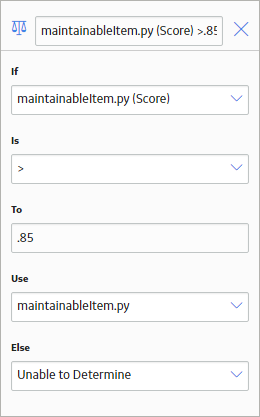
Based on these properties, the following logic will be applied when the cognition is executed:
- If the score of the predicted target value from the maintainableItem.py Classifier node is greater than .85, the maintainableItem.py Classifier node passes the predicted target value to the Maintainable Item output field.
- If the score of the predicted target value from the maintainableItem.py Classifier node is .85 or less, the maintainableItem.py Classifier node passes the value Unable to Determine from the Constant node to the Maintainable Item output field.
In this example, the following output values would be produced by the Comparison node:
|
Score from maintainableItem.py Classifier Node |
Predicted Target Value from maintainableItem.py Classifier Node |
Output Value from maintainableItem.py (Score) > .85 Comparison Node |
|---|---|---|
| .90 | Motor | Motor |
|
.75 | Motor | Unable to Determine |
| .96 | Gearbox | Gearbox |
| .85 | Gearbox | Unable to Determine |
About Constant Nodes in Cognitive Analytics
A Constant node is a node that represents a specific value that you can use as an input in the cognition design. Constant nodes can be connected directly to an output field or to another Logic node.
The output of a Constant node is the value that you specify in the Value for Constant box on the node's Properties window.
Additionally, you can use the following functions in the Value for Constant box:
- User(): Enters the user ID of the user executing the cognition as the Constant node's output value.
- Now(): Enters the date and time of the start of the execution of the cognition as the Constant node's output value.
Example
Consider the following nodes and connections.
In this example, the Unable to Determine Constant node is connected to a successor Comparison node. If the score of a value from the maintainableItem.py Classifier node does not meet the Comparison node's conditions, the Comparison node will write the value Unable to Determine to the Maintainable Item output field.
About Script Nodes in Cognitive Analytics
A Script node is a node that you can use in a cognition to return a result that is calculated by a General script created outside the cognition via the Scripts tool.
The inputs for a Script node must correspond to the type of inputs expected by the General script.
The output of a Script node is determined by the General script, which can produce both the output to use as the value and the output to use as the score of a predicted value.
Node Properties
The Properties window for a Script node contains the items that are described in the following table.
|
Item |
Description |
Notes |
|---|---|---|
|
| Specifies the General script that will run when the cognition is executed. | Select to browse to the General script that you want to use. |
| Additional sections corresponding to the inputs expected by the General script. | Specifies the values that will be used in the General script to calculate a result. |
The number of sections displayed in the Properties window is determined by the number of inputs configured in the specified General script. The value that you specify should correspond to the type of input expected by the General Script (i.e., List Values or a single value that is Numeric, Character, Boolean, or Date/Time). |