Manage the GE Digital APM Database Comparison Tool
About the GE Digital APM Database Comparison Tool
Using the GE Digital APM Database Comparison Tool, you can compare different databases. The following table identifies the purposes of available comparisons, and when you need to initiate each comparison.
|
Variable |
Purpose of Comparison |
When to Perform Comparison |
|---|---|---|
|
The content of the baseline GE Digital APM database for the source version. |
Allows you to see the changes that GE Digital APM has made since releasing the version from which you are upgrading. | |
|
The content of your customized database for the source version. |
Allows you to see how the content of the baseline database for the target version compares to the changes you have made in the source version. | |
|
The content of your customized database for the target version. |
Allows you to see how the content of the baseline database for the target version compares to the changes you have made in that version. |
You can use the GE Digital APM Database Comparison Tool to:
-
Initiate a new database comparison. The options that are available in the tool depend upon whether you are running the comparison against a pre-upgraded database or an upgraded database.
-or-
- Load results from a previous database comparison.
The GE Digital APM Database Comparison Tool works like a builder, which contains two screens:
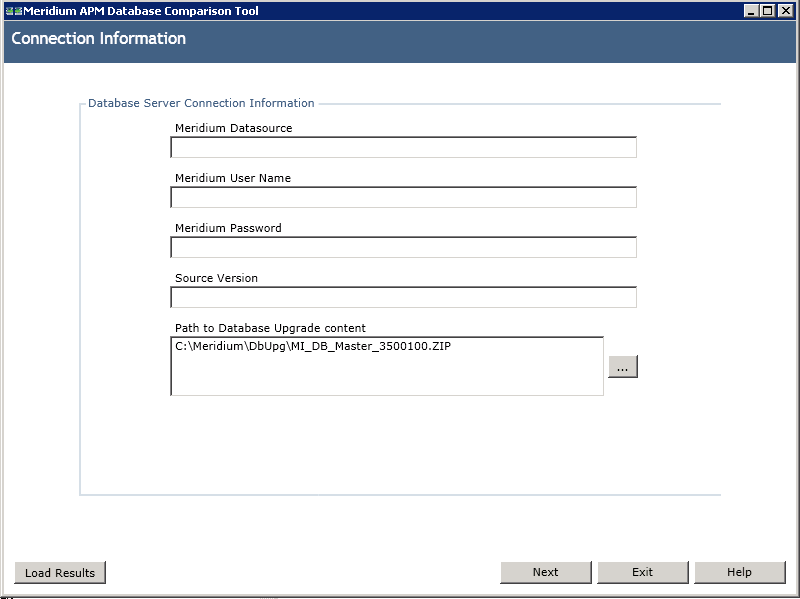
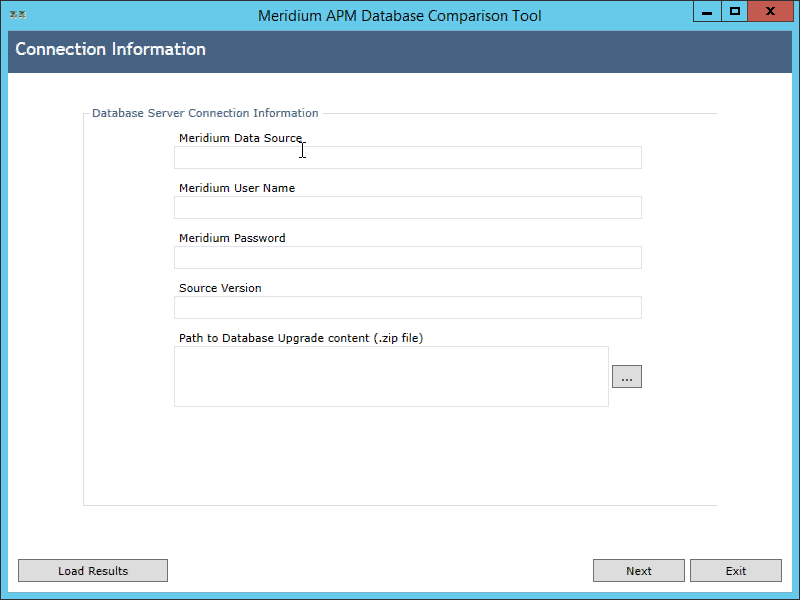
Connection Information: Lets you specify the connection information to the database whose content you want to compare against the content of the baseline database for the target version.
Comparison Details: Lets you run the comparison to identify the differences between the content of the two databases that you are comparing.

On this screen, you can also:
- Save the results to a .ZIP file, which can be reloaded into the tool later via the Connection Information screen.
- Export the results to an Excel file.
Run the Comparison Against a Pre-Upgraded Database
Before you begin
- On the GE Digital APM Server, navigate to C:\Windows\assembly to verify that the 64-bit version of the Oracle.DataAccess component is installed.
- If it is installed, then skip the rest of the steps in this Before You Begin section and proceed to step 1 in the Steps section.
-or-
If the 64-bit version of the component it is not installed, then obtain it from Oracle and install it on the GE Digital APM Server. You must then complete the following additional steps.
- On the GE Digital APM Server, navigate to the folder C:\Windows\Microsoft.NET\Framework64\V4.0.30319\CONFIG\.
- Using a text editor (e.g., Notepad), open the file machine.config.
- In the file, between the opening and closing <configuration> tags, add the following content.
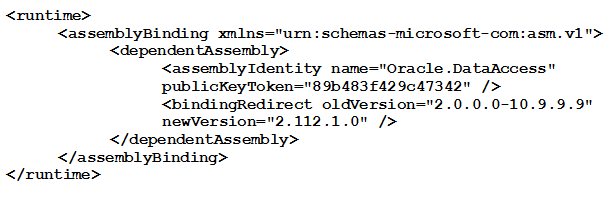
- Save the file, and then close it.
You can now proceed to step 1 in the Steps section.
Procedure
- On the GE Digital APM Server, navigate to the folder C:\Program Files\Meridium\Client\100.0.0.0.0, and then open the file DatabaseReport.exe.
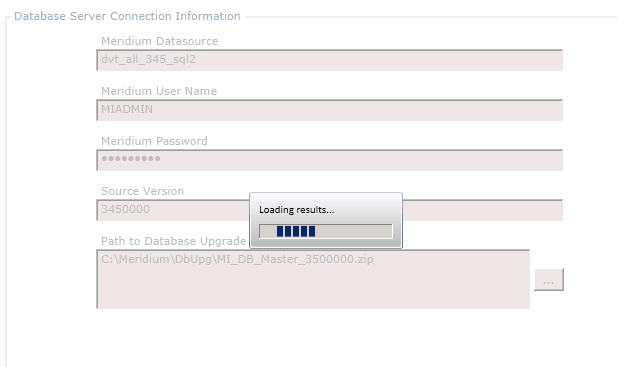
The GE Digital APM Database Comparison Tool appears, displaying the Connection Information screen.
- In the Source Version box, enter the seven-digit database version that matches the version of your source database that is being compared. You must enter the version in the format vvvmmzz, where:
- vvv is a three-digit number representing the main version.
- mm is a two-digit number representing the maintenance release version, if applicable. If the maintenance release version is a single digit, you must prepend zero (0) to it. If there is no maintenance release version, you must enter 00.
-
zz is a two-digit number representing the hot fix version, if applicable. If the hot fix version is a single digit, you must prepend zero (0) to it. If there is no hot fix version, you must enter 00.
For example, the database version number for V3.5.1MR6HF2 would be 3510602.
If you do not know the main version, service pack version, and hot fix version of your database, you can find it using either of the following methods:
-
Run the following query against the database:
Select modl_ver_nbrfrom mi_modules, where modl_nm = 'Meridium Core';
In Configuration Manager, on the About Meridium APM window (accessed via the Help menu), for the GE Digital APM Framework Tools license, locate the value in the Version column. The database version you should enter in the Source Version box is this version number without the periods.

- When you are finished specifying connection information, select Next.
If your database connection entries are valid, the Comparison Details screen appears.
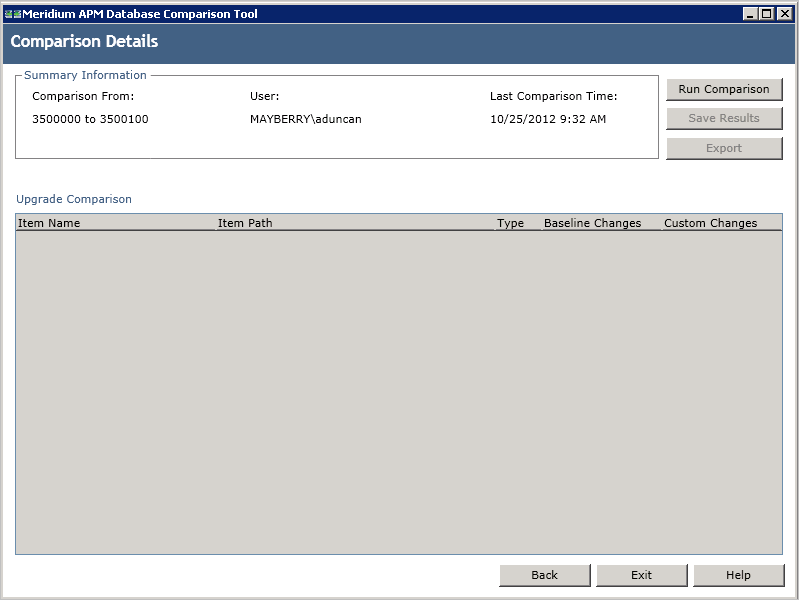
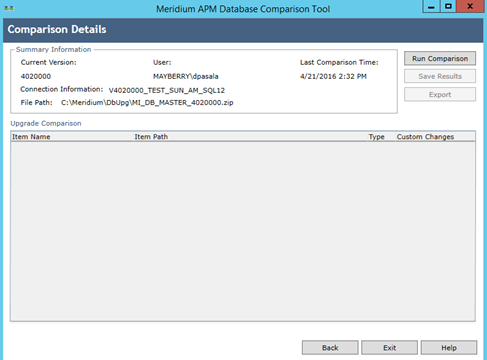
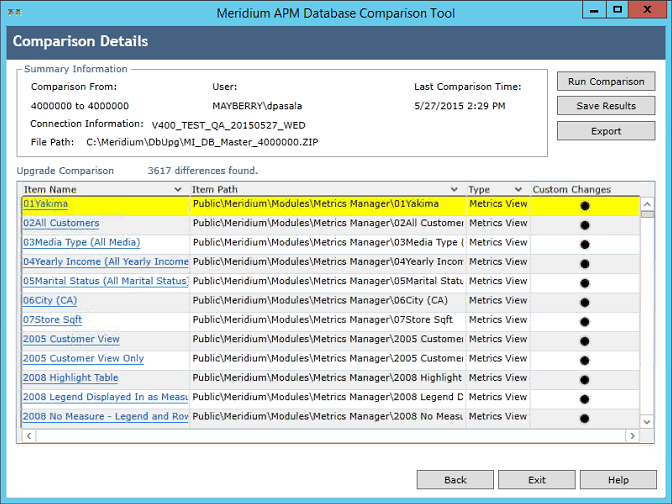
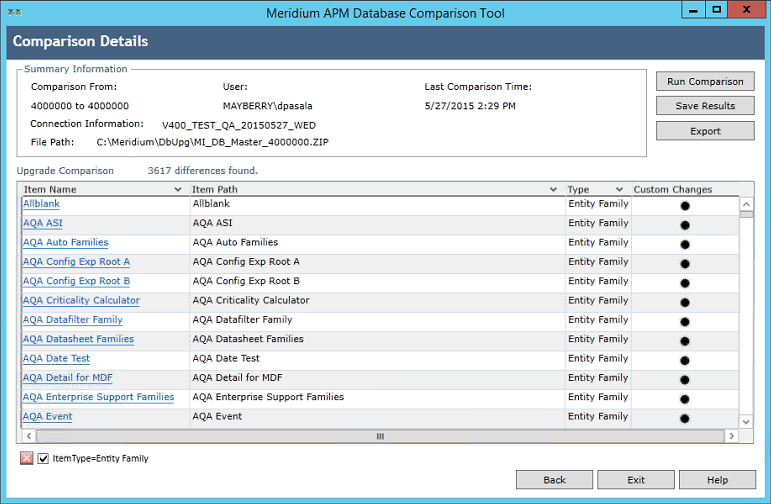
The following information appears in the Summary Information section:
-
Comparison From: The database versions that will be compared, using the format <source version> to <target version>, where:
- <source version> is the version of the source database that you are comparing against. The source version on the left should match the value in the Source Version box on the Connection Information screen.
- <target version> is the version of the database content to which you are upgrading. The target version on the right should match the file that you specified in the Path to Database Upgrade content box on the Connection Information screen.
- User: The credentials of your Windows user.
- Last Comparison Time: The date and time of any previous database comparison performed with this database. If the comparison has never been performed with this database, then the current date and time is displayed.
-
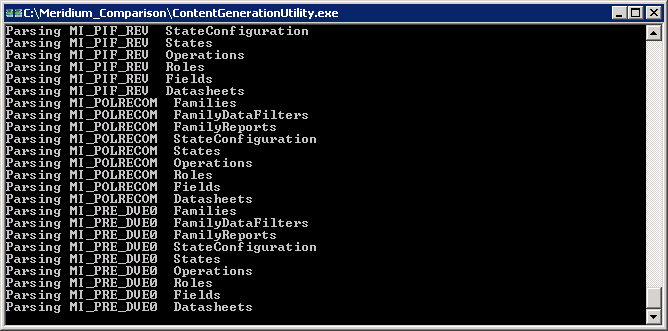
- Select Run Comparison.A progress bar appears.
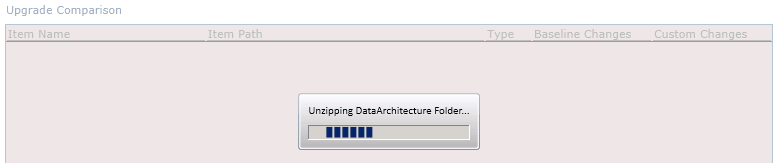
Eventually, a command prompt window will appear, displaying the progress of the various comparison stages.
When the comparison is complete, the command prompt window closes automatically, and the comparison results appear in the Upgrade Comparison section of the Comparison Details screen.
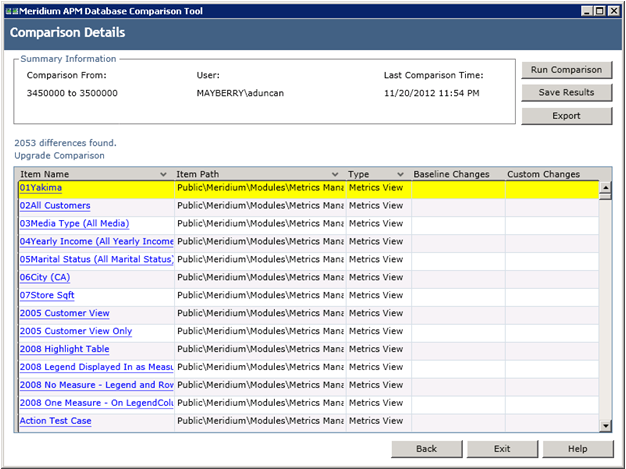
About the Pre-Upgrade GE Digital APM Database Comparison Tool Comparison Results Grid
When you perform a pre-upgrade database comparison, the results appear in a grid on the Comparison Details screen.

The grid contains the name of each item that was identified as different during the comparison process. You can determine the general difference using the Baseline Changes and Custom Changes columns. You can select any hyperlink in the left-most Item Name column to display more detailed comparison results using WinMerge.
The comparison results grid contains the following columns:
-
Item Name: The name of the item. You can select any hyperlink in the Item Name column to display more detailed comparison results using WinMerge.
-
Item Path: If the item is a Catalog item, this column displays the Catalog folder path. If the item is not a Catalog item, this column repeats the item name.
-
Type: The type of item.
-
Baseline Changes and Custom Changes: Contain black circles indicating that changes exist. In general, the Baseline Changes column contains a black circle if the baseline item has changed since the previous version. Likewise, the Custom Changes column contains a black circle if you have made custom changes to that item or if the item does not exist in your upgraded database.
The following table illustrates the possible combination of dots per item and explains how you can interpret those combinations.
|
Baseline Changes |
Custom Changes |
Explanation |
Example |
|---|---|---|---|

|
The baseline item has changed between the two versions. -and- The item in your pre-upgrade database is the same as the item in the baseline database. |
You are upgrading from V3.6.0.x to V4.0.0.0. In V3.5.0.0.0, the baseline family Asset Strategy was modified. You have not modified this family in your database. | |
|
|
The baseline item has not changed between the two versions. -and- There is difference between the baseline version of this item and the item in your upgraded database. |
You are upgrading from V3.6.0.x to V4.0.0.0. The baseline query Reading History has not been modified since the last version release. You have modified this query prior to the upgrade. | |
|
|
|
The baseline item has changed between the two versions or is new to the later version. -and- There is a difference between the baseline version of this item and the item in your upgraded database, or this item does not exist in your upgraded database. |
You are upgrading from V3.6.0.x to V4.0.0.0. In V3.5.0.0.0, the baseline query Asset Query was modified. You have modified this query prior to the upgrade. |
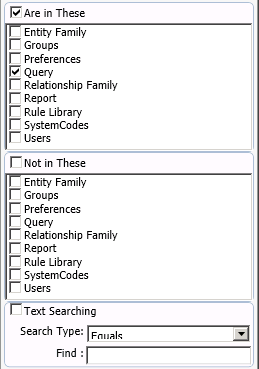
You can select any column heading to sort the results by the values in that column. You can also filter the results by selecting  in any column heading, and then selecting the value by which you want to filter the results. For example, to see only queries in the results, you would select in the Type column heading, and then select the Query check box, as shown in the following image.
The result would then contain only queries, as shown in the following image.

After you apply a filter, it will be displayed below the results, as outlined in red in the following image.

You can remove a filter by selecting  below the grid.
Run the Comparison Against an Upgraded Database
About this task
These instructions assume that you want to compare your upgraded database to the baseline version.
Procedure
- On the GE Digital APM Server, on the Apps interface, in the Meridium APM Applications section, select Database Upgrade Manager.The Meridium APM Database Comparison Tool window appears, displaying the Connection Information screen.
- Select Next.The Comparison Details screen appears.
The following information appears in the Summary Information section:
-
Comparison From: The database versions that will be compared, using the format:
<source version> to <target version>
...where
- <source version> is the version of the source database that you are comparing against. The source version on the left should match the value in the Source Version box on the Connection Information screen.
- <target version> is the version of the database content to which you are upgrading. The target version on the right should match the file that you specified in the Path to Database Upgrade content box on the Connection Information screen.
- Connection Information: The name of the current database.
- File Path: The path to the Database Upgrade content .zip file.
- User: The credentials of your Windows user.
- Last Comparison Time: The date and time on which the database comparison for this database was last run. If the comparison has never been run for this database, the current date and time is displayed.
-
- Select Run Comparison.A progress bar appears, displaying the progress of the comparison process. Eventually, a command prompt window will appear, displaying the progress of the various comparison stages.
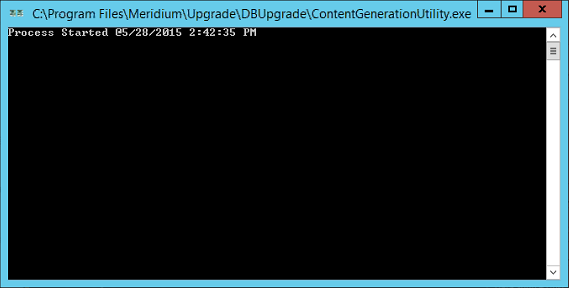
When the process is complete, the command prompt window closes automatically, and the comparison details appear in the Upgrade Comparison section on the Comparison Details screen of the GE Digital APM Database Comparison Tool.
About the Post-Upgrade GE Digital APM Database Comparison Tool Comparison Results Grid
When you perform a post-upgrade database comparison, the results appear in a grid on the Comparison Details screen.
The grid contains the name of each item that was identified as different during the comparison process. The comparison results grid contains the following columns:
-
Item Name: The name of the item. You can select any hyperlink in the Item Name column to display more detailed comparison results using WinMerge.
-
Item Path: If the item is a Catalog item, this column displays the Catalog folder path. If the item is not a Catalog item, this column repeats the item name.
-
Type: The type of item.
-
Custom Changes: The cells in this column contain black circles indicating that custom changes have been made to the associated item.
You can select any column heading to sort the results by the values in that column. You can also filter the results by selecting in any column heading, and then selecting the value by which you want to filter the results. For example, to see only items that are in Entity Families in the results, you would select in the Type column heading, and then select the Are in These and Entity Family check boxes, as shown in the following image.
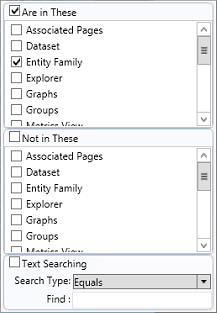
The result would then contain only queries, as shown in the following image.
After you apply a filter, it will be displayed below the results, as outlined in red in the following image.
You can remove a filter that you have applied by selecting next to the filter.
Revert Items to Baseline
Before you begin
- Create a data source.
Procedure
- On the GE Digital APM Server, navigate to Meridium/Upgrade/DBUpgrade, and then open the file RevertToBaselineApp.exe.The Revert To Baseline Login Screen window appears.
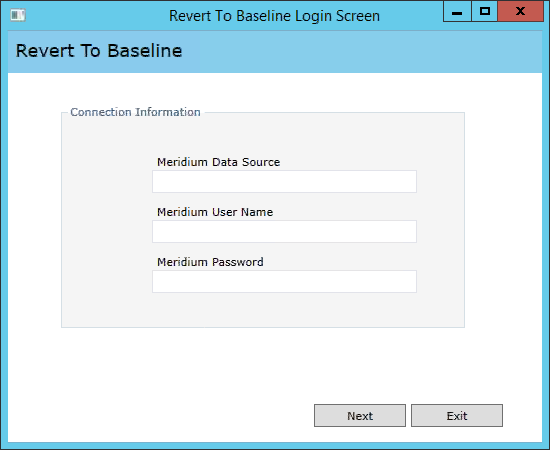
- Enter a valid data source, user name, and password, and then select Next.Note: The value in the Meridium Data Source box should match exactly the Data Source ID of the data source.
The Revert To Baseline screen appears, displaying the families that you can revert to baseline.
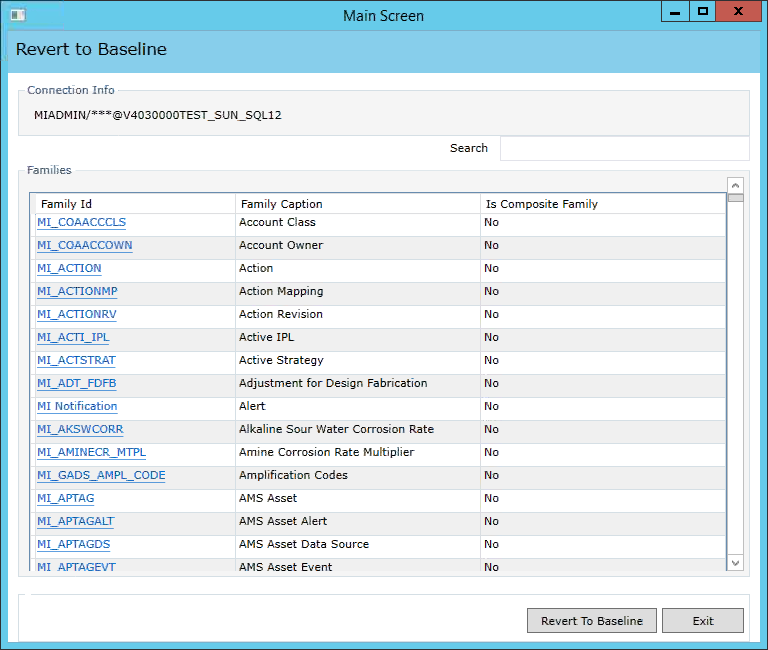
- Select the row containing the family whose element you want to revert to baseline, and then select Revert To Baseline.Tip: You can enter a value in the Search box to search for a specific family.Note: If you want to revert records and links for a family for which the value in the Is Composite Family column is Yes, you will need to revert the records and links for the parent family of that family. If this is the case, based on the following table, please select the appropriate parent family for the child family whose records and links you want to revert to baseline.
Child Family to Revert Parent Family to Select MI_STRMAPP MI_STMPCNFG MI_RRSKMDT MI_RRSKMAP MI_CLMND_PR
MI_MPPG_QRY
MI_DATA_GRP MI_PROTDEFI
MI_RISKTHRE
MI_PROBDEFI
MI_CONSDEFI
MI_RISKCATE
MI_RISKMATR The Various Options For Revert window appears.
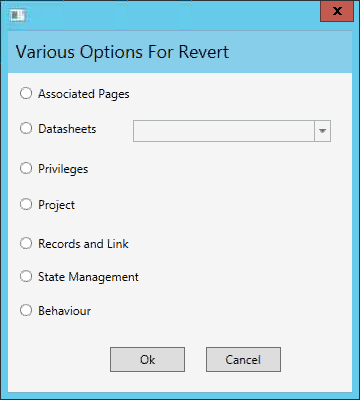
- Select the check box for the revert to baseline action that you want to execute, and then select OK.Note: If you selected the Datasheets check box, before selecting OK, you will need to select a datasheet in the drop-down list box next to the Datasheets check box.
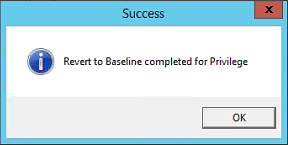
If you selected the Associated Pages, Datasheets, Privileges, Project, or Behavior check box, the Success window appears, displaying a message indicating that the revert to baseline action has been completed. The following image shows the Success window after the action of reverting Privileges to baseline has been completed.
- Select OK.
The Success and Various Options For Revert windows close.
-or-
If you selected the Records and Link check box, the Revert to Baseline - Records and Links window appears.
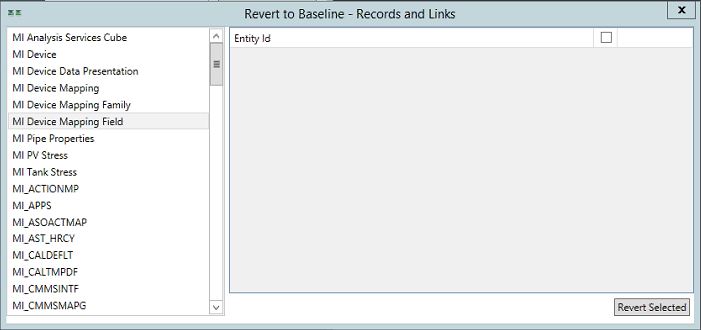
- In the list on the left side of the window, select the family that contains the records and links that you want to revert to baseline.
The selected records and links appear in the list on the right side of the window.
- If you want to revert the records and links for records in the family, in the list on the right side of the window, select the check box next to each record that you want to revert to baseline, and then select Revert Selected.
-or-
If you want to revert customized template values for the family to baseline, select a family on the left side of the window, and then, in the My Template Defaults row that appears, select Compare. Then, on the My Template Defaults window that appears, select Revert.
A message appears, indicating that the selected records and links have been reverted to baseline.
-or-
If you selected the State Management check box, the State Management Mapper window appears.
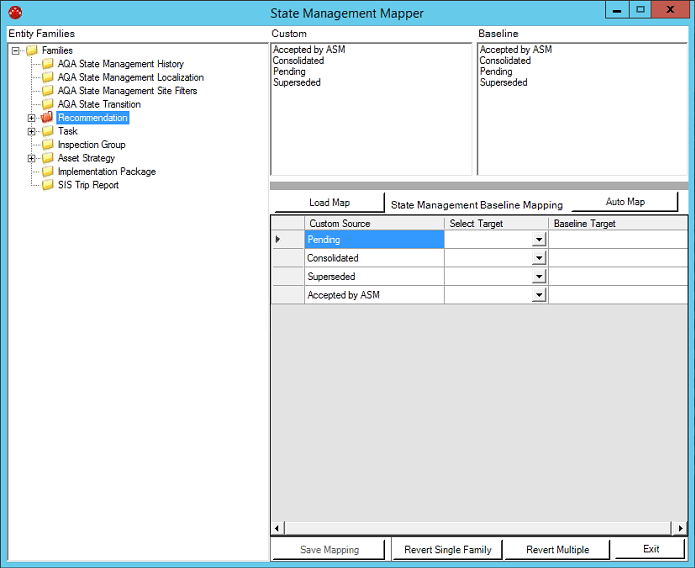
The family of the item that you selected in the Comparison Results grid is highlighted in the tree in the Entity Families section of the State Management Mapper window. In the Custom section, a list of the customized states for the family appears. In the Baseline section, a list of the baseline states for the family appears.
The customized states for the family also appear in the Custom Source column in the grid in the State Management Baseline Mapping section.
- In the State Management Baseline Mapping section, in each cell in the Select Target column, select the baseline target for each customized state in the Custom Source column.Note: If you select Auto Map, the GE Digital APM Database Comparison Tool will automatically assign baseline targets where possible. If you select Load Map, a window appears on which you can select a previously saved map of baseline target assignments.
The selected targets appear in the cells in the Baseline Target column.
- Select Revert Single Family or Revert Multiple.
If you selected Revert Single Family, a message appears, asking if you want to save the current mapping and revert to it.

- Select Yes.
A confirmation message appears.
- Select OK.
The selected states are converted.
-or-
If you selected Revert Multiple, the Browse For Folder window appears.
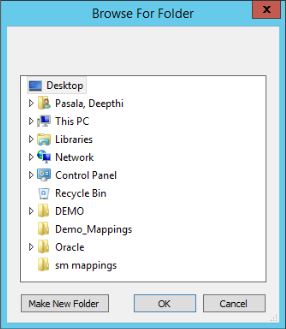
Navigate to the folder containing all of the families whose states you want to convert, and then select OK.
A message appears, asking you to confirm that you want to continue.
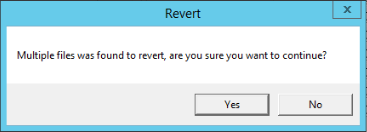
- Select Yes.
A confirmation message appears.
- Select OK.
The selected states are converted.
- Select Yes.
- Select OK.
Save the Results to a .ZIP File
About this task
After running the pre- or post-upgrade version of the GE Digital APM Database Comparison Tool, if you save comparison results to a .ZIP file using the following instructions, you can reload those results at a later time. These instructions assume that you have already launched the GE Digital APM Database Comparison Tool.
Procedure
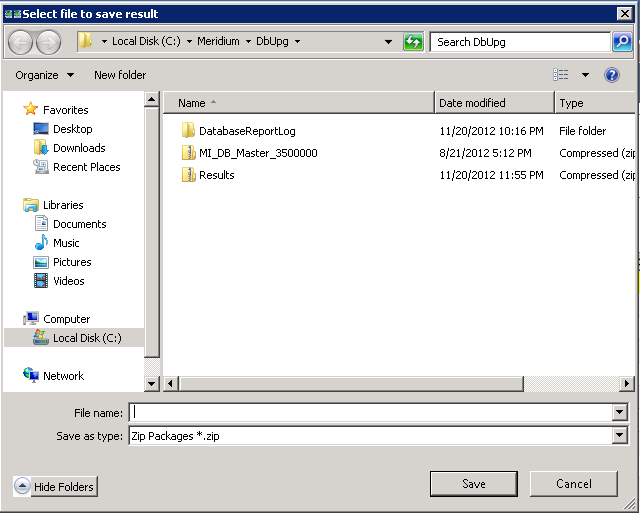
- On the Comparison Details screen, select Save Results.
The Select file to save result window appears. The folder path is set by default to C:\Meridium\DbUpg.
Reload Previous Comparison Results
About this task
Using the pre- or post-upgrade version of the GE Digital APM Database Comparison Tool, if you have saved previous comparison results to a .ZIP file, you can reload those results by following these instructions. These instructions assume that you have already launched the GE Digital APM Database Comparison Tool.
Procedure
- On the Connection Information screen, select Load Results.The Select export of result window appears. By default, the folder path is set to C:\Meridium\DbUpg.
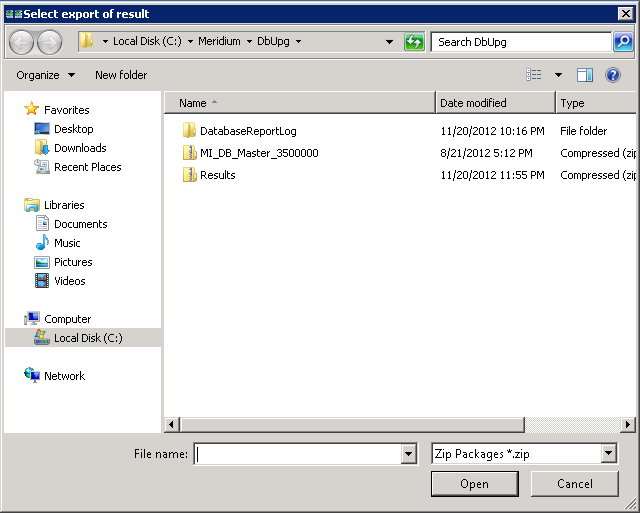
- Select the .zip file containing the results that you want to reload, and then select Open.A progress bar appears, indicating the progress of the loading process.
When the process is complete, the comparison results appear on the Comparison Details screen.
Export Comparison Results to an Excel File
About this task
If you have run a database comparison using the pre- or post-upgrade version of the GE Digital APM Database Comparison Tool and want to make the result available to users who do not have access to the GE Digital APM Server, you can save the results to a Microsoft Excel file. The Excel file will contain the data that appears in the grid on the Comparison Details screen of the GE Digital APM Database Comparison Tool. It will not present a detailed side-by-side comparison.
These instructions assume that you have already launched the GE Digital APM Database Comparison Tool.
Procedure
- On the Comparison Details screen, select Export.The Select file to save result window appears. By default, the folder path is set to C:\Meridium\DbUpg.
- In File name box, enter a name for the Excel file, and then select Save.The results are saved to the Excel file with the specified name in the specified location, and a message appears, indicating that the file was saved successfully. The content of the Excel file will look similar to this:

The file contains one worksheet, ExportToExcel, with the following columns of information:
- ModifiedID: Displays the value that appeared in the Item Name column in the GE Digital APM Database Comparison Tool.
- ItemPath: Displays the value that appeared in the Item Path column in the GE Digital APM Database Comparison Tool.
- ItemType: Displays the value that appeared in the Type column in the GE Digital APM Database Comparison Tool.
- HasBaselineChanges: Displays a value indicating whether or not a black circle appeared in the Baseline Changes column in the GE Digital APM Database Comparison Tool. If no black circle appeared, then the value is False. If a black circle appeared, then the value is True.
- HasCustomChanges: Displays a value indicating whether or not a black circle appeared in the Custom Changes column in the GE Digital APM Database Comparison Tool. If no black circle appeared, the value is False. If a black circle appeared, the value is True.
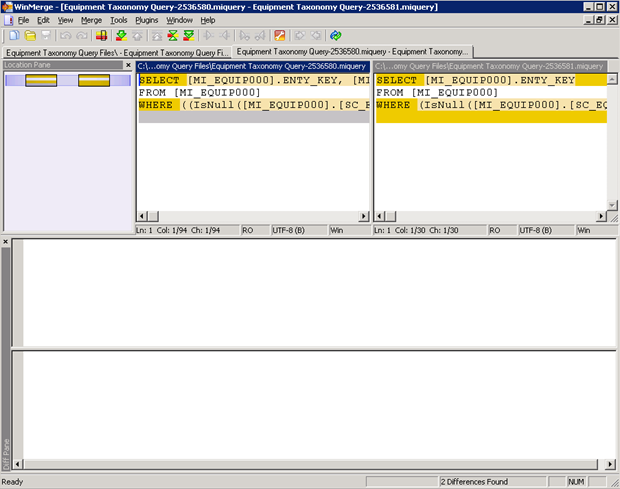
View Detailed Differences in WinMerge
About this task
In the comparison results grid, for any item in the grid, you can access a detailed comparison of the differences between that item in your customized database and the baseline database for the target version. The detailed differences will be displayed in WinMerge. Information on using WinMerge exceeds the scope of the GE Digital APM documentation, but can be found in the WinMerge Help system.
Procedure
- In the comparison results grid, select the hyperlinked name of the item whose differences you want to view.The Difference Details screen appears.
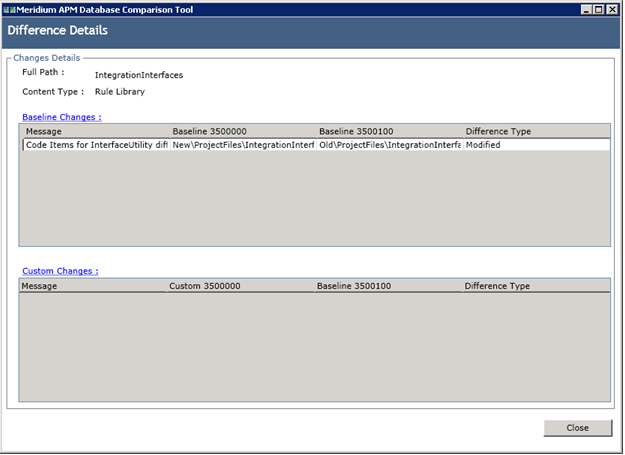
- If differences are referenced in the upper section, select Baseline Changes.If differences are referenced in the upper section, select Baseline Changes.
-or-
If differences are referenced in the lower section, select Custom Changes.
The sections shown in the following images can be accessed via the appropriate tabs:
In this section, the XML code for the item exists in one file per version (e.g., an entity family).
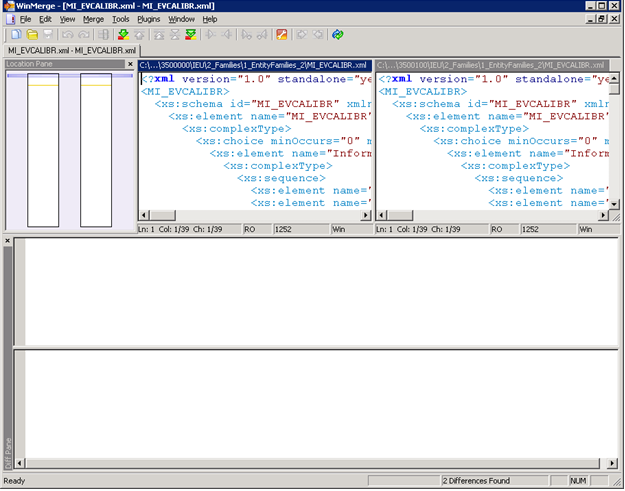
In this section, the item exists in multiple files per version (e.g., a query), which you can use to select the two specific files that you want to compare.
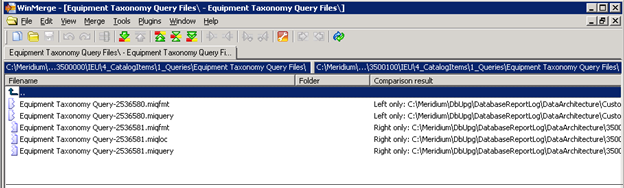
- In the section that allows you to select two specific files that you want to compare, select the two files, right-click, and then select Compare.
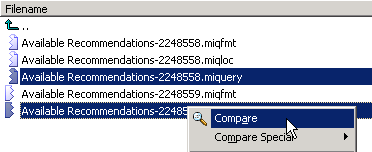
WinMerge appears, displaying the results of the comparison.