Add Multiple Tags from a Collector Using Historian Administrator

About this task

This topic describes how to add multiple tags from a collector using Historian Administrator. You can also add tags using the Web Admin console.
Note: When you add a tag, do not enter a leading space or a trailing space in the tag name.

Procedure

  1. Select the Add Tags From Collector link in the Tag Maintenance page.
    The Add Multiple Tags from Collector window appears.


  2. Select a collector from the Collector drop-down list.
    Note: If you add tags from a File collector, the file you import specifies the collector to which the tags are assigned. Those tags are then returned by a browse of the specified collector. It is also possible to leave the assignment blank. If the file does not specify a Collector Name for a tag, the tag is added with no collector name.

    You cannot browse a Calculation collector through the Add Tags From Collector window in Historian Administrator.

  3. In the Show Only field, select either All Source Tags or Source Tags Not Collected.
    If you select the second option, the browse returns only the tags that are not currently included for collection.

    If a Historian tag name is different from its source address tag name, the source tag is displayed in the returned list even if you browse the collector using the Show Source Tags Not Collected criterion. Collection on the same source address using a unique tag name is allowed.

  4. In the Source Tag name and Description fields, you can optionally enter masks for the browse, using standard Windows wildcard characters.
  5. Select Browse to initiate the search or Reset to start over.
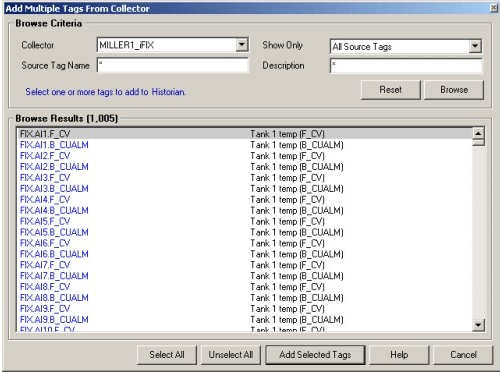
    The browse returns a list of tags, as shown in the following figure. In the Historian Non-Web Administrator, a tag that is currently collected appears in black type. A tag that is not currently collected appears in blue type.