 CIMPLICITY
Alarm Cast Administrator Device: Modem
About this task
- Modem/ModemIP.
- Modem Pool.
Modem/ModemIP
Do the following to configure the Modem/ModemIP option.
Procedure
-
Select Modem or ModemIP in the Communications>Type field.
Note: If you select ModemIP, your screen will differ slightly, with Host Name and Host Port replacing Port Name and Flow Control.
The Modem/ModemIP options are as follows.
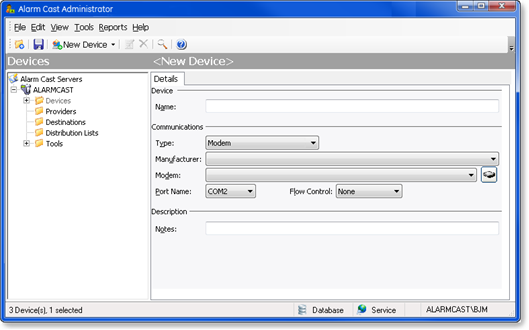
Field Description Device Name (Logical name) utilized by the administrator to refer to this physical device. For example, a Modem Device may include the name of the modem. Communications Type Select Modem or ModemIP from the list of device types. Manufacturer All available output cards. Important: ??A modem must be added before choosing a manufacturer. Modem Click the Modem button to add a modem. Port Name (Modem) List of available ports. Default is the next available port. ?? Flow Control (Modem) The way that devices throttle the flow of send and receive data. Select one of the following. - Hardware to use the devices hardware flow control method
- Software to use the devices software flow control method.
Host Name (ModemIP) Name of the machine being connected. Host Port (ModemIP) Port of the machine being connected. Description Notes Optional Modem/ModemIP: Add a Modem
The Modems folder enables users to add a modem that does not display in the list of available modem manufacturers and models.
Adding a modem involves the import of modem definitions from Windows INF files supplied by Microsoft or the modem manufacturer.
There are two ways to add a modem:
- Modem Included with Windows
- Import the INF files
- Modem from a Manufacturer Supplied INF File
- Utilize a manufacturer supplied INF file
Modem Included with Windows
Import the INF files that are included with Microsoft Windows
- Click the Modem button to the right of the Modem field.
The Add Modem Wizard opens.
- Select a modem in the Standard Modem Types list.
Tip: If your modem is not available in the browse list, use the Show Excluded option to display modem configurations that have been suppressed by the manufacturer.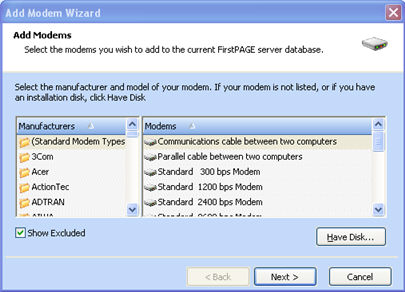
- Click Next.
A Target Server screen opens.
- Select the Alarm Cast Server to connect to.
- Click Next.
A Notes screen opens.
- (Optional) Enter a note in the Notes field.
- Click Next.
A Ready to Add screen will indicate that your modem is being added.
- Click Finish.
Result: Adding the modem is completed.
Modem from a Manufacturer Supplied INF File
Utilize a manufacturer supplied INF file from a modem CD or diskette distribution.
- Click the Modem button to the right of the Modem field.
The Add Modem Wizard opens.
- Select a manufacturer in the Add Modem Wizard left-pane.
- Select a modem in the Manufacturer's list.
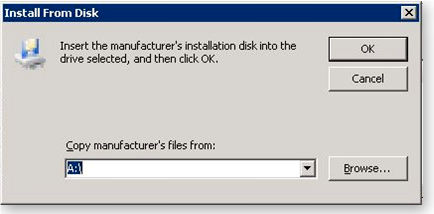
Tip: If your modem is not available in the browse list, ??use the Show Excluded option to reveal modem configurations that have been suppressed by the manufacturer.- Click Have Disk to add your manufacturer/model of modem.
- Select the location of your modem INF file then select OK. This will begin the file transfer.
- Click Finish to complete the addition of the Modem.
Result: When you have added the required modem(s), you can choose the Manufacturer and Modem from the drop-down menu in the Alarm Cast Administrator.
-
Click Save.
Result: The Modem device(s) display:
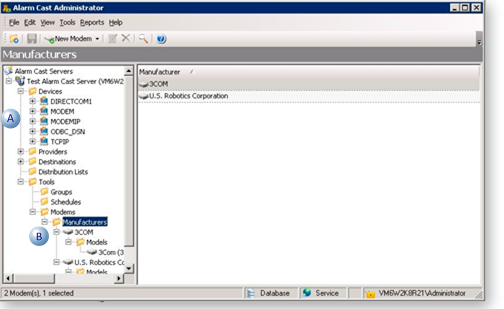
A In the Devices folder. B On the Tools menu in the tree view. By selecting a modem, the details specific to that modem show up in the Window pane. Note: These fields are read-only. Modem Pool
A modem pool adds multiple modems to a single device to share the load of sending messages, using more than one modem at one time.
Do the following to configure the Modem Pool option.
-
Select Modem Pool in the Communications>Type field.
The Pool options are as follows.
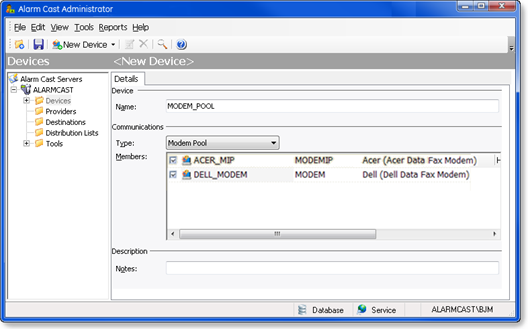
Field Description Device Name (Logical name) utilized by the administrator to refer to this physical device. Example A Modem Pool Device may be named DELL_POOL to show that the members are all Dell modems in this modem pool. Communications Type Select Modem Pool from the list of device types. Members A list of all available modems to add to the modem pool.?? Check the modems that will be members of this modem pool. Description Notes Optional
Results
The Device will now be visible under the Devices folder in the tree view. By selecting the Devices folder, all of the devices will be visible in the working pane.


