 CIMPLICITY
2.1.1. Enter SCHEDULE Region Basic Specifications
About this task
If you check your factory floor sketch, you will see that the schedule items area is the area in which the process begins.
You will define basic specifications for the SCHEDULE region first.
| A | Region Basic Specifications |
| B | Group (ASSEMBLY) Configuration |
- Region Basic Specifications
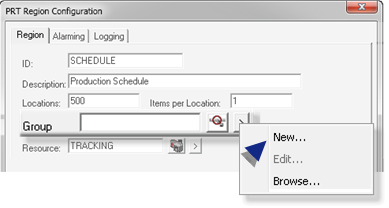
Basic specifications for the SCHEDULE region as follows:
Enter the following.

| Field | Value | |
|---|---|---|
| 1 | ID | SCHEDULE |
| 2 | Description | Production Schedule |
| 3 | Locations | 500 |
| 4 | Items per Location | 1 |
| 5 | Resource | TRACKING |
Note:
- If you did not create the TRACKING resource before opening the Tracker Configuration window, you can
- Right-click the Popup Menu button
 to the right of the ' field.
 - Select New on the Popup menu.
A New Resource dialog box opens.
- Follow the same procedure you would have followed if you opened the New Resource dialog box through the Workbench.
- You will fill in the Group field next.
- Group (ASSEMBLY) Configuration
The SCHEDULE region will be in an ASSEMBLY group, which needs to be created
Procedure
-
Click to the right of the Group field in the PRT Region Configuration dialog box.
-
Select New in the popup menu.
The PRT Group Configuration dialog box opens.
-
Enter the following.

A Group ASSEMBLY B Label ASSEMBLY_1 C Description Electronic Assembly D Resource TRACKING
Results
The PRT Group Configuration dialog box closes; the ASSEMBLY group is ready to be selected in the PRT Region Configuration dialog box>Group field.

Note:
- You can also create groups directly through the TrackerCfg_UI tree.
- If you double-click Groups after you complete configuration for this group, you will see that ASSEMBLY displays in the group list.


