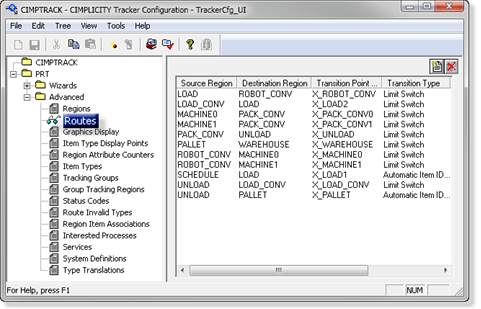
Exercise 2.3. Add Additional Routes to CIMPTRACK

About this task

You saw that a route goes from one region to another.

You need to create a route for the movement from each region to region that your items will make.

Consult the rough sketch you created at the beginning of the tutorial to figure out what routes you have to configure.

Make a list of Source to Destination regions.

A Create additional Routes
B Review the Completed Route List
  1. Create Additional Routs

Did you figure out most of the Source to Destination routes?

Procedure

  1. Create all the routes on the following table.
  2.  Enter the related specifications that are listed on the table for each route.

    Note: Refer to the steps for configuring the SCHEDULE to LOAD route, if needed.

    Several of the point types are BOOL; one is STRING 20. The reason will become clear as you progress through the tutorial.

    Source Region  Destination Region Transition Type Transition Point ID   Data Type
    SCHEDULE LOAD Automatic Item ID Giving Item ID X_LOAD1 STRING_20
    LOAD ROBOT_CONV LIMIT SWITCH X_ROBOT_CONV BOOL
    ROBOT_CONV MACHINE0 LIMIT SWITCH X_MACHINE0 BOOL
    LOAD_CONV LOAD LIMIT SWITCH X_LOAD2 BOOL
    MACHINE0 PACK_CONV LIMIT SWITCH X_PACK_CONV0 BOOL
    MACHINE1 PACK_CONV LIMIT SWITCH X_PACK_CONV1 BOOL
    PACK_CONV UNLOAD LIMIT SWITCH X_UNLOAD BOOL
    UNLOAD LOAD_CONV LIMIT SWITCH X_LOAD_CONV BOOL
    UNLOAD PALLET Automatic Item ID Giving Item ID X_PALLET STRING_20
    PALLET WAREHOUSE LIMIT SWITCH X_WAREHOUSE BOOL
    ROBOT_CONV MACHINE1 LIMIT SWITCH X_MACHINE1 BOOL

    Already configured

    1. Review the Completed Route List

    Check to see that all your required routes appear in the configuration window when you are finished.

    Important: Make sure your configuration is saved when you have completed the exercise.