 CIMPLICITY
2.3. Configure PRT Routes
About this task
Items follow routes from one region to another as they move through the Tracker model.
Each route from one region to the next needs to be configured.
| A | Open the PRT Route Configuration Dialog Box |
| B | Enter Route Source/Destination Regions |
| C | Enter Route Transition Type/Point ID |
| D | Enable Process first point change |
| E | Finish SCHEDULE to LOAD Route Configuration |
- Open the PRT Route Configuration Dialog Box
Procedure
-
Do the following.
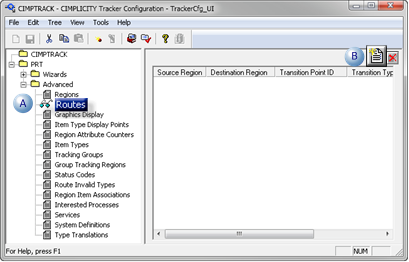
A Double-click Routes. B Click  in the TrackerCfg_UI right pane.
Results
The PRT Route Configuration dialog box opens in a basic view.
- Enter Route Source/Destination Regions
Select the following basic route specifications.
| 1 | Source Region |
| 2 | Destination Region |
| 1 | Source Region |
- Click the Browser button
 to the right of the Source Region field.
A PRT Browse window opens.
- Do the following.
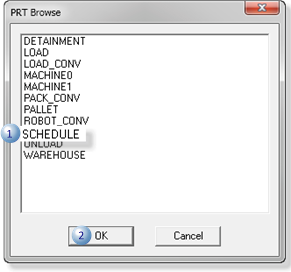
| 1 | Select SCHEDULE for the Source region |
| 2 | Click OK. |
Result: SCHEDULE is now the Source Region.
| 2 | Destination Region |
- Click the Browser button to the right of the Destination region field.
The PRT Browse window opens again.
- Select LOAD for the Destination Region.
- Click OK.
Result: LOAD is now the Destination Region.
- Enter Route Transition Type/Point ID
Transition points can move items from region to region based upon location or identification.
Each route in your factory model will need a transition type and point.
Transition type and point for the SCHEDULE to LOAD route are as follows.
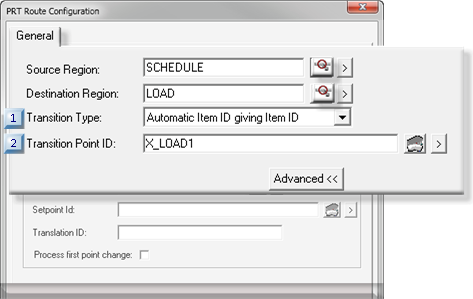
| 1 | Transition Type |
| 2 | Transition Point ID |
| 1 | Transition Type |
Select Automatic Item ID giving Item ID in the Transition Type dropdown menu.
| 2 | Transition Point ID |
Create the transition point, X_LOAD1, as follows.
- Click the Popup Menu button
 to the right of the Transition Point ID field.
 - Select New on the Popup menu.
A New Point dialog box opens.
- Enter and select the following.
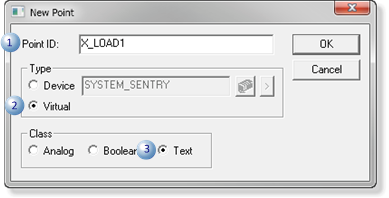
| 1 | Point ID | X_LOAD1 |
| 2 | Type | Virtual |
| 3 | Class | Text |
- Click OK.
The X_LOAD1 Point Properties dialog box opens.
- Select the General tab.
- Enter and select the following.
The Point Properties dialog box opens.
- Enter and select the following on the Virtual tab.
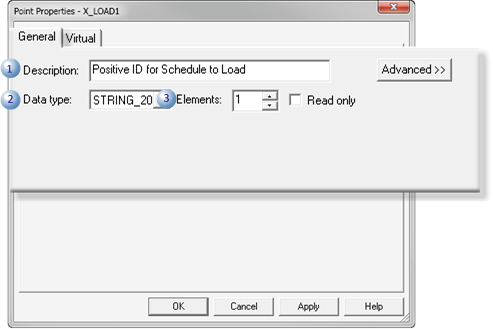
| 1 | Description | Positive ID for Schedule to Load |
| 2 | Data type | STRING_20 |
| 3 | Elements | 1 |
- Click OK.
| 3 | Enable |
The PRT Route Configuration dialog box displays again with the basic criteria for the SCHEDULE to LOAD route completed.
- Enable Process first point change
Do the following.
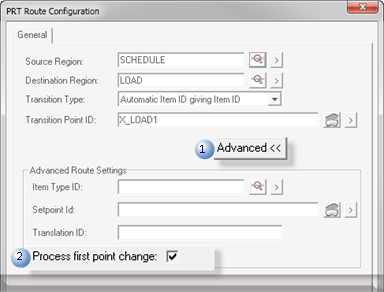
| 1 | Advanced button | Click Advanced. |
| 2 | Process first point change. | Check. |
- Finish SCHEDULE to LOAD Route Configuration
Click OK in the PRT Route Configuration dialog box.
The new route displays in the Tracker window.


