 Plant Applications
Access a Downtime Events List
About this task
Procedure
- Log in to the Plant Applications Web Client.
- Select
 .The Events page appears, displaying a list of downtime events and their details in a tabular format. In the table displaying the list of downtime events and their details, you can resize a column or drag and drop a column to a new position. The column settings you select in the table are retained when you access the Events page later.Note: The date and time format is m/dd/yyyy hh:mm:ss or dd/m/yyyy based on the localisation settings.A summary of unplanned, planned, external, and NPT downtime events within a time range appears in the page. In addition, the following information appears in a tabular format for each downtime event.
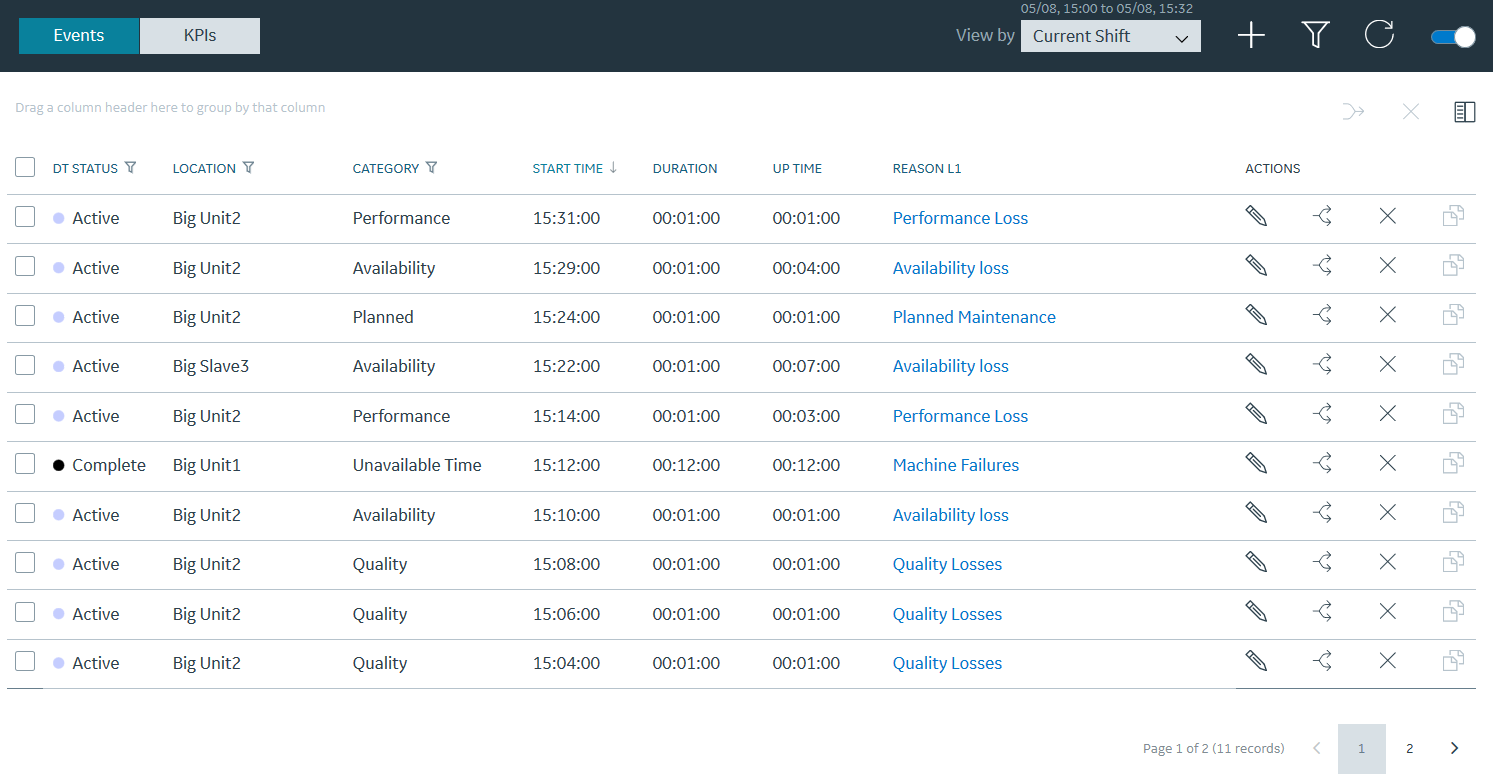
Column Description DT Status The downtime status for a downtime event along with the corresponding color. - Green: Active
- Blue: Open
- Black: Complete
Note: The color scheme is based on the default color scheme setting in the Plant Applications Administrator.Category The downtime category for a downtime event. You can select  appearing next to this column and then select required filters from the menu to include in the list. Note: The filters that you set for the Category column are retained when you access the Events page later.
Location The location of an equipment experiencing downtime. Start Time The start time for the downtime event. Duration The downtime duration for the downtime event. Note: The value in this field is blank for open downtime events.Reason The downtime reason for the downtime event. Actions The actions that you can perform on a downtime event. You can select one of the following action items:  : Select to modify a downtime event.
 : Select to split a downtime event.
 : Select to delete a downtime event.
 : Select to copy faults and reasons from a downtime event to the required selected downtime events.
Note: You can filter the downtime events based on filters applied to the selected columns. Select appearing next to the column name and then select required filters from the menu to include in the list. You also can drag a column to the column header to group the downtime events based on the column selected. Tip: The downtime events are listed in multiple pages. One page contains maximum of seven downtime events. - In the drop-down list box containing the time range options, select a time range as described in the following table. The range that you select appears in the form of date and time interval next to the drop-down list box containing the time range options.
Time Range Description Previous Day Select to access all downtime events from the day prior to the current Production Day. Current Day Select to access all downtime events from the start time of the current Production Day until the current time. If there are no shifts configured for the plant, this option is selected by default. Current Shift Select to access all downtime events from the start time of the ongoing shift until the current time. If shifts are configured for the plant, this option is selected by default. Previous Shift Select to access all downtime events from the shift prior to the current shift. Last 7 days Select to access all downtime events within seven days prior to the current Production Day. Custom Select to access all downtime events within a date and time range that you specify by using a calendar window. The following calendar window appears when you select the Custom option.
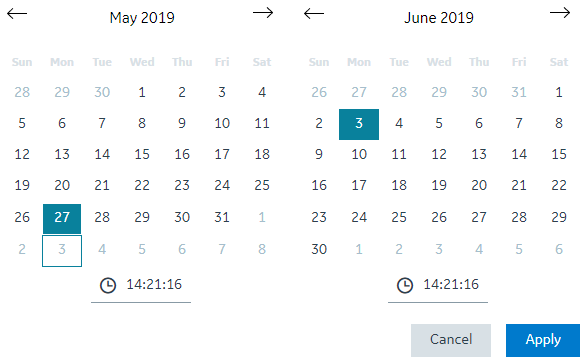 To specify a custom date and time range in the calendar window:
- In the START DATETIME section, select a date and enter a time in the format hh:mm:ss
- In the END DATETIME section, select a date and enter a time in the format hh:mm:ss
- Select Apply.
Note: The shift values for current and previous shifts are determined by the settings selected in the Plant Applications Department level. The time-interval that you select appears in the form of date and time next to the time-interval drop-down list box. - Optional: Select a downtime event to access the Quick Edit page and perform the following tasks:
- Optional: In the table displaying the list of downtime events and their details, select an option to perform an action as described in the following table.
Option Description Select to filter the downtime events based on the specified duration. You can also select the NPT check box, and then select Apply to include any non-productive time (NPT) in the results. 
Select to update the downtime events list with the latest information available for your equipment. Note:This icon is enabled only when there are updates to the downtime events list. Else, one of the following icon appears:-
 : Indicates that there are no updates to the downtime events list.
 -
 : Indicates that the RabbitMQ service is down.

Select either to add a downtime event or add a non-productive time (NPT) downtime event. 
Select to merge downtime events for the equipment from the same location. Note: This icon is enabled only when you select the check boxes for more than one downtime event in the table.Select to delete multiple downtime events. Note: This icon is enabled only when you select the check boxes for more than one downtime event in the table.
Select to add or remove columns from the table displaying the downtime events list. The added columns are retrieved when you access the Events page later. By default, the following columns appear in the specified order when you access the Events page:- DT STATUS
- CATEGORY
- LOCATION
- START TIME
- DURATION
- REASON
- PRODUCT
Tip: You can use the horizontal scroll bar in the table to drag the scroll box and access the data from all the added columns.
Select to automatically update the downtime events based on the selected time duration. -