Important: You do not have the latest version of Historian! You are missing out on the newest capabilities and enhanced security. For information on all the latest features, see the Historian product page. For more information on upgrades, contact your GE Digital sales agent or e-mail GE Digital Sales Support. For the most up-to-date documentation, go here.
Exporting Tags
About this task
The Export Tags function permits you to send tag information from the Historian Server to an Excel worksheet or to another system, which may be either local or remote.
Note:
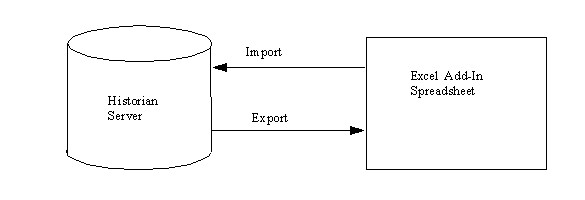
Before importing or exporting tags, data, or messages, you should be aware of a convention used with the Historian application. The Server is the reference point for all import and export functions, as illustrated in the following figure. If you want to move tag information from the Server into your worksheet, you must use the Export Tags command. Conversely, if you want to move data from your worksheet to the server, you must use the Import Data command.
You cannot enter more than 32,767 characters in a single cell in an Excel worksheet.
It is recommended that you first export a tag and then import it, to become familiar with the procedure and what the data looks like.
Procedure
Select Administration and then select Export Tags from the Historian menu.
The Export Tags from Historian window appears.
Select a server from the drop-down list.
If you do not select a server, the Add-In uses the default server.
In the Filter Criteria section, enter the name of the tag you want to export or, as an alternative, enter a mask for selecting a group of tags.
If you do not enter a tagname, the filter uses other criteria for selecting tags. If you do not enter any criteria, the filter returns all tags.
If you prefer, you can enter a tag description and/or a description mask instead of a tagname or tag mask.
Note: You cannot export multiple tags when tagnames are read from multiple cells. If you specify a range of tagnames to read from multiple cells in the Tag Mask or Tag Name(s) fields, only the first tag in the range will be exported.
Note: The selection of tags should always be via cell references. Try not to type them directly into the window. Rather, select them in the worksheet.
Enter a collector name in the Collector field. This entry is optional.
Select a data type from the drop-down list in the Data Type field.
If you do not select a data type, or if you select a data type that does not match the other entries you have made, the filter uses other criteria.
Select one or more field names from the list in the right hand window.
To select a single item, select the name of the field. To select multiple individual tags, press the Control key and select the tag-names. To select a sequence of tags, press the Shift key and select the first and last tagname of the sequence.
Note: Always include Tagnames in the list of fields to export.
In the Export Options section, select either the To New Worksheet, To CSV File, or To XML option.
If you select either the CSV or XML option, you must also enter a path and file name for the destination file.
Select OK to execute the Export Tag function.
Select Cancel to cancel and close the window.
When the export function finishes, a window appears within a display of the worksheet containing the exported tags. Select OK to acknowledge the operation and close the window.