 CIMPLICITY
1.2.2. Class Attribute Definition
About this task
| A | Configuration: Attribute. |
| B | Result: Object dialog box. |
- Configuration: Attribute
The attribute dialog box provides the tools to define the following.
- Definition: Attribute
- Definition: Attribute fields for the Object dialog box.
Definition: Attribute
The top part of the dialog box provides fields for you to define the attribute. Your definition can provide default values and determines the options available to an object designer when creating an object from the class.
Open either a new or existing Attribute dialog box in which you will fill in or modify the top part.
Specifications are as follows.
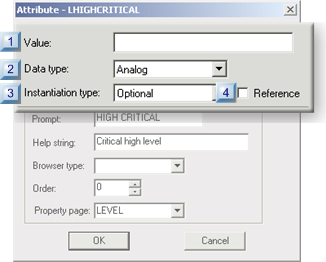
| 1 | Value |
| 2 | Data type |
| 3 | Instantiation type |
| 4 | Reference |
| 1 | Value |
(Optional) Enter the default value for the attribute.
Acceptable values:
- Must be within the range for the attribute type
- Are limited to 80 characters.
- Cannot contain the vertical bar '|' character.
| 2 | Data type |
Select the data type of the value from the drop-down list:
Data types are:
- Analog
- Boolean
- String
| 3 | Instantiation type |
Select the option from the drop-down list that will control how a user will deal with the attribute when an object is being created:
| Option | When an object is created, a user: |
| Hidden | Will be in the class object; however, it will not be listed in the Object dialog box. |
| Optional | Can override a class default value, if there is one. The attribute does not have to be specified to create the object. |
| Readonly | Will be listed in the Object dialog box; however, the field will be disabled, preventing users from editing it. |
| Required | Must provide a value for this attribute. Failure to provide a value when creating an object will generate an error. |
| Static |
|
| Static Display |
|
| 4 | Reference |
Check Reference if you want to identify the value of this attribute as the value of another attribute.
Definition: Attribute Fields for the Object Dialog Box
An object designer configures an object based on the class you are creating in an Object dialog box. The specifications you make in the Object Builder Group of the class attribute's Attribute dialog box determine where and how the attribute appears in the Object dialog box.
Procedure
-
Fill in the fields as follows.
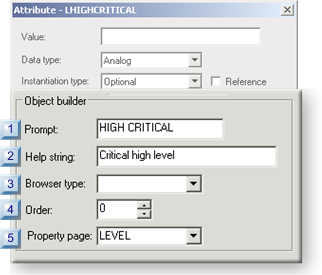
1 Prompt 2 Help string 3 Browser type 4 Order 5 Property page 1 Prompt (Optional) A meaningful description that is up to 20 characters.
Your entry appears as the field name for the class attribute in the Object dialog box.
The class attribute ID appears as the field name if there is no entry.
2 Help string (Optional) A tip up to 80 characters.
Your entry appears as a tool tip in the Object dialog box when the user places the cursor over the field.
3 Browser type (Optional) A user has access to the selected browser in the Object dialog box.
The Browser's button will appear to the right of the field in the Object dialog box.
Browser Options Button that ??will display Alarm Class 
Resource 
Device 
Role 
Point 
User 
Port 
4 Order The order in which the field will appear on the Object dialog box tab in the ??field.
- Lower numbers appear before higher numbers.
- Class attributes with the same order number (for the same tab) are sorted alphabetically by Prompt (field name).
5 Property page Selects the tab on which the attribute will display in the Object dialog box as follows.
Do one of the following.
- Select the General which is the default tab.
Note: The General tab, has a limit of 8 attributes (fields).CIMPLICITY attributes can be moved to another tab make room on the General tab for Custom attributes.
- Enter a new name. The name you enter will appear as a tab in the Object dialog box.
Note: Additional tabs have a limit of 9 attributes each. -
Continue creating the attributes that should be included in the class.
- Result: Object Dialog Box
When an Object dialog box is opened for a class object, the attribute's location and specifications reflect entries in the Attribute dialog box.
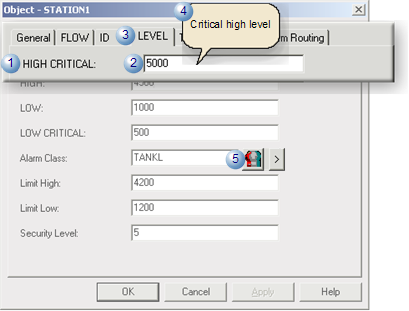
Field in: Purpose in: Class Attribute Dialog Box Object Dialog Box 1 Both the: - Prompt
- Order
Specifies the: - Field Label
- Order in which the field displays on the Attribute dialog box tab.
2 Both the: - Data Type
- Instantiation Type
Control the: - Data type allowed for the field value
- If a field entry is optional or required
3 Property Page Tab that the attribute is located on. 4 Help String Tool tip that displays then the mouse hovers over the attribute field.


