Remote Collector Management

About Installing and Managing Collectors Remotely

Many Historian users use collectors to collect data from data sources or servers. Typically, these collectors are distributed geographically, and so, accessing them can be challenging and not cost-effective. To overcome this challenge, Historian provides the Remote Collector Management agent, using which you can manage collectors remotely.

Advantages of using the Remote Collector Management agent:
  • Accessing a collector machine physically to manage the collector is no longer required.
  • Security is enabled. That is, only members of the iH Security Admins, iH Tag Admins, and the iH Collector Admins security groups can manage the collectors remotely.
  • Works with the older versions of collectors as well (V5.5 and later).

Features

Workflow

The following diagram provides the workflow of Remote Collector Management when creating a collector instance. After the collector instance is created, the collector sends data to the configured destination. The green lines indicate the initial, one-time steps. The red lines indicate the steps performed every time you want to manage the collector remotely.

Limitations
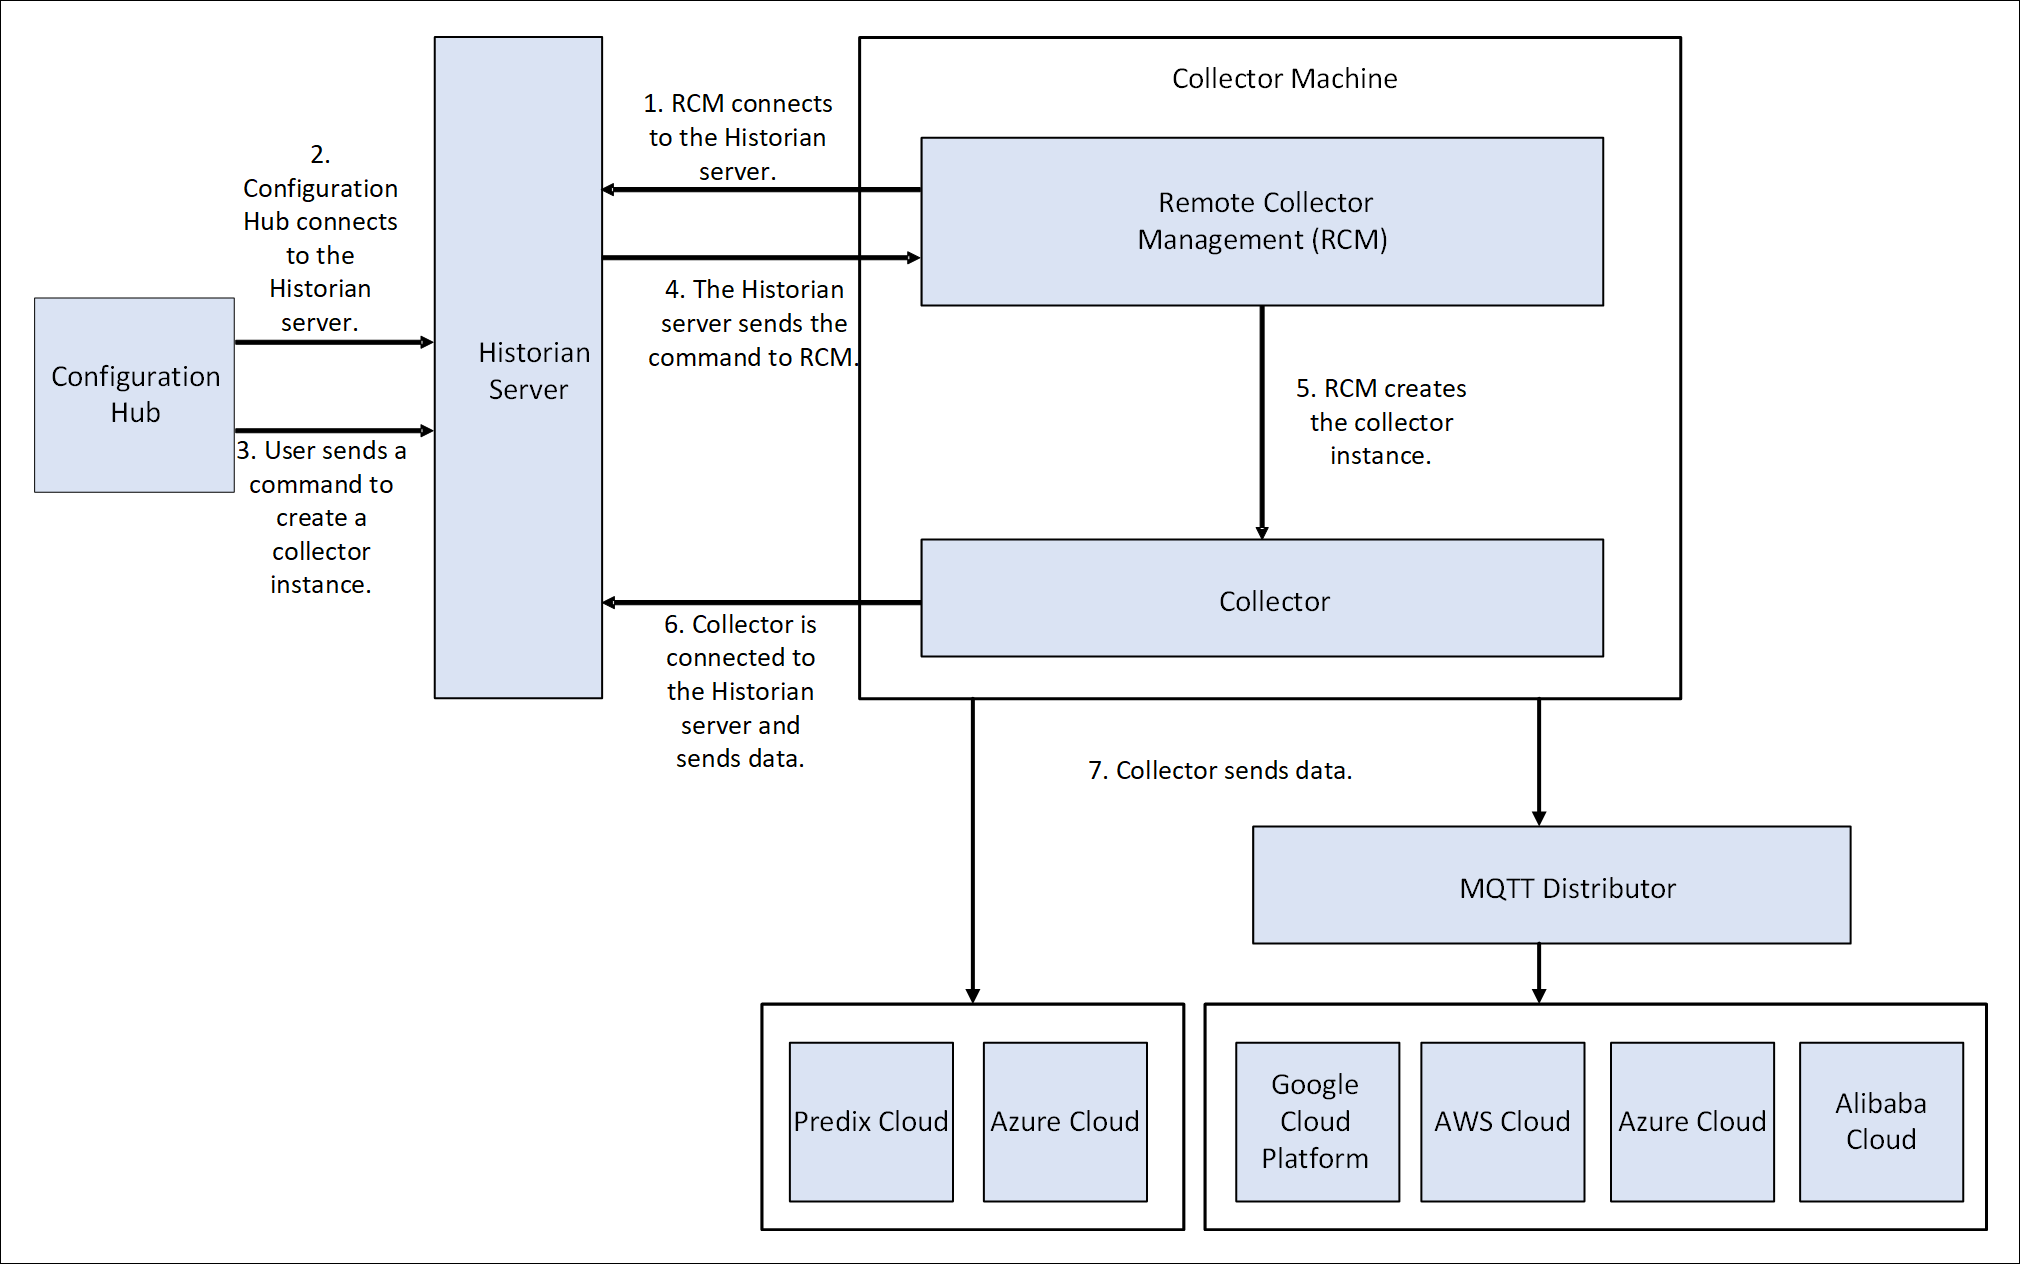
  • After installing Remote Management Agent, if you install a new collector, you must manually start it for the first time. This is to establish a connection between the collector and the Remote Collector Management agent. From the next time, you can manage the collector remotely.

About Managing Collector Instances Using the RemoteCollectorConfigurator Utility

After you install Historian, you must install the collectors. These collectors are used to collect data from various sources and send it to Historian. For a list of collectors and their usage, refer to About Historian Data Collectors.

After you install collectors and Remote Management Agent, the following artefacts will be available:
  • Executable files: These files are required to add a collector instance.
  • Instances of the following collectors:
    • The iFIX collector
    • The iFIX Alarms & Events collector
    • The OPC Classic Data Access collector for CIMPLICITY
    • The OPC Classic Alarms and Events collector for CIMPLICITY
    These instances will be created only if iFIX and/or CIMPLICITY are installed on the same machine as the collectors.
  • The Remote Collector Management agent: Provides the ability to manage collectors remotely.

You can then add a collector instance. This section describes how to add, modify, or delete a collector instance using the RemoteCollectorConfigurator utility. It is a System-API-based tool, which connects to the destination Historian server, and allows you to add, modify, and delete a collector instance without the need to install Web-based Clients. You can also perform these tasks using Configuration Hub.

You can use the RemoteCollectorConfigurator utility in one of the following ways:
  • Using Command Prompt: In this method, you will enter a single command at a command prompt to run the RemoteCollectorConfigurator utility and provide values to all the required parameters.
  • Using the interactive UI of the RemoteCollectorConfigurator utility: In this method, you will run the RemoteCollectorConfigurator utility, and use the on-screen instructions to manually provide values to all the required parameters.
In both these methods, you can either enter the installation parameters and their values manually or provide a JSON file that contains them. The RemoteCollectorConfigurator utility can also create sample JSON files, which you can use to create or modify collector instances. In addition, you can run the RemoteCollectorConfigurator utility without connecting to Historian or a data archiver. This section describes how to use each of these methods.
Tip: You can access the Help for the RemoteCollectorConfigurator utility by running the following command:
RemoteCollectorConfigurator.exe --help

Create a Sample JSON File

About this task

To add or modify a collector instance, you can provide a JSON file with the required details. Instead of manually creating the file, you can use the RemoteCollectorConfigurator utility to generate a sample JSON file. You can then modify the file as needed, and then use it to add or modify the collector instance.

Procedure

  1. Run the RemoteCollectorConfigurator.exe file. By default, it is located in the following folder: C:\Program Files\GE Digital\NonWebCollectorInstantiationTool\RemoteCollectorConfigurator.exe.
    A list of options to manage collector instances appears.
  2. Enter 7.
    A list of collector types appears, along with a number assigned to each of them. You are prompted to enter the collector type.
  3. Specify the collector type by entering the corresponding number. For example, if you want to add an instance of the Calculation collector, enter 1.
    A list of destinations appears, along with a number assigned to each of them.
  4. Specify the destination by entering the corresponding number. For example, if the destination is a Historian server, enter 1.
  5. If needed, enter the folder path where you want the sample JSON file to be created. By default, the file will be created in the same folder in which the RemoteCollectorConfigurator utility is located.
    A sample JSON file is created.
  6. As needed, update the sample JSON file with the required collector instance parameters. You can also specify values for the general parameters.

What to do next

Add or modify the collector instance using the sample JSON file that you have created.

Add a Collector Instance

Before you begin

About this task

Before you begin using a collector, you must add an instance of the collector. You can add multiple instances of the same collector or instances of multiple collectors where you have installed the collectors.
For an ODBC collector, a single mapping file is used by multiple instances.
Note: When you install collectors, if iFIX and/or CIMPLICITY is installed on the same machine as the collectors, instances of the following collectors are created automatically:
  • The iFIX collector
  • The iFIX Alarms & Events collector
  • The OPC Classic Data Access collector for CIMPLICITY
  • The OPC Classic Alarms and Events collector for CIMPLICITY
You can begin using these collectors, or create more instances as needed.

This topic describes how to add a collector instance using the RemoteCollectorConfigurator utility. You can also add a collector instance using Configuration Hub. If you want to add an offline collector instance, refer to Add an Offline Collector Instance.

Procedure

  1. If you want to use an interactive UI:
    1. Run the RemoteCollectorConfigurator.exe file. By default, it is located in the following folder: C:\Program Files\GE Digital\NonWebCollectorInstantiationTool.
      A list of options to manage collector instances appears.
    2. Connect to the collector machine by entering 1 or 2, depending on whether collectors are installed locally or on a remote machine.
    3. Enter 4.
      You are prompted to choose between entering the installation parameters manually and providing a JSON file.
    4. If you want to manually enter the parameters and values, enter 1, and then run the following command:
      {"<parameter>":"<value>","<parameter>":"<value>"}

      If you want to use a JSON file containing the installation parameters and values, enter 2, and then enter the path to the JSON file that you have created. Instead of manually creating the JSON file, you can use the RemoteCollectorConfigurator utility to generate it automatically.

      You can leave the Historian username and password blank if there are no Historian security user groups.

      For information on the parameters, refer to Collector Instance Parameters.
  2. If you want to use the Command Prompt window:
    1. Access the installation folder of the RemoteCollectorConfigurator utility. By default, it is C:\Program Files\GE Digital\NonWebCollectorInstantiationTool.
    2. Run Command Prompt in this location.
    3. If you want to manually enter the installation parameters and values, run the following command:
      RemoteCollectorConfigurator.exe "<Destination Historian>" "<Destination Historian username>" 
      "<Destination Historian password>" InterfaceCreateViaCmd "{\"<parameter>\":\"<value>\",
      \"<parameter>\":\"<value>\"}"
      If you want to use a JSON file containing the installation parameters and values, run the following command:
      RemoteCollectorConfigurator.exe "<Destination Historian>" "<Destination Historian username>" 
      "<Destination Historian password>" InterfaceCreateViaFile "<path to the JSON file>"

      Instead of manually creating the JSON file, you can use the RemoteCollectorConfigurator utility to generate it automatically.

      If ih security groups are available, you must enter the Windows username and password of the destination Historian. If you have enabled the Enforce Strict Collector Authentication option in Historian Administrator, you must provide the credentials of a user who is added to at least one of the following security groups:
      • iH Security Admins
      • iH Collector Admins
      • iH Tag Admins
      For information on the parameters, refer to Collector Instance Parameters.

Results

The collector instance is added.

What to do next

Specify the tags whose data you want to collect using the collector. For the CollectorDestination parameter:
  • If you have entered Historian, access Historian Administrator, and manage the tag configuration. For information, refer to Configure Tags.
  • If you not entered a value, modify the offline configuration file of the collector. By default, this file is available in the following location: <installation folder of Historian>\GE Digital\<collector name>. For information, refer to Creating Offline Configuration XML file.

Modify a Collector Instance

Before you begin

Stop the collector whose instance you want to modify.

About this task

This topic describes how to modify the destination details of a collector instance using the RemoteCollectorConfigurator utility. You can also modify a collector instance using Configuration Hub.

Procedure

  1. If you want to use the Command Prompt window:
    1. Run the RemoteCollectorConfigurator.exe file. By default, it is located in the following folder: C:\Program Files\GE Digital\NonWebCollectorInstantiationTool.
    2. If you want to manually enter the installation parameters and values, run the following command:
      RemoteCollectorConfigurator.exe "<Destination Historian>" "<Destination Historian username>" 
      "<Destination Historian password>" InterfaceEditDestinationViaCmd "{\"<parameter>\":\"<value>\",
      \"<parameter>\":\"<value>\"}"
      If you want to use a JSON file containing the installation parameters and values, run the following command:
      RemoteCollectorConfigurator.exe "<Destination Historian>" "<Destination Historian username>" 
      "<Destination Historian password>" InterfaceEditDestinationViaFile "<path to the JSON file>"

      Instead of manually creating the JSON file, you can use the RemoteCollectorConfigurator utility to generate it automatically.

      You can leave the Historian username and password blank if there are no Historian security user groups.

      For information on the parameters, refer to Collector Instance Parameters.
  2. If you want to use an interactive UI:
    1. Run the RemoteCollectorConfigurator.exe file. By default, it is located in the following folder: C:\Program Files\GE Digital\NonWebCollectorInstantiationTool.
      A list of options to manage collector instances appears.
    2. Connect to the collector machine by entering 1 or 2, depending on whether collectors are installed locally or on a remote machine.
    3. Enter 6.
      You are prompted to choose between entering the installation parameters manually and providing a JSON file.
    4. If you want to manually enter the parameters and values, enter 1, and then run the following command:
      {"<parameter>":"<value>","<parameter>":"<value>"}

      If you want to use a JSON file containing the installation parameters and values, enter 2, and then enter the path to the JSON file that you have created. Instead of manually creating the JSON file, you can use the RemoteCollectorConfigurator utility to generate it automatically.

      You can leave the Historian username and password blank if there are no Historian security user groups.

      For information on the parameters, refer to Collector Instance Parameters.

Results

The destination of the collector instance is modified.

Collector Instance Parameters

This topic provides a list of the parameters that you must provide when you add or modify a collector instance.
Table 1. Destination: Historian
Parameter Description
CollectorDestination The type of the configuration to specify the tags whose data you want to collect.
  • If you want to use Historian Administrator to specify the tags for data collection, enter Historian. For information, refer to Configure Tags.
  • If you want to specify the tags using an offline tag configuration file, do not enter a value. By default, this file is available in the following location: <installation folder of Historian>\GE Digital\<collector name>. For information, refer to Creating Offline Configuration XML file.
winUserName The username to connect to the machine on which Historian Administrator is installed. A value is required only if:
  • You want to use Historian Administrator to specify the tags for data collection.
  • Historian security groups are used.
  • The mode is set to 2.
winPassword The password to connect to the machine on which Historian Administrator is installed. A value is required only if:
  • You want to use Historian Administrator to specify the tags for data collection.
  • Historian security groups are used.
  • The mode is set to 2.
CollectorSystemName The name of the machine on which you have installed the collectors. A value is required.
InterfaceName The interface name of the collector instance. A value is required and must be unique per destination. The following characters are not allowed in the interface name:
  • < (less than)
  • > (greater than)
  • : (colon)
  • " (double quote)
  • / (forward slash)
  • \ (backslash)
  • | (vertical bar or pipe)
  • ? (question mark)
  • * (asterisk)
InterfaceDescription The description of the collector instance.
InterfaceSubType The subtype of the collector. For information, refer to Collector Type and Subtype.
Type The type of the collector. For information, refer to Collector Type and Subtype. A value is required.
DataPathDirectory The folder in which you want to store the collector log files. If you do not enter a value, by default, C:\\Proficy Historian Data is considered.
mode Identifies whether creating the collector instance requires a specific user account credentials. Enter one of the following values:
  • 1: Creates the collector instance with the credentials of the local user.
  • 2: Creates the collector instance with the credentials of a specific user. If you choose this mode, you must enter values for the winUserName and winPassword parameters.

Installation parameters for an iFIX collector to send data to Historian

{
               "mode": 2,
               "CollectorSystemName": "<host name>",
               "InterfaceDescription": "iFIX collector for unit 1",
               "DataPathDirectory": "C:\\Proficy Historian Data",
               "CollectorDestination": "Historian",
               "winUserName": "<host name>\\<user name>",
               "winPassword": "<password>",
               "InterfaceSubType": "",
              "DestinationHistorianUserName": "<user name>",
               "DestinationHistorianPassword": "<password>",
               "DestinationHistorian": "<host name>",
               "General1": "",
               "General2": "",
               "General3": "FIX",
               "General4": "",
               "General5": "",
               "Type": 1,
               "InterfaceName": "collector_unique_name"
}
Table 2. Destination: Predix TimeSeries
Parameter Description
ClientID The collector when interacting with Predix Time Series. This is equivalent to the username in many authentication schemes. The client must exist in the UAA instance identified by the identity issuer, and the system requires that the timeseries.zones. {ZoneId}.ingest and timeseries.zones.{ZoneId}.query authorities are granted access to the client for the Predix Zone ID specified. Your Predix Time Series administrator can provide this information.
ClientSecret The secret to authenticate the collector. This is equivalent to the password in many authentication schemes.
CloudDestinationAddress The URL of a data streaming endpoint exposed by the Predix Time Series instance to which you want to send data. Typically, it starts with ???wss://???. This value is used as part of the interface name and default tag prefix of the collector. Your Predix Time Series administrator can provide this URL.
CollectorDestination The type of the cloud destination. For Predix TimeSeries, enter Predix.
CollectorSystemName The name of the machine on which you have installed the collectors. A value is required.
DataPathDirectory The folder in which you want to store the collector log files. If you do not enter a value, by default, C:\\Proficy Historian Data is considered.
DatapointAttribute<number> The attributes for each data point whose values you want the collector to collect. You can specify maximum five attributes.
IdentityIssuer The URL of an authentication endpoint for the collector to authenticate itself and acquire necessary credentials to stream to the Predix Time Series. In other words, this is the issuer ID of the UAA instance that you want to use to connect to Predix Time Series. Typically, it starts with https:// and ends with ???/oauth/token???.
InterfaceName The interface name of the collector instance. A value is required and must be unique per destination. The following characters are not allowed in the interface name:
  • < (less than)
  • > (greater than)
  • : (colon)
  • " (double quote)
  • / (forward slash)
  • \ (backslash)
  • | (vertical bar or pipe)
  • ? (question mark)
  • * (asterisk)
InterfaceDescription The description of the collector instance.
InterfaceSubType The subtype of the collector. For information, refer to Collector Type and Subtype.
Proxy Identifies the URL of the proxy server to be used for both the authentication process and for sending data. If the collector is running on a network where proxy servers are used to access web resources outside of the network, then you must provide the proxy server settings. However, it does not affect the proxy server used by Windows when establishing secure connections. As a result, you must still configure the proxy settings for the Windows user account under which the collector service runs.
ProxyUserName The username to connect to the proxy server.
ProxyPassword The password to connect to the proxy server.
Type The type of the collector. For information, refer to Collector Type and Subtype. A value is required.
ZoneID Unique identifier of the instance to which the collector will send data.
winUserName The username to connect to the machine on which Historian Administrator is installed. A value is required only if:
  • You want to use Historian Administrator to specify the tags for data collection.
  • Historian security groups are used.
  • The mode is set to 2.
winPassword The password to connect to the machine on which Historian Administrator is installed. A value is required only if:
  • You want to use Historian Administrator to specify the tags for data collection.
  • Historian security groups are used.
  • The mode is set to 2.
mode Identifies whether creating the collector instance requires a specific user account credentials. Enter one of the following values:
  • 1: Creates the collector instance with the credentials of the local user.
  • 2: Creates the collector instance with the credentials of a specific user. If you choose this mode, you must enter values for the winUserName and winPassword parameters.

Installation parameters for an iFIX collector to send data to Predix TimeSeries

{
                "ClientID": "HistQA",
                "ClientSecret": "1234",
                "CloudDestinationAddress": "wss://abcd.run.123.predix.io/v1/stream/messages",
                "CollectorDestination": "Predix",
                "CollectorSystemName": "<host name>",
                "DataPathDirectory": "C:\\Proficy Historian Data",
                "DatapointAttribute1": "attribute1",
                "DatapointAttribute2": "",
                "DatapointAttribute3": "",
                "DatapointAttribute4": "",
                "DatapointAttribute5": "",
                "DestinationHistorian": "<host name>",
                "General1": "",
                "General2": "",
                "General3": "abc",
                "General4": "",
                "General5": "",
                "IdentityIssuer": "https://1234567.predix-uaa.run.aws-usw02-pr.ice.predix.io/oauth/token",
                "InterfaceDescription": "1234",
                "InterfaceName": "123",
                "InterfaceSubType": "",
                "Proxy": "http://<host name>:<port number>",
                "ProxyPassword": "",
                "ProxyUserName": "",
                "Type": 1,
                "ZoneID": "123-456-789de-rft",
                "winPassword": "",
                "winUserName": "",
                "mode": 1
}
Table 3. Destination: MQTT
Parameter Description
ClientID The name of the MQTT client. A value is required and must be unique for an MQTT broker.
CollectorDestination The type of the cloud destination. For MQTT, enter MQTT.
CollectorSystemName The name of the machine on which you have installed the collectors. A value is required.
DataPathDirectory The folder in which you want to store the collector log files. If you do not enter a value, by default, C:\\Proficy Historian Data is considered.
DeviceSharedKey The device shared key of the MQTT broker.
HostAddress The host name of the MQTT broker to which you want the collector to send data. A value is required.
HostPort The port number to connect to the MQTT broker to which you want the collector to send data.
InterfaceName The interface name of the collector instance. A value is required and must be unique per destination. The following characters are not allowed in the interface name:
  • < (less than)
  • > (greater than)
  • : (colon)
  • " (double quote)
  • / (forward slash)
  • \ (backslash)
  • | (vertical bar or pipe)
  • ? (question mark)
  • * (asterisk)
InterfaceDescription The description of the collector instance.
InterfaceSubType The subtype of the collector. For information, refer to Collector Type and Subtype.
MQTTAutoRefresh Indicates that the password is automatically generated on expiry; you are not required to provide the password.
MQTTCloudSubtype The subtype of the MQTT broker.
MQTTUserName Enter the username to connect to the MQTT broker.
MQTTPassword Enter the password to connect to the MQTT broker.
Topic The MQTT topic to which you want the collector to publish data.
Type The type of the collector. For information, refer to Collector Type and Subtype. A value is required.
winUserName The username to connect to the machine on which Historian Administrator is installed. A value is required only if:
  • You want to use Historian Administrator to specify the tags for data collection.
  • Historian security groups are used.
  • The mode is set to 2.
winPassword The password to connect to the machine on which Historian Administrator is installed. A value is required only if:
  • You want to use Historian Administrator to specify the tags for data collection.
  • Historian security groups are used.
  • The mode is set to 2.
mode Identifies whether creating the collector instance requires a specific user account credentials. Enter one of the following values:
  • 1: Creates the collector instance with the credentials of the local user.
  • 2: Creates the collector instance with the credentials of a specific user. If you choose this mode, you must enter values for the winUserName and winPassword parameters.
Tip: To establish an MQTT connection with Alibaba Cloud, refer to https://www.alibabacloud.com/help/doc-detail/73742.htm. To generate a password to connect to Alibaba Cloud, use the utility located here.

Installation parameters for an iFIX collector to send data to Google Cloud

{
               "InterfaceName": "<unique collector name>",
               "InterfaceDescription": "collector for unit 3",
               "Type": 1,
               "mode": 2,
               "CollectorSystemName": "<host name>",
               "DataPathDirectory": "C:\\Proficy Historian Data",
               "CollectorDestination": "MQTT",
               "HostAddress": "mqtt.googleapis.com",
               "HostPort": "8883",
               "ClientID": "projects/mygcpproject/locations/asia-east1/registries/testmqttgcpiot/devices/testdevice",
               "Topic": "/devices/gcptesting/events",
               "DeviceSharedKey": "",
               "MQTTCloudSubtype": "GOOGLE",
               "MQTTUserName": "testusername",
               "MQTTPassword": "testGoogleConnectiionstringPassword",
               "MQTTAutoRefresh": "NO",
               "MQTTCAFile": "",
               "MQTTCertificateFile": "",
               "MQTTPrivateKeyFile": "",
               "MQTTPublicKeyFile": "",
               "winUserName": "<host name>\\Admin",
               "winPassword": "<password>",
               "InterfaceSubType": "",
               "DestinationHistorianUserName": "<Windows user name of the destination>",
               "DestinationHistorianPassword": "<Windows password of the destination>",
               "DestinationHistorian": "<host name>",
               "General1": "",
               "General2": "",
               "General3": "FIX",
               "General4": "",
               "General5": ""
}
Table 4. Destination: Azure IoT Hub
Parameter Description
CollectorDestination The type of the cloud destination. For Azure IoT Hub, enter Azure.
CollectorSystemName The name of the machine on which you have installed the collectors. A value is required.
DataPathDirectory The folder in which you want to store the collector log files. If you do not enter a value, by default, C:\\Proficy Historian Data is considered.
DeviceConnectionString Identifies the Azure IoT device to which you want to send data. Enter a value in the following format: HostName=<value>;DeviceId=<value>;SharedAccessKey=<value>
DeviceId The ID of the Azure IoT device.
SharedAccessKey The shared access key of the device.
InterfaceName The interface name of the collector instance. A value is required and must be unique per destination. The following characters are not allowed in the interface name:
  • < (less than)
  • > (greater than)
  • : (colon)
  • " (double quote)
  • / (forward slash)
  • \ (backslash)
  • | (vertical bar or pipe)
  • ? (question mark)
  • * (asterisk)
InterfaceDescription The description of the interface.
InterfaceSubType The subtype of the collector. For information, refer to Collector Type and Subtype.
Proxy Identifies the URL of the proxy server to be used for both the authentication process and for sending data. If the collector is running on a network where proxy servers are used to access web resources outside of the network, then you must provide the proxy server settings. However, it does not affect the proxy server used by Windows when establishing secure connections. As a result, you must still configure the proxy settings for the Windows user account under which the collector service runs.
ProxyUserName The username to connect to the proxy server.
ProxyPassword The password to connect to the proxy server.
TrasportProtocol The protocol that you want to use to send data to Azure IoT Hub. Enter one of the following values:
  • HTTP
  • MQTT
  • AMQP
  • MQTT_OVER_WEBSOCKETS
  • AMQP_OVER_WEBSOCKETS
For information on which protocol to use, refer to Protocols and Port Numbers.
Type The type of the collector. For information, refer to Collector Type and Subtype. A value is required.
winUserName The username to connect to the machine on which Historian Administrator is installed. A value is required only if:
  • You want to use Historian Administrator to specify the tags for data collection.
  • Historian security groups are used.
  • The mode is set to 2.
winPassword The password to connect to the machine on which Historian Administrator is installed. A value is required only if:
  • You want to use Historian Administrator to specify the tags for data collection.
  • Historian security groups are used.
  • The mode is set to 2.
mode Identifies whether creating the collector instance requires a specific user account credentials. Enter one of the following values:
  • 1: Creates the collector instance with the credentials of the local user.
  • 2: Creates the collector instance with the credentials of a specific user. If you choose this mode, you must enter values for the winUserName and winPassword parameters.

Installation parameters for an iFIX collector to send data to Azure IoT Hub

{
               "InterfaceName": "collector_unique_name",
               "InterfaceDescription": "iFIX collector for unit 2",
               "Type": 1,
               "mode": 2,
               "CollectorSystemName": "<host name>",
               "DataPathDirectory": "C:\\Proficy Historian Data",
               "CollectorDestination": "Azure",
               "DeviceConnectionString": "HostName=abc.azure-devices.net;DeviceId=Device1;SharedAccessKey=xxxxxxxxxx",
               "TransportProtocol": "AMQP_OVER_WEBSOCKETS",
               "Proxy": "<host name>:<port number>",
               "ProxyUserName": "",
               "ProxyPassword": "",
               "winUserName": "<host name>\\<user name>",
               "winPassword": "<password>",
               "InterfaceSubType": "",
              "DestinationHistorianUserName": "<user name>",
               "DestinationHistorianPassword": "<password>",
               "DestinationHistorian": "<host name>",
               "General1": "",
               "General2": "",
               "General3": "FIX",
               "General4": "",
               "General5": ""
}

General Parameters of a Collector

This topic provides a list of general parameters that are applicable to each type of collector.

Collector Type Applicable General Parameters
The Calculation collector
  • General1 - optional. Used for calculation timeout (sec). Default value: 10.
  • General2 - optional. Used for Max Recovery Time (hr). Default value: 4
The Cygnet collector
  • General2 - optional. Used for recovery time (hr). Default value: 0
  • General3 - optional. Used for thread count. Default value: 5
  • General4 - optional. Used for the Cygnet debug mode. Default value: 0
  • General5 - optional. Used for optimization. Default value: 1
The iFIX Alarms and Events collector General1 - optional. Used for ProgId. Default value: Proficy.OPCiFIXAE.1
The iFIX collector
  • General3 - optional
  • General4 - optional. Used for blocks and fields for blocks. Default value: AI:F_CV,B_CUALM
The MQTT collector
  • General1 - required. Used for the source host name.

    General2 - required. Used for the source topic.

    General3 - required. Used for the source port.

The ODBC collector
  • General1 - required. Used for the ODBC server.
  • General2 - required. Used for the ODBC username.
  • General3 - required. Used for the ODBC password.
  • General4 - optional. Used for recovery time (hr). Default value: 0.
  • General5 - optional. Used for throttle (milliseconds). Default value: 100
The OPC Classic Alarms and Events collector General1 - required. Used for the OPC source server progID.
The OPC Classic DA collector General1 - required. Used for the OPC source server progID.
The OPC Classic HDA collector
  • General1 - required. Used for the OPC HDA server.
  • General2 - optional. Used for recovery time (hr). Default value: 24
The OPC UA DA collector
  • General1 - required. Used for the OPC UA server URI.
  • General2 - optional. Used for secured connectivity. Default value: false
  • General3 - optional. Used to enable user security. Default value: false
  • General4 - optional. Used for username when security is enabled.

    General5 - optional. Used for password when security is enabled.

The OSI PI collector
  • General1 - required. Used for the OSI PI server name.
  • General2 - optional. Used for the OSI PI username. Default value: piadmin
  • General3 - optional. Used for the OSI PI password.
  • General4 - optional. Used for max recovery time (hr). Default value: 4
  • General5 - optional. Used for the OSI PI source (archive or snapshot). Default value: Archive.
The OSI PI distributor
  • General1 - optional. Used for the OSI PI server.

    General2 - optional. Used for the OSI PI username. Default value: piadmin

  • General3 - optional. Used for the OSI PI password.
  • General4 - optional. Used for max recovery time (hr). Default value: 4
  • General5 - optional. Used for the OSI PI source (archive or snapshot). Default value: Archive.
The Server-to-Server distributor
  • General1 - optional. Used for calculation timeout (sec). Default value: 10
  • General2 - optional. Used for max recovery time (hr). Default value: 4
  • General3 - required. Used for the source server name
  • General4 - optional. Used for message replication (0 or 1) and alarm replication (0 or 1). Enter 0 or 1 only for alarm replication.
  • General5 - optional. Used for prefix to messages.
The Windows Performance collector None
The Wonderware collector
  • General1 - required. Used for the Wonderware server.
  • General2 - required. Used for the Wonderware username.
  • General3 - required. Used for the Wonderware password.
  • General4 - optional. Used for the recovery time (hr). Default value: 0
  • General5 - optional. Used for Throttle (milliseconds). Default value: 100

Delete a Collector Instance

Before you begin

Stop the collector whose instance you want to delete.

About this task

If you no longer want to use a collector instance to collect data, you can delete it. When you delete a collector instance, the Windows service for the collector, the Registry folder, and the buffer files are deleted as well.

This topic describes how to delete a collector instance using the RemoteCollectorConfigurator utility. You can also delete a collector instance using Configuration Hub. If you want to delete an offline collector, refer to Delete an Offline Collector Instance.

Procedure

  1. If you want to use the Command Prompt window:
    1. Access the installation location of the RemoteCollectorConfigurator utility. By default, it is C:\Program Files\GE Digital\NonWebCollectorInstantiationTool.
    2. Run the following command:
      RemoteCollectorConfigurator.exe "<Destination Historian>" "<Destination Historian username>" 
      "<Destination Historian password>" InterfaceDelete <interface name> ShouldDeleteTags[<0 or 1>]

      You can leave the Historian username and password blank if there are no Historian security user groups.

  2. If you want to use an interactive UI:
    1. Run the RemoteCollectorConfigurator.exe file. By default, it is located in the following folder: C:\Program Files\GE Digital\NonWebCollectorInstantiationTool.
      A list of options to manage collector instances appears.
    2. Connect to the collector machine by entering 1 or 2, depending on whether collectors are installed locally or on a remote machine.
    3. Enter 5.
      You are prompted to enter the interface name of the collector whose instance you want to delete.
    4. Enter the interface name of the collector that you want to delete.
      You are prompted to specify whether you want to delete the tag data as well.
    5. Enter 1 if you want to delete the tag data as well, or enter 0.

Results

The collector instance is deleted.

Add an Offline Collector Instance

About this task

You can use an offline collector to send data directly to a cloud destination (without using a Historian server).

Procedure

  1. Access the installation folder of the RemoteCollectorConfigurator utility. By default, it is C:\Program Files\GE Digital\NonWebCollectorInstantiationTool.
  2. If you want to manually enter the installation parameters and values, run the following command:
    ihCollectorManager_x64.exe InterfaceCreateViaCmd "{\"<parameter>\":\"<value>\",
    \"<parameter>\":\"<value>\"}"
    If you want to use a JSON file containing the installation parameters and values, run the following command:
    ihCollectorManager_x64.exe InterfaceCreateViaFile "<path to the JSON file>"
    Instead of manually creating the JSON file, you can use the RemoteCollectorConfigurator utility to generate it automatically.
    For information on the parameters, refer to Collector Instance Parameters.

Delete an Offline Collector Instance

About this task

This topic describes how to delete an offline collector instance using the RemoteCollectorConfigurator utility.
Note: When you delete an offline collector instance, the corresponding configuration file is not deleted. However, if another collector instance of the same interface name is created, the existing configuration file is replaced by a template configuration file.

Procedure

  1. Access the installation folder of the RemoteCollectorConfigurator utility. By default, it is C:\Program Files\GE Digital\NonWebCollectorInstantiationTool.
  2. Run the RemoteCollectorConfigurator.exe file. By default, it is located in the following folder: .
  3. Run the following command:
    ihCollectorManager_x64.exe InterfaceDelete <interface name>

Manage a Collector Remotely

Before you begin

  1. Ensure that the Historian server connected to the collectors that you want to manage is upgraded to Historian 8.1.
  2. Install Remote Management Agents.
    Note: Remote Collector Management will be installed as part of this installation.
  3. Ensure that the Windows Task Scheduler service is running. This service is required to manage collectors in the command line mode. You can check the status of this service in the Microsoft Services Management console.
  4. If you want to manage the iFIX collectors remotely, access the SCU - FIX window, and modify the task configuration such that the value in the Command Line field is NOSERVICE.

Procedure

Perform any of the following tasks using Configuration Hub:
Note: You can also perform these tasks using REST APIs.