 Historian
iFIX Collector
iFIX Data Collectors
Use this collector to collect data from an iFIX system. Several components of Historian, such as the iFIX Data Collectors, are designed to work with iFIX. The iFIX Data Collectors use the Easy Data Access (EDA) protocol to retrieve data from a running iFIX system.
- The iFIX collector
- The iFIX Alarms & Events collector
About Adding an iFIX Collector Instance Using Configuration Hub
| iFIX Running Mode | Recommended Configuration for the iFIX Collector | Collector Behaviour After You Add the Collector Instance |
|---|---|---|
|
iFIX is running in a service mode, and is secured. The iFIX Alarms and Events and the OPC Alarms and Events Servers are running as service. |
Configure the iFIX collector services under a user account under which iFIX is running as a service. While adding an instance of the iFIX collector or the iFIX Alarms and Events collector using Configuration Hub, select Service Under Specific User Account. |
|
|
iFIX is running as a service, and is not secured. The iFIX Alarms and Events and the OPC Alarms and Events servers are running as service. |
You can configure the iFIX collector service using a local system account or a specific user account. |
|
| iFIX is not running as a service mode, and is secured. | Configure the iFIX collector services under a user account that is added in the IFIXUSERS group. Do not configure as a local system service. While adding an instance of the iFIX collector or the iFIX Alarms and Events collector using Configuration Hub, select Service Under Specific User Account. |
|
| iFIX is not running as a service mode, and is not secured. | You can configure the iFIX collector service using a local system account or a specific user account. |
|
| iFIX is not running. | You can configure the iFIX collector service using a local system account or a specific user account, as per the security configuration of iFIX. |
|
Starting an iFIX Collector Instance
- Using iFIX SCU: Add the collector to the iFIX System Configuration (SCU)
startup list. The collector then starts automatically whenever you start iFIX.
This is the preferred way of starting the collector.
- To run the default iFIX collector instances (the ones created during the
installation of collectors), set the task parameters to
runasdosas shown in the following image.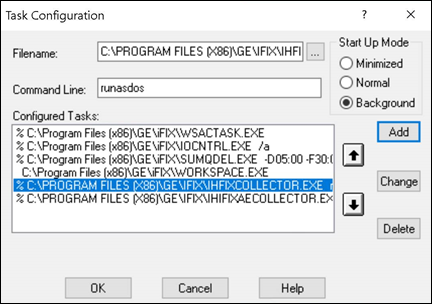
- To run additional instances of the iFIX collectors, set the task
parameters to
NOSERVICE
                                REG=<<CollectorInterfaceName>>
, as shown in the following image for a collector with the interface name win2019dj2_iFix_1.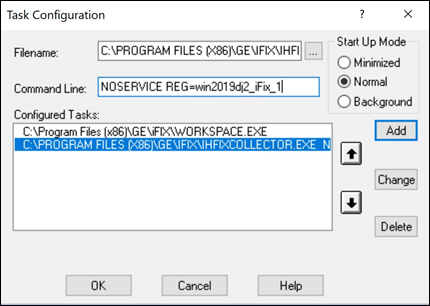 Note: To find out the collector interface name:
- If you have added the iFIX collector using Configuration Hub, the interface name is displayed in the COLLECTOR NAME column in the Collectors section.
- If you have added the iFIX collector using the RemoteCollectorConfigurator utility, the interface name is the value that you have provided for the InterfaceName parameter while adding the collector instance.
- To run the default iFIX collector instances (the ones created during the
installation of collectors), set the task parameters to
- As a console application: From the Windows Start menu, select . Similarly, to start an iFIX Alarms and Events collector, select .
- Using Configuration Hub: You can start collector instances and manage them using Configuration Hub. For information on the expected behavior and recommended configuration of the iFIX collectors based on the running mode of iFIX, refer to About Adding an iFIX Collector Instance Using Configuration Hub.
Upgrading the iFIX Collectors
Before you upgrade the iFIX collectors, back up the collector registry folders. This is because the custom, user-added Registry folders are not retained after you upgrade.
When you upgrade the iFIX collector and the iFIX Alarms and Events collectors, services are created for instances created by the installer in the previous version.
If an iFIX collector instance created in version 9.0 exists, after you upgrade collectors, another instance of the iFIX collector is created. Because of this, the Remote Collector Manager (RCM) will not work correctly. Therefore, if you want to use RCM, you must delete one of the instances. If needed, you can manually create another instance of the iFIX collector using Configuration Hub or the RemoteCollectorConfigurator utility. This is applicable to the iFIX Alarms and Events collector as well.
After upgrading an iFIX collector, if you cannot manage iFIX services using Configuration Hub, refer to Troubleshooting Remote Collector Management Issues.
Summary of iFIX collector Features
The following table outlines the features of the iFIX collectors.
| Feature | Capability |
|---|---|
| Browse Source For Tags | Yes |
| Browse Source For Tag Attributes | Yes |
| Polled Collection | Yes |
| Minimum Poll Interval | 100 ms |
| Unsolicited Collection | No |
| Timestamp Resolution | milliseconds or seconds |
| Accept Device Timestamps | Yes |
| Floating Point Data | Yes |
| Integer Data | Yes |
| String Data | Yes |
| Binary Data | Yes |
| Python Expression Tags | Yes |
Supported Tag Attributes
The following table outlines the tag attributes available when browsing.
| Attribute | Capability |
|---|---|
| Tagname | Yes |
| Source Address | Yes |
| Engineering Unit Description | Yes |
| Data Type | Yes |
| Hi Engineering Units | Yes |
| Lo Engineering Units | Yes |
| Hi Scale | No |
| Lo Scale | No |
| Is Array Tag | Yes |
- While you can query some of these attributes by browsing, they are not shown in the browse interface. These attributes are used when adding a tag, but whether all attributes come from the server or not is not visible to you.
- Although some of the status output attributes are not supported for an iFIX Alarms and Events collector, they still appear when you browse.
The Configuration Section for iFIX collectors
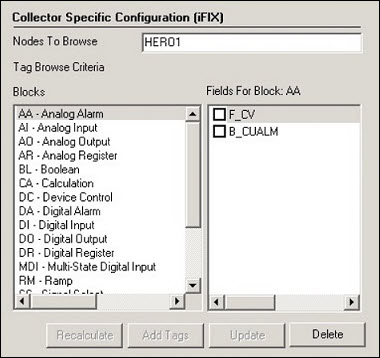
Collector-Specific Configuration (iFIX)
The Configuration section displays the following information.
| Field | Description |
|---|---|
| Node Browse Criteria |
Displays the mask used to select tags when performing a browse of collector node. The default is the iFIX SCADA or Client node name on which you installed the collector. If you want to browse for tags on other iFIX nodes via FIX networking, you can enter the other node name(s) here, separated by commas with no spaces. You must have the iFIX system configured for networking. For more information, refer to the iFIX product documentation on iFIX networking. Note: If you have modified iFIX node name, then you must also update the Nodes to Browse list before browsing tags from the iFIX collector.
When you browse multiple nodes for tags to add to an iFIX collector, do not use space characters between node names or between the required comma and next node name. All characters after the space are ignored. |
| Tag Browse Criteria |
See Selecting Tag Browsing Criteria for more information. Note: If you need to add block or field types to the list, edit the
FixTag.dat file for Historian Administrator you are using. See Editing FixTag.dat File for more information. |
Selecting Tag Browsing Criteria
About this task
To select tag browsing criteria:
Procedure
Editing FixTag.dat File
Overview
The most common block and field types are included in the default FixTags.dat file. You can edit this file to add or remove block and field types. The FixTags.dat file is an XML (eXtensible Markup Language) file. You can edit it with either a text editor like Notepad or with a third-party XML editing tool.
For Historian Non-Web Administrators, the FixTag.dat file is typically located in the Program Files\Proficy\Historian\NonWebAdmin directory of each individual Historian Non-Web Administrator client. Changes you make to the file apply only to that specific client and are not global to all Historian Non-Web Administrator clients
Because changes made to one FixTag.dat file are not automatically duplicated in other FixTags.dat files, it is recommended that you set up a standard procedure to ensure that all such files track changes made in any single file. One suggested method is to keep a master copy. To make a change, edit the master copy, deploy the changed file, and test it. If the change provides the desired effect, copy the new file to the non-web Historian Administrator directories, and save the new file as the master backup copy. All Administrators will then be using the same set of block and field types.
The FixTags.dat file has two main sections. The first section lists the configured FIX database block types and their descriptions. The second section lists field extensions for each of the block types defined in the first section. In addition, the second section also has an entry called Selected, which can be either True or False. This is used by Historian Administrator to indicate whether or not that block and field extension combination are included in a browse.
<XML ID="dsoTags"><MYLIST>..<ONEITEM> <VALUE>DI</VALUE> <DATA>DI Digital Input</DATA></ONEITEM>.
.</MYLIST></XML>
<XML ID="DI"><MYLIST> <ONEITEM> <VALUE>F_CV</VALUE> <DATA>F_CV</DATA> <SELECTED>False</SELECTED> </ONEITEM>
 <ONEITEM> <VALUE>B_CUALM</VALUE> <DATA>B_CUALM</DATA> <SELECTED>False</SELECTED> </ONEITEM></MYLIST></XML>
To Add a Field Extension to an Existing Block Type Using Notepad
- In the FixTag.dat file, locate the entry that starts with <XML ID = "**">, where ** is the block name (such as AA, AI, DI, etc).
- Copy one of the existing <ONEITEM>...</ONEITEM> blocks of text and edit it for your new field. Each field extension is contained in a block of text contained within the text: <ONEITEM>...</ONEITEM>.
There are two entries <VALUE> and <DATA>
which comprise the new field extension to be added, and a
<SELECTED> section, which is either True or
False, depending on whether or not you want the item to be
included in the browse.
True and False states change, depending on
your selection in Historian Administrator.An example for the Digital Input (DI) tag is shown below, where we have added the
A_ALMLASTTIME field, which identifies the last time the block
went into alarm.
<XML ID="DI"><MYLIST> <ONEITEM> <VALUE>F_CV</VALUE> <DATA>F_CV</DATA> <SELECTED>False</SELECTED> </ONEITEM>
<ONEITEM> <VALUE>A_ALMLASTTIME </VALUE> <DATA>A_ALMLASTTIME </DATA> <SELECTED>False</SELECTED> </ONEITEM>
<ONEITEM> <VALUE>B_CUALM</VALUE> <DATA>B_CUALM</DATA> <SELECTED>False</SELECTED> </ONEITEM></MYLIST>- Within the
<XML ID="dsoTags">and<MYLIST>sections, add a new<ONEITEM>entry with the tag name and description. There are two entries,<VALUE>and<DATA>,which will be the new tag name (AA, AI, DI, etc.) to be added and the tag description (e.g., AA Analog Alarm) that will be displayed in Historian Administrator. - Create the fields that will be available for the tag. This is similar to
modifying the field extensions discussed above, but in this case you must
create the
<XML ID = "**">structure (where**is your tag name.) Again, this is most easily performed by copying and pasting an existingXML IDstructure and modifying it for the new tag.Note: TheXML IDsection MUST be placed before the last three lines of the file:</MYLIST> </XML> </BlockList>
Configuration of iFIX Data Collector-Specific Fields
Adding a Historian tag with the selected database block source address allows you to collect the history of the collector's events per minute. This is very useful for troubleshooting and optimization analysis. The following table outlines the iFIX Data Collector-specific fields.
| Field | Description |
|---|---|
| Rate Output Address |
NTF in the iFIX database into which the collector writes the current value of the events/minute output, letting an operator or the HMI/SCADA application know the performance of the collector. Use an iFIX tag for the output address. Enter the address as This value displays the same statistic as the Report Rate field of the iFIX Data Collector in the System Statistics page of Historian Administrator. |
| Status Output Address |
NTF in the iFIX database into which the collector writes the current value of the collector status (for example, running) output, letting an operator or the HMI/SCADA application know the current status of the collector. This address should be connected to a writable text field of at least 8 characters. This value is only updated upon a change in status of the collector Use an iFIX tag for the output address. Enter the address as The text string usually displays either |
| Heartbeat Output Address |
Address in the source database into which the collector writes the heartbeat signal output. This address should be connected to a writable analog field. Use an iFIX tag for the output address. Enter the address as The iFIX Data Collector writes a value of 1 to this location every 60 seconds while it is running. Many applications use a heartbeat to indicate when something has stopped. For example, you could program the iFIX database to generate an alarm if the heartbeat output address is not written to once every 60 seconds notifying you that the iFIX Data Collector has stopped. |
Adding a Historian tag with the selected database block source address allows you to collect the history of the collector's events per minute. This is very useful for troubleshooting and optimization analysis.
Example: Restarting the iFIX Collector Using a Heartbeat
Many applications commonly use a heartbeat to indicate when a program stops. If you want to use a heartbeat with the iFIX collector, you need to configure it through Historian Administrator and the iFIX Database Manager.
In the iFIX Database Manager, configure this address to an Analog Output (AO) block and use a separate Program (PG) block to check the status of the collector heartbeat output and restart the collector if it stopped. Then, in Historian Administrator, define a Heartbeat Output Address on the Advanced section of the Collector Maintenance page for the specified iFIX collector
Once configured and started, the Historian iFIX collector sends a value of 1 to the specified Heartbeat Output Address every 60 seconds. If that heartbeat value is not sent, then iFIX detects this status and restarts the iFIX collector.
If your iFIX database PDB is quite large, you may need to increase the Delay Collection at Startup field on the Advanced section of the Collector Maintenance page in Historian Administrator. Doing so prevents excessive collector log entries if Historian cannot obtain a value before it initializes the source address.
In this example, an iFIX collector runs on NODE1 and the heartbeat output address is NODE1.HOA_2.F_ CV. We create an Analog Output Block is named HOA_2 and the Program block is named HB_HOA_1 in a new iFIX database. There are two parts to this example: configuration in iFIX and then Historian Administrator.
Part A: Configuration in iFIX
- Start iFIX.
- From the iFIX WorkSpace, open the Database Manager.
- Select New from the Database menu.
- Select Add from the Block menu. The Select Block Type window appears.
- Select AO and select OK. The Analog Output window appears.
- Enter
HOA_2as the Tag Name and select Save. - Select Add from the Block menu. The Select Block Type window appears.
- Select PG and select OK. The Program window appears.
- Enter
HB_HOA_1as the Tag Name for the block. - (Optional) Enter a description for the tag name.
- Enter the programming statements shown in the following figure for lines 0
through 8.

- Enter the programming statements shown in the following figure for lines 0 through 8.
- Select Save. A message box appears asking you if you want to put the block on scan.
- Select No.
- Select Reload from the Database menu in the iFIX Database Manager. The Reload window appears
- Select the database you currently have loaded and select Reload. A message box appears to confirm the reload.
- Select Yes to continue.
In about a minute, you should notice the iFIX collector start. The status of the Collector should change on the Collector Maintenance page of Historian Administrator.
Part B: Configuration in Historian Administrator
- From Historian Administrator, select on the Collector Maintenance page.
- Select the iFIX collector.
- Select Advanced.
- Enter
NODE1.HOA_2.F_CVin the Heartbeat Output Address field as shown in the following figure.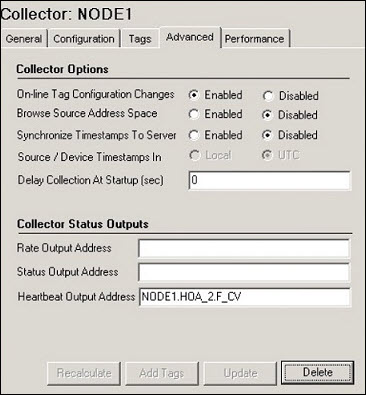
- Select Update.
Using an STK with the iFIX collector
To collect or browse tags with the iFIX collector when you use a system toolkit (STK) or Direct Driver Access (DDA) driver, which is also an STK, you need to edit the Fixtag.dat file to include the block types and field types for the STK. If you use a STK, there is no way to determine which block types the STK loads. Contact your STK vendor for more information.
Example: Using the BR3 STK
The Bristol Babcock BR3 driver uses the 160, 161, 162, and 163 block types. The
following example shows how to add a TYPE_160 block type with three
field types (F_CV, F_160, and
F_XMITCNT) for the BR3. For each new block type that you add,
you need to follow the steps outlined in this example. So, if you want to add new
block types for the 161, 162, and 163, you must repeat the steps outlined in this
example.
- Adding a New Block Type
-
Within the
<XML ID="dsoTags">and<MYLIST>sections of theFixtag.datfile, add a new<ONEITEM>entry for the new block type that you want to display in Historian Administrator. Enter the item name in the<VALUE>field and a description in the<DATA>field.The following XML code shows what a TYPE_160 entry for the BR3 might look like in the first portion of the Fixtag.dat file.
<ONEITEM> <VALUE>TYPE_160</VALUE> <DATA>The 160</DATA> </ONEITEM> - Adding Field Types for a New Block Type
-
At the end of the
Fixtag.datfile, before the</BlockList>tag, add field types for each new block type that you want to add for the BR3 driver. Each field type is contained in a block of text that starts and ends with these tags:<ONEITEM> . . . </ONEITEM>. You must enter three values,<VALUE>,<DATA>, and<SELECTED>for each field type that you want to display in Historian Administrator for the specified block type.The
<VALUE>and<DATA>tags include the new field type you want to add. The<SELECTED>tag contains either the wordTrueorFalse, depending on whether or not you want the item to be included in the browse. TheTrueandFalsestates will change, however, depending on your selection in Historian Administrator.The following XML code shows an example of three field types,
F_CV,F_160, andF_XMITCNT, added for theTYPE_160block type created for the BR3.<XML ID="TYPE_160"> <MYLIST> <ONEITEM> <VALUE>F_CV</VALUE> <DATA>F_CV</DATA> <SELECTED>False</SELECTED> </ONEITEM> <ONEITEM> <VALUE>F_160</VALUE> <DATA>F_160</DATA> <SELECTED>False</SELECTED> </ONEITEM> <ONEITEM> <VALUE>F_XMITCNT</VALUE> <DATA></DATA> <SELECTED>False</SELECTED> </ONEITEM> </MYLIST> </XML>After you add the block types and item types to the
Fixtag.datfile and save the file, you can view them in Historian Administrator program.


