Managing Collectors

About Installing and Managing Collectors Remotely

Many Historian users use collectors to collect data from data sources or servers. Typically, these collectors are distributed geographically, and so, accessing them can be challenging and not cost-effective. To overcome this challenge, Historian provides the Remote Collector Management agent, using which you can manage collectors remotely.

Advantages of using the Remote Collector Management agent:
  • Accessing a collector machine physically to manage the collector is no longer required.
  • Security is enabled. That is, only members of the iH Security Admins, iH Tag Admins, and the iH Collector Admins security groups can manage the collectors remotely.
  • Works with the older versions of collectors as well (V5.5 and later).

Features

Workflow

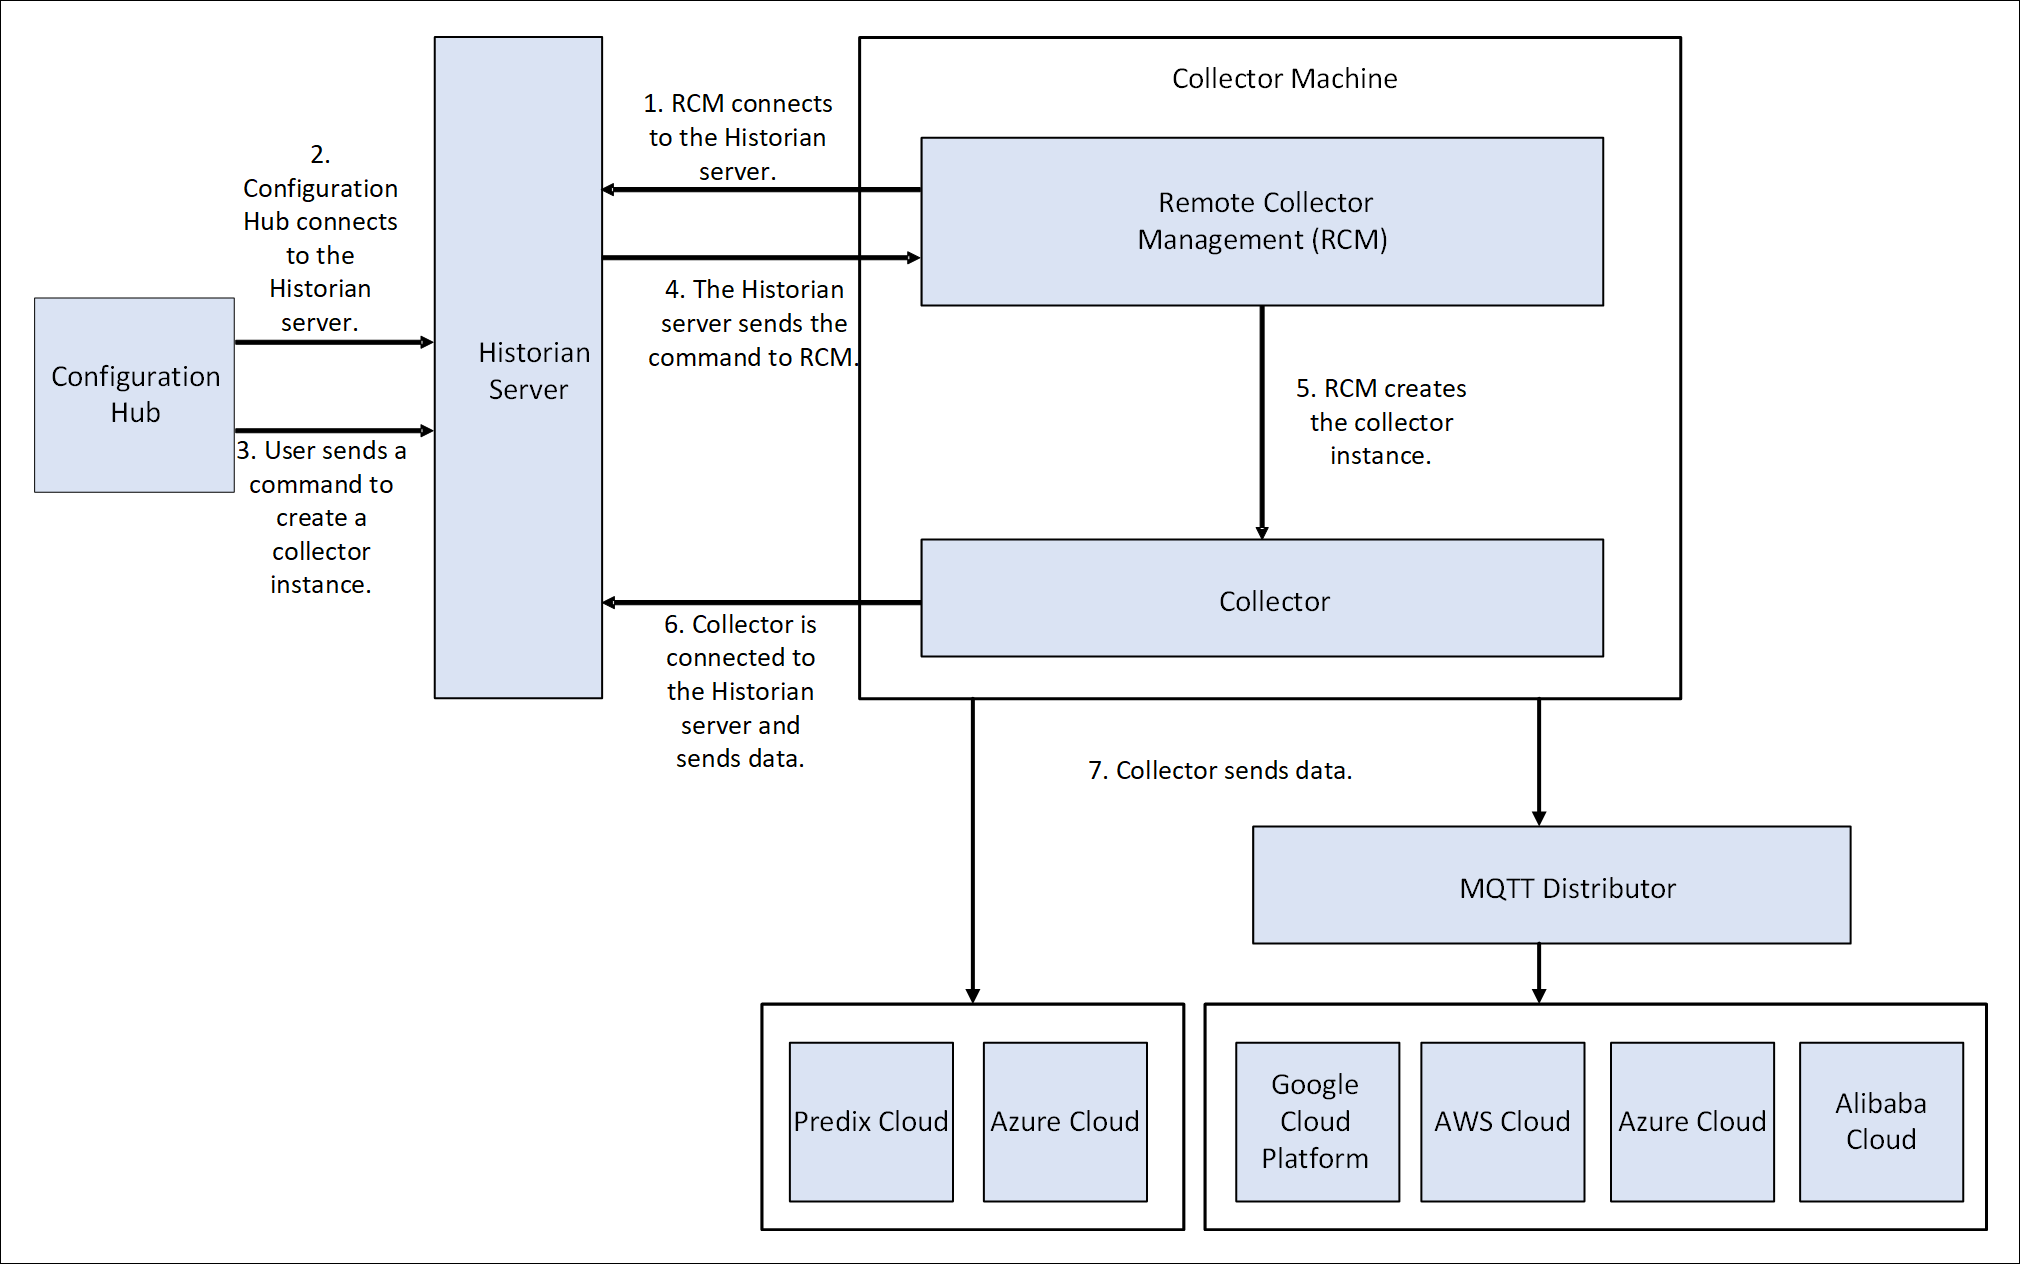
The following diagram provides the workflow of Remote Collector Management when creating a collector instance. After the collector instance is created, the collector sends data to the configured destination. The green lines indicate the initial, one-time steps. The red lines indicate the steps performed every time you want to manage the collector remotely.

Limitations
  • After installing Remote Management Agent, if you install a new collector, you must manually start it for the first time. This is to establish a connection between the collector and the Remote Collector Management agent. From the next time, you can manage the collector remotely.

Start a Collector

About this task

You can run a collector using one of the following options:
  • Service - Local System Account: Select this option if you want to start the collector as a Windows service using the credentials of the local user (that is, the currently logged-in user). If you select this option, the USERNAME and PASSWORD fields are disabled.
  • Service Under Specific User Account: Select this option if you want to start the collector as a Windows service using a specific user account. If you select this option, you must enter values in the USERNAME and PASSWORD fields.

Procedure

  1. Access the system linked to the collector that you want to start.
  2. Select Collectors.
    A list of collectors linked to the system appears.
  3. Select the row containing the collector that you want to start.
  4. Select Actions, and then Start.
    The Start: <collector name> window appears.
  5. Provide values as described in the following table.
    Field Description
    RUNNING MODE Select one of the following options:
    • Service - Local System Account: Select this option if you want to start the collector as a Windows service using the credentials of the local user (that is, the currently logged-in user). If you select this option, the USERNAME and PASSWORD fields are disabled.
    • Service Under Specific User Account: Select this option if you want to start the collector as a Windows service using a specific user account. If you select this option, you must enter values in the USERNAME and PASSWORD fields.
    Username Enter the username of the Windows user who can run the collector. A value is required if you have selected Service Under Specific User Account for the running mode.
    Password Enter the password of the Windows user who can run the collector. A value is required if you have selected Service Under Specific User Account for the running mode.
  6. Select Start.
    The collector is started, and the data collection begins. The status of the collector in the Collectors section changes to Starting and then to Running. If, however, the connection fails, the status changes to Unknown.
    Note: If auto-refresh is not enabled, refresh the collector manually.

Stop a Collector

About this task

When you stop a collector, the collector stops collecting data, and it is disconnected from the destination. If, however, you want the collector to remain connected to the destination, you can instead pause data collection.

Procedure

  1. Access the system linked to the collector that you want to stop.
  2. Select Collectors.
    A list of collectors linked to the system appears.
  3. Select the row containing the collector that you want to stop.
  4. Select Actions, and then Stop.
    The Stop: <collector name> window appears. The COLLECTOR MACHINE and CURRENT RUNNING MODE fields are populated and disabled.
  5. If the collector is running in a Windows service mode, select Stop. If the collector is running in a command-line mode, enter values in the Username and Password fields, and then select Stop.
    The collector is stopped, and the data collection is paused. The status of the collector in the Collectors section changes to Stopped.

Restart a Collector

About this task

You can restart a collector to stop and start it again. You can restart a collector only if it is running.

Procedure

  1. Access the system linked to the collector that you want to restart.
  2. Select Collectors.
    A list of collectors linked to the system appears.
  3. Select the row containing the collector that you want to restart.
  4. Select Actions, and then Restart.
    The Restart: <collector name> window appears.
  5. If the collector is running in the Windows service mode, select Restart. If the collector is running in the command-line mode, enter values in the Username and Password fields, and then select Restart.
    The collector is restarted, and the data collection is resumed.

Pause Data Collection

About this task

When you pause data collection, the collector stops collecting the data. However, the collector is still connected to the destination. If you want to disconnect the collector from the destination, stop the collector.
Note: You cannot pause the data collection of an offline collector.

Procedure

  1. Access the system linked to the collector whose data collection you want to pause.
  2. Select Collectors.
    A list of collectors linked to the system appears.
  3. Select the row containing collector whose data collection you want to pause.
  4. Select Actions, and then Pause Data Collection.
    A message appears, asking you to confirm whether you want to pause data collection.
  5. Select Pause.
    The data collection is paused, and the collector is stopped.

Resume the Data Collection of a Collector

Procedure

  1. Access the system linked to the collector whose data collection you want to resume.
  2. Select Collectors.
    A list of collectors linked to the system appears.
  3. Select the row containing the collector whose data collection you want to resume.
  4. Select Actions, and then Resume Data Collection.
    A message appears, asking you to confirm whether you want to resume data collection.
  5. Select Resume.
    The collector is started, and the data collection is resumed.

Delete the Buffer Files of a Collector

About this task

When you delete buffer files, the collector is stopped, and after the buffer files are deleted, it is restarted .

Procedure

  1. Access the system linked to the collector whose buffer files you want to clear.
  2. Select Collectors.
    A list of collectors linked to the system appears.
  3. Select the row containing the collector whose buffer files you want to clear.
  4. Select Actions, and then Clear Buffer.
    A message appears, asking you to confirm that you want to clear the buffer files.
  5. Select Clear.
    The Clear Buffer: <collector name> window appears.
  6. If the collector is running in the Windows service mode, select Clear. If the collector is running in the command-line mode with a specific user account, enter values in the Username and Password fields, and then select Clear.
    The buffer files of the collector are deleted.

Move the Buffer Files of the Collector

About this task

We recommend that you move the buffer files to a new folder within the same drive. You cannot move files to a folder on a network shared drive.

When you move buffer files, the collector is stopped, and after the buffer files are moved, it is restarted .

Procedure

  1. Access the system linked to the collector whose buffer files you want to move to a different folder.
  2. Select Collectors.
    A list of collectors linked to the system appears.
  3. Select the row containing the collector whose buffer files you want to move.
  4. Select Actions, and then Move Buffer.
    The Move Buffer: <collector name> window appears. The CURRENT LOCATION, COLLECTOR MACHINE, and RUNNING MODE fields are populated and disabled.
  5. In the TARGET LOCATION box, enter the path of the folder to which you want to move the buffer files.
  6. If the collector is running in the command-line mode, enter values in the Username and Password fields, and then select Move Buffer.
    The buffer files are moved, and the collector is started.

Change the Destination Server of a Collector

Before you begin

  1. Ensure that Historian is installed on the new destination server to which you want the collector to send data.
  2. Ensure that the collector whose destination server you want to change is running.

Procedure

  1. Access the system linked to the collector that you want to stop.
  2. Select Collectors.
    A list of collectors linked to the system appears.
  3. Select the row containing the collector whose destination server you want to change.
  4. Select Actions, and then Change Destination Server.
    The Change Destination Server: <collector name> window appears. The COLLECTOR MACHINE, CURRENT RUNNING MODE, and CURRENT DESTINATION SERVER fields are populated and disabled.
  5. In the NEW RUNNING MODE field, select one of the following options:
    • Service Under Local System Account: Select this option if you want to start the collector as a Windows service using the credentials of the local user (that is, the currently logged-in user). If you select this option, the Username and Password fields are disabled.
    • Service Under Specific User Account Select this option if you want to start the collector as a Windows service using a specific user account. If you select this option, you must enter values in the Username and Password fields.
  6. In the NEW DESTINATION SERVER field, enter the computer name of the new destination server to which you want the collector to send data.
  7. In the Username and Password fields, enter the credentials to access the new destination server.
  8. Select Change Server.
    The destination server of the collector is changed, and the collector is stopped.

What to do next

  1. Update the network message compression of the collector by modifying the collector instance using Configuration Hub.
  2. Reconfigure the collector properties using Historian Administrator.
  3. Restart the collector.