 Historian
Managing Collector Instances
About Managing Collector Instances Using Configuration Hub
Collectors are used to collect data from various sources and send it to Historian. For a list of collectors and their usage, refer to About Historian Data Collectors.
- Executable files: These files are required to add a collector instance.
- Instances of the following collectors:
- The iFIX collector
- The iFIX Alarms & Events collector
- The OPC Classic Data Access collector for CIMPLICITY
- The OPC Classic Alarms and Events collector for CIMPLICITY
- The Remote Collector Management agent: Provides the ability to manage collectors remotely.
Send Data to a Historian Server
Before you begin
- Install collectors.
- For an iFIX collector, ensure that iFIX is running in a Windows-service mode. For more information, refer to About Adding an iFIX Collector Instance Using Configuration Hub.
- If the destination of a collector is an Azure IoT Hub device, ensure that the device is running.
This topic describes how to add a collector instance and send data to a on-premises Historian server using Configuration Hub. You can also add a collector instance using the RemoteCollectorConfigurator utility, which does not require you to install Web-based Clients.
Procedure
-
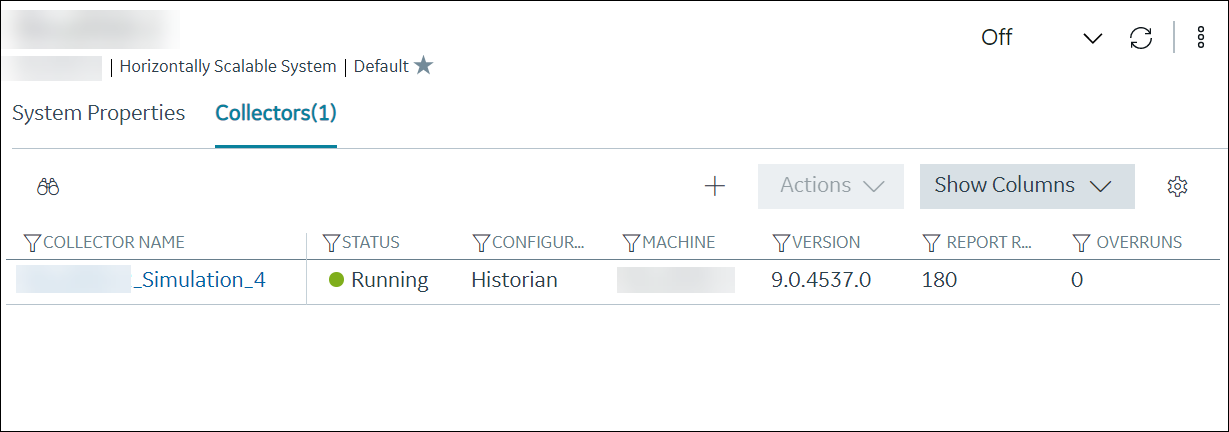
Select Collectors.
A list of collectors in the system appears.
-
Select
 .
The Add Collector Instance: <system name> window appears, displaying the Collector Selection section. The MACHINE NAME field contains a list of machines on which you have installed collectors.
.
The Add Collector Instance: <system name> window appears, displaying the Collector Selection section. The MACHINE NAME field contains a list of machines on which you have installed collectors.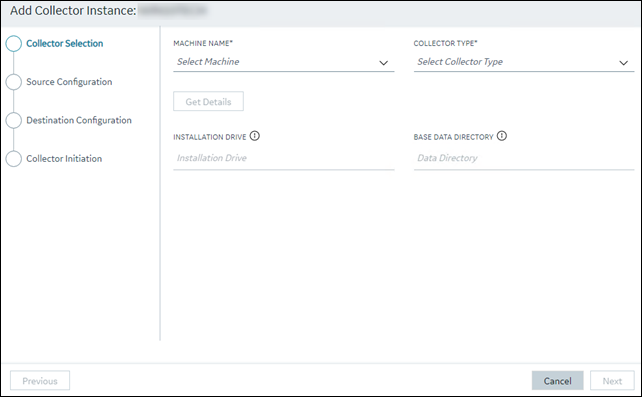
-
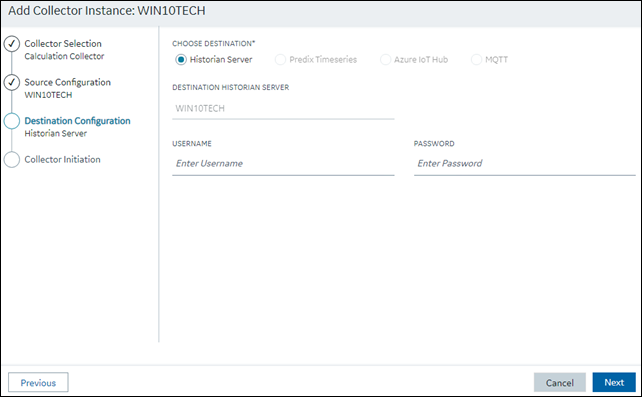
Select Next.
The Destination Configuration section appears. By default, Historian Server is selected, and the DESTINATION HISTORIAN SERVER field is disabled and populated with the value you provided in the MACHINE NAME field in the Collector Selection section.
-
If you want to use a local user account to connect to the Historian server,
select Next. Or if you want to use a specific user
account, enter values in the USERNAME and
PASSWORD fields, and then select
Next.
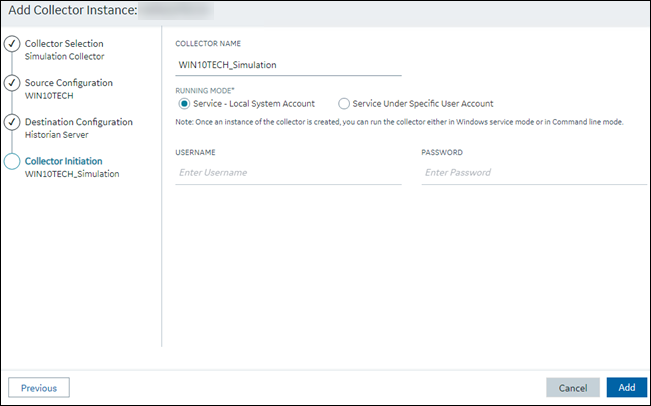
The Collector Initiation section appears.
Send Data to AWS IoT Core
Procedure
-
Download the certificates and key files for the device to communicate. In
addition, download the root CA certificate.
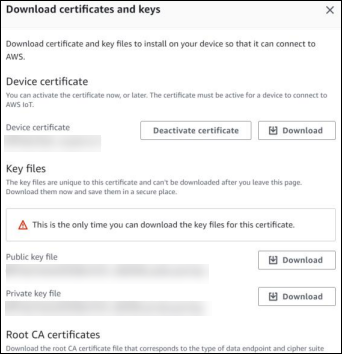
Important: This is mandatory, and it is the only time you can download the certificates. -
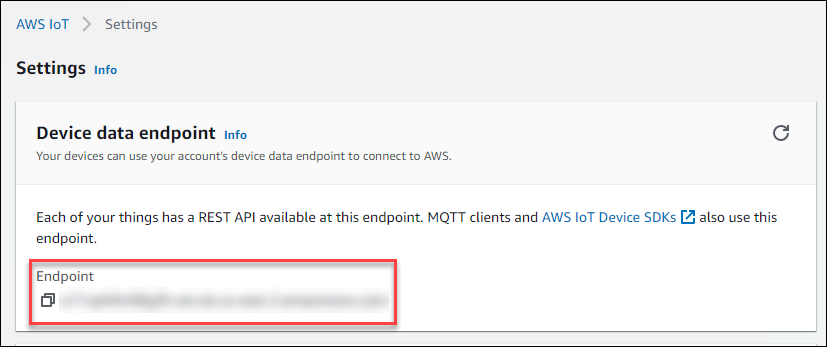
Make a note of the endpoint that appears.
-
Select Collectors.
A list of collectors in the system appears.
-
Select .
The Add Collector Instance: <system name> window appears, displaying the Collector Selection section. The MACHINE NAME field contains a list of machines on which you have installed collectors.
-
Select Next.
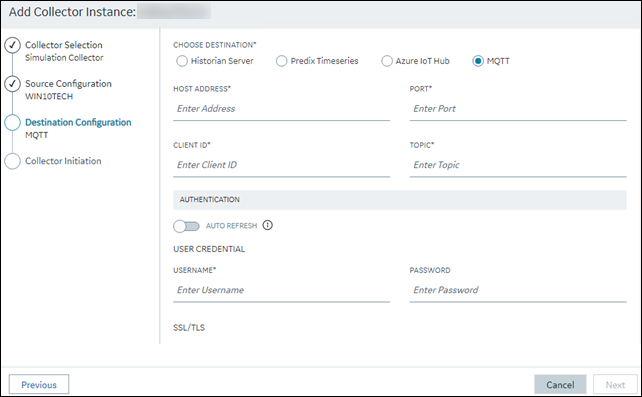
The Destination Configuration section appears.
-
Select Next.
The Collector Initiation section appears.
-
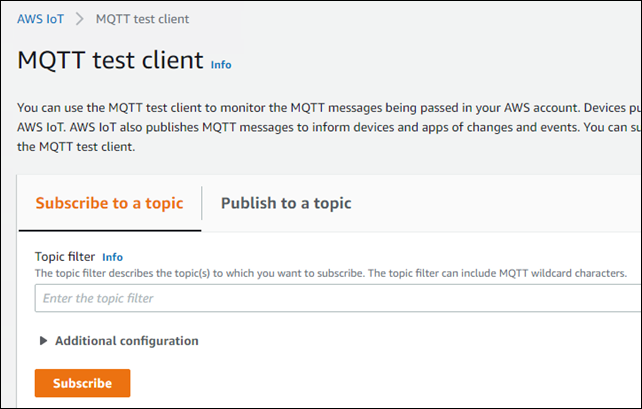
Access AWS IoT Core, and in the left pane, select
Test.
The MQTT test client page appears.
About Sending Data to Azure IoT Hub
- Data in Azure IoT Hub is stored for maximum seven days, after which it is deleted from the hub. Therefore, you must consume the data within seven days. Based on your requirement, you can store it in a relevant Azure storage. You can then use Azure functions or streaming analytics to analyse the data.
- The data sent to Azure IoT Hub is in the JSON format with UTF-8 encoding. To reduce the message size and avoid repetition of tag properties, the tag values are in the format of the KairosDB data points:
[{"<tag name>":"Cloud_GCYSS3X2E.Simulation00001","<time stamp, tag value, and quality>":[[1586260104000,132560.203125000,3]]}
- Set up an Azure IoT Hub account.Note: To choose the correct Azure IoT Hub based on your requirement, refer to https://docs.microsoft.com/en-us/azure/iot-hub/iot-hub-devguide-quotas-throttling
- Create devices in Azure IoT Hub. These devices store the data received from a collector. We recommend that you create one device per collector instance.
Access the Details of a Collector Instance
Procedure
-
Select the row containing the collector whose details you want to access.
The details of the collector appear in the main section, and a summary appears in the Details section.Note: If the Details section does not appear, in the upper-right corner of the page, select
 , and then select
Details.
, and then select
Details.
Add a Collector Instance
Before you begin
- Install collectors.
- For an iFIX collector, ensure that iFIX is running in a Windows-service mode. For more information, refer to About Adding an iFIX Collector Instance Using Configuration Hub.
- If the destination of a collector is an Azure IoT Hub device, ensure that the device is running.
About this task
- The iFIX collector
- The iFIX Alarms & Events collector
- The OPC Classic Data Access collector for CIMPLICITY
- The OPC Classic Alarms and Events collector for CIMPLICITY
This topic describes how to add a collector instance using Configuration Hub. You can also add a collector instance using the RemoteCollectorConfigurator utility, which does not require you to install Web-based Clients.
Procedure
-
Select Collectors.
A list of collectors in the system appears.
-
Select .
The Add Collector Instance: <system name> window appears, displaying the Collector Selection section. The MACHINE NAME field contains a list of machines on which you have installed collectors.
What to do next
- If you have selected Historian Configuration, access Historian Administrator, and manage the tag configuration. For information, refer to Configure Tags.
- If you have selected Offline Configuration, modify the offline configuration file of the collector. By default, this file is available in the following location: <installation folder of Historian>\GE Digital\<collector name>. For information, refer to Creating Offline Configuration XML file.
Modify a Collector Instance
About this task
- If the status of a collector instance in unknown, you cannot modify it.
- You cannot modify the instance of an offline collector.
Procedure
-
Select
 , and then select
Edit.
, and then select
Edit.
Add a Comment to a Collector Instance
About this task
- You cannot modify or delete comments.
- You cannot add comments to offline collectors.
Procedure
Access a Comment on a Collector Instance
Procedure
Collector Instance Fields
This topic provides information on the collector instance fields. These fields are categorized based on the destination of the collector.
Destination: Historian Server
| Field | Description |
|---|---|
| DESTINATION SERVER | The machine name of the Historian server to which you want the collector to send data. |
| USERNAME | The username to access the Historian server. |
| PASSWORD | The password to access the Historian server. |
Destination: Predix Timeseries
| Field | Description |
|---|---|
| CLOUD DESTINATION ADDRESS | The URL of a data streaming endpoint exposed by the Predix Time Series instance to which you want to send data. Typically, it starts with ???wss://???. This value is used as part of the interface name and default tag prefix of the collector. Your Predix Time Series administrator can provide this URL. |
| IDENTITY ISSUER | The URL of an authentication endpoint for the collector to authenticate itself and acquire necessary credentials to stream to the Predix Time Series. In other words, this is the issuer ID of the UAA instance that you want to use to connect to Predix Time Series. Typically, it starts with https:// and ends with ???/oauth/token???. |
| CLIENT ID | Identifies the collector when interacting with Predix Time
Series. This is equivalent to the username in many authentication
schemes. The client must exist in the UAA instance identified by the
identity issuer, and the system requires that the
timeseries.zones. {ZoneId}.ingest and
timeseries.zones.{ZoneId}.query authorities are
granted access to the client for the Predix Zone ID specified. Your
Predix Time Series administrator can provide this
information. |
| CLIENT SECRET | The secret to authenticate the collector. This is equivalent to the password in many authentication schemes. |
| ZONE ID | Unique identifier of the instance to which the collector will send data. |
| PROXY | Identifies the URL of the proxy server to be used for both the authentication process and for sending data. If the collector is running on a network where proxy servers are used to access web resources outside of the network, then you must provide the proxy server settings. However, it does not affect the proxy server used by Windows when establishing secure connections. As a result, you must still configure the proxy settings for the Windows user account under which the collector service runs. |
| PROXY USERNAME | The username to connect to the proxy server. |
| PROXY PASSWORD | The password to connect to the proxy server. |
| DATAPOINT ATTRIBUTES | The attributes or parameters related to a datapoint that you want the collector to collect. Select Add Attributes to specify the attributes. You can add maximum five attributes for each collector instance. |
| CHOOSE CONFIGURATION | The type of the configuration to specify the tags whose data you
want to collect. Select one of the following options:
|
| CONFIGURATION HISTORIAN SERVER | The host name of the machine from which you want to access Historian Administrator to add the tags manually for the collector. This field appears only if you have selected Historian Configuration in the CHOOSE CONFIGURATION field. |
Destination: Azure IoT Hub
| Field | Description |
|---|---|
| DEVICE CONNECTION STRING | Identifies the Azure IoT device to which you want to send data.
Enter a value in the following format:
HostName=<value>;DeviceId=<value>;SharedAccessKey=<value> |
| TRANSPORT PROTOCOL | The protocol that you want to use to send data to Azure IoT Hub.
Select one of the following options:
|
| PROXY | Identifies the URL of the proxy server to be used for both the authentication process and for sending data. If the collector is running on a network where proxy servers are used to access web resources outside of the network, then you must provide the proxy server settings. However, it does not affect the proxy server used by Windows when establishing secure connections. As a result, you must still configure the proxy settings for the Windows user account under which the collector service runs. |
| PROXY USERNAME | The username to connect to the proxy server. |
| PROXY PASSWORD | The password to connect to the proxy server. |
| CHOOSE CONFIGURATION | The type of the configuration to specify the tags whose data you
want to collect. Select one of the following options:
|
| CONFIGURATION HISTORIAN SERVER | The host name of the machine from which you want to access Historian Administrator to add the tags manually for the collector. This field appears only if you have selected Historian Configuration in the CHOOSE CONFIGURATION field. |
Destination: MQTT
| Field | Description |
|---|---|
| HOST ADDRESS | The host name of the MQTT broker to which you want the collector to send data. A value is required. |
| PORT | The port number of the MQTT broker. |
| CLIENT ID | The name of the MQTT client. A value is required and must be unique for an MQTT broker. |
| TOPIC | The MQTT topic to which you want the collector to publish data. A value is required. |
| AUTO REFRESH | Indicates whether you want to automatically refresh the
authentication token when it expires.
|
| USERNAME | Enter the username to connect to the MQTT broker. |
| PASSWORD | Enter the password to connect to the MQTT broker. |
| CA SERVER ROOT FILE | Enter the path of the CA server root file that you want to use to connect to the MQTT broker. |
| CLIENT CERTIFICATE | Enter the path to the client certificate that you want to use to connect to the MQTT broker. |
| PRIVATE KEY FILE | Enter the path to the private key file that you want to use to connect to the MQTT broker. |
| PUBLIC KEY FILE | Enter the path to the public key file that you want to use to connect to the MQTT broker. |
| CHOOSE CONFIGURATION | The type of the configuration to specify the tags whose data you
want to collect. Select one of the following options:
|
| CONFIGURATION HISTORIAN SERVER | The host name of the machine from which you want to access Historian Administrator to add the tags manually for the collector. This field appears only if you have selected Historian Configuration in the CHOOSE CONFIGURATION field. |
Protocols and Port Numbers
| Protocol | When to Use | Port Number |
|---|---|---|
| HTTP | Use this protocol if the data that you want to send is not large and/or the default ports for the other protocols are not available. | 80 |
| MQTT | MQTT is lightweight compared to AMQP, and is widely used. Use this protocol if you want to send data using low bandwidth and/or you do not want to connect to multiple devices using the same connection. | 8883 |
| AMQP | AMQP is more reliable compared to other protocols. It sends data in batches, and hence, the network traffic is less compared to that of MQTT. Use this protocol if you want to send a large amount of data from multiple collectors frequently. | 5671 |
| MQTT over web sockets | MQTT is lightweight compared to AMQP, and is widely used. In addition, communication using web sockets is more reliable and secure. Use this protocol if you want to send data using low bandwidth and securely. | 443 |
| AMQP over web sockets | AMQP is more reliable compared to other protocols. It sends data in batches, and hence, the network traffic is less compared to that of MQTT. In addition, communication using web sockets is more reliable and secure. Use this protocol if you want to send a large amount of data from multiple collectors frequently and securely. | 443 |
Delete a Collector Instance
About this task
Procedure
-
Select , and then select
Delete.
A message appears, asking you to confirm that you want to delete the collector instance.


