 Historian
Tag Configuration
Configure Tags
To display the Tag Maintenance page, select the Tags link in any of Historian Administrator pages. The Tag Maintenance page lets you read and modify all tag parameters for the Historian system.
To access information on a specific tag or group of tags, however, you must first search for the tags. You can search for the tags in the Historian Tag Database by selecting the Search Historian Tag Database link. You can also add tags manually or automatically from the collector by selecting the appropriate link in the second line of the display.
If you add a tag with a tag name greater than 25 characters in length, the characters beyond 25 are not visible in the Tags list on Historian Administrator Tag Maintenance page. To see the entire tag name, place the mouse cursor over the tag to see a ToolTip that displays the full tag name.
Viewing Tags by Name or Description
About this task

- To view the tags by name, right-select in the Tag Maintenance page and select View by Tagname from the menu.
- To view the tags by description, right-select in the Tag Maintenance page and select View by Description from the menu.
- To view the tags by both name and description, right-select in the Tag Maintenance page and select View by Tagname and Description from the menu.
Browse for Tags
About this task
MaxTagsToRetrieve registry key. Procedure
Rename a Tag
Before you begin
About this task
Historian allows you to rename tags through the Non-Web Historian Administrator, Excel Add-in, ihuAPI, and ihSDK. New tag names are called active tag names and old tag names are called aliases.
Tag renaming will only update or modify tag names without modifying or updating the tag properties. If you want to modify the properties of a newly named tag, be aware that all of the aliases tag properties will also be updated.
Whenever you rename/alias a tag, only the active tag name (that is, the new tag name) will be visible in the Tags list on Historian Administrator Tag Maintenance page. You can rename tags multiple times, but only the latest active tag name will be visible in the Tags list. You can also retrieve the data using any alias (that is, the new or old tag names). However, the Tag Maintenance page will display only an active tag name (that is, the new tag name).
Whenever you change or copy a tag name, the information about the old tag name, new tag name, and time stamps are all recorded in the audit trail. You can also view the previous tag names. To view the previous tag names, right-select on the tag name and select Show Previous Tagnames.
- If you modify a renamed tag property, then all of the alias' tag properties will also be updated.
- If you delete a renamed tag, then all the aliases will also be deleted.
- You can rename tags multiple times, but only the latest active tag name (renamed tag name) will be visible in the Tags list.
- If you rename a tag, the tag count does not increase.
- If you copy a tag, then the tag count increases.
- An alias can be queried, but cannot be modified or deleted.
- You can use any of the following Application Program Interfaces (APIs) to
rename tags:
- ihSDK
- ihUAPI
- ihAPI
- Excel Add-in
Procedure
- Select the Copy/Rename Tag link in the Tag Maintenance page.The Copy/RenameTag window appears.

Rename a Tag Permanently
About this task
Historian allows you to permanently rename tag names. You can permanently rename a tag if you no longer want to read and write a tag by its previous name. Permanent rename makes the previous tag name available for new usage. For example, if you had permanently renamed Tag A to Tag B, then you could create a new tag with the name Tag A with no linkage to the previous tag.
- If you permanently rename a tag, the tag name will be updated with the new tag name and the old tag name will be lost.
- You can permanently rename tags multiple times, but only the latest tag name (new tag name) will be visible in the Tags list.
- If you permanently rename a tag, the tag count does not increase.
- Store and forward data will be lost if you do a permanent rename and the data is sent using the old tag name.
- There will be loss of data during the process of permanently renaming a tag. Best practice is to stop the collector, permanently rename the tag, and then restart the collector.
- If a trigger tag to other tags is permanently renamed, you need to re-assign the new trigger name to the affected tags.
- You can use any of the following Application Program Interfaces (APIs) to
permanently rename tags:
- ihSDK
- ihUAPI
- Client Access API
- Excel Add-in
Procedure
- In the Tag Maintenance page, select the Copy/Rename Tag link.The Copy/Rename Tag window appears.
Copy a Tag
Procedure
- Select the Copy/Rename Tag link in the Tag Maintenance page.The Renaming Tag window appears.
Add a Tag Manually
About this task
Typically, you add tags to Historian by browsing the data source. If you need to add a tag manually, use the following procedure.
- OPC Collector
- iFIX collector
- Calculation collector
- Simulation Collector
- Server to Server Collector
- PI Collector
- PI Distributor
The dynamic collector update feature ensures that any modifications to the tag configuration do not affect all the tags in a collector. Tags that stop data collection may record zero data and bad quality without restarting the collector. Tags that do not stop data collection do not record bad data samples to the collection.
By default, the On-line Tag Configuration Changes option is enabled, which allows a tag to stop and restart data collection without restarting the collector. If you disable the On-line Tag Configuration Changes option, any changes you make to the tags do not affect collection until after you restart the collector. To enable or disable the On-line Tag Configuration Changes option, select Advanced on the Collector Maintenance page.
To restart the collector you must stop and start the collector service or executable. Restarting the collector stops and restarts the tag(s) collection and may record bad data samples to the collection. All the collector configuration changes done within a 30 second time frame are batched up together. To collect the modified data faster, update/modify a small set of tags at a time.
Procedure
- Select the Add Tag Manually link in the Tag Maintenance page.The Add Tag Manually window shown in the following figure appears.

Get all the Fields Related to a Tag
Procedure
- Create a DWORD (32-bit) registry entry named GetAllTagProps for the collector. For IGS, the registry path is HKEY_LOCAL_MACHINE\SOFTWARE\Wow6432Node\Intellution, Inc.\iHistorian\Services\OPCCollector\*_OPC_Intellution_IntellutionGatewayOPCServer
- Provide the value 1 for the registry entry.
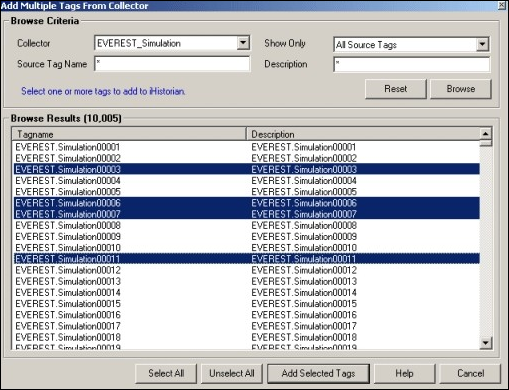
Add Uncollected Tags
Procedure
- Select the desired tag(s).
- Select a single tag by selecting on the name of the tag.
- Select multiple individual tags by pressing the Control key and selecting the tags.
- Select a contiguous group by pressing the Shift key and selecting the first and last tag of the group.
- To select all tags, select Select All.
- To clear all selections, select Unselect All.
Delete A Tag
About this task
Historian allows you to delete and permanently delete tags. When a tag is deleted, it is removed from the tag database, but all data for that tag is retained in the archive and the tag name cannot be re-used. Since the tag data is still available from the archive, you can still reference that tag from within a calculation formula, for example, or by using the Excel Add-In.
When a tag is permanently deleted, all the data for that tag is removed from the archive and the tag name is available for reuse. For more information, see Permanently Deleting Tags.
- OPC Collector
- iFIX collector
- Calculation collector
- Simulation Collector
- Server to Server Collector
- PI Collector
- PI Distributor
By default, the On-line Tag Configuration Changes option is enabled, which allows a tag to stop and restart data collection without restarting the collector. If you disable the On-line Tag Configuration Changes option, any changes you make to the tags do not affect collection until after you restart the collector. To enable or disable the On-line Tag Configuration Changes option, select Advanced on the Collector Maintenance page. To restart a collector, stop and start the collector service or executable.
Restarting the collector stops and restarts the tag(s) collection and may record bad data samples to the collection. All the collector configuration changes done within a 30 second time frame are batched up together. To collect the modified data faster, update/modify a small set of tags at a time. If the modified tags get zero bad markers and available runtime values at the same time, then precedence is given to available runtime values instead of zero bad markers.
- To collect the modified data faster, update/modify a small set of tags at a time.
- When updating large sets of tags at the same time, best practice is to disable the On-line Tag Configuration Changes option and restart the collector after modification.
Procedure
- Select the Delete button at the bottom right of the page.The Delete Tag window shown in the following figure appears.

Deleting Tags Permanently
About this task
Procedure
- Select Delete. The Delete Tag window appears as shown in the following figure.
Stop or Resume Tag Data Collection
Procedure
- To stop data collection on a tag:
- Open the Tag Maintenance page.
- From the list in the left-hand window of the page, select a tag.
- In the window on the right side of the page, select Collection.
- For the Collection field, select the Disabled option.
- Select Update.
- To resume data collection on a tag:
Modify Tag Parameters
By default, the On-line Tag Configuration Changes option is enabled, which allows a tag to stop and restart data collection without restarting the collector. All collector configuration changes done within a 30 second time frame are batched up together. To collect the modified data faster, update/modify a small set of tags at a time. When updating large sets of tags at the same time, best practice is to disable the On-line Tag Configuration Changes option and restart the collector after modification.
If you disable the On-line Tag Configuration Changes option, any changes you make to the tags do not affect collection until after you restart the collector. To enable or disable the On-line Tag Configuration Changes option, select Advanced on the Collector Maintenance page.
- OPC Collector
- iFIX collector
- Calculation collector
- Simulation Collector
- Server to Server Collector
- PI Collector
- PI Distributor
- Collector Name
- Collector Type
- SourceAddress
- Spare 1-5
- Data Type
- Collection Interval
- Collection Offset
- Collection Disabled/Enabled (CollectionDisabled in SDK)
- Collection Type
- TimeStampType
- Calculation Dependencies (in SDK) or Calculation Triggers (in Historian Administrator) (Applies to Server-to-Server and Calculation collectors only.)
- High Engineering Units
- Low Engineering Units
- Input Scaling
- High Scale
- Low Scale
- Collector Compression
- Collector Deadband Percent Range
- Collector Compression Timeout
View Tag Trends and Raw Data
About this task
Procedure
- To display a trend of data for a selected tag:
- Right-select the tag and select Trend. The page shown in the following figure appears.
 The page displays the trend of data over a selected time period.
 - Specify the time period and other parameters by selecting on the Criteria button at the bottom of the display. The Trend Criteria window shown in the following figure appears.

- Right-select the tag and select Trend.
- To select criteria for the trend display:
- To Display the Last Ten Raw Data Samples:
- Right-select the tag and select Last 10 Values.

- Right-select the tag and select Last 10 Values.
Array Tags
Historian allows you to store a set of values with a single timestamp and single quality and then read the elements back individually or as an array. In Historian, a tag can be modified to an array tag by selecting the Is Array Tag property.
When using Array tags, be aware of the following:- The size of the array tag does not need to be configured. The Data Archiver will store the number of elements that were written.
- The maximum number of elements that an array tag can store is 10,000. If this limit is exceeded, Historian does not accept any further elements.
- If you are retrieving the data of an array tag using a previous version of Historian Client, then the array tag will be displayed as a Blob data type.
- You cannot associate an Enumerated Set to an array tag.
- Fixed String and Scaled data types are not supported.
- You cannot make an array of a User Defined Type.
- Scaling, Collector Compression, and Archive Compression does not apply to array tags.
- An array element cannot be used as a Calculation Trigger.
- Trend data is not supported for array tags.
- TagStats calculation mode is not supported.
Change a Tag to An Array Tag
About this task
Procedure
- Change a tag from the Collection section.
- Access the Tag Maintenance page, and then select Collection.
- Select the tag to change to an array tag from the Tags section.
- Select the Is Array Tag check box.
- Select Update.
- Change a tag from the Add Tag Manually window.
- In the Tags Maintenance window, select Add Tag Manually. The Add Tag Manually window appears.
- In the Tags Maintenance window, select Add Tag Manually.
View the Last Ten Values of an Array Tag
About this task
Procedure
- Right-select the tag and select Last 10 Values from the menu. Each element of the array tag is displayed as a separate row with the tag name and the index as displayed in the following image.
User Defined Data Types
- Create a User Defined Type
- Add Fields to a User Defined Type
- Modify and Delete Fields in a User Defined Type
- Modify a User Defined Type
- Delete a User Defined Type
- Create a User Defined Type with Multiple Fields
- Set a Source Address
- View the Last 10 Values of a MultiField Tag
- View the Trend of a MultiField Tag
- Associate a Tag with a User Defined Type
- Remove a Type from a Tag
- You need to have appropriate security permissions to create, modify, and delete a user defined type.The type can have its own Administrator security group. For more information on the security rights, refer to the Implementing Historian Security section for the definition of the various security levels and groups.
- You cannot create an array tag that uses a user defined type.
- User Defined Types cannot have fields of Scaled or FixedString data types.
- Scaling, Collector Compression, and Archive Compression does not apply to tags of MultiField data type.
- You cannot associate an Enumerated set with a field in a MultiField tag.
- A MultiField tag supports a maximum of 100 fields.
Create and Modify User Defined Types
About this task
Procedure
- To set a source address for a multifield tag:
- Select the tag and select Browse (...) in the Source Address field.The List of Fields window appears.

- Select the tag and select Browse (...) in the Source Address field.
- To view the last 10 values of a multifield tag:
- Right-select on a multifield tag (a tag indicated with ???*???) and select Last 10 values. The List of Fields window appears.
- Right-select on a multifield tag (a tag indicated with ???*???) and select Last 10 values.
Assign and Remove User Defined Types
About this task
Procedure
- To assign a User Defined Type to a tag from the Collection tab:
- To assign a User Defined Type to a tag from the Add Tag Manually window:
- To remove a User Defined Type from a tag:
- From the Tags list, select the tag with the user defined type that you want to remove.
- Delete the User Defined Type name.
- Select a different Data Type from the list.
- Select Update.
Create and Delete Enumerated Data Sets
About this task
An Enumerated Data Set provides an enhanced way of displaying data. It enables you to retrieve numeric data as string state values. The string values can be used in reports or displays.
An Enumerated Data Set contains several states with a set of numeric values and their string display values. You can define enumerated state values such as 0=Manual, 1=Automatic, or 0-100=ON, 101-200=OFF and associate these sets with a tag to retrieve data accordingly.A Set contains multiple enumerated state values. You can create multiple sets and associate them with multiple tags.
Procedure
- To create a Set:
- To delete a Set:
- Right-select the set you wish to delete and select Delete Selected Set.
- To modify a Set:
Assign and Remove Enumerated Sets from Tags
About this task
Procedure
- To assign a set to a tag:
- To remove an assigned set from a tag:
Create, Modify, and Delete Data States
About this task
| State Name | State Value |
|---|---|
| 0 | Open |
| 1 | Close |
| 2 | Close |
| 2 | Open |
Procedure
- To create a State:
- To modify a State:
- Select the state to modify from the List of States section.
- Make the desired changes and select Save to List.
- To delete State(s):
- To delete a single state, select the state and select Delete State.
- To delete all the states, select Select All , then select Delete State.
Display and Edit Tag Parameters and Options
- Action Buttons
-
All tabs in the Tag Maintenance page contain action buttons. Select a button to perform the action indicated by the name. If you want to cancel changes and return to the original values or settings, open a different page and then return to the Tag Maintenance page.
Button Description Update Apply all parameter changes you have made on any tabs in this page. Delete Delete the selected tag. You can either remove the tag from Historian or just stop collection of data from the tag by selecting the appropriate button and then selecting OK. This action deletes the tag, but does not delete any data for that tag. - The General Section
-
To display or edit general parameters listed below, select General. To modify the values, enter new values in the appropriate fields and then select the Update button at the bottom of the page to apply the changes. Until you select the Update button, entering a new value changes the display of the field name to blue.
Field Description Description The tag description of the selected tag. EGU Description The engineering units, if any, assigned to the selected tag. Comment Comments, if any, that apply to the selected tag. StepValue This tag property is used to indicate that the actual measured value changes in a sharp step instead of a smooth linear interpolation. This option should only be selected for numeric data. Enabling this option only affects data retrieval; it has no effect on data collection or storage. Spare Configuration The Spare 1 through Spare 5 fields list any configuration information stored in these fields. Note: Do not add or update the following spare configurations as the data may get corrupted or over written:- The Spare 1 field for OSI PI Distributor. OSI PI distributor reads data from the Historian tag displayed in the Tag Source Address field and sends it to the OSI PI tag name displayed in the Spare 1 field.
- The Spare 5 field for Server to Server Collector and Server to Server Distributor as it is only used for internal purposes.
- The Collection Section
-
To display or edit collection parameters, select Collection. The page shown in the following figure appears.

To modify the values, enter new values in the appropriate fields and then select the Update button at the bottom of the page to apply the changes. Until you select the Update button, entering a new value changes the display of the field name to blue.The fields in the Collection section contain the following information:
Table 1. Data Source Field Description Collector The name of the collector for the selected tag. Select the drop-down arrow to display a list of all collectors. Source Address The address for the selected tag in the data source. Select the Browse button (...) to display a browse window.
Leave the Source Address field blank for Calculation and Server-to-Server tags.
For Python Expression tags, the Source Address field contains the full applicable JSON configuration, which includes an indication of the source address. The Browse button (???) is disabled for such tags.
Note: When exporting or importing tags using the EXCEL Add-In, the Calculation column, not the SourceAddress column, holds the formulas for the Calculation or Server-to-Server tags.Data Type A list of data types. Note: If you change the data type of an existing tag between a numeric and a string or binary data type (and vice versa), the tag's compression and scaling settings will be lost.Enumerated Set Name The name of the Enumerated Set that can be assigned to the tags. Select the Browse button (...) to display the Define Enumerated Set window. Data Length The number of bytes for a fixed string data type. This field is active only for fixed string data types. This field is adjacent to the Data Type field. Is Array Tag Indicates the tag is an array tag. Choosing a Data Type: The main use of the scaled data type is to save space, but this results in a loss of precision. Instead of using 4 bytes of data, it only uses 2 bytes by storing the data as a percentage of the EGU limit. Changing the EGU limits will result in a change in the values that are displayed. For example, if the original EGU values were 0 to 100 and a value of 20 was stored using the scaled data type and if the EGUs are changed to 0 to 200, the original value of 20 will be represented as 40.
Table 2. Collection Options Field Description Collection Select the appropriate option to enable or disable collection for this tag. The default setting is Enabled. If you disable collection for the tag, Historian stops collecting data for the tag, but does not delete the tag or any data. Collection Type Select the type of data collection used for this tag, which can be polled or unsolicited. Polled means that the data collector requests data from the data source at the collection interval specified in the polling schedule. Unsolicited means that the data source sends data to the collector whenever necessary (independent of the data collector polling schedule). Collection Interval Enter the time interval between readings of data from this tag. With Unsolicited Collection Type, this field defines the minimum interval at which unsolicited data should be sent by the data source. Collection Offset Used with the collection interval to schedule collection of data from a tag. For example, to collect a value for a tag every hour at thirty minutes past the hour (12:30, 1:30, 2:30, and so on), enter a collection interval of 1 hour and an offset of 30 minutes. As another example, to collect a value each day at 8am, enter a collection interval of 1 day and an offset of 8 hours. Note: If you enter a value in milliseconds, the value must be in intervals of 1000 ms. For example, 1000, 2000, and 3000 ms are valid values, but 500 and 1500 ms are invalid. The minimum value is 1000 ms.Time Resolution Select the precision for timestamps, which can be either seconds, milliseconds or microseconds. Condition based collection: Condition based collection is a method to control the storage of data for data tags by assigning a condition. Data is always collected but it is only written to the Data Archiver if the condition is true; otherwise, the collected data is discarded.
This condition is driven by a trigger tag; a tag collected by the collector evaluating the condition. Ideally, Condition based Collection should be used only with tags that are updating faster than the trigger tag. Condition based collection can be used to archive only the specific data which is required for analysis, rather than archiving data at all times, as the collector is running.
For example, if a collector has tags for multiple pieces of equipment, you can stop collection of tags for one piece of equipment during its maintenance. It is typically used on tags that use fast polled collection but you don't want to use collector compression. While the equipment is running, you want all the data but when the equipment is stopped, you don't want any data stored. The trigger tag would also typically use polled collection. But, either tag could use unsolicited collection.
The condition is evaluated every time data is collected for the data tag. When a data sample is collected, the condition is evaluated and data is either queued for sending to archiver, or discarded. If the condition cannot be evaluated as true or false, like if the trigger tag contains a bad data quality or the collector is not collecting the trigger tag, the condition is considered true and the data is queued for sending.
No specific processing occurs when the condition becomes true or false. If the condition becomes true, no sample is stored to the data tag using that condition, but the data tag will store a sample next time it collects. When the condition becomes false, no end of the collection marker is stored until the data tag is collected.
For example, if the condition becomes false at 1:15 and the data tag gets collected at 1:20, the end of collection marker will be created at 1:20 and have a timestamp of 1:20, not 1:15.
Condition based collection is supported by only archiver and collectors of Historian version 4.5 and above. Condition based collection does not apply to alarm collectors. This condition based collection is applicable to the following collectors only:- Simulation Collector
- OPC Collector
- iFIX collector
- PI Collector
Table 3. Condition Based Collection Field Description Condition Based Select the appropriate option to enable or disable Condition Based Collection for a tag. The default setting is Disabled. Trigger Tag The name of the tag used in the condition. Use the browse button to select a trigger tag from the list of tags associated with the collector. Comparison Select the appropriate comparison operator from the drop-down list. Below is the list of comparison operator parameters: - Undefined: Collection will resume only when the value of the triggered tag changes. This is considered an incomplete configuration, so condition based collection is turned off and all the collected data is sent to archiver.
- < =: Setting condition as Trigger Tag value less than or equal to the Compare Value.
- > = Setting condition as Trigger Tag value greater than or equal to the Compare Value.
- <: Setting condition as Trigger Tag value less than the Compare Value.
- >: Setting condition as Trigger Tag value greater than the Compare Value.
- =: Setting condition as Trigger Tag value equals Compare Value.
- !=: Setting condition as Trigger Tag value not the same as Compare Value.
Compare Value Enter an appropriate target value to be compared against the value of the Trigger tag. Make sure when using '=' and '!=' comparison parameters that the format of the compared value and triggered tag are the same. For example, for a float type trigger tag, the compare value must be a float value; otherwise, the condition result is an invalid configuration. When the configuration is invalid, condition based collection is disabled and all data is sent to archiver. End of Collection Markers Select the appropriate option to enable or disable End of Collection markers. The default setting is enabled. This will mark all the tag's values as "Bad", and sub-quality as "ConditionCollectionHalted" when the condition becomes false. Trending and reporting applications can use this information to indicate that the real world value was unknown after this time until the condition becomes true and a new sample is collected. If disabled, a bad data marker is not inserted when the condition becomes false. - The Scaling Section
-
Scaling converts a data value from a raw value expressed in an arbitrary range of units, such as a number of counts, to one in engineering units, such as gallons per minute or pounds per square inch. The scaled data type can serve as a third form of data compression, in addition to collector compression and archive compression, if it converts a data value from a data type that uses a large number of bytes to one that uses fewer bytes.
To display or edit scaling parameters, select Scaling. The page shown in the following figure appears.

To modify the values, enter new values in the appropriate fields and then select the Update button at the bottom of the page to apply the changes. Until you select the Update button, entering a new value changes the display of the field name to blue. The fields in the Scaling section contain the following information:Table 4. Engineering Unit Range Field Description Hi Engineering Units Displays the current value of the upper range limit of the span for this tag. Lo Engineering Units Displays the current value of the lower range limit of the span for this tag Engineering Hi and Lo are retrieved automatically for F_CV fields for iFIX tags; all others are left at default settings. When adding tags from the server using an OPC Collector, the OPC Collector queries the server for the EGU units and EGU Hi/Lo limits. Not all OPC Servers make this information available, however. Therefore, if the server does not provide the limits when requested to do so, the collector automatically assigns an EGU range of 0 to 10,000.
Table 5. Input Scaling Field Description Input Scaling Select the appropriate option to enable or disable input scaling, which converts an input data point to an engineering units value. For example, to rescale and save a 0 - 4096 input value to a scaled range of 0 - 100, you enter 0 and 4096 as the low and high input scale values and 0 and 100 as the low and high engineering units values, respectively.
If a data point exceeds the high or low end of the input scaling range, then Historian logs a bad data quality point with a ScaledOutOfRange subquality. In the previous example, if your input data is less than 0, or greater than 4096, then Historian records a bad data quality for the data point. For instance, a value of 4097, in this example, yields a bad data quality.
Hi Scale Value The upper limit of the span of the input value. Lo Scale Value The lower limit of the span of the input value. OPC Servers and TRUE Values: Some OPC Servers return a TRUE value as -1. If your OPC Server is returning TRUE values as -1, modify the following scaling settings in the Tag Maintenance page of Historian Administrator:Hi Engineering Units = 0 Lo Engineering Units = 1 Hi Scale Value = 0 Lo Scale Value = - 1 Input Scaling = Enabled - The Compression Section
-
Note: Array tags do not support Archive and Collector Compression. If the tag is an array tag, then the Compression section is disabled.
To display or edit compression parameters, select Compression. The page shown in the following figure appears.

To modify the values, enter new values in the appropriate fields and then select the Update button at the bottom of the page to apply the changes. Until you select the Update button, entering a new value changes the display of the field name to blue. The fields in the Compression section contains the following information:
Table 6. Collector Compression Field Description Collector Compression (Enabled, Disabled) Select the appropriate option to enable or disable compression at the collector level. Collector compression applies a smoothing filter to incoming data by ignoring incremental changes in values that fall within a deadband centered around the last reported value. The collector reports any new value that falls outside the deadband to the Historian archive and then centers the deadband around the new value.
Collector Deadband The current value of the compression deadband. This value can be computed as a percent of the span, centered around the data value or given as an absolute range around the data value. Note: Some OPC Servers add and subtract the whole deadband value from the last data value. This effectively doubles the magnitude of the deadband compared to other OPC Servers. To determine how your specific server handles deadband, refer to the documentation of your OPC Server.Example:
The engineering units are 0 to 200. The deadband value is 10%, which is 20 units. If the deadband value is 10% and the last reported value is 50, the value will be reported when the current value exceeds 50 + 10 = 60 or is less than 50 - 10 = 40. Note that the deadband (20 units) is split around the last data value (10 on either side.)
Alternatively, you could specify an absolute deadband of 5. In this instance, if the last value was 50, a new data sample will be reported when the current value exceeds 55 or drops below 45.
If compression is enabled and the deadband is set to zero, the collector ignores data values that do not change and records any that do change. If you set the deadband to a non-zero value, the collector records any value that lies outside the deadband. If the value changes drastically, a pre-spike point may be inserted. See Spike Logic for more details.
Engineering Unit Converts the deadband percentage into engineering units and displays the result. This value establishes the deadband range that is centered around the new value. When enabling Archive Compression or Collector Compression, the Engineering Units field represents a calculated number created to give an idea of how large a deadband you are creating in Engineering Units. The deadband is entered in % and Historian multiplies that % by the range (Hi Engineering Units - Lo Engineering Units) to compute the % in Engineering Units.
Collector Compression Timeout Indicates the maximum amount of time the collector will wait between sending samples for a tag to the archiver. This time is kept per tag, as different tags report to the archiver at different times. For polled tags, the Collector Compression Timeout value should be in multiples of your collection interval. After the timeout value is exceeded, the tag stores a value at the next scheduled collection interval, and not when the timeout occurred. For example, if you have a 10 second collection interval, a 1 minute compression timeout, and a collection that started at 2:14:00, if the value has not changed, the value is logged at 2:15:10 and not at 2:15:00.
For unsolicited tags, a value is guaranteed in, at most, twice the compression timeout interval.
A non-changing value would be logged on each compression timeout. For example, an unsolicited tag with a 1 second collection interval and a 30 second compression timeout would be stored every 30 seconds.
A changing value for the same tag may have up to 60 seconds between raw samples. In this case, if the value changes after 10 seconds, then that value is stored, but the value at 30 seconds (if unchanged) will not be stored. The value at 60 seconds will be stored. This leaves a gap of 50 seconds between raw samples which is less than 60 seconds.
Compression timeout is supported in all collectors except the PI collector.
Table 7. Archive Compression Field Description Archive Compression (Enabled, Disabled) Select the appropriate option to enable or disable compression at the Historian archive level. If enabled, Historian applies the archive deadband settings against all reported data from the collector. Archive Deadband The current value of the archive deadband, expressed as a percent of span or an absolute number. Each time the system reports a new value, it computes a line between this data point and the last archived value. The deadband is calculated as a tolerance centered about the slope of this line. When the next data point is reported, the line between the new point and the last archived point is tested to see if it falls within the deadband tolerance calculated for the previous point. If the new point passes the test, it is reported and is not archived. This process repeats with subsequent points. When a value fails the tolerance test, the last reported point is archived and the system computes a line between the new value and the newly archived point, and the process continues.
Engineering Unit Converts the deadband percentage into engineering units and displays the result. This value establishes the deadband range that is centered around the new value. When enabling Archive Compression or Collector Compression, the Engineering Units field represents a calculated number created to give an idea of how large a deadband you are creating in Engineering Units. The deadband is entered in % and Historian multiplies that % by the range (Hi Engineering Units - Lo Engineering Units) to compute the % in Engineering Units.
Archive Compression Timeout Indicates the maximum amount of time from the last stored point before another point is stored, if the value does not exceed the archive compression deadband. The data archiver treats the incoming sample after the timeout occurs as if it exceeded compression. It then stores the pending sample.
- Calculation Tab
-
Note: The Calculation section applies only to Calculation and Server-to-Server tags. The Calculation section is disabled for array tags.
To display calculation parameters, select Calculation.
The page shown in the following figure appears.

To modify the calculation formula, enter new values in the appropriate fields and then select Update at the bottom of the page to apply the changes. Until you select the Update button, entering a new value changes the display of the field name to blue.
Calculation Pane
The Calculation pane is where you build your calculation formula. You can either type the VB Script directly or use the Insert Function Wizard. See Building Calculation Formulas Using the Wizard for more information. Calculation Triggers defines the appropriate trigger for all tags that have a Collection Type set to Unsolicited rather than Polled.
There are several buttons associated with the Calculation pane.- The Wizard, Tag, and Time buttons are associated with the Insert Function Wizard and allow you to use the wizard to directly populate syntax within the Calculation pane.
- The Test button allows you to verify the syntax within your calculation formula.
- Use the Clear button to clear the Calculation pane.
- The Window button expands the Calculation pane.
- The Advanced Section
-
To display or edit advanced parameters, select Advanced.
The page shown in the following figure appears.
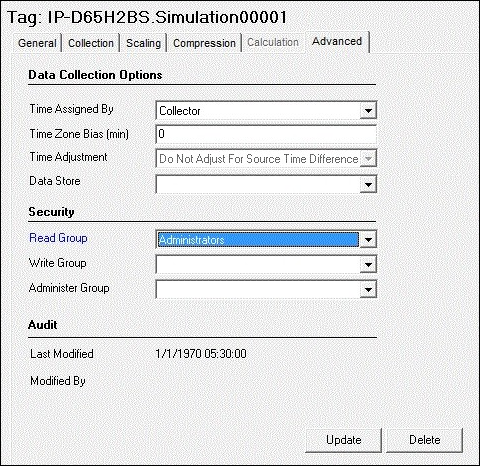
To modify the values, enter new values in the appropriate fields and then select the Update button at the bottom of the page to apply the changes. Until you select the Update button, entering a new value changes the display of the field name to blue.
The fields in the Advanced section contain the following information:
Table 8. Data Collection Options Field Description Time Assigned By The source of the timestamp for a data value is either the collector or the data source. Note: This field is disabled for Calculation and Server-to-Server tags.All tags, by default, have their time assigned by the collector. When you configure a tag for a polled collection rate, the tag is updated based on the collection interval. For example, if you set the collection interval to 5 seconds with no compression, then the archive will be updated with a new data point and timestamp every 5 seconds, even if the value isn't changing.
However, if you change the Time Assigned By field to Source for the same tag, the archive only updates when the device timestamp changes. For example, if the poll time is still 5 seconds, but if the timestamp on the device does not change for 10 minutes, no new data will be added to the archive for 10 minutes.
Time Zone Bias The number of minutes from GMT that should be used to translate timestamps when retrieving data from this tag. For example, the time zone bias for Eastern Standard time is -300 minutes (GMT-5). This property is not used during collection. Use this option if a particular tag requires a time zone adjustment during retrieval other than the client or server time zone. For example, you could retrieve data for two tags with different time zones by using the tag time zone selection in the iFIX chart.
Time Adjustment If the Server-to-Server Collector is not running on the source computer, select the Adjust for Source Time Difference option to compensate for the time difference between the source archiver computer and the collector computer. Note: The Time Adjustment field only applies to Server-to-Server tags that use a polled collection type.Data Store Displays the data store the tag belongs to. Refer to Implementing Historian Security for definitions of the various security levels and groups.
Table 9. Security Field Description Read Group The Windows security group assigned to the selected tag. Refer to Implementing Historian Security for definitions of the various security levels and groups. Write Group The Windows security group assigned to the selected tag. Administer Group The Windows security group assigned to the selected tag. Table 10. Audit Field Description Last Modified The date the last tag parameter modification was made. Modified By The name of the person who last modified the tag configuration parameters.
Notes on Collector and Archive Compression
This section describes the behavior of collector and archive compression. Understanding these two Historian features will help you apply them appropriately to reduce the storage of unnecessary data. Smaller archives are easier to maintain and allow you to keep a greater time span of historical data online.
Collector Compression:
Collector compression applies a smoothing filter, inside the collector, to data retrieved from the data source. By ignoring small changes in values that fall within a deadband centered around the last reported value, only significant changes are reported to the archiver. Fewer samples reported yields less work for the archiver and less archive storage space used.
The definition of significant changes is determined by the user by setting the collector compression deadband value. For convenience, Historian Administrator calculates and shows the deadband in engineering units if you enter a deadband percentage. If you later change the high and low EGU limits, the deadband is still a percentage, but of the new limits. A 20% deadband on 0 to 500 EGU span is 100 engineering units. Then, you change the limits to 100 and 200 and the 20% is now 20 engineering units.
The deadband is centered around the last reported sample, not simply added to it or subtracted. If your intent is to have a deadband of 1 unit between reported samples, you want a compression deadband of 2 so it is one to each side of the last reported sample. In an example of 0 to 500 EGU range, with a deadband of 20%, the deadband is 100 units, and the value has to change by more than 50 units from the last reported value. Changes in data quality from good to bad, or bad to good, automatically exceed collector compression and are reported to the archiver. Any data to that comes to the collector out of time order will also automatically exceed collector compression.
It is possible for collected tags with no compression to appear in Historian as if the collector or archive compression options are enabled. If collector compression occurs, you will notice an increase in the percentage of the Compression value from 0% in the Collectors panel of the System Statistics page in Historian Administrator. When archive compression occurs, you will notice the Archive Compression value and status bar change on the System Statistics page.
For all collectors, except the File collector, you may observe collector compression occurring for your collected data (even though it is not enabled) if bad quality data samples appear in succession. When a succession of bad data quality samples appears, Historian collects only the first sample in the series. No new samples are collected until the data quality changes. Historian does not collect the redundant bad data quality samples, and this is reflected in the Collector Compression percentage statistic.
For a Calculation or Server-to-Server Collector, you may possibly observe collector compression (even though it is not enabled) when calculations fail, producing no results or bad quality data. The effect of Collector Compression Timeout is to behave, for one poll cycle, as if the collector compression feature is not being used. The sample collected from the data source is sent to the archiver. Then the compression is turned back on, as configured, for the next poll cycle with new samples being compared to the value sent to the archiver.
Archive Compression:
Archive compression can be used to reduce the number of samples stored when data values for a tag form a straight line in any direction. For a horizontal line (non changing value), the behavior is similar to collector compression. But, in archive compression, it is not the values that are being compared to a deadband, but the slope of line those values produce when plotted value against time. Archive compression logic is executed in the data archiver and, therefore, can be applied to tags populated by methods other than collectors.
Archive compression can be used on tags where data is being added to a tag by migration, or by the File collector, or by an SDK program for instance. Each time the archiver receives a new value for a tag, the archiver computes a line between this incoming data point and the last archived value.
The deadband is calculated as a tolerance centered about the slope of this line. The slope is tested to see if it falls within the deadband tolerance calculated for the previous point. If the new point does not exceed the tolerance, it is held by the archiver rather than being archived to disk. This process repeats with subsequent points. When an incoming value exceeds the tolerance, the value held by the archiver is written to disk and the incoming sample becomes held.
The effect of the archive compression timeout is that the incoming sample is automatically considered to have exceeded compression. The held sample is archived to disk and the incoming sample becomes the new held sample. If the Archive Compression value on the System Statistics page indicates that archive compression is occurring, and you did not enable archive compression for the tags, the reason could be because of internal statistics tags with archive compression enabled.


