General Reference
Policy Designer Data Model
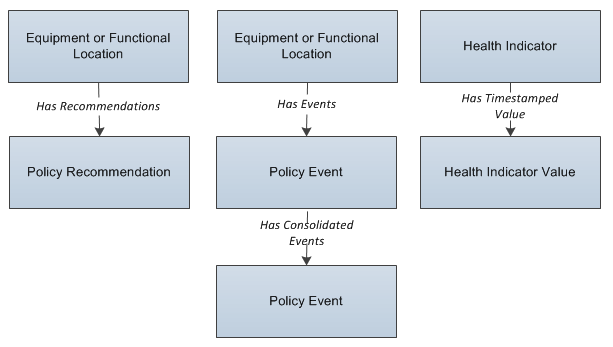
The basic, underlying data structure of the Policy Designer module contains Policy and Policy Instance records.
- Policy records store identifying information about policies, such as the name, description, and execution dates. Policy records also store code that defines the logic represented by a policy model.
- Policy Instance records store identifying information about policy instances and store code that maps nodes in a policy model to values from specific Predix Essentials records.
When you work with policies in Policy Designer, values in these records are updated automatically.
Depending on the specific nodes used in a policy model, additional records may be created or modified via Policy Designer. Specifically:
- Records in the Policy Recommendation and Has Recommendations families may be created when you include a Create Recommendation node.
- Records in the Health Indicator, Health Indicator Value, and Has Timestamped Value families may be created when you include an Add Value to Health Indicator node.
The following image illustrates these families and their relationships.
Policy Designer Security Groups
The following table lists the baseline Security Groups available for users within this module, as well as the baseline Roles to which those Security Groups are assigned. In Predix Essentials, Roles are assigned to Security Users through permission sets.
| Security Group | Roles |
|---|---|
| MI Policy Administrator |
MI Health Admin MI Policy Administrator |
| MI Policy Designer |
MI Health Power MI Health Admin MI Policy Designer MI Policy Administrator |
| MI Policy User |
MI Health User MI Policy User |
| MI Policy Viewer | MI Policy Viewer |
The baseline family-level privileges that exist for these Security Groups are summarized in the following table.
| Family | MI Policy Administrator | MI Policy Designer | MI Policy User | MI Policy Viewer |
|---|---|---|---|---|
| Entity Families | ||||
| Health Indicator Value | View, Update, Insert, Delete | View, Update, Insert, Delete | None | View |
| Policy | View, Update, Insert, Delete | View, Update, Insert, Delete | View | View |
| Policy Event | View, Update, Insert, Delete | View, Update, Insert, Delete | View, Update | View |
| Policy Instance | View, Update, Insert, Delete | View, Update, Insert, Delete | View, Update, Insert, Delete | View |
| Policy Recommendation | View, Update, Insert, Delete | View, Update, Insert, Delete | View, Update | View |
| Relationship Families | ||||
| Has Event | View, Update, Insert, Delete | View, Update, Insert, Delete | View, Update | View |
Policy Designer URLs
There is one URL route associated with Policy Designer: policy. The following table describes the various paths that build on the route, and the values that you can specify for each element in the path.
| Element | Description | Accepted Value(s) | Notes |
|---|---|---|---|
| policy: Opens a new policy in the Details workspace. | |||
| policy/overview: Opens the Policy Designer Overview page. | |||
| policy/<EntityKey>/<WorkspaceName>: Opens a new or existing policy in the Policy Designer page. | |||
| <EntityKey> | Specifies the policy that you want to open. | Any numeric Entity Key that corresponds to an existing policy. | Opens the specified policy in the Details workspace. This value is required to open an existing policy from a URL. |
| 0 | Opens a new policy in the Details workspace. | ||
| <WorkspaceName> | Specifies the workspace in which you want to open the policy. | details | The specified policy will appear in the Details workspace. |
| design | The specified policy will appear in the Design workspace. | ||
| policy/instance/<InstanceEntityKey>: Opens a policy instance in the Instances pane. | |||
| <Instance EntityKey> | Specifies the policy instance that you want to open. | Any numeric Entity Key that corresponds to an existing policy instance. | The specified policy instance will appear in the Instances pane in the Design workspace for the policy that contains the instance. |
| policy/Execute/<PolicyName>: Executes all active instances associated with a policy. | |||
| <PolicyName> | Specifies the name of the policy that you want to execute. | Name of a policy. | None. |
| policy/Execute/<PolicyName>/<InstanceName1>/<InstanceName2>/...../<InstanceNameN>: Executes specific instances associated with a policy. | |||
| <PolicyName> | Specifies the name of the policy that you want to execute. | Name of a policy. | None. |
| <InstanceName> | Specifies the name of the policy instance that you want to execute. | Name of an instance associated with the specified policy. | You can specify multiple instance names associated with the specified policy. |
Example URLs
| Example URL | Destination |
|---|---|
|
#policy -or- #policy/0/details | The Details workspace for a new policy. |
|
#policy/64253414514 -or- #policy/64253414514/details | The Details workspace for the policy with the Entity Key 64253414514. |
|
#policy/64253414514/design | The Design workspace for the policy with the Entity Key 64253414514. |
|
#policy/instance/64253414515 | The Design workspace for the policy that contains the policy instance with the Entity Key 64253414515. The specified policy instance is selected in the Instances pane. |
| #policy/Execute/Trigger Notification | A new tab displaying a message, indicating successful execution of all active instances associated with the Trigger Notification policy. |
| #policy/Execute/Trigger Notification/Instance for Notifying Technician/ Instance for Notifying Manager | A new tab displaying a message, indicating successful execution of the Instance for Notifying Technician and Instance for Notifying Manager instances associated with the Trigger Notification policy. |
Policy Designer Site Filtering
The Policy and Policy Instances families are not enabled for site filtering. This means that any user who has the required security and license permissions can access and modify these records. However, as policies and policy instances interact with other records that are enabled for site filtering, it is important to understand what modifications a user may or may not make when working with policies that manipulate records across multiple sites.
Overview Page
On the Policy Designer Overview page, any user can view all policies and related information, such as execution results and policy instance information. In addition, any user may open any policy and modify the policy details, activate or deactivate the policy, or modify the policy model.
Instances
Any user may create new policy instances; however, users may only select records for the sites to which they have access when assigning records to a policy instance. When viewing existing policy instances, a user can modify (for example, save, activate, or deactivate) instances that contain records to which they do not have access (that is, records that were already associated with the policy instance by another user with access to different sites). However, users cannot validate an instance containing records to which they do not have access.
Validation
If a user attempts to validate an instance containing records to which they do not have access, the validation results will include errors indicating that the user does not have permission to view certain entities. However, if an instance indirectly references records to which users do not have access (for example, via the Query node), the instance can be validated and the validation results will respect site filtering based on the access of the signed in user.
So, for example, if a policy contains a Query node and a user validates an instance, the results of the query include only the records for the sites to which that user has access.
Ad Hoc validation operates in the same way, with the addition that values entered by the user in Ad Hoc validation are passed directly to validation. For example, assume that a policy uses the Entity Key of an asset record as the input parameter to a query to find information about the asset. The user enters a value in the Entity Key input box in Ad Hoc validation and runs validation. If the record with that entity key belongs to a site to which the user does not have access, validation will run and no validation error specific to site filtering will be generated, however, the Query node will return no results. This behavior is similar to the result if a user enters a value in the Entity Key input box which does not match any record in the database.
Execution
Policies are executed by a Super User and therefore has no site restrictions. Because of this, the actual results of a policy execution may differ from the validation results seen by a specific user.
To restrict the execution results based on Site, any queries used in a policy must be designed to return appropriate results. For example, you could specify an asset entity key as an input parameter to find related entities, which will generally be site filtered.
Execution Results
All users can view all execution history summary and details for all sites. However, if an execution result contains a hyperlink to a record for which a user does not have access, that user cannot access the record (that is, an error message will appear).
Consider an organization that has three sites, Site X, Site Y, and Site Z. A policy is created with the following instances:
- Instance 1: References a piece of equipment that is assigned to Site X.
- Instance 2: References a piece of equipment that is assigned to Site Y.
- Instance 3: References a piece of equipment that is assigned to Site Z.
| Scenario | Description |
|---|---|
| Scenario 1: User assigned to only Site X | This user may create new policy instances, but he or she may only select records for Site X when assigning records to a policy instance. The user can modify and validate Instance 1. The user can modify Instance 2 and Instance 3, but cannot validate these instances. If an execution result contains a hyperlink to a record from Site Y or Site Z, the user cannot access the record (that is, an error message will appear). |
| Scenario 2: User assigned to both Site X and Site Y | This user may create new policy instances and select records for Site X and Site Y when assigning records to a policy instance. The user can modify and validate Instance 1 and Instance 2. The user can modify Instance 3, but cannot validate these instances. If an execution result contains a hyperlink to a record from Site Z, the user cannot access the record (that is, an error message will appear). |
| Scenario 3: Super User | This user may create new policy instances and select records for Site X, Site Y, or Site Z when assigning records to a policy instance. The user can modify and validate any instance. |
About Policy Security and Ownership
Policy Designer Security Groups
The following table shows the Policy Designer activities that are accessible to members of the baseline Policy Designer Security Groups.
| Activity | MI Policy Administrator | MI Policy Designer | MI Policy User | MI Policy Viewer |
|---|---|---|---|---|
| Configure policy execution history retention settings |

| None | None | None |
| Create a new policy |
|
| None | None |
| Make changes to an existing policy, including the policy model and execution settings |
|
| None | None |
| Save a copy of a policy |
|
| None | None |
|
|
| None | None | |
| Take ownership of a policy |
|
| None | None |
| Add or edit policy instances |
|
|
| None |
| Validate a policy |
|
|
|
|
| View execution history |
|
|
|
|
Policy Ownership
Each policy is owned by a user who is responsible for the policy and is granted exclusive privileges to modify the policy model and execution settings. The user who creates a policy is automatically assigned as the owner. If a different user wants to modify the policy, he or she must first take ownership of the policy.
In order to be a policy owner, a user must be a Super User or a member of the MI Policy Designer Security Group. If any individual policy security is applied to the policy, the user must also have Designer permission.
About The Notification Bar
The notification bar that appears at the top of the page in Policy Designer provides real-time validation feedback on the configuration of a policy. The following image shows an example of the notification bar.

The notification bar appears either red or yellow, depending on the nature of the message:
- Red: The notification bar appears red for notifications that identify missing or invalid data in fields that are required for the policy to be fully configured. To avoid the execution of an invalid policy, you cannot save an active policy while red notifications appear. You must either complete the configuration of the policy or deactivate it prior to saving it.
- Yellow: The notification bar appears yellow to identify optional data that is missing or warnings about potentially incorrect configurations. While you can save policies with yellow notifications, you should confirm that the corresponding configurations are correct as you intended them.
Notifications appear at the top of the screen until the requirements described in the message are fulfilled. If multiple notifications are displayed at once, you can scroll through them using the < and > buttons.
Depending upon the notification, the bar may include a View Details link, which you can select for more information, and a Go To Source link, which you can select to go to the source of the notification.
About Execution Result Summaries
- No Action Taken
- The policy was executed but no actions were triggered. For example, this might occur if the policy's input values did not meet the conditions defined in the policy logic.

- <Action Taken>
- The policy was executed and resulted in actions. The actions are listed in the Summary column of the grid.

- Errors Occurred
- There was an error in the policy logic, and no action was taken. For example, this might occur if a node's Properties window did not contain a value in a required field.

When you select an execution summary in the Execution History pane, detailed execution results are displayed on the model canvas. However, if changes have been made to the policy model since the selected execution occurred, you will not be able to view that details of that execution on the canvas.
- If the Execution History Log Setting selected for a policy is Errors Only, you will see only the executions that resulted in an error.
- If the policy model has been updated since the policy execution occurred, you may be unable to access the detailed execution results.
About Validation and Execution Details
After you validate or execute a policy, detailed results of the validation or execution can be viewed on the model canvas. Validation details appear on the model canvas automatically when you run the validation process. Execution details appear when you select a past execution on the Execution History pane.
Node Color-Coding
To indicate the results of an execution, the nodes in the policy model are color-coded as follows:
- Green
- Indicates that the node was executed successfully (i.e., the node was configured correctly, the source value was valid, and the execution produced a valid result).
- Pale yellow
- Indicates that the node was executed successfully, but raised a warning that the policy designer should review and address if needed.
- Red
- Indicates that the node was not executed successfully due to an error. When a node's execution encounters an error, subsequent nodes in the model will not be executed.
- Gray
- Indicates that the node was not executed. This may be expected (i.e., due to the policy logic) or unexpected (i.e., due to errors in the execution of preceding nodes).
The following example diagram shows nodes in each of these states.

Node Execution Details Window
After you validate or execute a policy, you can select a node in the policy model to view the execution details of the node in the Node Execution Details window. If the node was successfully executed, the inputs and outputs (for example, certain values, logical results, or actions) of the node appear in the execution details of the node. If the execution of the node resulted in a warning or error, the window provides additional details about the cause of the warning or error. In addition to the execution details of the node, the Node Execution Details window for the Sub Policy node contains the View Execution Details link. You can use the link to view the model and execution details of the sub policy that is mapped to the node.
The following image is an example of the Node Execution Details window for a Condition node that was executed successfully with a logical result of Yes.

About Specifying Dates and Times to Evaluate in Policy Designer
In the Properties window for some nodes, you can specify a date and time that should be used when evaluating values. For example, consider the following Properties window for a Collection Filter node that is configured to filter Measurement Location reading values to only those that were recorded in the past 7 days.

You can define specific date and time values in the standard format YYYY-MM-DD HH: mm: ss, where the time values use a 24-hour time format.
Alternatively, you can use a combination of acceptable values to specify dates and times that are relative to the time at which the policy is executed.
Specifying Relative Dates and Times
When using relative dates and times, the actual date and time that is evaluated depends on the date and time at which the policy is executed. For example, if you specify a relative date of Sunday, the Predix Essentials system will use the most recent Sunday (at 12:00:00 A.M. in the policy's time zone) relative to the date and time that the policy is being executed. So, if a policy is executed on Friday, July 13, the evaluated date would be Sunday, July 8, as illustrated in the image below, where:
- The yellow star identifies the policy execution date.
- The red box indicates the evaluated date relative to the policy execution date.

You can adjust relative date and time values by adding operators and variables to the relative date:
- Operator
- Specifies whether or not time should be added to or subtracted from the relative date and time. You can use the + (plus sign) or - (minus sign) operators.
- Variable
- Specifies the amount of time to add to or subtract from the relative date and time.
For example, if you specify Sunday + 4 hours, the evaluated date will be 4:00:00 A.M. on the most recent Sunday.
Acceptable Format for Relative Date and Time Values
The following table describes the constants that you can use to specify relative dates and times. Note that:- Relative dates and times are determined in respect to the policy's time zone.
- These values are not localized, so you must enter them in English.
|
Constant |
Meaning |
|---|---|
|
Constants for Days | |
|
*, start |
The day and time that the policy execution began. |
|
now |
The day and time that the specific node is executed. For example, policy execution might begin at 1:00:00 A.M., but a subsequent node may not be executed until 1:00:25 A.M. If now is specified in the subsequent node, the Predix Essentials system will use the time 1:00:25 A.M. |
|
t, today |
12:00 A.M. of the current day. |
|
y, yesterday |
12:00 A.M. of the previous day. |
|
Sun, Sunday |
12:00 A.M. of the most recent Sunday. |
|
Mon, Monday |
12:00 A.M. of the most recent Monday. |
|
Tue, Tuesday |
12:00 A.M. of the most recent Tuesday. |
|
Wed, Wednesday |
12:00 A.M. of the most recent Wednesday. |
|
Thu, Thursday |
12:00 A.M. of the most recent Thursday. |
|
Fri, Friday |
12:00 A.M. of the most recent Friday. |
|
Sat, Saturday |
12:00 A.M. of the most recent Saturday. |
|
Constants for Months | |
|
Jan, January |
12:00 A.M. of the most recent January 1st. |
|
Feb, February |
12:00 A.M. of the most recent February 1st. |
|
Mar, March |
12:00 A.M. of the most recent March 1st. |
|
Apr, April |
12:00 A.M. of the most recent April 1st. |
|
May |
12:00 A.M. of the most recent May 1st. |
|
Jun, June |
12:00 A.M. of the most recent June 1st. |
|
Jul, July |
12:00 A.M. of the most recent July 1st. |
|
Aug, August |
12:00 A.M. of the most recent August 1st. |
|
Sep, September |
12:00 A.M. of the most recent September 1st. |
|
Oct, October |
12:00 A.M. of the most recent October 1st. |
|
Nov, November |
12:00 A.M. of the most recent November 1st. |
|
Dec, December |
12:00 A.M. of the most recent December 1st. |
Acceptable Format for Variables
The following table describes the variables you can use with relative dates. Note that these values are not localized, so you must enter them in English.
|
Variable |
Description |
Valid Number Type |
Example |
|---|---|---|---|
|
s, sec, second, seconds |
Adjusts the time by the specified number of seconds. | Integer or decimal | 7 sec |
|
m, min, minute, minutes |
Adjusts the time by the specified number of minutes. | Integer or decimal | 10 minutes |
|
h, hour, hours |
Adjusts the time by the specified number of hours. | Integer or decimal | 6.5 h |
|
d, day, days |
Adjusts the time by the specified number of days. A day is interpreted as 24 hours and does not account for Daylight Savings Time. | Integer | 1 day |
|
w, week, weeks |
Adjusts the time by the specified number of weeks. | Integer |
3 w |
|
mo, month, months |
Adjusts the time by the specified number of months. | Integer | 6 months |
|
y, year, years |
Adjusts the time by the specified number of years. | Integer | 2 years |
|
[ddd].HH:MM:SS |
Adjusts the time by the specified time period. | N/A |
15.12:15:35 |
How the Policy Time Zone Affects Relative Dates and Times
When you specify a date and time that is relative to 12:00:00 A.M. of a specific day, the date range criteria and the policy time zone work together to determine the range of data that is included in the evaluation.
For example, suppose that you set up two policies to evaluate the exact same data, but one policy uses Eastern Time (UTC - 5) and the other uses Pacific Time (UTC - 8). If you specify that the policy should evaluate reading values starting at the relative time of today + 4 hours, the start time will be interpreted as 4:00:00 A.M., in the policy's time zone, of the current day. Because 4:00 A.M. Eastern Time occurs 3 hours earlier than 4:00 A.M. Pacific Time, each of those policies will end up evaluating a different set of data.
The following image illustrates this difference, where:
- The start and end time for the policy using Eastern Time is represented by the red shaded region.
- The start and end time for the policy using Pacific Time is represented by the green shaded region.

About Specifying Amounts of Time to Evaluate in Policy Designer
In the Properties window for some nodes, you can specify an amount of time (i.e., a time span) that should be used when evaluating values. For example, consider the following Properties window for a Comparison node that is configured to determine whether or not the Accumulated Time output of a Threshold Statistics node is greater than 3 days.

Acceptable Format for Amounts of Time
The following table describes the values that you can use to specify an amount of time to evaluate. Note that:
- These values are not localized, so you must enter them in English.
- You can use negative numbers.
- You cannot specify a number of months or years because some months and years have a different number of days. Instead, you should specify a number of days (e.g., 30 days or 365 days).
| Value | Description | Valid Number Type | Example |
|---|---|---|---|
| s, sec, second, seconds | Specifies a number of seconds. | Integer or decimal | 15 seconds |
| m, min, minute, minutes | Specifies a number of minutes. | Integer or decimal | 10.5 min |
| h, hour, hours | Specifies a number of hours. | Integer or decimal | 1 hour |
| d, day, days | Specifies a number of days.A day is interpreted as 24 hours and does not account for Daylight Savings Time. | Integer | 5 d |
| w, week, weeks | Specifies a number of weeks. | Integer | 7 weeks |
| [ddd].HH:MM:SS | Specifies a number of days, hours, minutes, and seconds. | N/A | 300.23:13:22 |
About Constants for Specific Values
To streamline the creation of calculations in policies, you can use constants to specify certain values. These constants can be specified in a Constant or Point Value node with an appropriate data type, and then used as an input to any other node in your policy.
The following table describes the supported constants.
| Constant | Meaning | Data Type |
|---|---|---|
| Pi, pi | Pi, rounded to 14 decimal places (i.e., 3.14159265358979) | Decimal |
| E, e | Euler’s number, rounded to 14 decimal places (i.e., 2.71828182845904) | Decimal |
| Null, null | Null (i.e., no value) | Any data type other than string. |
About Units of Measure in Policies
During validation and execution of policies involving numeric values, Units of Measure (UOMs) are handled in the following ways for conversion and display of the values:
- If numeric values with different base UOMs are calculated or compared, the policy must be configured to apply the required UOM conversions before performing any action on the values or updating any of the values in other records.
- If a numeric value is required to be displayed in the execution summary of a policy or in a notification triggered by the policy, the value appears in the base UOM and not in the UOM Conversion Set associated with the user.
- Any value that you specify to be updated in a record through a policy is considered to be in the base UOM of the corresponding field.
Values with Different Base UOMs
Suppose that values from two temperature related fields with different UOMs are compared in a policy, which is configured to send an email notification if one temperature exceeds the other. The first temperature has a base unit of Kelvin and the second has a base unit of Fahrenheit. In this scenario, the policy must be configured to convert the first temperature value from Kelvin to Fahrenheit, and then make the comparison.
Precedence of Base UOM over User UOM Conversion Set
Suppose that the UOM associated with a temperature related field is Fahrenheit and the UOM Conversion Set associated with a user is configured to display all values of temperature related fields in Kelvin. Now, a policy is configured such that in a certain condition, the numeric value of the temperature related field is sent in an email notification to the user. In this scenario, the temperature value in the email notification appears in Fahrenheit even though the UOM Conversion Set associated with the user is configured to display temperature values in Kelvin.