Action Nodes
About Action Nodes in Policies
Action nodes represent actions that are performed when a policy is executed and the conditions preceding the Action node are met.
Action Nodes
Create Alert Nodes in Policy Designer
A Create Alert node represents an action to create an alert for an enterprise, site, segment, or asset. You can specify the alert template and attributes for the new alert as input values in the Properties window for the node.
The output values of the Create Alert node are the unique ID and URL of the new alert.
Node Properties
The Properties window for a Create Alert node contains the items that are described in the following table.
| Field | Description | Note |
|---|---|---|
| Alert Name | Specifies the type of alert that the Create Alert node will create. | This list contains all the alert templates that are defined in Predix Essentials. |
| Start Time | Specifies the Event Start Time for the alert. | None. |
| End Time | Specifies the End Time for the alert. | This field appears only if you select Yes in the Recurring field. |
| Storage Receive Time | Specifies the Storage Receive Time for the alert. | This field appears only if you select No in the Recurring field. |
| Asset Unique ID | Specifies the unique identifier of the enterprise, site, segment, or asset for which you want to create an alert. | If you want to create the alert for an Equipment or a Functional Location record configured to represent an enterprise, site, segment, or asset, you can use the value in the Unique ID field of the record as the Asset Unique ID value for the node. |
| Recurring | Specifies whether to create a recurring alert. | None. |
| Frequency | Specifies the frequency of a recurring alert. | This field is enabled only if you select Yes in the Recurring field. |
| Field | Specifies an attribute for the new alert. | This list contains all the standard and custom attributes that are configured for alerts in Predix Essentials. |
| Value | Specifies the new value for the corresponding attribute. | The values that you specify must comply with the requirements of the corresponding attribute. |
For full details of the standard attributes and accepted values, refer to the API documentation for creating an Alert (i.e. POST /alertmgmt/v1/alarms) at https://apm-apidocs-rc.int-app.aws-usw02-pr.predix.io/.
Some of the standard attributes for Alerts that you can set in policy are described in the following table. If an attribute is a JSON object type, you can use a Text node to create the required value, using inputs including tag ids, timestamps, and reading values from the other nodes in the policy.
| Field | Data Type | Usage Notes | Example |
|---|---|---|---|
| Severity | Numeric | By default, the severity of an alert is set automatically according to the value specified in the selected Alert Template. You can override the default severity when creating an alert by specifying a value in the policy. | None |
| scanGroupData | JSON Object | A list of key value pairs containing the tags and values that triggered the alert. |
|
| incident | JSON Object | A list of key value pairs containing additional alert details. |
|
| tagsOfInterest, | JSON Object | A list of time series tags that may be of interest when reviewing the alert. |
|
Example of a Text node configured to create a JSON object for the incident field:
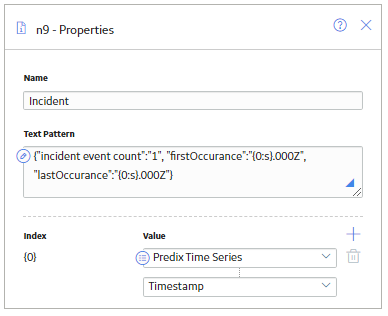
Example of a Text node configure to create a JSON object for the scanGroupData field:

Create Alert node
The following example illustrates how you can use a Create Alert node to create an alert if a reading in a time series exceeds a specified limit.

In this example, the most recent reading from a time series is represented by the Last Reading node. The reading is then compared with a threshold value that is represented by the Point Value node. If the reading is greater than the threshold value, the Create Alert node creates an alert and assigns it to the asset represented by the Equipment node.
The following image shows the Properties window of the Create Alert node described in the example.

Create Recommendation Nodes in Policy Designer
The outputs of the Create Recommendation node are the following system fields for the record that the node creates: Content GUID, Entity Key, Entity ID, and Site Key.
Node Properties
The Properties window for a Create Recommendation node contains the items that are described in the following table. In each section, you can select  to display the output of a predecessor node. The values that you define in each section will be used to populate the corresponding fields in the Policy Recommendation record that is created.
| Item | Description | Notes |
|---|---|---|
| Associated Reference section | Specifies the Reference ID of the event or any other entity that originated the recommendation. | None. |
| State Assignee User ID | Specifies the user that is assigned to the initial state. | The state assignee value must match exactly a valid User ID for an active Security User. |
| Create Work Request section |
Specifies whether a work request for the EAM system that you have configured in Predix Essentials will be created from the Policy Recommendation record. | The value in this section must be a logical result (that is, Yes or No). |
| Equipment ID section | The Record ID of the Equipment record to which the Policy Recommendation record will be linked. |
You do not need to specify a value in both the Equipment ID and Functional Location ID sections. If you specify a value in either section, the Predix Essentials system will automatically create relationships between the related Equipment, Functional Location, and Recommendation records. However, if you do specify values in both sections, they must correspond to the same asset. |
| Event Start Date section | Specifies the timestamp that is associated with the beginning of the event for which the Policy Recommendation record is created. | If you enter a date, you must use the correct format. |
| Functional Location ID section | The Record ID of the Functional Location record to which the Policy Recommendation record will be linked. |
You do not need to specify a value in both the Equipment ID and Functional Location ID sections. If you specify a value in either section, the Predix Essentials system will automatically create relationships between the related Equipment, Functional Location, and Recommendation records. However, if you do specify values in both sections, they must correspond to the same asset. |
| Recommendation Headline section | A short description of the recommended action. | None. |
| Recommendation Priority section | Specifies a priority value used to rank the importance of the recommendation. | The value that you specify must be a valid system code and be valid according to any field-level rules that you have specified for the Recommendation Priority field. |
| Target Completion Date | The date by which the recommended action should be completed. | This value is required. If you enter a date, you must use the correct format. |
Deactivate This Instance Nodes in Policy Designer
A Deactivate This Instance node represents an action to deactivate the current policy instance. You can use this node to ensure that an action is taken only once per instance.
When a Deactivate This Instance node is executed, the policy instance whose values caused the node to be executed will be deactivated automatically. If more than one policy instance is associated with the policy, all other policy instances will remain unchanged.
After the conditions that caused the instance to be deactivated have been addressed, you can reactivate the policy instance manually from the Instances pane in Policy Designer or the Policies section in Asset Health Manager.
Node Properties
Other than optionally specifying a name for the node, there are no properties to configure for a Deactivate This Instance node.
The following example illustrates how you can use a Deactivate This Instance node to ensure that only one Policy Recommendation record is created as a result of the policy conditions being met for a specific policy instance. Consider the following nodes and connection.

In this example, the OPC Tag node and the Condition node to which it is connected indicate that a Policy Recommendation record should be created when the DA Reading Value associated with the OPC Tag node exceeds 200.
Assume that the following records are associated with the OPC Tag node via policy instances:
- Pump 101, whose DA Reading Value is greater than 200.
- Pump 102, whose DA Reading Value is not greater than 200.
When the policy is executed, a Policy Recommendation record for Pump 101 will be created. Because the policy also includes a Deactivate This Instance node, after the Policy Recommendation record is created, the Predix Essentials system will deactivate automatically the policy instance that is associated with Pump 101. The policy instance that is associated with Pump 102 will remain active.
Because the policy instance that is associated with Pump 101 is no longer active, even if the DA Reading Value associated with the pump continues to exceed 200, additional Policy Recommendation records will not be created.
Email Contact Nodes in Policy Designer
An Email Contact node represents an action to send an email message. When an Email Contact node is executed, an email message with a summary of the policy execution will be sent to the specified recipient(s). You can define a subject, message, and a table of results to be included in the email.
Node Properties
The Properties window for an Email Contact node contains the items that are described in the following table.
| Item | Description | Notes |
|---|---|---|
| To Address | The email address(es) to which the message should be sent. |
You can select When you specify a constant value, you can enter one or more email addresses directly in the text box, or you can select the If you enter more than one email address in the text box, each email address must be separated by a comma or semicolon. |
|
Message | Content that you want to include in the email message in addition to the summary of the policy execution (which is included by default). |
You can select |
|
Subject | The subject line that you want to appear in the email message. The length is limited to 255 characters. |
You can select If you do not specify a value in this section, the email subject line is set to "Notification from Policy <Name>"). |
|
Show Policy logic summary? | Specifies whether the Policy Logic Summary is included in the email message or not. | The option Yes is selected by default. In case you do not need the summary displayed in the email message, you can select the option No. |
|
Results Table | Specifies how the query result is shared in an email message. | You can select from the list to Embed in email message, Attach to email as file, or Both. Note: The attachment is shared only in the .csv format. Note: Attached files are stored in GE Digital APM as Reference Document records. If the attached file size exceeds the configured limit, the Reference Document is created but the file is not attached to the email message. You need to access GE Digital APM to open the Reference Document. |
|
Include query/collection results section | The query or collection results are included in the email message. By default, the results are displayed in the table format. | You can select query or collection from the drop down You can select Note: Numeric values are displayed to two decimal places. Dates and times are displayed in UTC. Note: Tables embedded in the email body are truncated to display the first 500 rows only. Note: To avoid display issues with some email clients, it is recommended to limit the number of columns in the embedded table to 30. |
 button to select a recipient via the
 Return Value Nodes in Policy Designer
A Return Value node represents an action to return a specific value. You can use this node for a variety of reason, such as:
- To include specified values in the execution results summary for a policy.
- While designing a policy, to show the result of a specific node in order to verify that certain values are being evaluated as expected in cases where the value would not otherwise be displayed in the validation results (because validation results only display the values that are used by a subsequent node). Once the policy logic is fully validated, you can remove the Return Value nodes to make the policy smaller.
- When used within a baseline policy for a Predix Essentials analysis (for example, Risk Based Inspection), to pass values from the policy back to the analysis process that triggers the policy.
Node Properties
The Properties window for a Return Value node contains the items that are described in the following table.
|
Item |
Description |
Notes |
|---|---|---|
| Return Value section | Specifies the value that you want to return. |
You can select |
Return Value node
The following example illustrates how you can use a Return Value node to include relevant values in the execution results summary of the policy. Consider the following nodes and connections.

In this policy, the two Return Value nodes are configured to return the Accumulated Time and Count values, respectively, from the Threshold Statistics node. Because the Return Value nodes are included in this policy, the Accumulated Time and Count values are easily accessible in the execution results summary of the policy.
Sub Policy Nodes in Policy Designer
A Sub Policy node is an Action node that you can use in the policy model to pass values from one policy (the calling policy) to be evaluated or acted on by a different policy (the sub policy). Results from the sub policy may be returned to the calling policy for further evaluation or action.
A sub policy can be created for commonly used policy logic to reduce policy development time and ensure consistency. It also allows large policy models to be broken down into a series of sub policies, which are easier to understand and perform better in the Policy Designer user interface.
Node Properties
The Properties window for a Sub Policy node contains items that are described in the following table.
| Item | Description | Note |
|---|---|---|
| Policy | Name of the sub policy to call. | None |
| Iterate Over Collection? | Specifies whether the sub policy must be executed for each row in a collection that is used as an input for the node. | None |
| Execute Specific Instance? | Specifies whether a specific instance associated with the sub policy must be executed. | If you select Yes, in the Instance Id box that appears, you can specify the name of the sub policy instance that you want to be executed. |
| Additional sections corresponding to the inputs defined by the Point Value nodes contained in the sub policy. | Specifies the values to be represented by the Point Value nodes in the sub policy. | A Point Value node in the sub policy can represent a single value. If the Sub Policy node is configured to iterate the execution of the associated sub policy, you can specify a column of an input collection as the input for a Point Value node in the sub policy. |
Working with Sub Policies
You must configure the sub policy such that all the required inputs are defined as single value Point Value nodes (that is, collection inputs are not supported). Results from the sub policy may be passed back to the calling policy by using Return Value nodes. If you configure the sub policy to be executed for each row of an input collection, each output of the sub policy is a collection of values.
- Make sure that the sub policies called by a policy are active. If a sub policy is inactive, a message appears in the notification bar and the calling policy cannot be activated.
- Changes to Point Value or Return Value nodes, or the name of a sub policy will not be automatically reflected in calling policies that use the sub policy. It is possible to specify additional security for a sub policy to minimize the inadvertent impact to other policies.
- While it is possible for a sub policy to act as a calling policy for another sub policy, it is essential that a circular execution path is not created. In other words, if policy A calls policy B, which calls policy C, then policy C must not call policy A or policy B. If such a circular execution path is detected while you are editing the policy, a message appears in the notification bar. However, a circular execution path where the sub policy acts on the same entity that triggers the calling policy is not detected and no message appears in the notification bar. Make sure that such a circular execution path is not created in a policy.
- If an error occurs during the execution of a sub policy, execution of the calling policy fails, irrespective of the execution status of other sub policies called by the policy.
- If a Return Value node in a sub policy represents a collection, other nodes in the calling policy model that use the output of the Sub Policy node cannot process the values in the columns of the collection.
- You cannot use a Create Event node paired with a Close Event node in a sub policy to create and close Policy Events with duration, unless you are calling a specific instance of the sub policy because the Close Event node depends on the open Policy Event that is linked to the policy instance.
Sub Policy Node Execution Details
After you validate or execute a policy that contains a Sub Policy node, you can select the Sub Policy node to view the execution details of the node in the Node Execution Details window. Along with viewing the execution details of the node, you can select the View Execution Details link in the Node Execution Details window to view the policy model and execution details of the sub policy that is mapped to the node.
The following image is an example of the Node Execution Details window for a Sub Policy node:

The following image is an example of the Sub policy execution details for policy window that appears when you select the View Execution Details link in the Node Execution Details window for a Sub Policy node:

Sub Policy Node Configured for Single Execution
The following is an example of how a Sub Policy node can be used to implement a standard calculation method which could be applied in any number of other policies. Consider the following nodes and connections:

In this example, the latest reading values from two measurement locations and a constant value are passed into a sub policy, which calculates a value to be used in the Email node. The Properties window for the Sub Policy node is shown in the following image:

The sub policy used in the above example includes Is Null nodes which provide default values to be used if the calling policy does not supply an input value, as shown in the following image:

Sub Policy Node Configured for Iterated Execution
The following is an example of how a Sub Policy node can be used to add a collection of calculated values to a health indicator.

In this example, the Collection Filter nodes are used to filter the readings that are taken for the last two days from two Measurement Location nodes. An Entity node is used to define the health indicator record to which the readings must be added. The collections of readings and time stamps are passed to the sub policy and a single health indicator entity key value is used for each iteration of the sub policy. Each execution of the sub policy calculates a new value based on the readings from the two measurement locations and updates it to the health indicator. The following image shows the Properties window for the Sub Policy node:

The following image shows the sub policy used in the above example:

The sub policy contains four Point Value input nodes. The Reading Value 1, Reading Value 2, and Health Indicator Key Point Value nodes are configured to represent Decimal data type values, and the Reading Date/Time node is configured to represent a Time & Date data type value. Even though the calling policy is configured to pass a collection of values, each iteration of the sub policy will use a single value from each input collection.
The values represented by the Reading Value 1, Reading Value 2 nodes are passed to a Math node which calculates a new value to be written to the health indicator by the Add Value to Health Indicator node. The Return Value node is configured to return the single value output from the Math node. In the calling policy, the corresponding output from the Sub Policy node is a collection made up of the results from each iteration of the sub policy.