Policy Instances
About Primary Records and Primary Nodes
The primary record is a record in a policy instance to which most or all other records in the instance are linked. The primary record may or may not be represented by a node in the policy model. Not every policy will be configured such that its instances have primary records, but if it is, you can use the primary record feature to streamline the process of creating policy instances.
Typically when creating a policy instance, for each node in the policy model, you must access a Search window and configure the appropriate search criteria in order to locate the record that you want to assign to the node. If, however, you specify a primary record, the search criteria are configured automatically to return only records that are linked to the primary record. Further, rather than using a Search window at all, you can simply select a record from a list of records that are linked to the primary record.
If the primary record is represented by a node in the policy model, before you create a policy instance, you can specify that node as the primary node. Then, in each policy that you create, the record that you assign to the primary node will become the primary record automatically.
If the primary record is not represented by a node in the policy model, you can specify the primary record directly in each policy instance.
Primary record represented by a node in the policy model
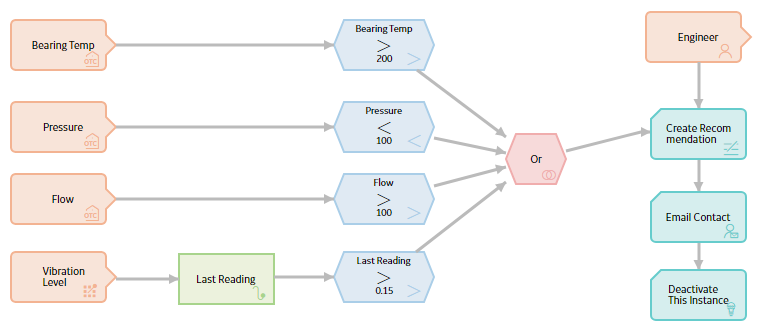
Consider the following policy that monitors various types of information for a piece of equipment.

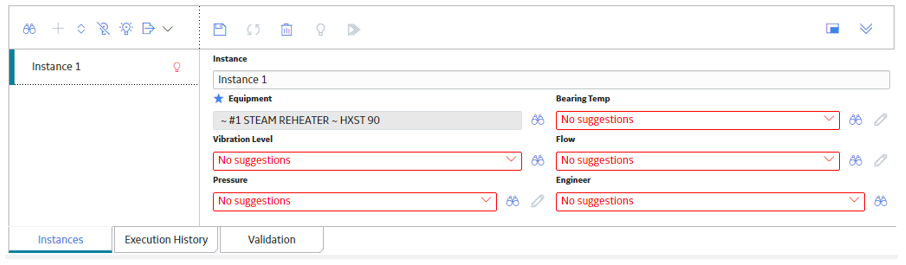
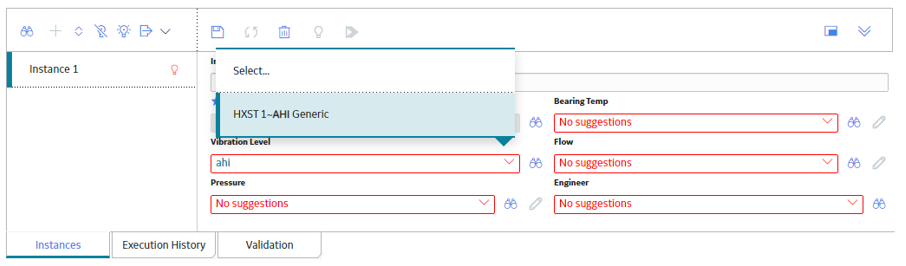
The Equipment node in this model represents an Equipment record to which all of the other input records (represented by other Input nodes) are linked. Therefore, the Equipment node has been specified as the primary node, as indicated by the blue star that appears on the node in the model.
In a policy instance associated with this policy, a blue star appears next to the node name, indicating that the record specified for the Equipment node will be the primary record. In the following image, an Equipment record with the Record ID ~ #1 STEAM REHEATER ~ HXST90 has been specified for the Equipment node and is, as a result, also the primary record for this policy instance.
Primary record not represented by a node in the policy model
Consider the following policy that monitors various types of information for a piece of equipment.
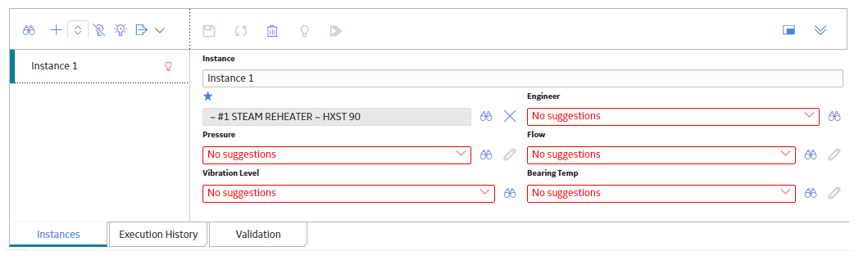
The Input nodes in this policy model represent records that are related to a single Equipment record, but the Equipment record itself is not represented by a node in the model. Therefore, there is not a primary node in this policy model. However, you can still specify a primary record in each policy instance.
In a policy instance that is associated with this policy, the top row contains a blue star that indicates the primary record, but the row does not contain a node name because there is not a primary node in the model. In the following image, an Equipment record with the Record ID ~ #1 STEAM REHEATER ~ HXST90 is specified as the primary record.
Assigning records to nodes after a primary record is specified
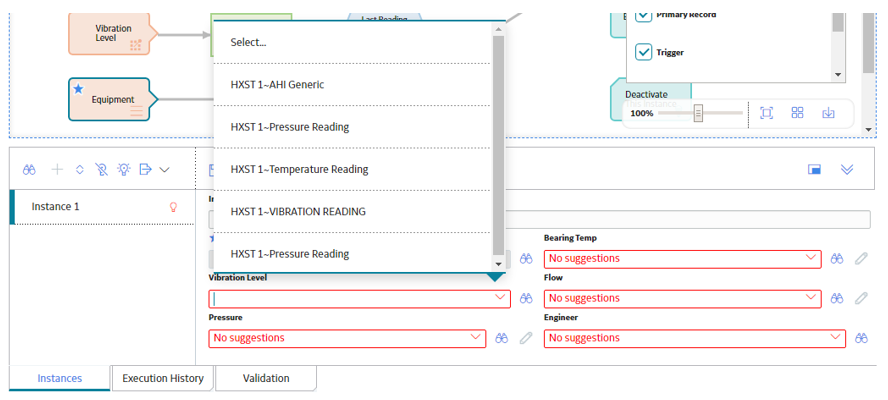
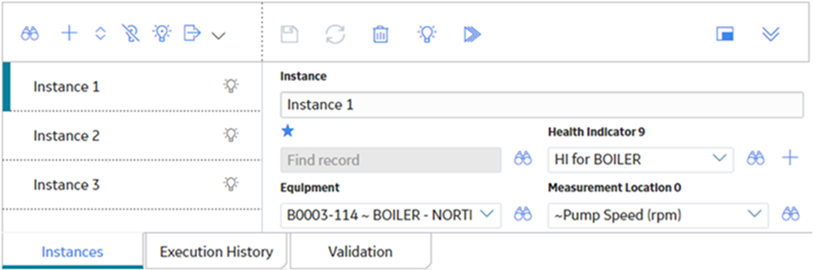
Continuing with the previous examples in this topic, after a primary record has been specified, when you assign records to the remaining nodes in the model, you can select the record you want from the list that is enabled. As shown in the following image, the list contains records in the database that are linked to the Equipment record ~ #1 STEAM REHEATER ~ HXST90.
You can also enter a Record ID directly in the cell. When you do this, the list is re-populated with the linked records whose Record IDs contain the value that you entered, as shown in the following image.
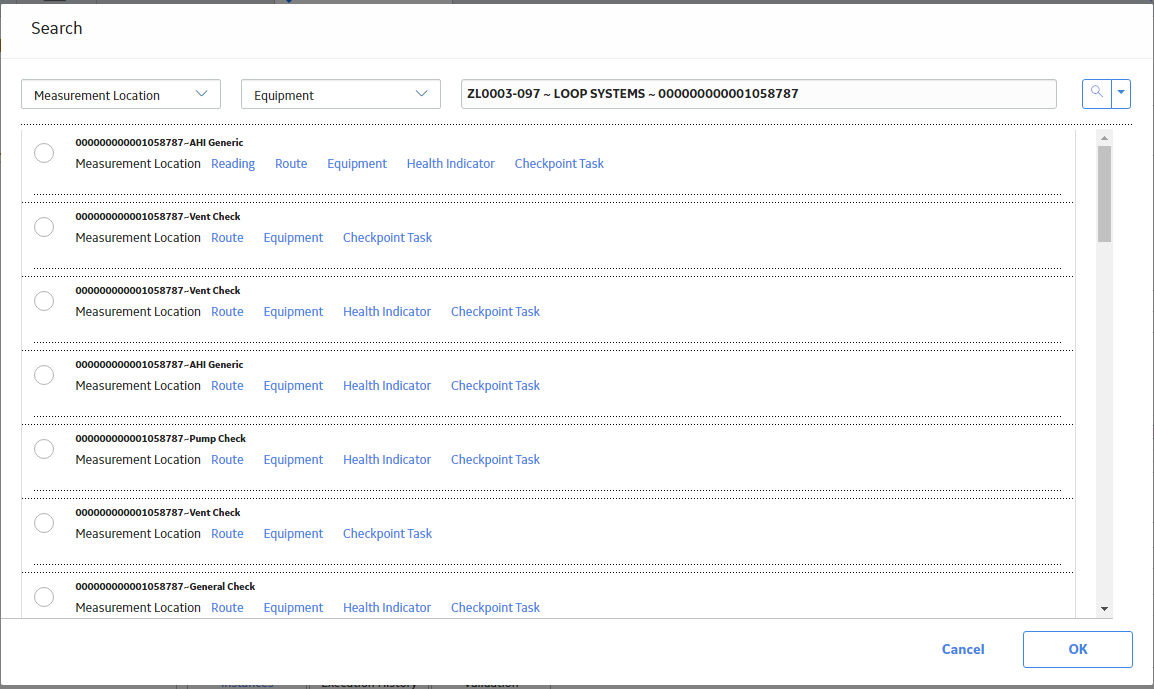
Alternately, you can use the Search window to search for and select a record to assign to an Input node. When you do this, the search criteria that are defined by default will return only records that are linked to the Equipment record specified in the instance, as shown in the following image.
Specify the Primary Node in a Policy Model
Before You Begin
- Build a policy model.
- Note the following limitations that apply to primary nodes:
- You can specify only one primary node in a policy.
- Any Input node except for a Constant, Query, or Point Value node can be specified as the primary node.
About This Task
Procedure
- On the Properties window, select the Primary Record check box.
A blue star appears on the upper-left corner of the node in the policy model, indicating that the node is the primary node in the policy.

Results
- When you create a policy instance, the record that you assign to the primary node will be the primary record for that instance.
Create a Policy Instance
Before You Begin
- Build a policy model.
- Specify the primary node, if there is one.
Procedure
- At the bottom of the Design workspace, select the Instances tab.The Instances pane appears.
Tip:- To resize the pane, drag the top edge of the pane.
- To maximize the pane, select
 .
. - To restore the pane to its original size, select
 .
. - To close the pane, select
 .
.
- On the left side of the Instances pane, select
 .
.A new policy instance appears, which includes options to assign a record to each Input node in the policy (excluding Query and Constant nodes whose values are not specified in policy instances).

- If you want to use the primary record feature to streamline the process for assigning records to nodes, select
 next to the text box under the blue star. Note: Depending on whether or not you have specified a primary node, this text box may or may not correspond to a node in the policy model.
or
If you do not want to use the primary record feature, select
next to the text box corresponding to a node in the policy model. The Search window appears. The search criteria are defined automatically to return only records in the family represented by the selected node.Important: If a family has been excluded from the global search, you will not be able to assign records from that family to a policy instance.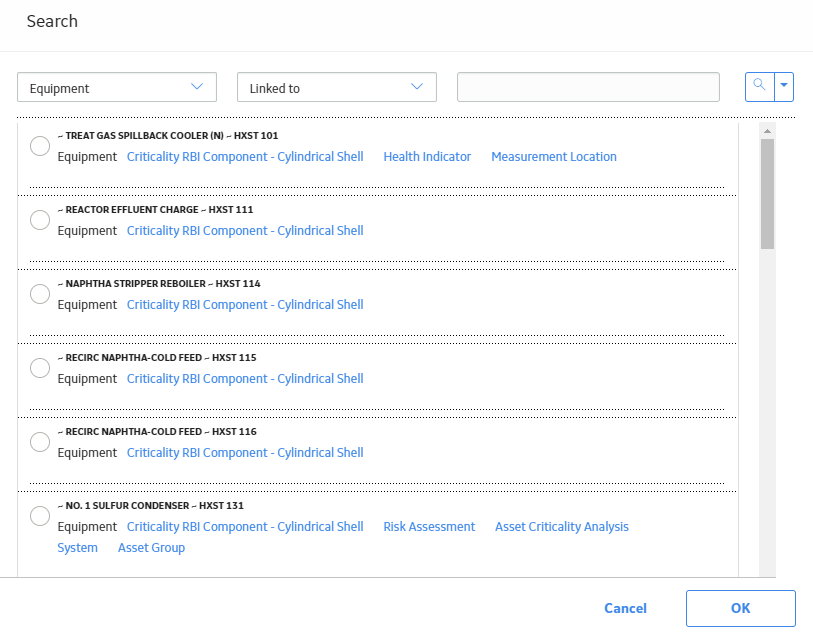 Note: The appearance of the Search window varies depending on the type of the selected input node.
 - Specify additional search criteria as needed, and then select
 .
. - In the search results, select the record that you want to assign to the policy instance, and then select OK.
The Search window closes, and the Record ID of the selected record appears in the corresponding text box.
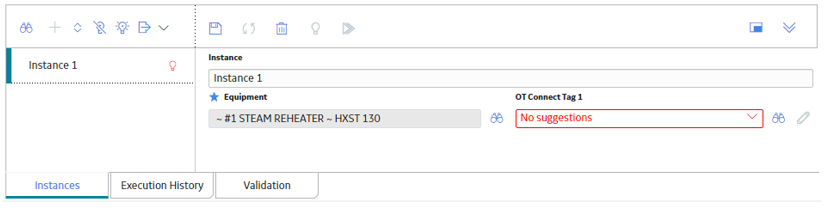
The following image shows an example in which the Equipment record with the Record ID ~ #1 STEAM REHEATER ~ HXST130 has been assigned to the node Equipment. The blue star above the text box indicates that ~ #1 STEAM REHEATER ~ HXST130 is also the primary record.
- Choose one of the following methods to assign a record to each remaining node included on the right side of the Instances pane.
- If you have specified a primary record, you can do this in one of the following ways:
- Select a record from the list in the corresponding text box. This list contains the records in the corresponding family that are linked to the primary record.
- Enter part of a Record ID directly in the text box. When you do this, the list is re-populated with the records whose Record IDs contain the value that you entered.
- Select to access the Search window. By default, the search criteria are defined to return only records that are linked to the primary record.
- If you have not specified a primary record in the policy, repeat steps 5 through 7 (that is, use the Search window to assign records to each node).
Note: If a policy model contains a Health Indicator node, within a policy instance, instead of assigning an existing Health Indicator record to the node, you can optionally create a new Health Indicator record to assign to the node. - If you have specified a primary record, you can do this in one of the following ways:
- On the Instances pane, select
 .The policy instance is saved.
Results
- A Policy Instance record representing the policy instance is saved to the Predix Essentials database.
Create a New Health Indicator Record from the Instances Pane
Before You Begin
- Build a policy model.
- Create a policy instance.
About This Task
Procedure
- At the bottom of the Design workspace, select the Instances tab.The Instances pane appears.
- On the right side of the Instances pane, next to the text box for the Health Indicator node to which you want to assign a new Health Indicator record, select .The Create Health Indicator window appears.
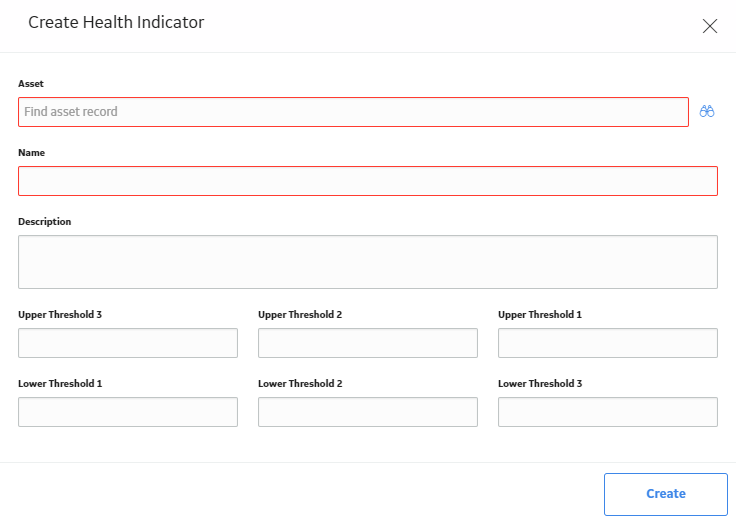
- Next to the Asset text box, select , and then use the Hierarchy Finder window to select the asset record to which you want to link the Health Indicator record (e.g., a record in the Equipment family).
- On the Instances pane, select .The policy instance is saved.
Configure OT Connect Tag Limits from the Instances Pane
Before You Begin
About This Task
Procedure
- On the right side of the Instances pane, next to the text box for the OT Connect Tag node for which you want to configure the limit values, select
 . Note: TheThe Edit Numeric Limits or the Edit Character Limits window appears, based on the data type of the Source Tag, numeric or character, which is assigned to the OT Connect Tag node. icon is enabled for the field only if a record is assigned to the OT Connect Tag node.
 - On the Instances pane, select .The policy instance is saved.
Activate or Deactivate a Single Policy Instance
Before You Begin
About This Task
Procedure
- At the bottom of the Design workspace, select the Instances tab.The Instances pane appears.
- On the right side of the pane, above the grid, either the
 button or the
  button is displayed.
- If the button is displayed, the policy instance is active. To deactivate the policy instance, select this button.
- If the button is displayed, the policy instance is not active. To activate the policy instance, select this button.
In the left pane, the corresponding active/inactive indicator changes to reflect your selection. - If the
- On the Instances pane, select .The policy instance is saved.
Results
- If you activated the policy instance and if the policy is active, the instance will be executed according to the policy's execution settings.
- If you deactivated the policy instance, the instance will not be executed.
Activate or Deactivate All Policy Instances Associated with a Policy
Before You Begin
About This Task
Procedure
- At the bottom of the Design workspace, select the Instances tab.The Instances pane appears.
- On the left side of the Instances pane, below the grid:
- If you want to activate all policy instances, select the
 button.
 - If you want to deactivate all policy instances, select the
 button.
In the left pane, the corresponding active/inactive indicators change to reflect your selection. - If you want to activate all policy instances, select the
Results
- If you activated all policy instances and the policy is active, all policy instances will be executed according to the policy's execution settings.
- If you deactivated all policy instances, no instances that are associated with the policy will be executed.
Export Policy Instances
About This Task
Procedure
- In the Design workspace, select the Instances tab.The Instances section appears.
- In the Instances section, select
 , and then select
  .All instances associated with the Policy are exported to a Microsoft Excel (.xslx) file and the file is downloaded to your local drive.Note: By default, the name of the file is in the Policy_Instances_<PolicyName>.xlsx format.
Duplicate a Policy Instance
Procedure
- At the bottom of the Design workspace, select the Instances tab.The Instances pane appears.
- On the right side of the pane, select
 .A confirmation message appears.
Delete a Policy Instance
Procedure
- At the bottom of the Design workspace, select the Instances tab.The Instances pane appears.
- On the right side of the pane, select
 .A confirmation message appears.