Policy Management
About Policies
Policies are strategic plans that define actions that should be taken when certain conditions exist. A policy is made up of multiple components. Technically, a policy can exist with only a name and description, which are stored in a Policy record. However, a complete policy includes a policy model and one or more policy instances.
Policy Model
The following image shows an example of a policy model:
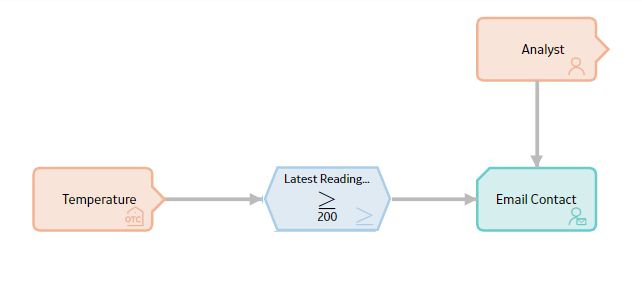
- The items that you want to monitor (e.g., equipment temperature).
- The conditions that should trigger actions to be taken (e.g., temperature rises above 200 degrees).
- The actions that should be taken (e.g., send an email message).
A policy model does not function like a typical logic diagram. For example, a node does not automatically evaluate the values from the immediately preceding node. Rather, for each node, you can specify an input value that is associated with any predecessor node, even if the nodes are not directly connected. Before you create a policy model, make sure that you understand the basic principles for working with a policy model.
Policy Instances
Policy instances identify the records to which logic in the policy model will be applied. In other words, you will use policy instances to identify the specific records whose values you want to monitor.
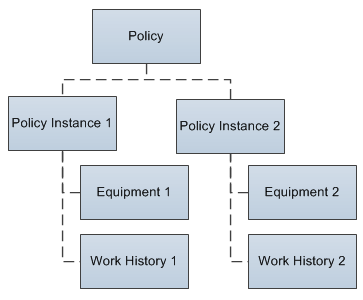
Each policy instance references one record for each input node in the policy model. For example, if a policy model contains two input nodes, one that represents the Equipment family and one that represents the Work History family, each policy instance that is associated with the policy will reference two records. The following image illustrates this example. In this image, boxes represent individual records and dotted lines represent associations between records.
Each policy can be associated with an unlimited number of policy instances, so you can use one policy to apply the same logic to multiple records.
Dates and Times Displayed in Policy Designer
The date format and time zone that are displayed on the Policy Designer interface may differ from other user or system settings that you have configured. This topic describes the specific differences you may see.
Policy Designer Date Format
Certain dates and times in the Policy Designer interface are displayed and saved in the standard ISO date format YYYY-MM-DD HH: mm: ss, where the time values use a 24-hour time format. This applies to the dates and times that are:
- Written into the body of email messages.
- Written into the Description field of Policy Recommendation and Policy Event records that are generated by policies.
- Included in the validation and execution result text for the Return Value node.
In these areas, the standard ISO date format is used regardless of any global date format settings or operating system settings.
Policy Time Zone
For each policy, you can specify the time zone in which the Policy Designer interface displays dates and times. For example, the time zone setting determines the dates and times that are:- Displayed in the Execution History pane.
- Displayed in validation messages.
- Written into the body of email messages.
- Written into the Description field of Policy Recommendation and Policy Event records that are generated by policies.
- Evaluated when you specify a relative date and time.
The time zone that you specify for a policy will be used irrespective of any other user or system time zone settings.
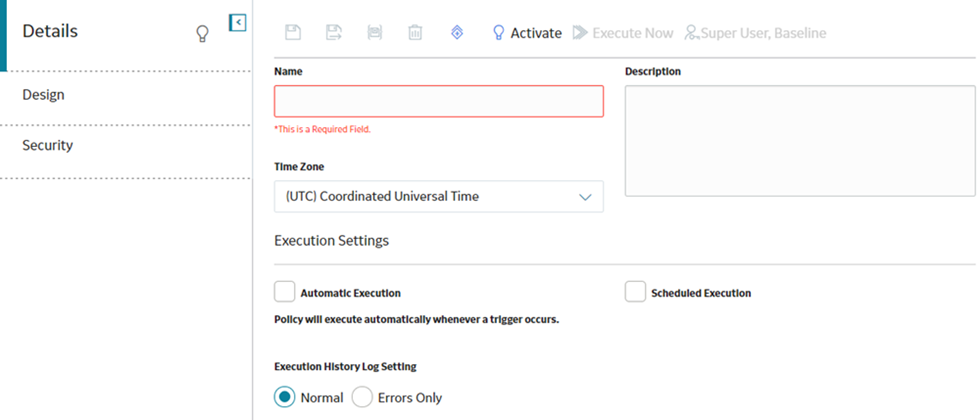
Create a New Policy
Procedure
-
Access the Policy Designer Overview page, and then select New Policy.
The Policy Designer page appears, displaying the Details workspace.
Tip: If you are already viewing a policy, you can also create a new policy by selecting in the Details workspace.
 - On the toolbar, select
 A new policy is created, and you can now build a policy model and create one or more policy instances to complete the policy.
Results
- The Policy record belonging to the policy is saved to the Predix Essentials database.
- You are assigned automatically as the policy owner.
- Dates and times that are associated with the policy are set to display in the time zone that you specified.
- The policy is set to inactive.
Access a Policy
Procedure
- Access the Policy Designer Overview page, and then select a policy name in one of the lists.
- Search for a policy using the Predix Essentials search tool.
Take Ownership of a Policy
Procedure
- In the Details workspace, on the toolbar, select
 .
.Your name appears next to the
button. - On the toolbar, select .
The policy is saved.
Results
- You are set as the owner of the policy.
- You can modify the policy.
Copy a Policy
About This Task
You can create a new policy by copying an existing policy, either with or without its associated instances.
Procedure
- In the Details workspace:
- If you want to copy the policy only, select
 .
. - If you want to copy the policy and its associated instances, select
 .
.
The Save Policy As dialog box appears.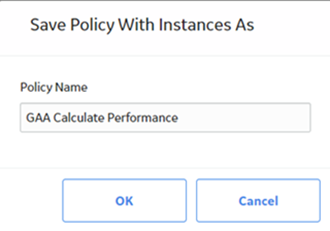
- If you want to copy the policy only, select
Results
- You are assigned automatically as the owner of the new policy.
- The new policy is set to inactive.
- All other policy and instance (if applicable) settings match the original policy.
Refresh Metadata for Policies
About This Task
Procedure
- Access the policy for which you want to refresh the metadata.
- In the Design workspace, perform one of the following steps:
- If you want to refresh the metadata for the policy, in the Edit section of the toolbar, select
 .
.The metadata for the policy is refreshed.
- If you want to refresh the metadata for a node, select the node, and then in the Properties window for the node, select .
The metadata for the node is refreshed.
- If you want to refresh the metadata for the policy, in the Edit section of the toolbar, select
Delete a Policy
Procedure
- On the toolbar, select
 .A dialog box with a confirmation message appears.