Data Loader
About the Policy Instance Data Loader
Using the Policy Instance Data Loader, you can add or update large numbers of policy instances for a policy in Predix Essentials.
To import data using the Policy Instance Data Loader, Predix Essentials provides an Excel template, Policy Instance.xlsx.
About the Policy Instance Data Loader Requirements
Before you use the Policy Instance Data Loader, ensure that the Policy Name and the node details specified in the data loader workbook exist in the Policy Designer module in Predix Essentials.
Security Settings
The user who loads data must be associated with the following Security Groups and Security Roles:
- MI Data Loader User Security Role or MI Data Loader Admin Security Role
- MI Policy Administrator, MI Policy Designer, or MI Policy User Security Group; or a Security Role that is associated with the MI Policy Administrator, MI Policy Designer, or MI Policy User Security Group
About the Policy Instance Data Loader Data Model
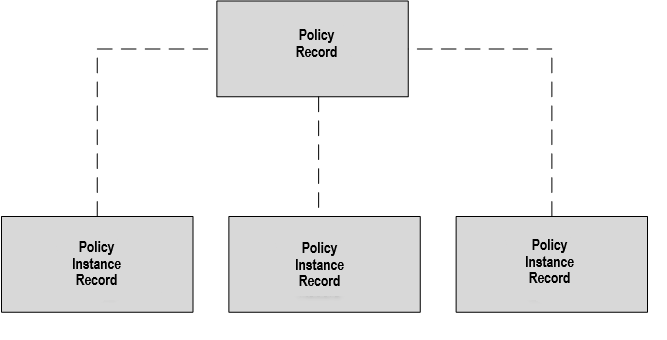
A Policy Instance record has a foreign-key relationship to the Policy record that defines the instance.
The following data model illustrates the Policy Instance Data Loader:
About the Policy Instance Data Loader General Loading Strategy
This section describes the prerequisites for loading the data and the order in which the data will be loaded.
Prerequisites
- The policy for which you want to import the instances must already exist in the Predix Essentials database.
- Identify the Input nodes contained in the policy or policies for which you want to create instances. The Input nodes determine the columns required in the MI_POLICY_INST sheet of the data loader workbook.
- All input records that will be used in the policy instances must already exist in the Predix Essentials database.
- Extract the data required to populate the data loader workbook from Predix Essentials. You can do this by querying the database to retrieve the entity keys or entity IDs to use as inputs for the policy instances. You can then export the results of the query to an Excel spreadsheet to update the Policy Instance Data Loader workbook.
Load Sequence
- Download the Policy Instance Data Loader workbook provided by Predix Essentials.
- Modify the worksheet with the data extracted from Predix Essentials.
- Load the data loader workbook.
- Monitor the status of the data load operation.
- Access the data loader log to check for errors and warnings.
- Conduct tests in Predix Essentials to make sure that the imported data is correctly loaded.
About the Policy Instance Data Loader Workbook Layout and Use
The following table lists the worksheets that are included in the Policy Instance Data Loader workbook:
| Worksheet | Description |
|---|---|
| Configuration | This worksheet is used to specify whether policy instances will be updated. |
| MI_POLICY_INST | This worksheet is used to specify policy instances per policy. |
Configuration Worksheet
In the Configuration worksheet, you must specify the settings for the import.
| Field Caption | Field ID | Data Type | Comments |
|---|---|---|---|
| Batch ID | BATCH_ID | Numeric |
Enter a serial number (for example, 1). Note: Records with different Batch ID values are processed as separate batches by the data loader.
|
| Replace Existing Instance? | OPTION_REPLACE_INSTANCE | Character |
Enter one of the following values:
Note: If you do not enter a value, the value FALSE will be considered and existing policy instances will not be updated.
|
MI_POLICY_INST Worksheet
In the MI_POLICY_INST worksheet, you must specify the existing or new instances to be imported for a policy. You must use the entity key or the entity ID of a record to map it to a node. By default, the MI_POLICY_INST worksheet is configured to use the entity keys to identify the records. If you want to specify entity IDs instead of entity keys, you must replace the text 'ENTY_KEY' with 'ENTY_ID' in the field ID of the required columns of the worksheet, and then enter the relevant entity IDs in the subsequent rows. For example, if you want to specify entity IDs instead of entity keys for a column with the field ID n0|ENTY_KEY, you must change the field ID to n0|ENTY_ID before entering the values in the subsequent rows.
- If the entity ID is associated with multiple records and there is no primary record specified for the instance.
- If the entity ID is associated with multiple records that are linked to the primary record specified for the instance.
- If the entity ID or entity key does not exist in the specified entity family.
Under these conditions, the information associated with the relevant record is not imported, though it will not affect the rest of the information in the workbook, and a warning message appears in the data loader log, indicating the record that could not be imported. However, if an entity ID is associated with multiple records, among which, only one record is linked to the primary record specified for the instance, the record that is linked to the primary record is identified for the entity ID.
| Field Caption | Field ID | Data Type | Comments |
|---|---|---|---|
| Batch ID | BATCH_ID | Numeric |
Enter a serial number (for example, 1). Note: Records with different Batch ID values are processed as separate batches by the data loader.
|
| Policy Name | MI_POLICY_INST_POLICY_GUID | Text |
Enter the name of an existing policy. |
| Policy Instance ID | MI_POLICY_INST_ID_C | Text |
Enter the name of a policy instance to associate with the specified policy. This value must be unique within a policy. Note: If the worksheet contains duplicate Policy Instance IDs within a policy, only the last row associated with the Policy Instance ID is imported, and a warning message appears in the data loader log, indicating the instances that could not be imported due to the duplicate IDs.
|
| Active? | MI_POLICY_INST_ENABLED_F | Character |
Enter one of the following values:
Note: If you do not enter a value, the value FALSE will be considered for a new policy instance, whereas for an existing policy instance, its status will be retained.
|
| Primary Record (ignored if there is a Primary Node) | FAMILY_ID|ENTY_KEY | Text |
Enter the family ID and entity key of the record that you want to specify as the primary record in the policy (for example, MI_EQUIP000|64262245939). Note: If the policy contains a primary node, this field will be ignored.
|
| <Input node name> | One of the following:
| Text |
For each Input node that you want to specify, you must create a new <Input node name> column. Specify the name of the Input node (for example, Oil Level HI) as the field caption. Enter the ID of the Input node and one of the following values as the field description:
In the subsequent rows:
|
Example Policy Instance Data Loader Workbook
This topic provides a sample of the worksheets in the Policy Instance Data Loader workbook to illustrate the process of adding and updating policy instances.
The following Configuration worksheet is populated to update the policy instance that is specified in the MI_POLICY_INST worksheet:
| Replace Existing Instance? |
| OPTION_REPLACE_INSTANCE |
| TRUE |
The following MI_POLICY_INST worksheet is populated to add and update policy instances for a policy named Equipment Lubrication Policy:

Instance 1 is an existing policy instance that you want to assign to the following Input nodes of Equipment Lubrication Policy:
- n0, an Input node other than the Point Value node whose entity key is 64251832824.
- n2, a Point Value node that represents a constant value and whose constant value is 5.
Instance 2 is a new policy instance that you want to assign to the following Input nodes of Equipment Lubrication Policy:
- n0, an Input node other than the Point Value node whose entity key is 64251959674.
- n2, a Point Value node that represents a value from a field and whose family ID is MI_MEAS_LOC, entity key is 64254041888, and field ID is Checkpoint ID.
When this Policy Instance data loader workbook is successfully imported into Predix Essentials:
- Instance 1 will be updated in Equipment Lubrication Policy according to the respective node details defined in the worksheet.
- Instance 2, with the respective node details defined in the worksheet, will be added to Equipment Lubrication Policy; however, it will not be activated because the Active column had the value FALSE.
About the Policy Instance Data Loader Load Verification
After the data loader completes, this is how you verify the load was successful.