Step 4. Configure Triggers
About this task
Note: Make sure the site is locked.
Procedure
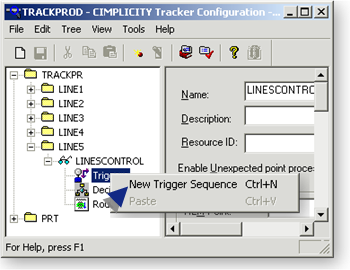
- Right-click the RCO Triggers folder in the TrackerCfb_UI left pane.
-
Do one of the following.
Method 1
Select File>Routing Control Objects on the Tracker menu bar.
Method 2
- Right-click the Triggers icon.
- Select New Trigger Sequence from the Popup menu.

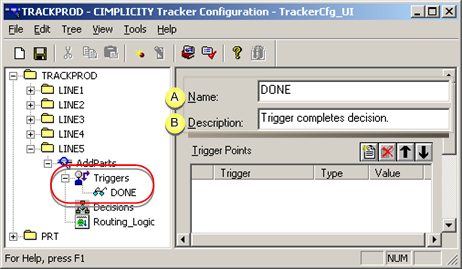
A new Trigger item displays in the left pane; the right pane displays the dialog for configuring a trigger.
-
Enter the following:

Field Description A Name A unique name for the new trigger. B Description (Optional) A brief description describing the purpose of the trigger. -
Click
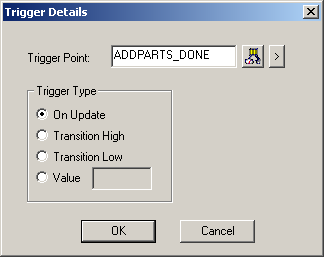
 to display the Trigger Details dialog box.

-
Configure the trigger details as follows.
Field Description Trigger Point Point value is used to determine the trigger sequence of events. The point type depends on what value is being compared. Trigger Type The checked radio button specifies when the trigger will be activated, as follows. On Update Value of the Point must change to activate the trigger. Transition High Value of the Point must start high to activate the trigger. The initial state of this trigger upon CIMPLICITY startup is high. Transition Low Value of the Point must change from a non-zero value to 0 to activate the trigger. The initial state of this trigger upon CIMPLICITY start is low, so the point must change to a non-zero value, and then to a 0 value. Value Point changes to the value you specify to activate the trigger. When radio button is clicked, the Value field will activate. Type the value in the field. - Click OK.
Results
The new trigger is listed in the TrackerCfg_UI left pane; when selected, its details display in the right pane of the window.
Note: More than one trigger can be added to the Routing Control Object. Repeat procedure to add more triggers.


