 Historian
Send Data to Predix Cloud
About this task
- The iFIX collector
- The MQTT collector
- The ODBC collector
- The OPC Classic DA collector
- The OPC Classic HDA collector
- The OPC UA DA collector
- The OSI PI collector
- The Server-to-Server collector
- The Simulation collector
- The Windows Performance collector
- The Wonderware collector
Procedure
- Register with the Timeseries service or any UAA service that you want to use. Note down the destination address, URI, client ID, client secret, and the zone ID that you have provided.
- Access Configuration Hub.
-
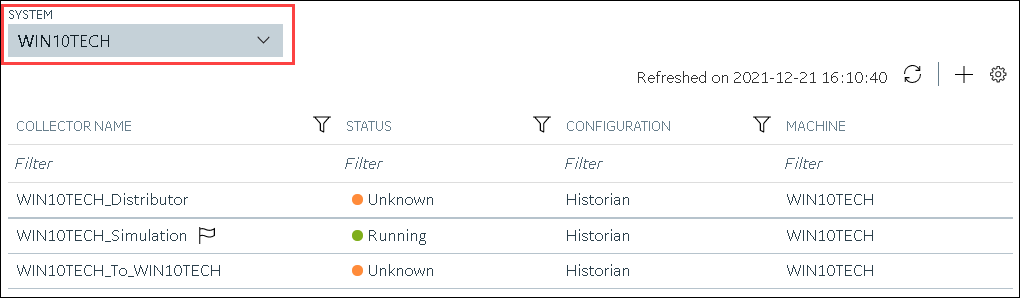
Select Collectors.
A list of collectors in the system appears.
-
If needed, select the system in which you want to add a collector
instance.
-
In the upper-right corner of the main section, select
 .
.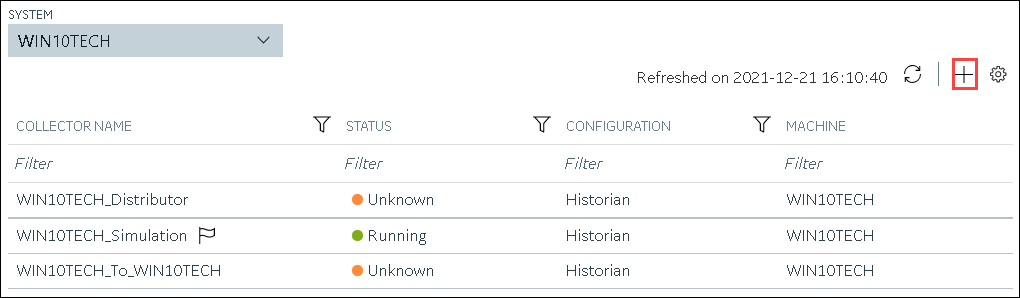
The Add Collector Instance: <system name> window appears, displaying the Collector Selection section. The MACHINE NAME field contains a list of machines on which you have installed collectors. -
In the COLLECTOR TYPE field, select a collector type
(except the File collector and the Server-to-Server collector), and then select
Get Details.
The INSTALLATION DRIVE and DATA DIRECTORY fields are disabled and populated.
-
Select Next.
The Source Configuration section appears, populating the hostname of the collector machine.
-
Select Next.
The Destination Configuration section appears.
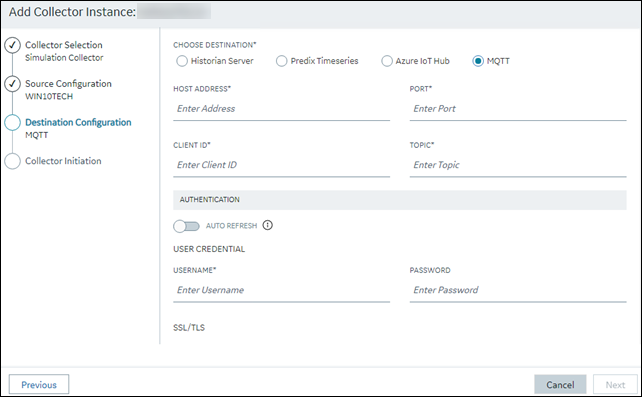
-
In the CHOOSE DESTINATION field, select
Predix Timeseries, and then provide values as
described in the following table.
Field Description CLOUD DESTINATION ADDRESS The URL of a data streaming endpoint exposed by the Predix Time Series instance to which you want to send data. Typically, it starts with “wss://”. This value is used as part of the interface name and default tag prefix of the collector. Your Predix Time Series administrator can provide this URL. IDENTITY ISSUER The URL of an authentication endpoint for the collector to authenticate itself and acquire necessary credentials to stream to the Predix Time Series. In other words, this is the issuer ID of the Proficy Authentication instance that you want to use to connect to Predix Time Series. Typically, it starts with https:// and ends with “/oauth/token”. CLIENT ID Identifies the collector when interacting with Predix Time Series. This is equivalent to the username in many authentication schemes. The client must exist in the Proficy Authentication instance identified by the identity issuer, and the system requires that the timeseries.zones. {ZoneId}.ingestandtimeseries.zones.{ZoneId}.queryauthorities are granted access to the client for the Predix Zone ID specified. Your Predix Time Series administrator can provide this information.CLIENT SECRET The secret to authenticate the collector. This is equivalent to the password in many authentication schemes. ZONE ID Unique identifier of the instance to which the collector will send data. PROXY Identifies the URL of the proxy server to be used for both the authentication process and for sending data. If the collector is running on a network where proxy servers are used to access web resources outside of the network, then you must provide the proxy server settings. However, it does not affect the proxy server used by Windows when establishing secure connections. As a result, you must still configure the proxy settings for the Windows user account under which the collector service runs. PROXY USERNAME The username to connect to the proxy server. PROXY PASSWORD The password to connect to the proxy server. DATAPOINT ATTRIBUTES The attributes or parameters related to a datapoint that you want the collector to collect. Select Add Attributes to specify the attributes. You can add maximum five attributes for each collector instance. CHOOSE CONFIGURATION The type of the configuration to specify the tags whose data you want to collect. Select one of the following options: - Historian Configuration: Select this option if you want to add the tags manually. If you select this option, the CONFIGURATION HISTORIAN SERVER field appears.
- Offline Configuration: Select this option if you want to provide the tag names using the offline configuration file instead of adding tags manually. By default, this file is located in the following location: <installation folder of Historian>\GE Digital\<collector name>
CONFIGURATION HISTORIAN SERVER The host name of the machine from which you want to access Historian Administrator to add the tags manually for the collector. This field appears only if you have selected Historian Configuration in the CHOOSE CONFIGURATION field. -
Select Next.
The Collector Initiation section appears.
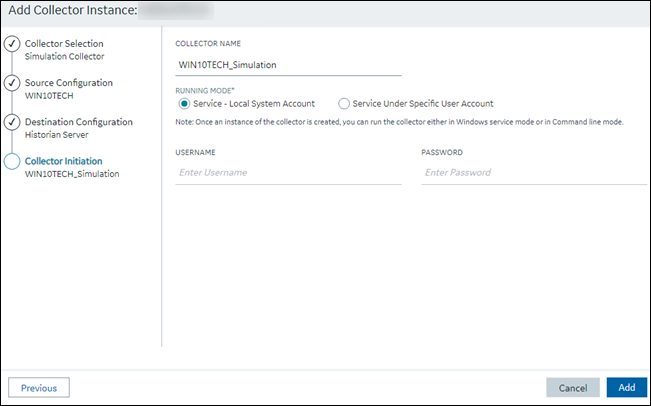
- Enter a unique collector name.
-
In the RUNNING MODE field, select one of the following
options.
- Service - Local System Account: Select this option if you want to run the collector as a Windows service using the credentials of the local user (that is, the currently logged-in user). If you select this option, the USERNAME and PASSWORD fields are disabled.
- Service Under Specific User Account: Select this
option if you want to run the collector as a Windows service using a
specific user account. If you select this option, you must enter values
in the USERNAME and
PASSWORD fields. If you have enabled the
Enforce Strict Collector Authentication
option in Historian Administrator, you must provide the credentials of a user who is added to at least
one of the following security groups:
- iH Security Admins
- iH Collector Admins
- iH Tag Admins
If you choose the first option, you can also configure the collector to start automatically when you start the computer, or, in the case of iFIX collectors, whenever you start iFIX.
-
Select Add.
The collector instance is created.
-
Specify the tags for which you want to collect data.
- If you have selected Historian Configuration in the CHOOSE CONFIGURATION field, specify the tags manually.
- If you have selected Offline Configuration in the CHOOSE CONFIGURATION field, specify the tags using the offline configuration file.
The collector begins sending Historian data to Predix Timeseries.