 Historian
Add a Tag Manually
Before you begin
- Add the collector instance using which you want to collect data.
- By default, the tag data is stored in the user data store, which is created automatically when you set up Configuration Hub. If, however, you want to store the data in a different data store, create it.
About this task
Procedure
- Access Configuration Hub.
- In the NAVIGATION section, select Tags.
-
In the upper-right corner of the main section, select
 .
.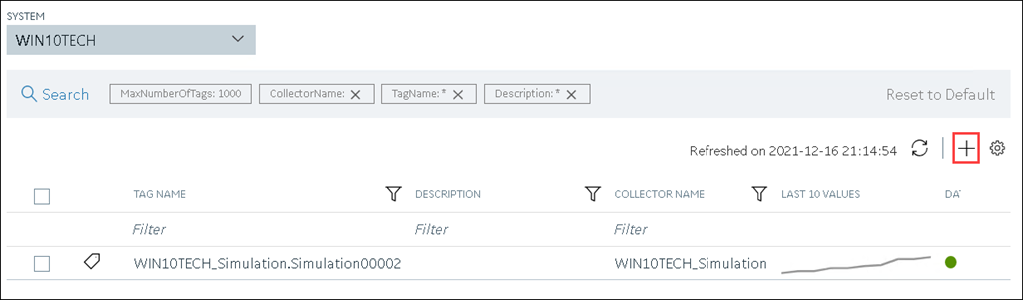
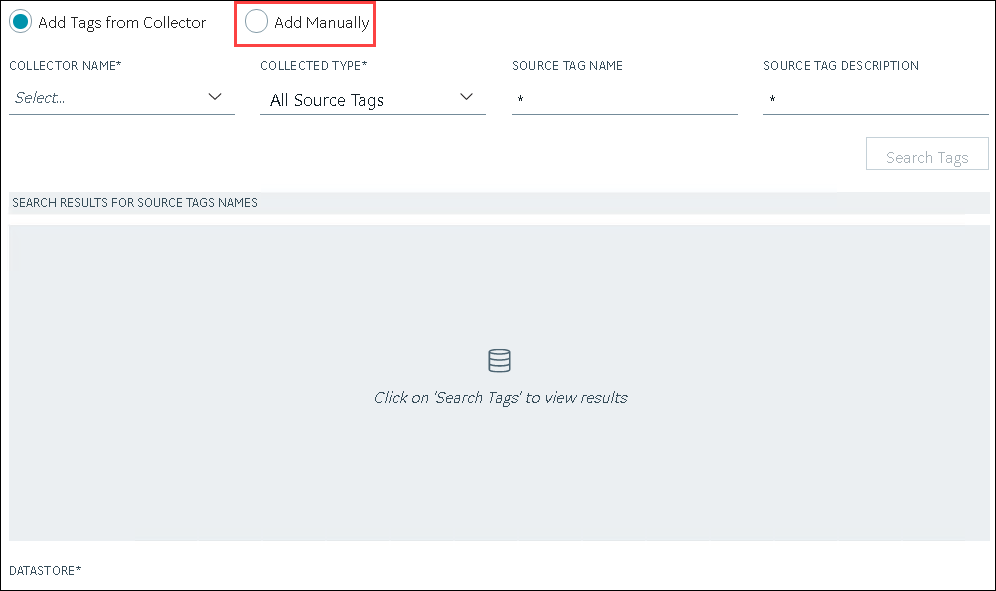
The <system name> - Add Tag page appears. The Add Tags from Collector option is selected by default. -
Select Add Manually.
-
Enter values as described in the following table.
Field Description COLLECTOR NAME Select the collector instance that you want to use to collect data. If, however, this tag is not associated with a collector, you can leave the field blank (for example, you want to ingest this data manually instead of using a collector). SOURCE ADDRESS Specify the source tag to which you want to map the one you are creating. This field is enabled only if you select a value in the COLLECTOR NAME field. When you select  , the Browse Source Tag: <collector
name> window appears. Provide the search
criteria to find the tag that you want to map.
, the Browse Source Tag: <collector
name> window appears. Provide the search
criteria to find the tag that you want to map.TAG NAME Enter a name for the tag. A value is required and must be unique for the Historian server. The value that you enter:- Must begin with a letter or a number.
- Can contain up to 256 characters.
- Can include any of the following special characters: /!|#{}%$-_
- Must not include a space or any of the following characters: ~`+^:;.,?"*={}@
DATA TYPE Select the data type of the tag data. To find out the data types supported by a collector, refer to the documentation on the collector that you have created. Important: If you select an unsupported data type, you may receive incorrect data or even lose data.If you select Multi-Field, the USER-DEFINED TYPE NAME field appears, and the ENUMERATED SET and ARRAY TAG fields are disabled.If you select Fixed String, the STRING LENGTH field appears.
STRING LENGTH Enter the maximum character length allowed for the tag data. This field appears only if the value in the DATA TYPE field is Fixed String. A value is required. You can enter a value between 1 and 255. The default value is 8.
USER-DEFINED TYPE NAME Select the user-defined data type that you want to use for the tag. This field appears only if the value in the DATA TYPE field is Multi-Field. A value is required. ENUMERATED SET Select the enumerated set that you want to use for the tag. This field is not applicable for string and multi-field data types. ARRAY TAG Switch the toggle to indicate whether the tag stores an array of data. This field is disabled if you select a value in the ENUMERATED SET field or if the value in the DATA TYPE field is Multi-Field. For information on array tags, refer to Array Tags.
TIME RESOLUTION Select the time resolution for the tag. A value is required. For example, if you select Seconds, when you plot the data on a trend chart, the timestamp of the data points will be one second apart.
DATA STORE If you want to store the data in a different data store that the user data store, select the same. -
Select Add Tag.
Data collection begins for the selected tags.