 CIMPLICITY
Step 2: Common Licensing Software
Overview
Perform the following steps to install the required Common Licensing software on your computer:
- Execute CommonLicensing<version>.exe
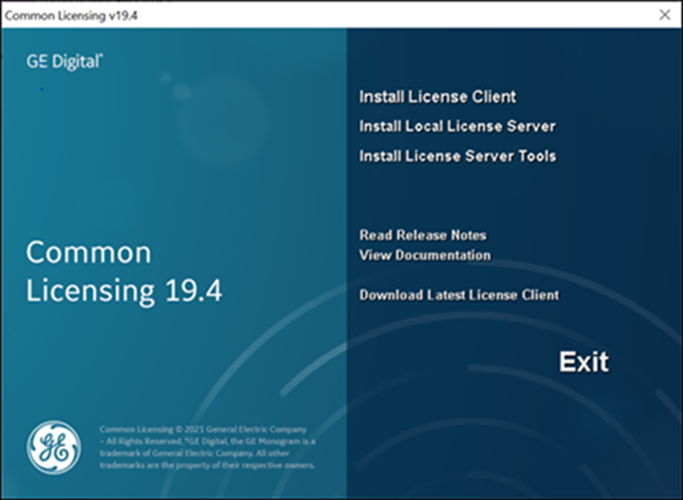
- Install License Client
- Install the Local License Server
- Install License Server ToolsImportant: When you run CommonLicensing_<version>.exe, you must be logged in as an Administrator.
Before you begin, follow the below important notes on the Common Licensing software installation for your system configuration.
Note:
- For a physical machine, the License Client is the only software that must be configured. The physical machine can collect the GE product licenses from the GE cloud server or from the Local License Server, and then the GE products are activated through the License Client.
- For a virtual machine, all the three software: 1) License Client, 2) Local License Server, and the 3) License Server Tools must be installed. If you have a separate computer pre-installed with Local License Server, you do not have to install Local License Server in your virtual machine. The virtual machine can collect the GE product licenses from the Local License Server and then the GE products are activated through the License Client.
Execute CommonLicensing<version>.exe
- Confirm that you are logged in as an Administrator.
- Browse the folder where you downloaded the CommonLicensing<version>.exe file.
- Right-click the CommonLicensing<version>.exe file, and select Run as Administrator. A message appears asking if you want to allow this application to make changes to your device.
- Select Yes. The Common Licensing screen
appears, as shown in the following figure.
Install License Client
- From the Common Licensing screen, select Install License Client.
- The installation process may take a few moments, and may require some prerequisites to
install. The following screen appears.

- Select Next. The License Agreement appears.
- Select I accept the terms of this license agreement and select Next to continue.
- If a message to install USB HASP Drivers appears, leave the default (selected), and select Next. Otherwise, the Ready to Install the Program screen appears.
- Select Install. When the installation completes, the
InstallShield Wizard Complete screen appears.

- Select the I would like to create a shortcut on my Desktop check box.
- Select Finish to complete the installation.
Install Local License Server
- From the Common Licensing screen, select Install Local License Server .
- The installation process may take a few moments, and may require some prerequisites to
finish the installation. When the installation completes, the InstallShield
Wizard Completed screen appears.

- Select the I would like to create a shortcut on my Desktop check box.
- Select Finish to complete the installation.
Install License Server Tools
- From the Common Licensing screen, select Install License Server Tools.
- The installation process may take a few moments, and may require some prerequisites to
install. The welcome screen appears.

- Select Next. The License Agreement page appears.
- Select I accept the terms of this license agreement option, and then select Next. The Ready to Install the Program page appears.
- Select Install. When the installation completes, the
InstallShield Wizard Complete screen appears.

- Select the I would like to create a shortcut on my Desktop option.
- Select Finish to complete the installation.
After you have configured the software as per your system requirements from the Common Licensing screen, you can proceed to the next step, Step 3: Activating Licenses.
