 CIMPLICITY
Step 3: Activating Licenses
Activating Licenses Scenarios
Scenario 1: Computer (online) connected to the GE Cloud License Server

The computer (physical machine or virtual machine) with GE Cloud License Server is connected to internet, the GE product licenses are collected from GE Cloud License Server and then the licenses are activated in the computer installed with License Client.
- In License Client, select Activate Licenses, select the option 1,
Yes, for this computer from the GE Cloud License Server.

- The Activate Licenses from the GE Cloud Server page appears.Note: Internet connectivity is verified before this page is displayed. An error message is displayed if the GE Cloud License Server is not accessible, and the No Licenses on this Computer page is automatically displayed.
- Enter your first activation code, and then select Add Code.
- Repeat the previous step for each license you have.
- Select Activate. The Licenses screen should now display all the licenses activated on the server.
Scenario 2: Computer (online) or VM connected to a Local License Server

The computer (physical machine or virtual machine) with Local License Server is connected to internet, the GE product licenses are collected by communicating with GE Cloud License Server and then the licenses are activated in the intranet computer installed with License Client.

The virtual machine with all the three software: 1) License Client, 2) Local License Server and the 3) License Server Tools must be installed. If you have a separate computer pre-installed with Local License Server, you do not have to install Local License Server in your virtual machine.
Follow the below steps for a physical machine or a virtual machine installed with Local License Server software:
- From the Windows Services console (Press Windows+R on your keyboard, then enter
services.msc and press the Enter button), confirm that the License Server
is running.

- Navigate to C:\ProgramData\Microsoft\Windows\Start Menu\Programs\General Electric, and then select Local License Server Administration Tool. A message appears prompting you to confirm the changes.
- Select Yes to continue. The Local License Server
Administration Tool screen appears, as shown in the following figure.

- Select Add Licenses. The following screen appears.
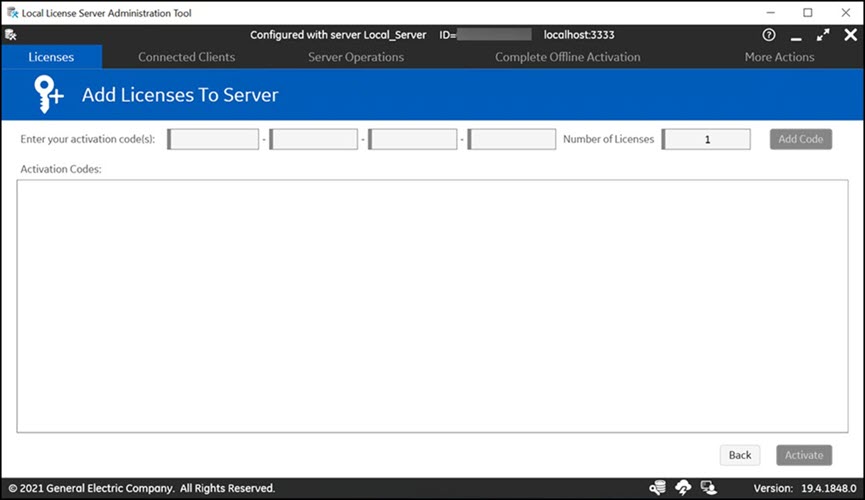
- Enter your first activation code, and then select Add
Code.Note: You can find the activation codes in your GE order e-mail.
- Repeat the previous step for each license you have.
- Select Activate. The Licenses screen should now display all the
licenses activated on the server, as shown in the following figure.

Activate your Product Licenses on License Client
- Navigate to C:\ProgramData\Microsoft\Windows\Start Menu\Programs\General Electric and then select License Client. A message appears prompting you to confirm the changes.
- Select Yes to continue. The License Client
screen appears, as shown in the following figure.

- In License Client, select Activate Licenses.
- You have the Local Licensing Server already installed on the same computer, hence select
the option 2, Yes, for this computer from a local license server .
The Lease licenses from a local license server screen appears, as
shown in below figure.

- Select the check box for the products you want to activate, and then select Activate.
Confirm the License Client Displays Licenses
- In License Client, select View Licenses. The activated licenses
for the selected server appears, similar to the screen below. In the Licensed Products
section, select the products listed to view the license information.
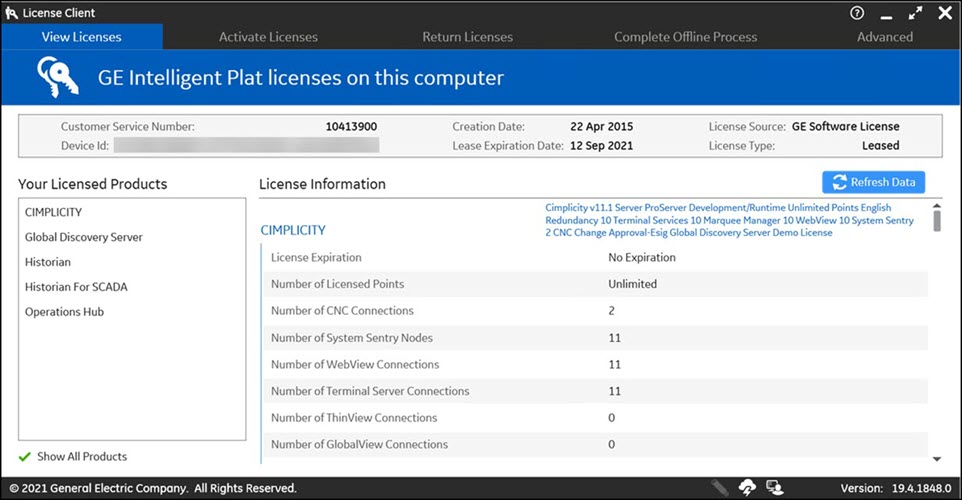
- Confirm that your license information appears correctly for each product you activated.
Scenario 3: Computer (offline) Licenses Activation by using GE USB Hardware Key

- Configurable GE USB Hardware Keys: Configurable keys are plugged-in to a computer with internet to activate licenses and then used in the computer that does not have internet.
- Non-configurable GE USB Hardware Keys: Pre-loaded with the licensing information for your products.
- Insert the GE USB Hardware Key to your online computer (physical machine or a virtual machine).
- In License Client, select Activate Licenses, select the option 3,
Yes, for the inserted Hardware key. Note: If you did not install the Sentinel USB drivers, error messages appear and the disabled USB
 icon appears in the footer.
 If you did install the Sentinel USB drivers, the License Client detects and reads the GE USB Hardware Key (up to two minutes), and then the Activate Licenses on GE USB Hardware Key page appears, as shown below.
- Enter your first activation code, and then select Add Code.
- Repeat the previous step for each license you have.
- Select Activate. The Licenses screen should now display all the licenses activated on the server.
- Remove the GE USB Hardware Key from your online computer and plug-in to the offline computer.
Scenario 4: Computer (offline) Licenses Activation by using Request and Response Files

A Request file and a Response file is used as a medium between a computer having internet and GE Cloud server to activate the licenses in the offline computer.
- Generate a request file from the offline computer. Send the request file to the online computer.
- From an online computer, send the request file to the GE cloud license server and generate a response file.
- Send the response file to the offline computer and activate the licenses.
- From License Client, select the Activate Licenses tab. The
License Client detects that the client computer is not connected to the internet. The
"Do you need to activate a License?" page appears.

- Select Yes, for a permanently offline computer. The
Generate a Request File to activate licenses page
appears.

- Browse to the media device or the network location where the request file is saved.
- Enter each activation code and select Add Code to add it to
the Activation Codes area. Note: You can find the activation code(s) in your GE order e-mail.
- Select Generate File to create and save a request file to the specified location.
- The Complete Offline Process page appears. A message appears
indicating the request file location and when it was created.

Collect the request file from the offline computer and then generate a response file from an online computer.
- Select Complete Offline Process. The Complete Offline
Process page appears. A message appears indicating the response file
location and when it expires.

- Select Generate a response file from an online computer. The
Generate a Response File page appears.

- If necessary, insert the media device into the computer.
- Select the request file and response folder location, then select Generate
File. The response file is generated and saved to the specified location
on a media device or network drive that can be accessed by the offline
computer.Note: The response file expires 24 hours after being created. The application indicates the time remaining before the response file expires.
After generating a request file from your offline computer and a response file from an online computer, you can activate licenses on the offline computer.
- On the Complete Offline Process page, select Use the
response file to update licenses on the original offline computer.
 The Use the Response File to Update Licenses page appears.
- If necessary, insert the media device with the response file into the computer.
- Browse to the location of the response file, and select the file.
- Select Update Licenses.Note: After the response file is imported, the response file extension is modified to ''response_imported''.