Fields
About Fields
Fields represent the individual pieces of information that will be stored for records belonging to a given family. For example, records stored in the Full Inspection family will contain information related to full inspections. Therefore, the Full Inspection family contains fields that help define the inspection.
Each field that is defined for a family corresponds to a column in that family table. Any field that you define for a family can be displayed in a datasheet so that values can be displayed and collected via the Predix Essentials application. Additionally, fields can be used in queries, graphs, reports, and other utilities to help you retrieve and display specific information about records in the database.
- Letters and numbers (e.g., Equipment or Equipment-123).
- Numbers only.
- A Boolean value (i.e., true or false).
- Date and time values.

About the Field Sequence Number
All the fields within a family are assigned a field sequence number, which determines the order in which fields will be displayed, loaded, and processed during certain operations. The default field sequence number is assigned automatically by the Predix Essentials system when a field is created, but you can change the field sequence for a family as needed.
In some cases, field sequence number are inconsequential and do not impact how the system functions. In other cases, particularly in cases where rules are fired, field sequence numbers are important. To make sure that these operations do not result in errors, you should define field sequence numbers for field as appropriate for the rules that exist for that family.
For example, consider a family that contains fields A, B, and C, each of which is formatted to display a list of valid values. Now, suppose that rules have been written for the field to specify that the value selected in list A determines the available values in list B, and the value selected in list B determines the value selected in list C. On the datasheet, where you have control over the order in which fields are displayed, you can specify that list A should appear first, then list B, and finally list C. This would encourage users to select a value first from list A, then from list B, and finally list C, causing all the rules to be fired in the intended order.
In operations where you do not have control over the order in which fields are processed, however, you must rely upon field sequence numbers. In this example, you would want to set the field sequence numbers such that field A would be processed first, followed by B, and then by C.
Operations in which field sequence numbers are used include when:
- Fields are processed during an import or export.
- A record is moved from one family to another via a Predix Essentials plug-In for DataStage job.
About Field Sequence Numbers in Imports and Exports
When you export a family using the Export tool, the sequence number for each field is included in the FIELD_SEQUENCE_NBR on the Fields tab of the .XML file.
The Families of the export file also includes the FAMILY_APPLY_FIELD_SEQUENCES, which contains a setting that determines how field sequence numbers will be handled for each family included in the file during an import. When the FAMILY_APPLY_FIELD_SEQUENCES is set to:
- False (the default setting for all export files created by the Predix Essentials system): When the file is imported, if the family already exists in the target database, the existing field sequence numbers will not be overwritten with the field sequence numbers in the import file.
- True: When the file is imported, if the family already exists in the target database, the existing field sequence numbers will be overwritten with the field sequence numbers in the import file.
If you import a file that contains information for a family that does not already exist in the target database, the field sequence numbers that are defined in the import file will be applied to the fields in the new family, regardless of the value in the FAMILY_APPLY_FIELD_SEQUENCES.
The Predix Essentials enforces no restrictions on duplicate field sequence numbers. If you import a file that contains a subset of fields that are defined for an existing family and any of the field sequence numbers are the same as those defined for existing fields, the import will be successful and will result in duplicate field sequence numbers within the family. Additionally, Predix Essentials allows duplicate field sequence numbers for different fields within the same import file. Duplicate field sequence numbers may cause rules to function improperly and should be corrected via the Family Fields Sequence Order feature, which will reset all sequence numbers to reflect the order of the fields as displayed on the Family Fields Sequence Order window.
The features described above will also exist in a Microsoft Excel export file.
About Data Spreading
Grouping families into hierarchies encourages the use of data spreading. Using data spreading, fields that are common to all families within a branch of the hierarchy can be defined on a family and then spread down to subfamilies. Fields that are specific only to one subfamily can be defined directly at the sublevel. Any fields that are defined for a family will be available for display at all the sublevel. You should not over-use the data-spreading feature. The deeper a family exists in the hierarchy, the more time it takes when querying data from the family because the query must look at many family tables to gather all the information for generating the query results.
- Metadata: When a field is spread from one family to another, the metadata (i.e., Field Identification Properties) associated with the root family field is inherited by the subfamily field when the subfamily is created. In other words, the field properties at the target level match the field properties defined at the source level. Most of this information cannot be modified on the family to which the field has been spread. The Caption, Description, and Help Text can be modified. Additionally, the special properties may be editable at the subfamily level, depending on the selected option.
- Physical Tablespace: Within the family hierarchy, a table will be created for each family, regardless of its position in the hierarchy.
- Behavior: For field-level behaviors you can edit parent spread behaviors but if the Allow changing the properties of this field check box in the Configuration Manager is unchecked, you cannot add a new behavior for the field.
Within the properties of any family field, select the Spread to Sub Families check box. When you do so, all subfamilies created under that family will automatically inherit that field when the subfamily is created.
After a field has been spread, clearing the Spread to Sub Families check box will prevent that field from being spread to additional families but will not remove the field from families to which it has already been spread. The metadata, physical tablespace, and behavior will continue to exist at the subfamily level until they are deleted manually. Clearing a field will, however, break the connection between the source field and the subfamily field, meaning that changes made to the source family field will not be applied at the subfamily level, even if the subfamily field originated through spreading.
Example A: No data spreading applied
| Family | Fields |
|---|---|
| Failure |
Failure ID Failure Date Failure Comments |
| Failure\Equipment Failure | None |
| Failure\Equipment Failure\Shutdown | None |
| Failure\Equipment Failure\Leak |
Failure ID Failure Date Failure Comments Leak Substance |
Example B: Data spreading applied
| Family | Fields |
|---|---|
| Failure |
Failure ID Failure Date Failure Comments |
| Failure\Equipment Failure |
Failure ID Failure Date Failure Comments |
| Failure\Equipment Failure\Shutdown |
Failure ID Failure Date Failure Comments |
| Failure\Equipment Failure\Leak |
Failure ID Failure Date Failure Comments Leak Substance |
Example A does not use data spreading. Therefore, you need to manually create all the fields in the subfamilies.
Example B uses data spreading. Example B, which uses data spreading, has only four fields as compared to the seven fields created for Example A. Example B, there are no duplicate fields, whereas Example A has three duplicate fields: Failure ID, Failure Date, and Failure Comments. In this example, data spreading multiplied over hundreds of families can help to save administrative time that is required to create and maintain the data fields, and it can help limit the size of the physical database.
About the Formula Field
- Select the Formula Field check box.
- Define rules for the field to specify how the field value should be calculated.
- Rather than having a base class of EntityFieldCustomization or RelationshipFieldCustomization, they have a base class of CalculatedEntityFieldCustomization (for entity family fields) or CalculatedRelationshipFieldCustomization (for relationship family fields).
- They contain Formula rules. Note: Formula rules must be defined manually in the Visual Studio.
- Select the Formula Field check box and save the field.
- For entity fields, manually change the base class on the field's code item from EntityFieldCustomization to CalculatedEntityFieldCustomization.
- For relationship fields, manually change the base class on the field's code item from RelationshipFieldCustomization to CalculatedRelationshipFieldCustomization.Note: If you modify the formula for an existing formula field or define a new calculation for a field that was previously not a formula field, the value for that field will not be updated automatically in existing records. The new calculated value will be displayed in formatted query results and in Record Manager. The value stored in the database, however, will not be updated until the records are re-saved. Unformatted queries will display the value that is stored in the database.
About the Multi-Value Field
Multi-value fields are fields that can contain more than one value. The number of values allowed in a multi-value field is determined by the No. of values per field property, which can be defined for a new or existing field in the Information section. Multi-value fields can be useful in cases where you want the fields to store multiple, distinct values.
Suppose that you use the Work Order family to store records containing information about work performed on equipment in your plant. Now, suppose that the Work Order family contains the Maintenance Type field, which is meant to identify the type of work represented by a given Work Order record. In this case, it may not be adequate to associate a single maintenance activity with each Work Order record. For instance, some work orders may require that a piece of equipment be repaired or cleaned. If more than one activity is performed against a single piece of equipment by the same person at any given time, you may want to allow multiple values to be selected in the Maintenance Type field. Therefore, you can associate more than one activity with each Work Order record rather than creating multiple Work Order records.
- In the Information section of the field Maintenance Type, in the No. of values per field box, enter the number of values that you want to allow users to specify. For example, if you want to allow up to three maintenance types, enter 3.
- Create a Valid Values behavior to populate the field Maintenance Type with a list of valid maintenance activities.
The behavior is implemented. Now, when a user accesses the Work Order family in Predix Essentials, the field Maintenance Type will display the list of allowed values.
When working with multi-value fields in the Configuration Manager, only a character or numeric field can be configured to contain more than one value by specifying the required value in the No. of values per field box. The character and numeric fields behave in a way similar to the example provided above. Binary, text, and logical fields cannot be configured as multi-value fields.
About Hyperlink Fields
A hyperlink field is a field that appears as a hyperlink in Predix Essentials datasheets and provides access to an internal or external location defined through a URL. For example, the baseline Inspection family contains the fields Asset ID Link and Functional Location ID Link, both of which are hyperlink fields that provide access to the equipment or location record, as appropriate.
- Select the Hyperlink check box in the Information section. You can select this check box when you first create the field or at some later time.
- Define a Default Value rule for the field that specifies the hyperlink. The link must be defined using an HTML <a> tag that contains an href element. The Predix Essentials system will interpret the HTML tag as it would be interpreted by any HTML viewer, where:
- The value defined for the href element defines the destination of the link.
- The text between the opening and closing <a> tags defines the text that will be displayed on the datasheet.
- You can use both internal and external URLs as the destination for hyperlink fields.
- Because the destination URL is defined within a default rule, the hyperlink will be the same for all records that are created within that family.
- Regardless of the other rules and properties that are defined for the field, the value in a hyperlink field cannot be modified by users via the datasheet.
- A given field can be either a formula field or a hyperlink field.
- You must use only character fields for hyperlink fields. Using other field types as hyperlink fields may display error messages when the associated family is accessed in Predix Essentials.
- Hyperlink fields can contain only one value. If you set the No. of Values Per Field to more than 1 (one), the value will be ignored.
Access the Fields Section
About System Fields
In addition to the fields that you define manually for each family, each record that you create will also contain system fields.
- Are identified by a field ID (i.e., you cannot define a field caption for them).
- Are managed automatically as you perform actions within the Predix Essentials system.
- Do not appear in many of the places where family fields appear (e.g., on datasheets).
- Can be included in queries.
- Are referenced throughout the Predix Essentials product but in ways that most end users do not see (e.g., in rules and in URLs).
| Field ID | Description | Behavior or Usage |
|---|---|---|
| CONTENT_GUID | A global unique identifier that uniquely identifies a record across all databases. | This field is populated automatically with a system-generated value when a record is instantiated (i.e., when you initiate the record-creation process). Note that if you include this field in a query, when you run the query, values will not be displayed in the CONTENT_GUID column. |
| ENTY_CAPTION_TX | A field that stores a copy of the Record ID. | This field is updated when the ENTY_ID field is updated. |
| ENTY_ID | A value that uniquely identifies a record within a given database. | This field is populated automatically with a system-generated value the first time a record is saved. The ENTY_KEY field is widely using within URLs to provide a means for giving you direct access to the information associated with a specific entity. |
| FMLY_KEY | A value that identifies the family to which a record belongs. | This field is populated automatically when a record is first saved with the unique key value that identifies a family within a database. |
| LAST_UPBY_SEUS_KEY | A value that identifies the user who last updated the record. | This field is updated automatically whenever a record is modified. |
| LAST_UPDT_DT | A value that identifies the date that a record was last updated. | This field is updated automatically whenever a record is modified. |
| LOCK_SEQ_NBR | A value is internally by the Predix Essentials system to indicate how many times a record has been modified. | This field is updated every time a record is modified. |
Create a New Family Field
Before You Begin
Procedure
- In the Fields section, select
 .The workspace for the new field appears, displaying the Information section.
 - Select
 .The new family field is saved and appears in the list of the fields for the family.Note: The newly created field will be available for you in Family Management, whereas to access the field from other modules, you must log out and log in to Predix Essentials. For other users who are being logged in to Predix Essentials, the created field will be available only when they log in to the application again.
What To Do Next
About Information Section Fields
When you create or modify a field, the workspace for the field appears, displaying the Information and Behavior tabs. By default, the Information tab is selected and the Information section is displayed. The Information section allows you to define the basic details of the field, such as data type, field caption, and so on.
| Fields | Description | Notes |
|---|---|---|
| Active Status | Determines whether or not the field is active. | This setting cannot be modified for fields that have been spread from higher-level families. Inactive fields will not appear in the following locations:
If a field is flagged as inactive after it is already being used in a query, it will continue to be included in the query unless you remove it manually. |
| Allow changing the properties of this field | Specifies that the field can have its own rules and special properties that are different from the ones defined at the level from which the field was spread. | This option appears only in the subfamily Edit Field window. You can clear this check box if you want to inherit the changes from the parent family. |
| Data Type | Identifies the type of data that will be stored in the field. | The data type controls which other properties are enabled or disabled for that type of data. This field contains a list of the following values:
|
| Description | Specifies an optional, textual description of the field and its function. | The field description is optional. You can enter text in the Description field. |
| Edit Length | Specifies the maximum number of characters that will be accepted for the field value. | This setting applies to character fields only. Text fields have no limit. All other fields have a limit of 50 characters. The default setting for character fields is 50, but you can type any value up to 2000 (the maximum number of characters allowed for a character field). It is recommended not to modify the field lengths of baseline Predix Essentials family fields. |
| Field Caption | Specifies the label for the field. | To define a field caption, type a name in the Field Caption text box. A field caption is required for all fields and can be translated. Each field caption must be unique within its family. Defining translations for field captions alone will not ensure that translated strings appear everywhere throughout the Predix Essentials application. If you want to use translated strings, you should define them both for field captions and for datasheet captions. |
| Field ID | Specifies the unique ID that identifies the field. | The Field ID is required for all fields and must be unique. After creating a field, we recommend that you do not modify the Field ID. If you need to change the field ID, you should delete the existing field and recreate it. The code item names in family rule projects are based upon family and field IDs, if the field ID matches the family ID, the Predix Essentials system will not be able to create a unique code item for both the family and the field. When the field-level code item is created, it will overwrite the family-level code item. In order for the code items to be unique, the IDs must be unique. |
| Formula Field | Defines the field as a formula field. | You can define the field as a formula field. This setting cannot be modified for fields that have been spread from higher-level families. |
| Hyper Link Field | Defines the field as hyperlink field. | You can define the field as a hyperlink field. In addition to selecting this check box, you need to define a rule to create a fully functional hyperlink field. This setting cannot be modified for fields that have been spread from higher-level families. |
| ID Field | Designates the field as an ID field. | All fields that are designated as ID field will be spread automatically to all subfamilies of the current family. When you select the ID Field check box, the Spread to Subfamilies check box will be selected automatically to indicate that the field will be spread to subfamilies automatically. This setting cannot be modified for fields that have been spread from higher-level families. We recommend that you select this check box for any field that you plan to use in the ID Template for this family. ID fields will appear on the Manage ID Templates window. |
| Keep History | Specifies whether or not revision history will be saved for the field. | If you have set the
Authentication Required to Insert or Update Records
check box for a family, then this option is selected by default. When a change is made to the value in a field, a copy of it is created and saved to a history log. You can view the revision history in the Record Manager in the Predix Essentials. This setting cannot be modified for fields that have been spread from higher-level families. |
| No. of Values per field | Specifies the number of values that can be entered into a field. | The default value is 1 (one), but you can specify any number up to 2000. You cannot modify this property for existing fields that belong to a family for which at least one record exists. If at least one record exists in a given family, this property is read-only. If you want to change this value for an existing field, you will need to delete the field and create a new one. |
| Physical Column | Displays information about where the field is physically stored in the database. | This field is populated automatically with the column name based on Field Caption. However, you can modify the Physical Column name. The Physical Column text box contains a value that specifies the name of the physical table column in which the field is stored. The Physical Column setting is required for all fields and must be unique. For fields that have been spread down to a subfamily from a higher-level family, the physical column name is determined by the value for the source family. For spread fields, you cannot modify this value at the subfamily level. If you change the value in the Physical Column text box at the subfamily level, your changes will not be saved. |
| Spread to Sub Families | Specifies whether or not the field will be spread to subfamilies of the current family. | You can select this check box, if you want a field to exist in all subfamilies of the current family. You cannot undo spreading for specific subfamilies. This setting cannot be modified for fields that have been spread from higher-level families. For any field that is spread from the parent family, the Spread From Parent column in the Fields grid appears as Yes. |
| Spread From Parent | Specifies whether or not the field is spread from the parent family. | This option appears in the main display area of the Fields section. |
| User help text | Specifies the explanation of the field, which will be displayed to users when they are entering values in that field via the Predix Essentials application. | In the application, when a user pauses on a field, the user help text will appear in a tooltip. The user help text is useful if the field purpose is complex. You may also want to use the user help text property to describe the behavior of the field because of the rules defined. It is recommended that you limit user help text to one sentence. |
About Behavior Section Fields
Field-level behavior defines how a field behaves. You can define the behavior of a field in the New field window or the window that appears when you select a field to modify, using the Behavior box in the Behavior section. You can also add multiple conditions using the If and Else statements to determine if a behavior will be applied or not. The conditions in the If section are evaluated first. If the results are TRUE, the behaviors are applied without evaluating the Else section. If the results are FALSE, the conditions in the Else section are evaluated.
If and Else conditions:| Or | Field A | Equals | A |
| Or | Field A | Equals | B |
| Or | Field A | Equals | C |
| And | Field A | Equals | M |
If and Else conditions:| Or | Field A | Equals | A |
| Or | Field A | Equals | B |
| Or | Field A | Equals | C |
| And | Field A | Equals | M |
If (field A = A or B or C and M)
    Apply Behavior1
Else (field A = M)
    Apply Behavior2
When you define the properties of a field, the Behavior drop-down list box is updated with the corresponding options. If a behavior is not supported for a field, the option is not displayed in the Behavior drop-down list box. For example, for a field with the Character data type, the Format Value option is not available. Select Edit to access the existing field-level behaviors, which are listed above the Behavior drop-down list box.
For the fields of a baseline Predix Essentials family, the rules defined in the Rules Library are inherited at the field level. For a baseline family, the Default option indicates that the baseline rules are applied. Depending on the rules that are inherited from the Rules Library, the field may not have any behavior. For the fields of a custom family (that is, a family that is added to the Predix Essentials baseline database), the Default option indicates that no rules exist.
In a parent family, when you set the behavior for a field that is spread to its subfamily, and if the field behavior contains a field that is not available in the subfamily, the inherited field behavior for the subfamily is set to Default. For example, in the parent family, if you modify Field 1 that is spread to its subfamily and you select Field 3 as the Literal Value for Field 1, and if Field 3 does not exist in the subfamily, the behavior of Field 1 in the subfamily is set to Default.
| Parameter | Description | Parameter Option |
|---|---|---|
| Default | Defines the default value for a field. |
If you select this option, the field is populated with the default value. You cannot use this behavior in fields with the Binary data type. To add the default behavior, perform the following steps:
|
| Disabled | Determines whether the field should be disabled. |
If you select this option, the field is disabled and cannot be modified. You cannot use this behavior in fields with the Binary data type. To add the Disabled behavior to a field, perform the following steps:
|
| Format Value |
Determines the formatting rules that should be applied to the value of a field. | You can define the format of the field value. Only the Numeric and Date data types support the Format Value behavior. You can use only one format behavior for a field. To add the Format behavior to a field, perform the following steps:
Note: In the Format Value drop-down list box, if you select the custom format, then the standard numeric format string values defined by Microsoft are displayed. For more information, refer to https://docs.microsoft.com/en-us/dotnet/standard/base-types/standard-numeric-format-strings. For example, to display a date in 2021-01-31 format, you need to specify yyyy-MM-dd. |
| Hidden | Determines whether a field should be shown or hidden. | You can select this behavior to hide a field. You cannot use this behavior in fields with the Binary data type. To add the Hidden behavior to a field, perform the following steps:
|
| Masked Field | Determines whether the characters entered in the field should be masked. | You can select this behavior to mask the characters entered in the field. The characters in the field are masked with the special character *. You can use this behavior only in fields with the Character data type. You can use only one Masked Field behavior in a field. To add the Masked Field behavior to a field, perform the following steps:
|
| Required | Determines whether a value must be entered in a field before you save a record in the family. | You can select this behavior if you want the field to be required to save a record. If a value is not entered in a required field, an error message appears when you save the record. You cannot use this behavior in fields with the Binary data type. To add the Required behavior to a field, perform the following steps:
|
| State Management | Determines if the State Management ID should be displayed in the State Management field. | You can use this behavior only in State Management fields. The field caption can be localized. To add the State Management behavior to a field, perform the following steps:
|
| Validate |
Defines the validation rules that will be used to validate values that are entered in a field. |
You can use this behavior if you want to force the values in a field to conform to specified limits or criteria that are considered valid. You can use this behavior only in fields with the Numeric and Date data types. To add validations to a field, perform the following steps:
|
| Picklist |
Defines a list of values that will be available for selection. | You can use this behavior to display a list of values for selection, only for the fields with the Character or Text data type. To add this behavior to a field, perform the following steps:
|
 next to the behavior or condition.
Example for APM Query with Parameters
For example, consider a family ‘Equipment’ with three fields Equipment (EQPT), Functional Location (FL), and Manufacturer (MFGR).
The Manufacturer field contains the following values:
- ACME
- BURNS
- SMITH
The Equipment field contains the following values:
- Compressor
- Heat Exchanger
- Motor
- Pump
- Tank
The Functional Location contains the following values:
- Roanoke
- Bangalore
- San Ramon
To populate the MFGR field based on the EQPT and FL, you must create the following three queries:
- Functional Location
- Equipment
- Manufacturer
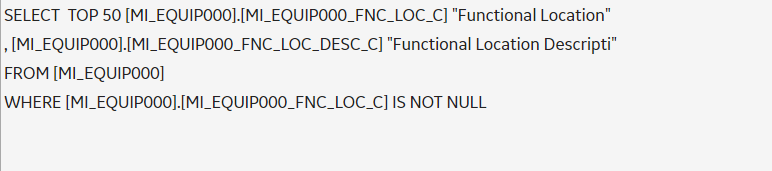
Functional Location
Create an APM Query for the FL field such that all functional locations are listed.
The following image shows the sample query for functional location.
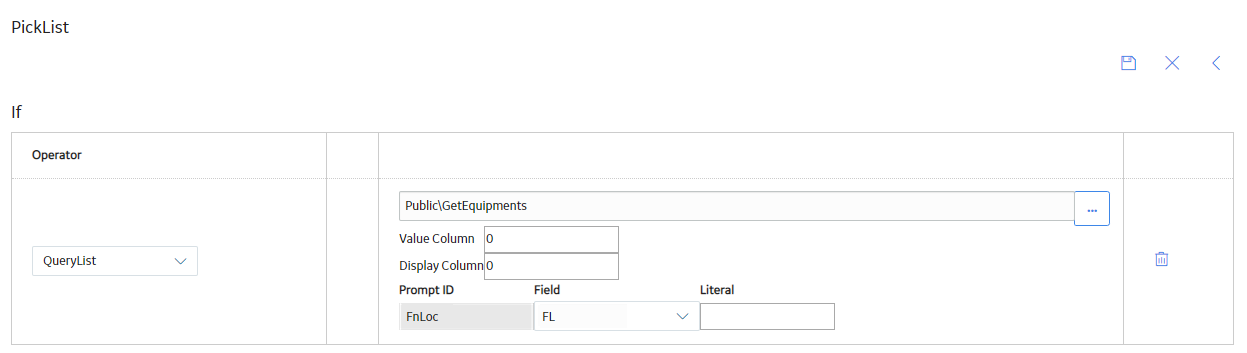
Equipment
Create an APM Query for the EQPT field that lists the equipment for a given Functional Location. In the Behavior section of the field, in the Picklist behavior, select the QueryList option and map the Functional Location parameter of the query with the FL field such that the values in the EQPT field in the datasheet are displayed based on the values in the FL field.
The following image shows the sample query for Equipments.

The following image shows the mapping of parameters.
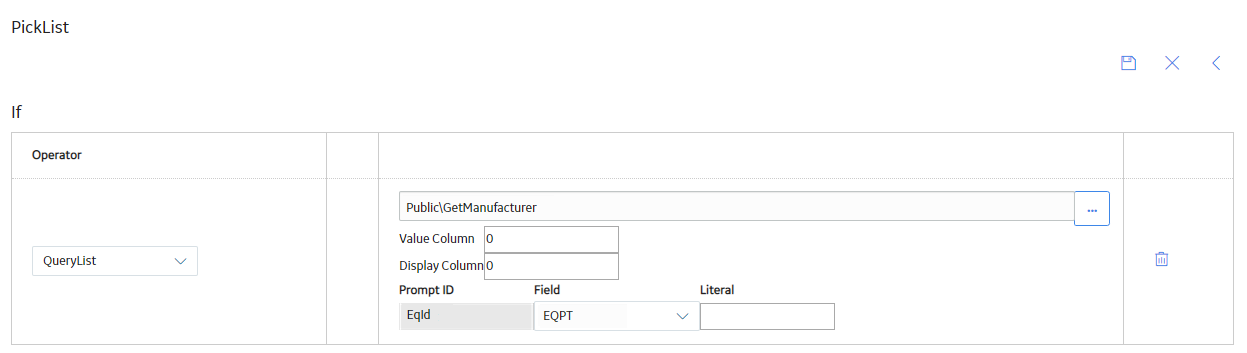
Manufacturer
Create an APM Query, for MFGR field, that lists the manufacturers for an Equipment. In Field Behavior section, in the Picklist behavior, select the QueryList option and map the Equipment parameter of the query with the EQPT field such that the values in the MFGR field in the datasheet are displayed based on the values in the EQPT field.
The following image shows the sample query for Manufacturer.

The following image shows the mapping of parameters.
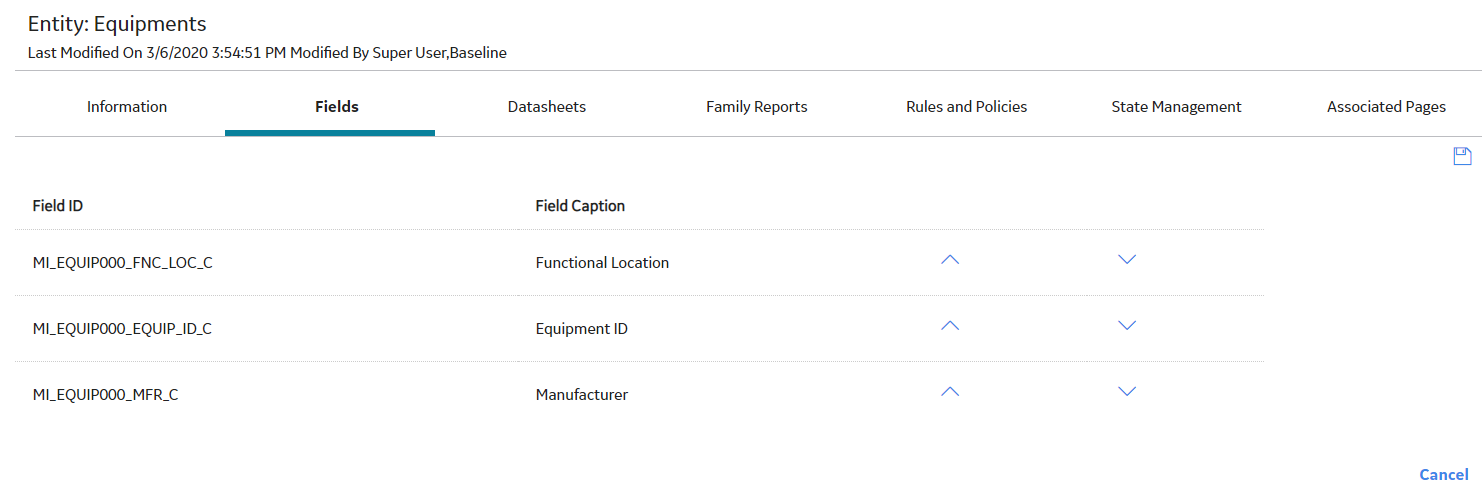
After the queries are created, in the Family Fields Sequence Order window, you must arrange the queries in the following order:
1. Functional Location
2. Equipment
3. Manufacturer
The following image shows an example of query arrangement in the Family Fields Sequence Order window.
Assume that the Functional Location Roanoke has the equipments Pump and Motor and with these queries in place, in a datasheet of the Equipment family if a user selects Roanoke in the FL drop-down list box, the EQPT drop-down list box will contain only Pump and Motor. And, if you select Motor in the EQPT drop-down list box, the manufacturer associated with the equipment will be populated in the MFGR field.
Create a Valid Values List from a System Code Table
About This Task
Procedure
- In the Fields section, select .The workspace for the selected field appears, displaying the Information section.
- Select .A list of valid values is created.
Example of Filtering System Code List to Display Referenced System Codes
By using the Static Filter option, you can create valid value list to display system codes that are referenced from another System Code. Consider, for example, two System Code Tables: Manufacturer (MFGR) and Equipment Type (EQPT).
- The Equipment Type table contains the following values:
- Compressor
- Heat Exchanger
- Motor
- PumpTank
- The Manufacturer table contains the following values:
- ACME
- BURNS
- SMITH
If the manufacturers ACME and BURNS both produce motors, then, in the Equipment Type System Code Table, you can add references to the ACME and BURNS System Codes in the Motor System Code . The references would indicate that the two manufacturers are associated with that equipment type.
Now, assume that you have a family called Motor that will be used to store information about the motors in your company. Also, assume that the Motor family contains the Manufacturer (ASSET_MANUF_CHR) field, which is intended to identify the name of the company that manufactures a given motor. In this case, you could use a Valid Values rule to create a list for this field that contains all values from the Manufacturer (MFGR) System Code Table. But, since only some manufacturers produce motors, it would be better to filter the list to contain only the valid manufacturers: ACME and BURNS.
Assuming that the System Code references described above are already in place, you can use the field behavior to implement this functionality by generating a Valid Values behavior for the Manufacturer (ASSET_MANUF_CHR) field that is built from the Manufacturer System Code Table and contains a Static Filter to include only the values that are referenced by the Motor System Code in the Equipment Type (EQPT) System Code Table.
Sequence a Family Field
About This Task
When you select the Save on the Family Fields Sequence Order window, the fields will be assigned a sequence number that corresponds to the order in which they are displayed in the list on the Family Fields Sequence Order window. The first field in the list will be assigned a 1, the second field will be assigned a 2, the third field will be assigned a 3, and so on. You can reorganize fields within the list to determine the sequence number that will be assigned to each field. Note that the actual field sequence number values are unimportant. It is the order of each sequence number relative to the sequence numbers defined for other fields in the same family.
Procedure
- Select
 .The Family Fields Sequence Order window appears.
The order of the fields in the list is an exact representation of the field sequence. The list contains all fields that exist for the selected family, including any fields that have been spread from a family.
- To move the field(s) up in the list, select
 .
.-or-
To move the field(s) down in the list, select
 .
.
Modify the Family Field Properties
Before You Begin
- Depending on whether or not a given field has been spread down to the current family from a higher-level family, some field properties may not be editable.
- Some attributes of baseline fields cannot be modified. If you attempt to make a modification that is not allowed, an error message will appear, and your change will not be saved.
- Some baseline fields cannot be modified because they belong to a family that has been delivered with read-only properties. When you view the properties for a field that meets this criteria, some field properties will not be editable.
Procedure
- Select .Your changes are saved.
Delete the Family Field
Procedure
- Select .The Delete Family Field window appears.
- Select OK.A confirmation message appears, indicating that the field is deleted. The field does not appear in the Fields section.Note: The deleted field will no longer be available for you in Family Management, whereas to ensure that the field is not accessible from other modules, you must log out and log in to Predix Essentials. For other users who are being logged in to Predix Essentials, the deleted field will not be available only when they log in to the application again.Note: A field that has been spread down or copied from a parent with Field Chooser cannot be deleted (
 ).
).