Associated Pages
Associated Pages Construction and Configuration
Associated Pages are links that are configured for a specific family, and which provide access to internal or external locations, such as a page in Predix Essentials, a webpage, or an external file. You can configure Associated Pages for any entity family so that when users view a record belonging to that family, links will appear on the Associated Pages pane to provide users with access to those items. Associated Pages are meant to provide additional information or functionality related to the record that is currently being viewed.
To create Associated Pages, you must be familiar with constructing URLs for Predix Essentials features. When you create Associated Pages, it is useful to be familiar with URLs that use an Entity Key parameter as it allows you to pass the Entity Key of the record to the URL.
You can configure Associated Pages for the families through Configuration Manager. You have two options when designing the menu on which they will appear. You can:
- Place them directly on the root menu which is the root Associated Pages menu.
- Place them on one or more submenus, which cascade down from the root menu. Each submenu that you create can also contain one or more submenus of its own.
If you choose to organize items on submenus, you can create one or more submenus, each with its own set of items. In addition, when you use submenus, you can divide the items on the menus into different groups.
Access the Associated Pages Section
Procedure
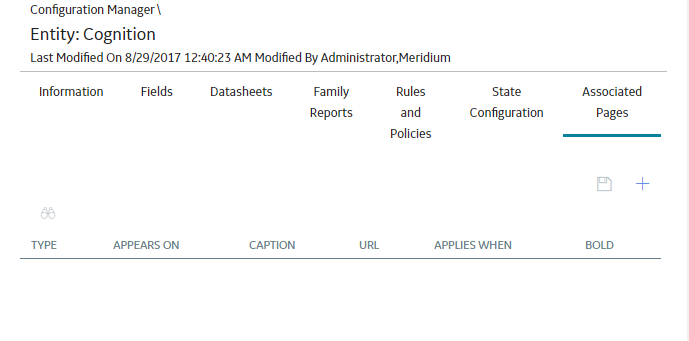
- At the top of the workspace, select the Associated Pages tab.The Associated Pages section appears, displaying the grid populated with the Associated Pages that are already defined for the selected family.
Properties of Associated Pages
You can configure the properties of an Associated Page or a submenu when you add a new Associated Page or submenu for a family or by modifying an existing Associated Page or submenu that already exists for a family. In both cases, you can configure properties on the Menu Information window. The grid on the Associated Pages section displays a list of Associated Pages that are associated with a selected family and any submenus that are used to group the Associated Pages.
- Type: A flag that indicates that the item is a submenu. The submenu can be a submenu of the root menu, which is either the root Associated Pages menu or it could be a submenu of another submenu.
- Appears On: The name of the menu on which the Associated Page will appear.
- Caption: The label that will appear for the Associated Page. If desired, you can manage translations for that string.
- URL: The URL that will be used to construct the link for the Associated Page. A value will appear in this field only for Associated Pages, not for submenus.
-
Applies when: A flag that specifies when the Associated Page will appear. Each Associated Page can appear:
- All the time: The Associated Page will always appear, regardless of other conditions that exist.
- Only one record is selected: The Associated Page will appear only when one record is selected in the search results. Note that this option applies only when the Associated Page is displayed in the shortcut menu of search results.
- When user is a Super User or a member of the MI Power User security group: The Associated Page will appear only when the user who is logged in to the Predix Essentials Super User or a member of the MI Power User Security Group.
- Bold: A flag that indicates whether the label for the Associated Page will be displayed with bold text.
Fields of the Menu Information Window
| Fields | Description | Behavior and Usage |
|---|---|---|
| Apply When | The option that indicates when the Associated Page should appear. |
You can choose:
Note: If you change the Apply When settings of a submenu from All the time to a more restrictive option, a message appears, indicating that the change will be propagated to ALL of the child items. In addition, if you are configuring settings for a submenu, you cannot choose an Apply When setting that is less restrictive than that of the menu on which the submenu appears. For example, if the Inspection submenu appears on the Internal URLs submenu, which is configured to appear Only one record is selected, the Inspection submenu cannot be configured to appear All the time.
|
| Appears On | Specifies the menu on which the Associated Page should appear. | This could be the root menu or a submenu appearing on either the root menu or another submenu. The default value is Root Menu, but you can select a submenu if any submenus have been created. This list is populated with an alphanumeric list of all the submenus defined for this family. |
| Caption | The text that will appear as the label for the Associated Page. | This field is required. You can create a separator by typing a hyphen in the Caption field. |
| Hyper Link Information | Configures the properties of an Associated Page. | Selected by default. |
| Make Bold | Specifies whether or not you want the Associated Page to appear in bold text. | You can select the check box if you want the Associated Page to appear in bold text. |
| Sub-Menu Information | Configures the properties of a submenu that is used to group Associated Pages. | You can select one or more submenus, which cascade down from the root menu. |
| URL | The URL for the Associated Page. |
This field appears when you select Hyper Link Information and is a required field for all Associated Pages. You can specify an internal Predix Essentials URL or an external URL. In either case, you must define the scheme within the URL (e.g., https://).
|
Associated Page URLs
The base URL route that is used for associated pages is record-manager. The following table describes the various paths that build on the route, and the elements that you can specify for each.
| Parameter | Description | Accepted Value(s) | Notes |
|---|---|---|---|
| Other | Passes Entity Key to an Associated Pages URL. | Numeric Entity Key | Passes the Entity Key from Record Manager to an Associated Page URL. |
Example: Associated Page URLs
| Example URL | Destination |
|---|---|
| #record-manager/[enty_key] | Passes the Entity Key from Record Manager to an Associated Page URL. |
Passing Values from Records into URLs on the Associated Pages
Via Configuration Manager, you can create Associated Pages for a family. When you are viewing a record that belongs to a family, these Associated Pages will appear as links in the Associated Pages pane. You can create Associated Pages using any URL that uses the #<name of the page> or http:// as the scheme.
The following examples show several ways to pass a value to a URL.
Example 1: Pass a Single Value Parameter into a URL
Suppose that you have created a report and the report contains a parameter (P0) that accepts an entity key of Full Inspection family record. When you provide an entity key, the report displays data for Full Inspection record. You can create a link in the Associated Pages pane so that you will be able to view this report whenever you are viewing a record in Full Inspection. To do so, you would construct a URL as follows:
#ssrs/viewer/Public\Meridium\Modules\Inspection\Reports\Full Inspection Report/P0=[ENTY_KEY]
- #ssrs/viewer/Public\Meridium\Modules\Inspection\Reports\Full Inspection Report specifies the report to open in the Report Viewer.
- Public\Meridium\Modules\Inspection\Reports\Full Inspection Report is the Catalog path and file name of the report that you want to open.
- P0 specifies that you are supplying a value for the first prompt in the report.
- [ENTY_KEY] is the variable that will be replaced at runtime by the entity key of the actual Full Inspection record that you are viewing.
Example 2: Pass a Multi-Value Parameter into a URL
Suppose that you have created a report and the report contains two parameters. The first parameter (P0) accepts an entity key and the second parameter (P1) accepts a static value. After the P0 and P1 parameters are provided, the report displays data for Full Inspection record. You can create a link in the Associated Pages pane so that you will be able to view this report whenever you are viewing a record in Full Inspection. To do so, you would construct a URL as follows:
#ssrs/viewer/Public\Meridium\Modules\Inspection\Reports\Full Inspection Report/P0=[ENTY_KEY]/P1=[Value]- #ssrs/viewer/Public\Meridium\Modules\Inspection\Reports\Full Inspection Report specifies the report to open in the Report Viewer.
- Public\Meridium\Modules\Inspection\Reports\Full Inspection Report is the Catalog path and file name of the report that you want to open.
- P0 specifies that you are supplying a value for the first parameter in the report.
- [ENTY_KEY] is the variable that will be replaced at runtime by the entity key of the actual Full Inspection record that you are viewing.
- P1 specifies that you are supplying a value for the second parameter in the report.
- [Value] is the static value that you provide to open the report.Note: If you do not provide any static value for this parameter, then a window will appear and you will need to manually select the value for P1.
Example 3: Pass a Multiple Value Parameter into a URL
Similarly, in the previous example, if P1 accepts multiple static values (Value 1 and Value 2), then you can create a link in the Associated Pages pane so that you will be able to view this report whenever you are viewing a record in Full Inspection. To do so, you would construct a URL as follows:
#ssrs/viewer/Public\Meridium\Modules\Inspection\Reports\Full Inspection Report/P0=[ENTY_KEY]/P1=[Value_1]/P1=[Value_2]- #ssrs/viewer/Public\Meridium\Modules\Inspection\Reports\Full Inspection Report/P0=[ENTY_KEY]/P1=[Value_1]/P1=[Value_2] specifies the report to open in the Report Viewer.
- Public\Meridium\Modules\Inspection\Reports\Full Inspection Report/P0=[ENTY_KEY]/P1=[Value_1]/P1=[Value_2] is the Catalog path and file name of the report that you want to open.
- P0 specifies that you are supplying a value for the first parameter in the report.
- [ENTY_KEY] is the variable that will be replaced at runtime by the entity key of the actual Full Inspection record that you are viewing.
- P1 specifies that you are supplying multiple values for the second parameter in the report.
- [Value_1] and [Value_2]: are the static values that you provide to open the report. Note: If you do not provide any static value for these parameters, then a window will appear and you will need to manually select the values for P1.
Syntax for Variable Parameter Values in Associated Pages
In the Configuration Manager, you can create Associated Pages, which are URLs that are associated with a specific entity family. Associated Pages will be available in the Predix Essentials when a user is viewing a record that belongs to a family for which Associated Pages have been defined. In general, the syntax for URLs that serve as Associated Pages is the same as the syntax for URLs that you construct in the Predix Essentials. One exception to Associated Pages is the URL syntax for specifying a variable parameter value. In the Predix Essentials system, variable parameter values in query URLs are surrounded by $ (dollar signs). For URLs that serve as Associated Pages, variable parameter values are surrounded by [ ] (square brackets).
Consider an example where the Tank family has a Manufacturer_ID field that stores the name of the company that manufactured the Tank. Now, suppose a query exists that returns a list of tank failures and contains a prompt, with the prompt ID Manufacturer, which accepts the name of a given manufacturer. The purpose of the prompt is to limit the query results to those failures associated with the specified manufacturer. Using this example, you could create a link on the Associated Pages menu that executes this query and passes in to the Manufacturer prompt the Manufacturer ID from the Tank record that is displayed in the Record Manager.
The URL for the link might look something like this: meridium://Registry/QueryBuilder?QueryPath=Public\Meridium\Queries\Failures by Manufacturer&Manufacturer=[Manufacturer_ID]
This URL contains one variable parameter value: Manufacturer_ID. When a user executes the Associated Page, the value from the Manufacturer_ID field in the current Tank record will be passed to the Manufacturer prompt in the Failures by Manufacturer query. As a result, the query will return a list of failures associated with the manufacturer of the Tank record that you are viewing at any given time.
Create a New Associated Page or Submenu
About This Task
Procedure
- In the grid, select
 .The Menu Information window appears.
 - Select
 .The new Associated Page or submenu is saved for the selected family.Note: The newly created associated page will be available for you in Family Management, whereas to access the associated page from other modules, you must log out and log in to Predix Essentials. For other users who are being logged in to Predix Essentials, the associated page will be available only when they log in to the application again.
Modify an Existing Associated Page or Submenu
Before You Begin
Procedure
- In the grid, select the item that you want to modify, and then select
 .The Menu Information window appears, displaying the information that is currently defined for the selected item.
 - Select .A confirmation message appears, indicating that the updates are saved.Note: The associated page with the modifications will be available for you in Family Management, whereas to access the associated page with the modifications from other modules, you must log out and log in to Predix Essentials. For other users who are being logged in to Predix Essentials, the associated page with the modifications will be available only when they log in to the application again.
Delete Associated Page or Submenu
Procedure
- In the grid, select the item that you want to delete, and then select
 .A message appears, asking if you want to delete the selected items. If the selected item is a submenu, the message will indicate that deleting the item will also delete any Associated Pages that are configured to appear on the submenu.
 - Select .A confirmation message appears, indicating that the updates are saved.Note: The deleted associated page will no longer be available for you in Family Management, whereas to ensure that the associated page is not accessible from other modules, you must log out and log in to Predix Essentials. For other users who are being logged in to Predix Essentials, the deleted associated page will not be available only when they log in to the application again.