Production Plans
About Production Plans
Each Production Unit can generate one or more products. For each product that it generates, a production profile will exist to identify information about that product, such as the maximum demonstrated rate of production and the amount of profit one of those products yields.
For each Production Unit, you will have one or more Production Plans in which you can define criteria, as outlined in the following table:
| Plan Details | Description | Example |
|---|---|---|
| What | The products that you plan to produce. Each plan can include one or more products. | You plan to produce water bottles and labels. |
|
When -or- How Much |
When: The time period for which you want to track the production. In this case, you will provide the start and end dates, and the planned product quantity will be determined automatically based upon the production profile. This option is called a time-based plan. -or- How Much: The amount of each product that you plan to produce. In this case, you will provide the start time and the planned product quantity, and the end time will be determined automatically. This option is called a quantity-based plan. |
When: You plan to produce bottles and labels from January 1, 2015 through April 30, 2015. -or- How Much: You plan to produce 50,000 bottles and 100,000 labels, starting January 1, 2015. |
| During Which Hours | The hours each day that you produce the specified products. |
You have one shift running 8:00 A.M. to 5:00 P.M. -or- You have two shifts:
|
| How Often You Enter Data |
The frequency by which you enter production data and production losses. You can choose the Data Entry type to select the frequency by which you enter data. |
You enter production data daily. -or- You enter production data once per shift. |
Each production plan is represented by a Production Plan record.
About Usage of the Planned Production Values
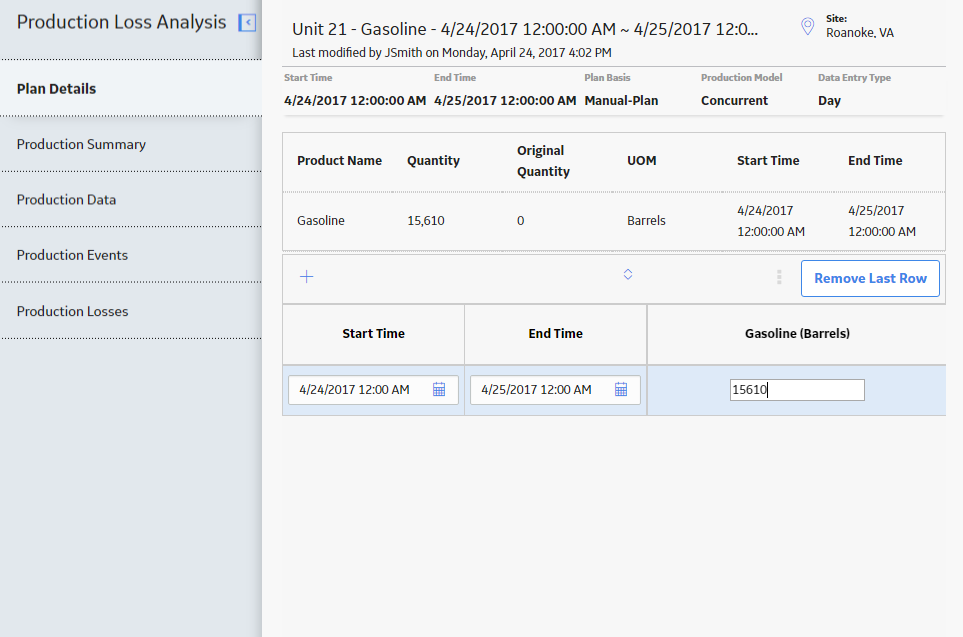
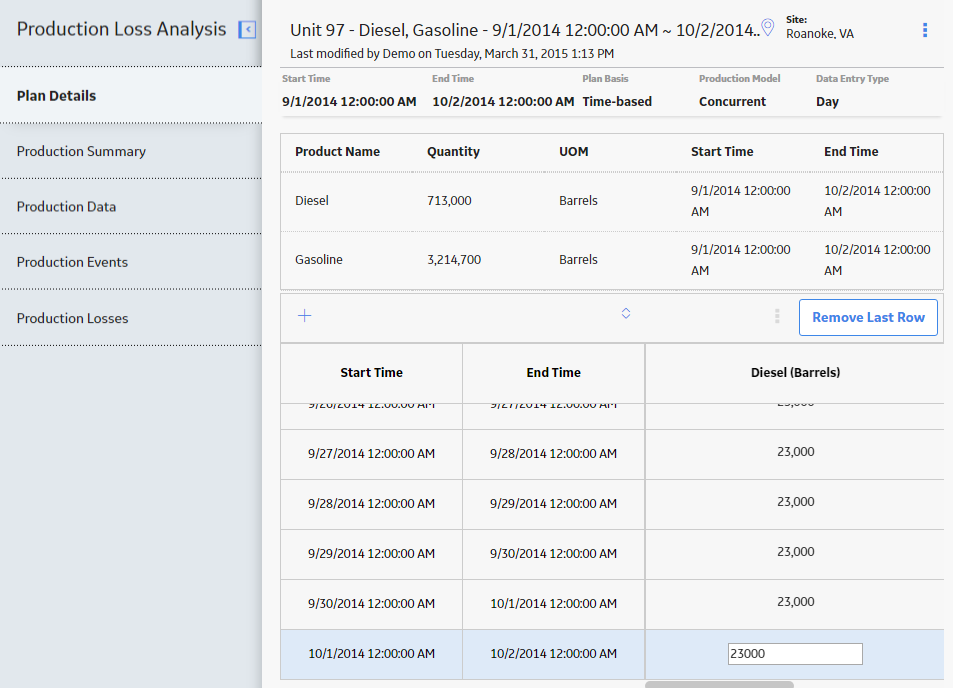
After you create a Production Plan, the plan will contain a row for each period for which you plan to produce a given product (i.e., an entire day or a specific shift within a day). Each row will contain a planned production value, where the product associated with those values is specified in the column heading. The following image illustrates planned production values for Gasoline.
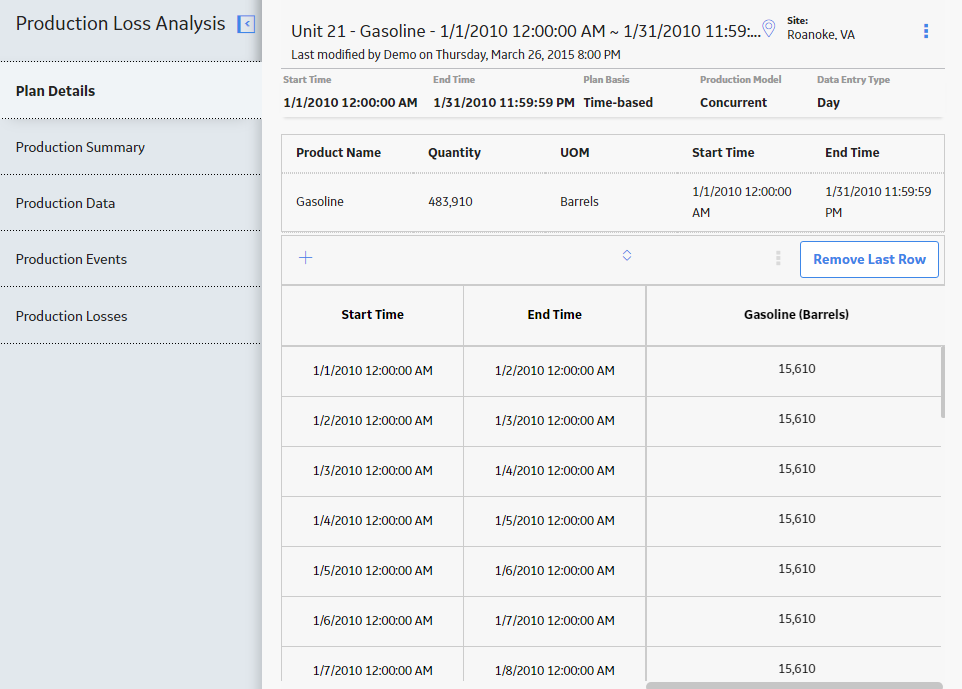
When you access the Production Data workspace for a production plan, for each product, you will see a similar row for each period in the plan. Each row represents a separate Production Data record. In each row, the value in the Short Range Plan column is a copy of the planned production value.
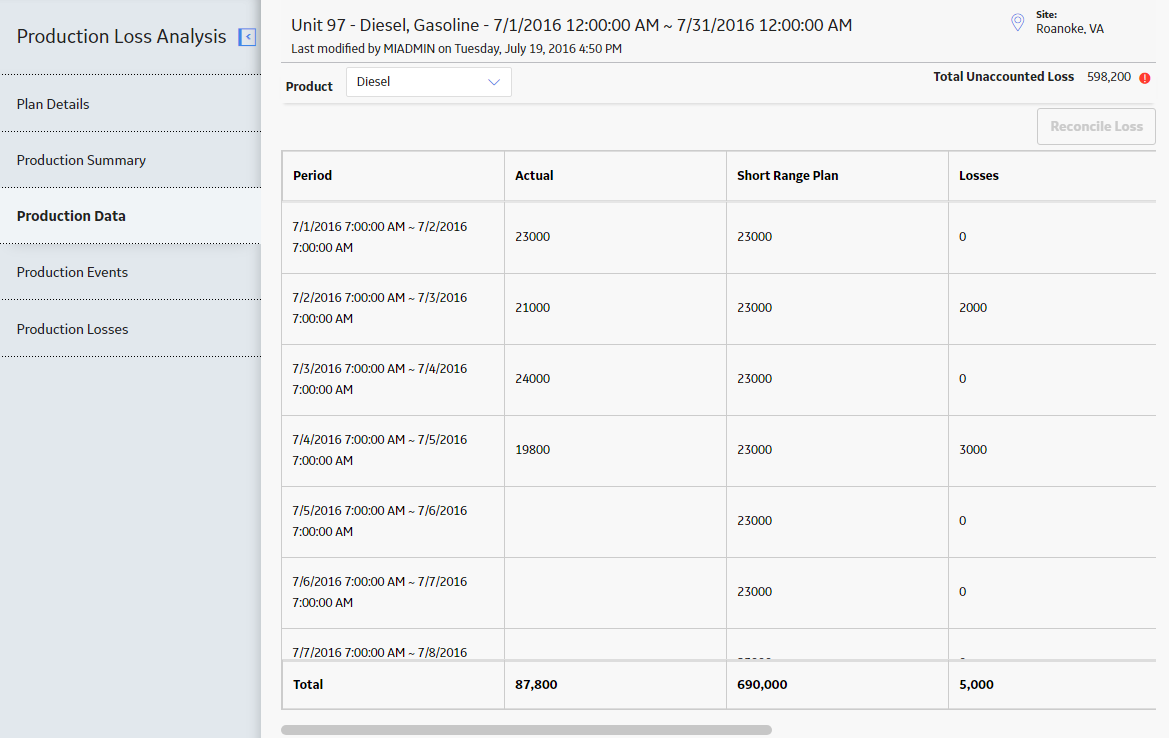
About the Short Range Plan
When you create a Production Profile, you can specify the quantity of Product that can be consistently produced by a Production Unit without adversely affecting the piece of equipment, the location, or the quality of the product. This value is stored in the Planning Rate field of the Production Profile.
For the Production Plan of a Production Unit, the planned production quantity is based on the value in the Planning Rate field of the related Production Profile. Based on the planned production quantity and your knowledge of the planned events within the facility, for a Production Data record, you can specify the quantity of Product that the Production Unit can produce. This quantity is called the Short Range Plan.
The Short Range Plan of a Production Data record can be the same as the planned production quantity, or it can be different to account for the various factors that can affect the production rate, such as weather, loss of cooling capacity due to high ambient temperatures, fluctuations in product demand depending on seasons, and other factors.
Short Range Plan in the Production Data Workspace of a Production Plan
Suppose that for a Production Plan, the planned production quantity, which is specified in the Plan Details workspace, is 500 barrels for June 1, 2018. If a hurricane occurs, and the facility is shut down for several weeks for repairs, you might want to modify the planned production quantity. This adjusted planned production quantity is stored in the Short Range Plan field of the Production Data record.Access a Production Plan
Procedure
- Select the Production Plans tab.
The Production Plans section appears, displaying a list of Production Plans available in the database.
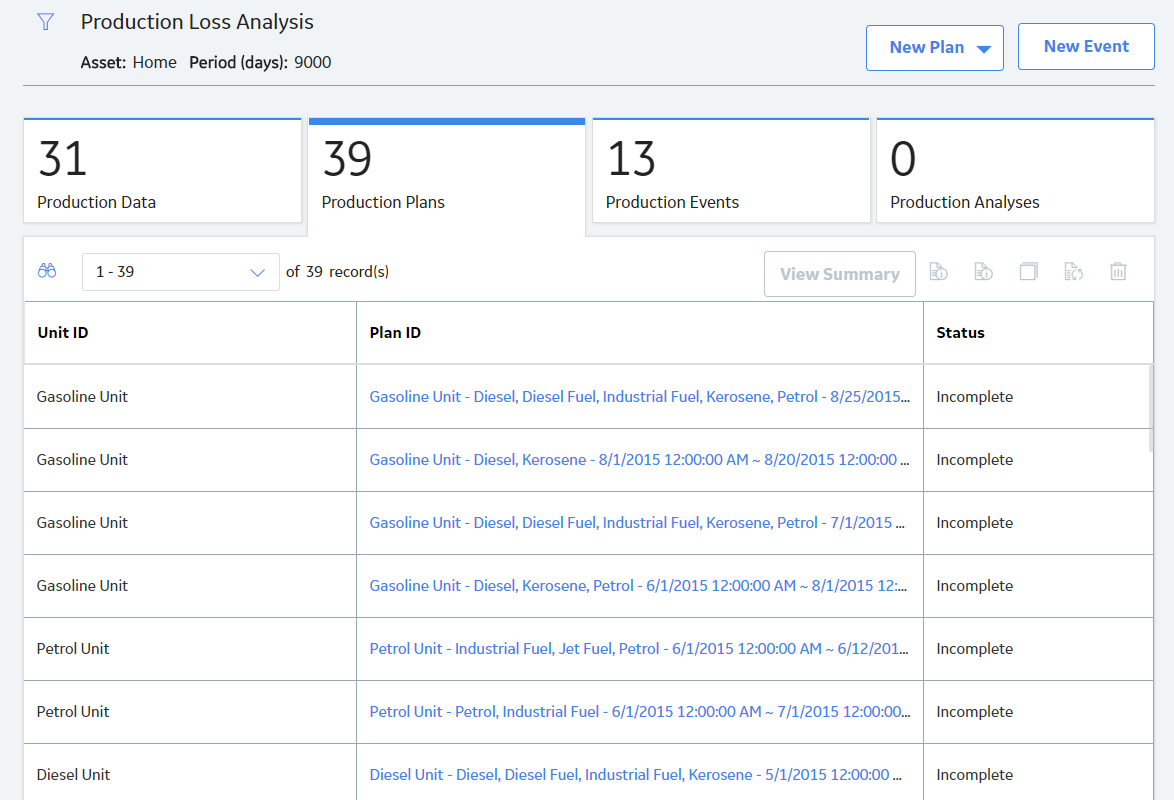
- In the row containing the Production Plan whose details you want to view, in the Plan ID column, select the link to access the details of the Production Plan.
The Plan Details workspace appears, displaying the details of the selected plan.
The Plan Details workspace contains the following items:
- Start Time : The start time of the production plan. This value is read-only.
- End Time: The end time of the production plan. If this is a time-based plan, you specified this value manually in the Production Plan Builder. Alternatively, if this is a quantity-based plan, this value is determined automatically based upon the product quantity and start time that you specified. This value is read-only.
- Plan Basis: The type of plan: Time-based or Quantity-based.
-
Production Model: The order in which the products will be produced: Concurrent or Sequential.
-
Data Entry Type: How often you plan to enter production data and losses.
-
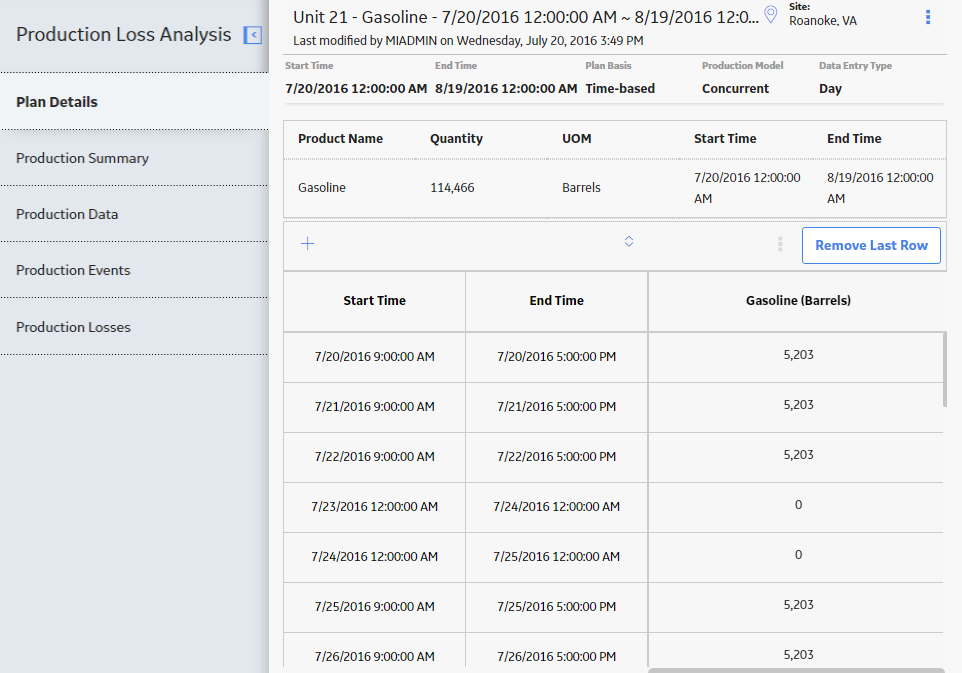
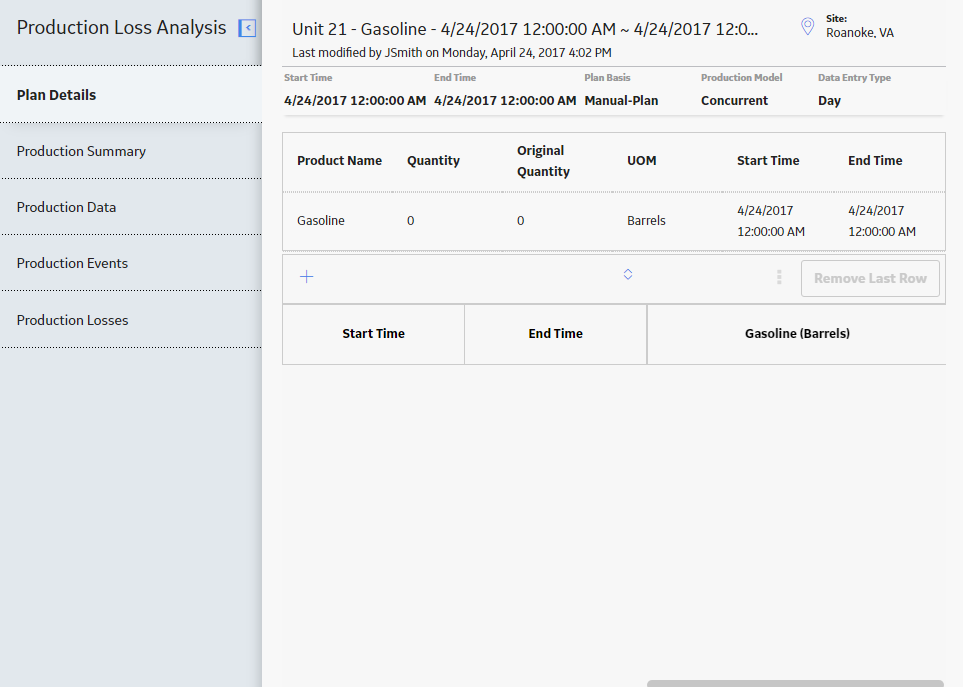
Upper Grid: In the Plan Details workspace, each row in the upper grid represents a separate product that is being produced during the plan. All values in the grid are read-only. The grid contains the following columns:
- Product Name: The name of the product.
- Quantity: The amount of product that should be produced during the entire plan. If this is a time-based plan, this value is determined automatically based upon the start and end times that you specified in the Production Plan Builder and the batch production values that you specified in the associated Production Profile. Alternatively, if this is a quantity-based plan, you specified this value manually in the Production Plan Builder.
- UOM: The unit of measure that is associated with the product.
-
Sequence: The order in which the product will be produced during the Production plan (represented by a number 1 through n).
Note: The Sequence column is displayed only for the Sequential Production Model. - Start Time: The time at which that product will start being produced. If multiple products are being produced, the start time for each product is determined based upon your production model selection in the Production Plan Builder. For example, if multiple products are being produced sequentially, for each product after the first one, production will start after production ends for the previous product.
- End Time: The time at which that product will stop being produced.
-
Lower Grid: In the Plan Details workspace, each row in the lower grid represents a separate period in the plan (e.g., a separate day or a separate shift within the same day). The grid contains the following columns:
- Start Time: The start time of the period.
- End Time: The end time of the period.
-
<Product Name (<UOM>)>: The planned production amount for that period. You can modify the value as long as it does not exceed the maximum demonstrated capacity that is defined in the associated Production Profile.
You can modify values in the Plan Details section by selecting the value that you want to modify. Doing so will update the value in the Quantity column in the Products section and the plan start and end time above the Products section.
Access the Production Summary
Procedure
- Select View Summary.
The page for the selected plan appears, displaying summary information for the Production Plan in the Production Summary workspace.
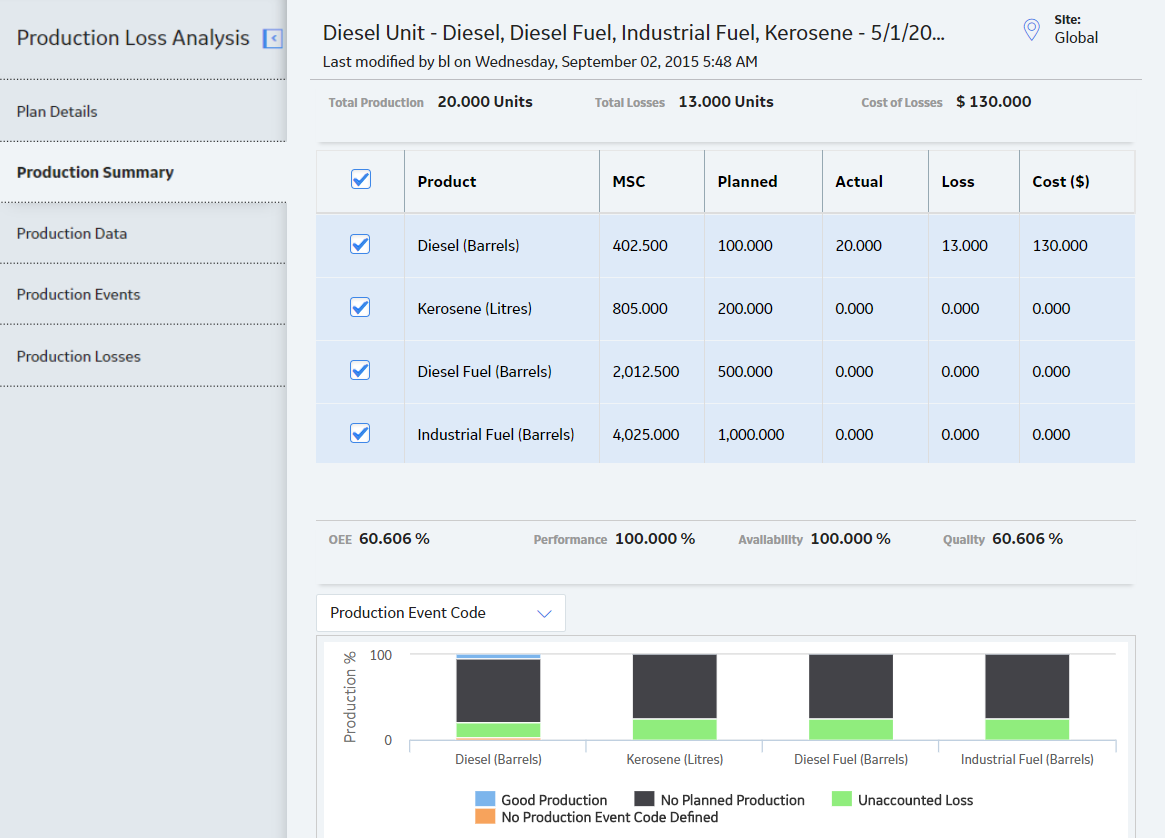 The Production Summaryworkspace contains the following items:
- Total Production: The sum of all values in the Actual column on the corresponding Production Data workspace, appended with the value in the Product UOM field in the Production Profile that is associated with this Production Data. If the Production Plan includes more than one product, however, the total production value is appended with Units.
- Total Losses: The sum of all values in the Losses column on the corresponding Production Data workspace, appended with the value in the Product UOM field in the Production Profile that is linked to the Production Plan that you selected when you accessed the Production Data workspace (e.g., Barrels). If the Production Plan includes more than one product with different units of measure, however, the total losses value is appended with Units.
- Cost of Losses: The cost of all losses across all products that are included in the plan, where the value is calculated using the following equation:
Cost of Losses = Σ Losses x Margin
Note: The currency symbol that appears in the Production Summary workspace and the number of decimal places that appear in the Cost of Losses value are defined via the Production Loss Analysis Application Settings. - Product: The name of the product and its associated unit of measure.
- MSC: The value in the Maximum Sustained Capacity Rate field in the Production Profile that is associated with this Production Plan.
- Planned: The sum of all values in the Short Range Plan column in the corresponding Production Data workspace.
- Actual: The sum of all values in the Actual column in the corresponding Production Data workspace.
- Loss: The sum of all values in the Losses column in the corresponding Production Data workspace.
- Cost: The sum of cost of all losses for all days in the plan, where the value is calculated using the following equation:
Cost of Losses = Σ Losses x Margin
- Production Data Summary Plots: Displays a graphical representation of the data that exists in the Production Data workspace.
- OEE: The OEE percentage for the products that are selected in the production grid. OEE is calculated using the following equation:
OEE = (Availability x Performance x Quality) x 100
- Performance: The performance percentage for the products that are selected in the production grid. Performance is calculated using the following equation:
Performance = [(Good Production + Quality Loss) / (Good Production + Performance Loss + Quality Loss)] x 100
- Availability: The availability percentage for the products that are selected in the production grid. Availability is calculated using the following equation:
Availability = [(Good Production + Performance Loss + Quality Loss) / (Good Production + Availability Loss + Performance Loss + Quality Loss)] x 100
- Quality: The quality percentage for the products that are selected in the production grid. Quality is calculated using the following equation:
Quality = [Good Production / (Good Production + Quality Loss)] x 100
Create a Production Plan via the Production Plan Builder
About This Task
This topic describes how to create a Production Plan via the Production Plan Builder. Alternatively, you can:
- Create a manual Production Plan.
- Copy a Production Plan to create a new plan.
- Create a Production Plan from a Plan Template
Procedure
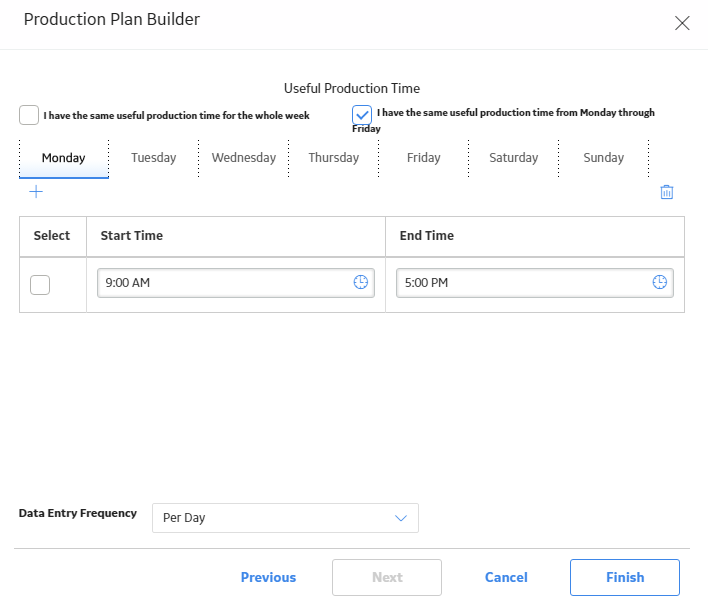
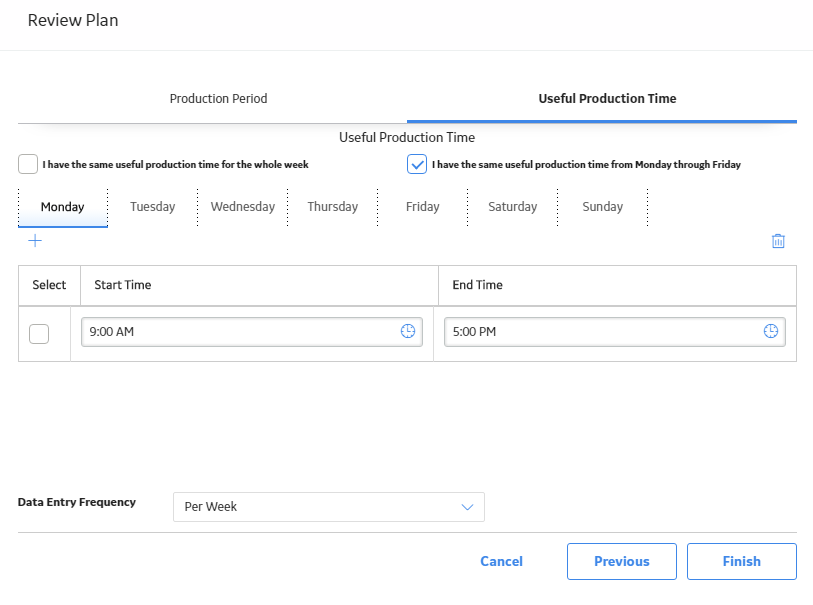
- To refine the hours each day that you produce the specified products, by selecting the appropriate tabs, define your shifts as necessary.
- If your shifts are the same Monday through Friday, you can leave the default I have the same useful production time from Monday through Friday check box selected, and then define the shift only for Monday. It will then be copied to Tuesday through Friday automatically.
- If your shifts are the same every day of the week (including weekends), you can select the I have the same useful production time for the whole week check box. You can then define the shift only for Monday, and it will be copied to Tuesday through Sunday automatically.
- If your shifts are on specific days, clear the I have the same useful production time from Monday through Friday and I have the same useful production time for the whole week check boxes, and then manually define the shifts for each day.
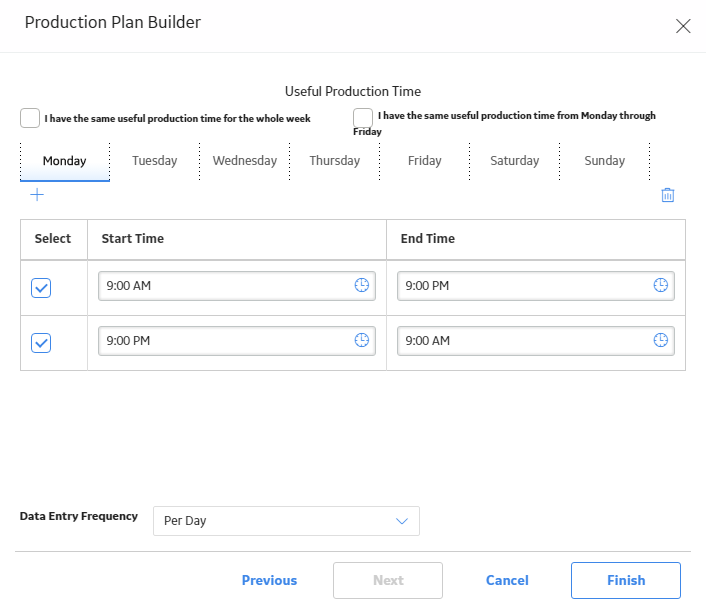
When defining shifts:
-
If you run only one shift all day (24 hours a day), make the start time and end time the same, as shown in the following image:
-
If you run multiple shifts per day, back to back, match the start time of the second shift to the end time of the previous shift, as shown in the following image:
Create a Production Plan from a Plan Template
Procedure
- On the upper-right corner of the PLA Overview page, select New Plan, and then select Use Plan Template.
The Use Plan Template window appears.
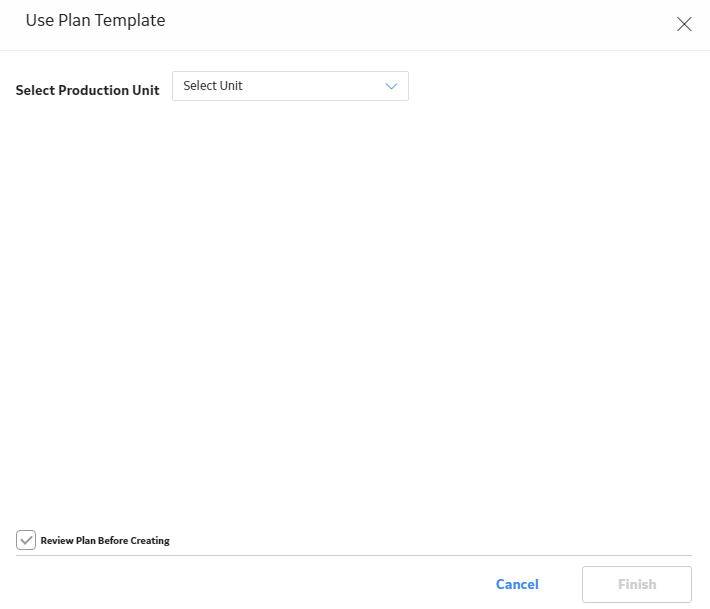
- Select the Unit that contains the Plan Template that you want to use.
A list of Plan Templates for the selected Unit appears.
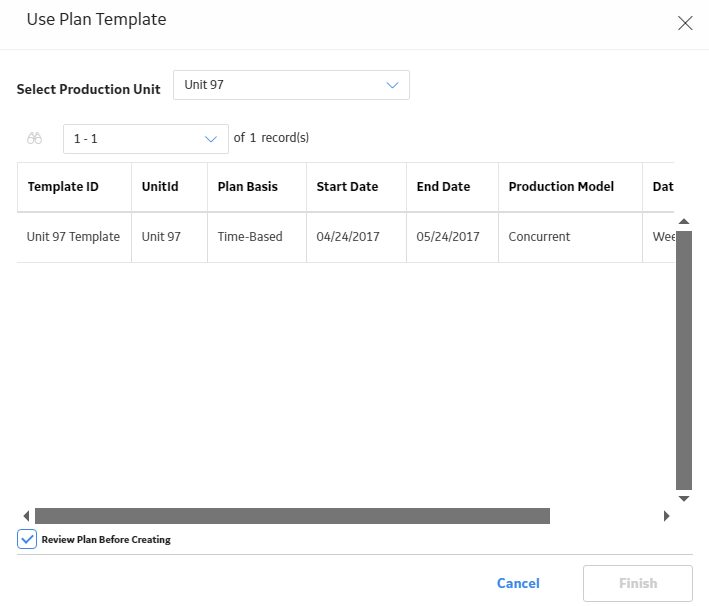
- Select Finish.
The Review Plan window appears, displaying the Production Period section.
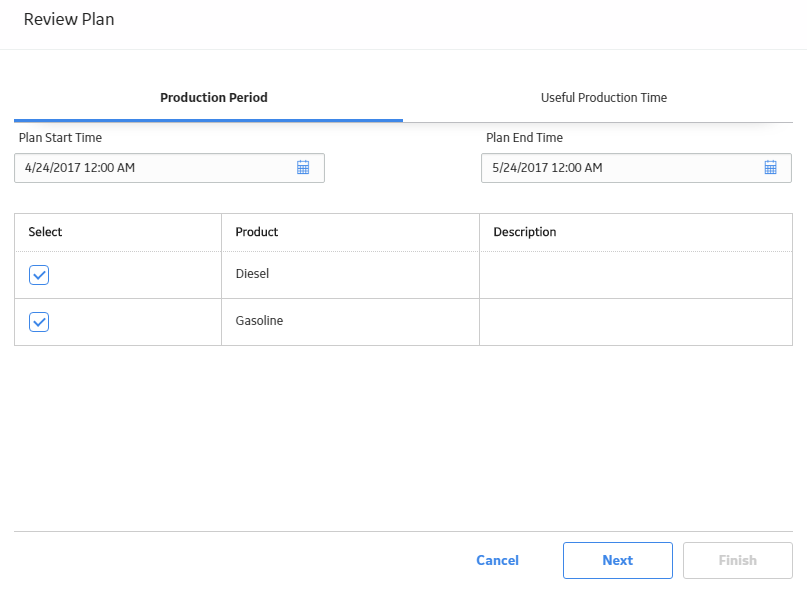
- Select Next.
The Useful Production Time section appears.
Create a Manual Production Plan
About This Task
After creating a manual Production Plan, you can add products to the plan, as well as modify the start and end time, via the Plan Details section.
Procedure
- Select Finish.
The plan is generated and appears in the Plan Details workspace.
 Tip: The start time is automatically generated as the date the plan is created, and the end time is exactly 24 hours later. The start time and end time can be modified by selecting the field and entering new values.Note: The initial quantity shown in the Plan Details section is based on the duration of the plan multiplied by the MSCR of the selected product, which can be modified along with the start time and end time.
Modify a Manual Production Plan
About This Task
Manual Production Plans can be modified in the Plan Details section.
Procedure
-
Access a manual Production Plan.
The Plan Details workspace for the selected manual Production Plan appears.
- As needed, modify the following details:
-
If you want to modify the Start Time and End Time, then complete the following steps:
- Select the row of data for which you want to modify the Start Time or End Time.
- In the Start Time cell, enter the new start time.
-
In the End Time cell, enter the new end time.
The values are saved automatically when you select outside the cell.
-
If you want to add a row at the bottom of the grid, then complete the following steps:
-
In the upper-left corner of the grid, select
 , and then select Add Row.
A new row is added to the bottom of the grid. The start time, end time, and planned production value for the new row will be determined automatically. An equivalent row is added in Production Data section if the start time for the new row is before the current start time.
-
As needed, modify the values in the cells in the following columns:
- Start Time : Enter the start time.
- End Time : Enter the end time.
-
<Product (UOM)>: Enter the quantity of the product based on the Unit of Measure (UOM).
The values are saved automatically when you select outside the cell.
Note: If an overlap exists in the plan, then a warning message appears.
-
-
If you want to insert a row before or after a row, then complete the following steps:
-
Select the row above or below which you want to insert a row.
-
In the upper-right corner of the grid, select
 , and then select Insert Row Above or Insert Row Below.
A new row appears in the grid based on your selection.
-
As needed, modify the values in the cells in the following columns:
- Start Time : Enter the start time.
- End Time : Enter the end time.
-
<Product (UOM)>: Enter the quantity in the column labeled with the selected UOM for the plan.
The values are saved automatically when you select outside the row.
Note: If an overlap exists in the plan, then a warning message appears.
-
-
If you want to add a product, then complete the following steps:
-
In the upper-left corner of the grid, select
, and then select Add Product.The Product List window appears.
-
Select a product from the list, and then select OK.
The product appears in the grid in the upper section.
-
-
Add a Row in a Production Plan
Procedure
- In the Plan Details workspace, select
 , and then select Add Row.
 A new row of data is added to the second table. The values in the Start Time and End Time columns and the planned production value for the new row are determined automatically.
The values in the Quantity and End Time columns in the first table and the Plan ID are updated.
Copy a Production Plan
About This Task
When you copy a Production Plan, a new Production Plan is created. You can copy a Production Plan to create a Production Plan for the same Production Unit for which the source plan was created. The copied Production Plan will be created in the time zone of the Production Unit.
Procedure
- In the upper-right corner of the workspace, select , and then select Copy Plan.
The Production Plan is copied and the list of Production Plans is updated. The copied Production Plan has the same name as the Production Plan from which it was copied.
Remove the Last Row in a Production Plan
Procedure
Regenerate a Production Plan
About This Task
After you create a Production Plan (unless you created a manual Production Plan), you can change only the planned Production Values. You cannot change Production Plan details such as start time, end time, and products. Instead, if you want to modify the details of a Production Plan, you will need to regenerate the Production Plan. Doing so will delete the current Production Plan and create a new one.
When you regenerate a Production Plan, you do not have to enter all details. The details of the previous plan will be retained in the builder. You can keep the details that you want and modify the details that are no longer valid.
You can regenerate a production plan on the PLA Overview page.
Procedure
-
Access the Production Plan that you want to regenerate, and then, in the upper-right corner of the workspace, select , and then select Regenerate Plan.
The Regenerate Plan dialog box appears, asking you to confirm that you want to regenerate the selected Production Plan.
Delete a Production Plan
Procedure
- In the upper-right corner of the workspace, select
 .
.The Delete Plan dialog box appears, asking if you really want to delete the selected Production Plan.