Deployment
Deploy PLA for the First Time
Before You Begin
The following table outlines the steps that you must complete to deploy and configure this module for the first time. These instructions assume that you have completed the steps for deploying the basic system architecture.
These tasks may be completed by multiple people in your organization. We recommend, however, that the tasks be completed in the order in which they are listed.
If you are deploying this module in APM Now, before you begin completing these tasks, review the system requirements for this module to identify the supported features for this module in APM Now . Unless noted, all deployment tasks in the following table are applicable for the deployment of this module in APM Now.
Results
| Step | Task | Notes |
|---|---|---|
| 1 | Review the PLA data model to determine which relationship definitions you will need to modify to include your custom equipment and location families. Via Configuration Manager, modify the relationship definitions as needed. |
This step is required only if you store equipment and location information in families other than the baseline Equipment and Functional Location families. |
| 2 | Assign Security Users to one or more of the Production Loss Analysis Security Groups and Roles. | This step is required. Users must have permissions to the PLA families to use the PLA functionality. |
| 3 | Change the default currency symbol. |
This step is optional. By default, the currency symbol is set to $ and appears in the following places:
|
| 4 | >Define all products. | This step is required. You must define all products whose production you plan to track using PLA. Each product is stored in a Product record. |
| 5 | Define Production Units. |
This step is required. You must identify the Production Units that produce the products you defined in the previous task. A single product can be produced by more than one Production Unit. A single Production Unit can also produce more than one product. Each Production Unit is stored in a Production Unit record, which can be linked to an existing Functional Location record that contains detailed information about the Production Unit. |
| 6 | Define Production Profiles. |
This step is required. For each Production Unit that you defined in the previous step, you must identify all the products that it produces and information about those products, such as the maximum demonstrated rate of production and the amount of profit one of those products yields. The combination of data about a product and the corresponding Production Unit is the Production Profile for that Production Unit. A Production Unit will have one Production Profile for each product it produces. Each Production Profile is stored in a Production Profile record, which is linked to the corresponding Product record and Production Unit record. |
| 7 | Define Production Event Codes. |
The baseline GE Digital APM database contains Production Event Code records that define a set of basic production event codes. Therefore, this step is required only if you do not want to use the baseline production event codes or if you want to use codes in addition to those that are provided. You must use Production Event Codes to categorize the types of events that can cause you to produce less than the maximum sustained capacity amount. Production Event Codes define the cause of lost production and answer the question: Why are we losing production? You can also group the types of events by structuring them in a hierarchy. For example, you might group event types into planned and unplanned, where planned events are events such as maintenance down days or employee holidays, and unplanned events are events such as equipment failures or natural disasters (e.g., floods or hurricanes). Each production event code will be stored in a separate Production Event Code record. |
| 8 | Define Impact Codes. | The baseline GE Digital APM database contains Impact Code records that define a set of basic Impact Codes. Therefore, this step is required only if you do not want to use the baseline Impact Codes or if you want to use codes in addition to those that are provided. |
| 9 | Define OEE Codes. | The baseline GE Digital APM database contains OEE Code records that define a set of basic OEE Codes. Therefore, this step is required only if you do not want to use the baseline OEE Codes or if you want to use codes in addition to those that are provided. For non-baseline codes to be included in the OEE Metric View, however, they must be children of the baseline parent codes. |
| 10 |
Configure PLA for PDI integration:
|
This step is required if you want to use the integration between PLA and the Process Data Integration feature where Production Data records are created automatically using the baseline PLA Service policy in Policy Designer. |
| 11 | Replace the Top 10 Bad Actors query for the PLA Overview page. |
This step is optional. The Top 10 Bad Actors query is used by GE Digital APM to populate the Top 10 Bad Actors graph on the PLA Overview page. In some databases, when viewing this graph, you may receive an error that prevents the graph from populating correctly. If this error occurs, replace the Top 10 Bad Actors query. |
Upgrade or Update PLA to V4.3.0.7.0
Before You Begin
The following tables outline the steps that you must complete to upgrade this module to V4.3.0.7.0. These instructions assume that you have completed the steps for upgrading the basic GE Digital APM system architecture.
These tasks may be completed by multiple people in your organization. We recommend, however, that the tasks be completed in the order in which they are listed.
Procedure
Import Baseline Rules
Before You Begin
- Acquire a copy of the baseline GE Digital APM database whose version number matches the version number of your current, pre-upgraded database. If you do not have access to the appropriate baseline database, consult a member of the GE Digital APM Professional Services department.
Procedure
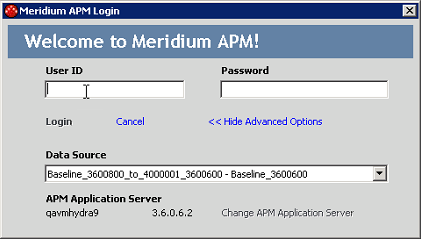
- On the GE Digital APM Server, via the Windows start button, access Configuration Manager.
The Meridium APM Login window appears.
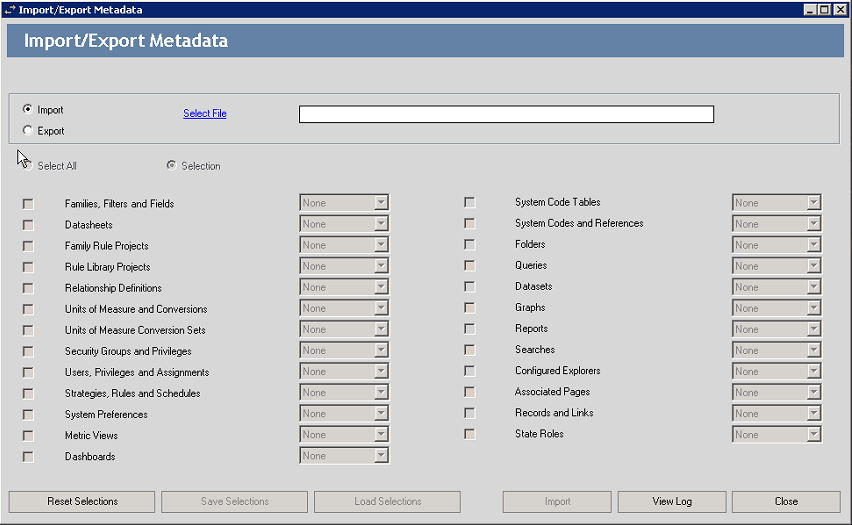
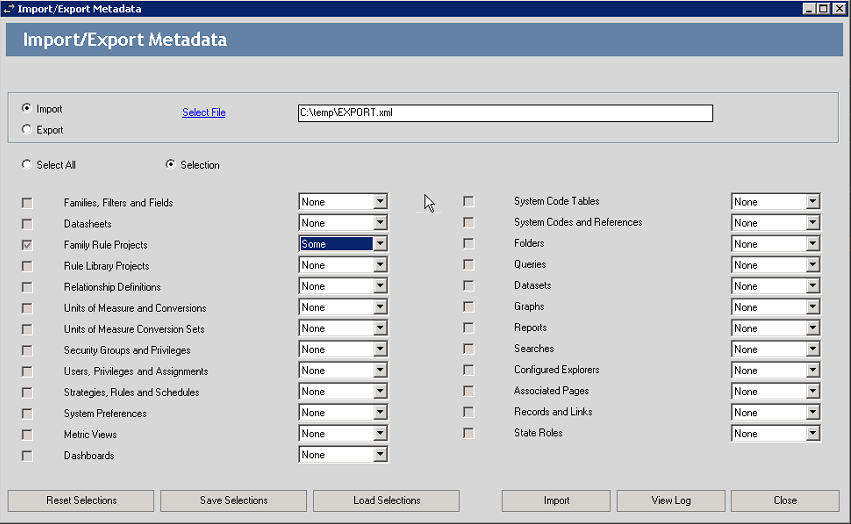
- On the top navigation bar, select Tools, and then select Import/Export Meridium Metadata.
The Import/Export Metadata window appears.
- Navigate to the location where you want to save the exported metadata, then enter a name in the File name: box, and then select Save.
The Save As window closes, and the selected filepath is displayed in the Select File box on the Import/Export Metadata window.
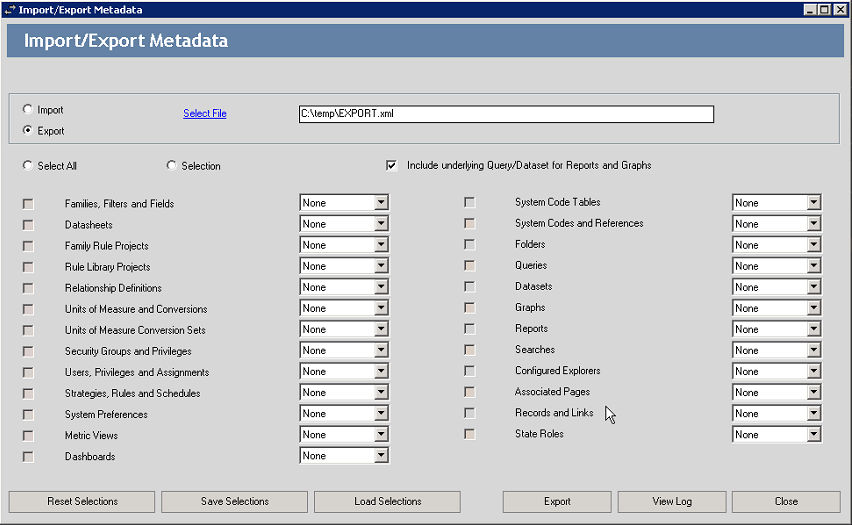
- In the drop-down list box to the right of the Family Rule Projects check box, select Some.
The Select Rule Projects to Export window appears.
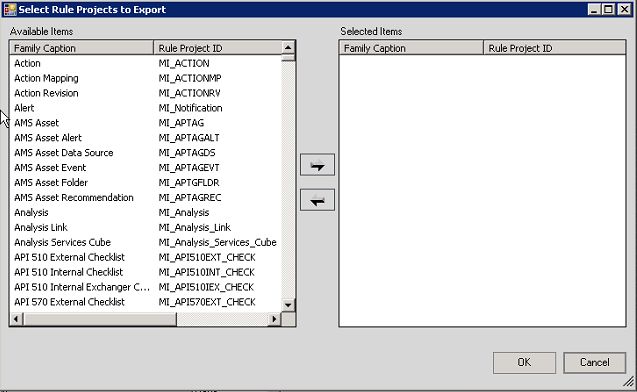
- In the Available Items section, select the item whose Family Caption is Production Event, and then select
 .
.The selected item appears in the Selected Items section.
- In the Available Items section, select the item whose Family Caption is Production Profile, and then select .
The selected item appears in the Selected Items section.

- Select OK.
The Select Rule Projects to Export window closes, and, on the Import/Export Metadata window, the Family Rule Projects check box is selected automatically.
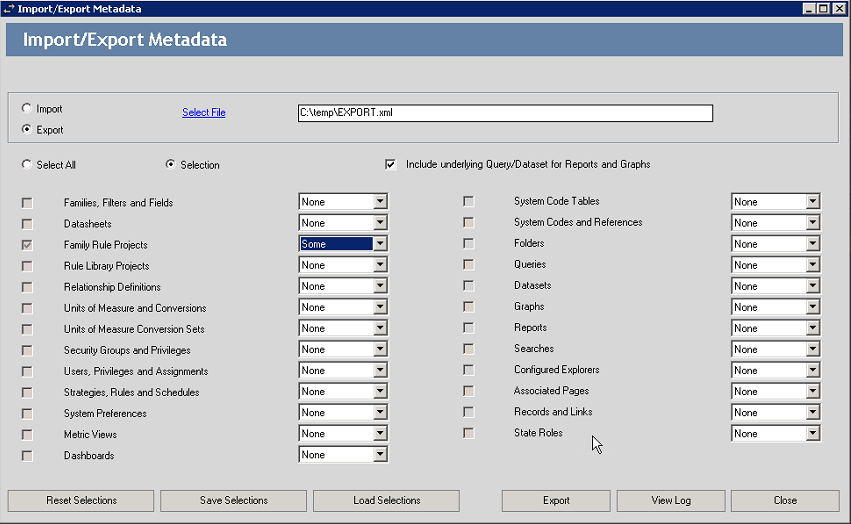
- Select Export.
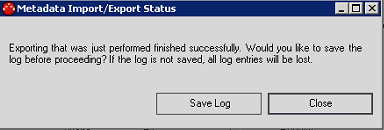
The Metadata Import/Export Status dialog box appears, displaying a progress bar. When the export is complete, a message appears, asking if you want to save the log.
- On the Meridium Server machine, via the Windows start button, access Configuration Manager.
The Meridium APM Login window appears.
- Navigate to and select the file that you saved in step 6, and then select Open.
The Open window closes, and the selected filepath is displayed in the Select File box on the Import/Export Metadata window.
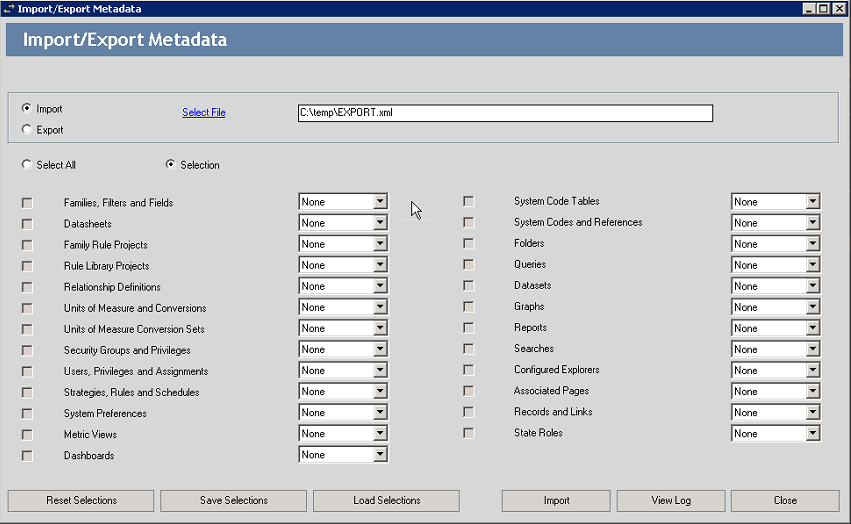
- In the drop-down list box to the right of the Family Rule Projects check box, select Some.
The Select Rule Projects to Import window appears.
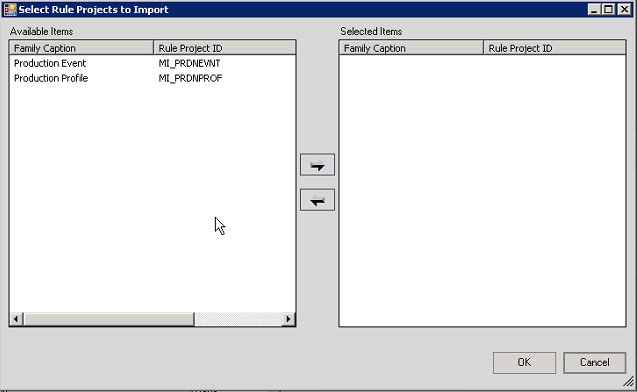
- In the Available Items section, select the item whose Family Caption is Production Event, and then select .
The selected item appears in the Selected Items section.
- In the Available Items section, select the item whose Family Caption is Production Profile, and then select .
The selected item appears in the Selected Items section.
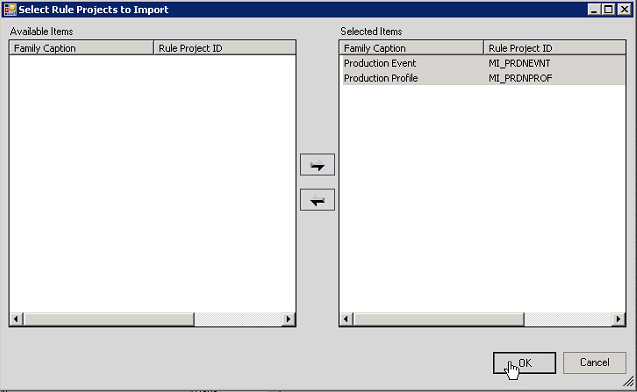
- Select OK.
The Select Rule Projects to Import window closes, and, on the Import/Export Metadata window, the Family Rule Projects check box is selected automatically.
- Select Import.
The Metadata Import/Export Status dialog box appears, displaying a progress bar. When the import is complete, a message appears, asking if you want to save the log.
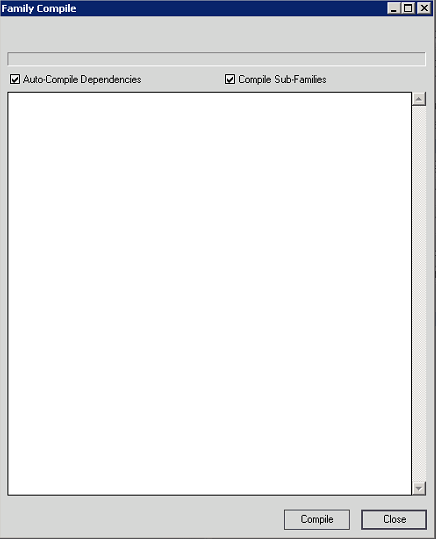
- In the Tasks section of the workspace, select Compile Family.
The Family Compile window appears.
Replace the Top 10 Bad Actors Query
About This Task
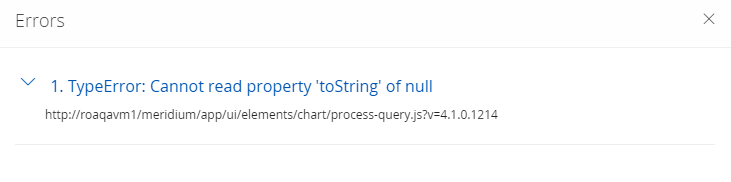
The Top 10 Bad Actors query is used by GE Digital APM to populate the Top 10 Bad Actors graph on the Production Loss Analysis Overview page. In some databases, when viewing this graph, you may receive the following error:
To implement the corrected query and to correct this error, complete the following steps.
Procedure
- In the heading of the Query page, select Browse.
The Select a query from the catalog window appears.
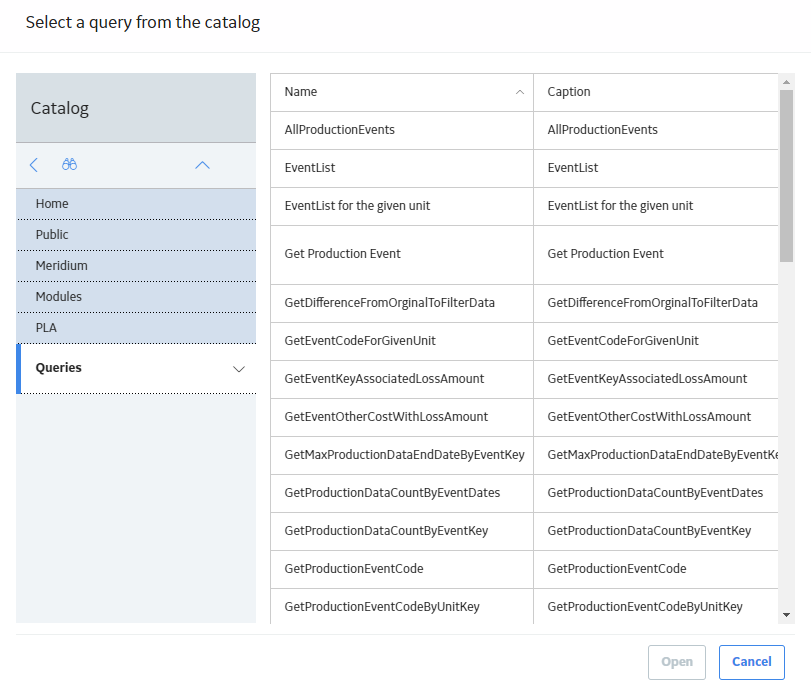
- In the left pane, navigate the Catalog to: Meridium/Public/Modules/PLA/Queries, select the Top10BadActors query and then select Open.
The Enter Parameter Values window appears.
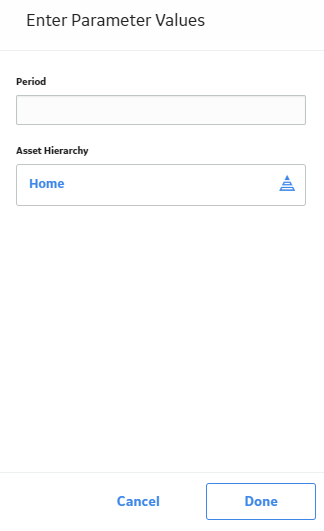
- Select OK. Note: For the purposes of these instructions, you do not need to complete any fields in the Enter Parameter Values window.
The Top 10 Actors query page appears, displaying the Results tab.

- Select the SQL tab.
The SQL query text appears in the workspace, displaying the current query.

- On the right side of the page heading, select
 .
.The new query text is saved.