Working with Tags

Understanding Tag names

Historian tag names vary according to the type of collector. By default, the tag name is the source address prepended with a string.

It is recommended that tag names use only characters available for folders and file names to avoid the problems (limitations) with some clients and filtering. You can use tag names that contain the characters & and + in the Non-Web Historian Administrator.

iFIXCollector Tagnames

The format of Historian tag names for an iFIX collector generally is
Node.Tag.Field
where
  • Node, by default, is the name of the SCADA node, the data source. This field is configurable, however.
  • Tag is the database tag.
  • Field is the database field.
Examples of typical tag names:
NODE8.WATER-_SWITCH.F_CV 
NODE2.MASH_LEVEL.B_CUALM 
USGBS1.FIC101.F_CV 
USGBS1.FT102.A_LAALM
where
  • NODE8, NODE2, and USGBS1 are the names of the iFIX SCADA nodes.

  • WATER_SWITCH, MASH_LEVEL, FIC101, and FT102 are the names of the database tags.

  • 4F_CV means single floating point, current value.
  • B_CUALM means current alarm status.
  • A_LAALM means analog input, latched alarm.

OPC or Simulation Collector Tagnames

The format of Historian tags for an OPC or Simulation collector is:
ComputerName.ItemID
where
  • ComputerName, by default, is the name of the machine on which the collector is installed. This field is configurable, however.
  • ItemID is the data point being polled.

Calculation collector Tagnames

There is no specified format for Historian tags for a Calculation collector. We recommend that you select a consistent naming convention so the tags are easily and clearly identifiable. You should avoid using spaces and other special characters or reserved words used in SQL or VBScript. This applies to any tag being used as a source tag in the formula.

Server-to-Server Collector Tagnames

There is no specified format for Historian tags for a Server-to-Server Collector. We recommend that you select a consistent naming convention so the tags are easily and clearly identifiable. Server-to-Server Collectors allow you to specify a prefix to add to the Server-to-Server Collector tags.
Note: In cases where you want the destination tag's data to be a duplicate of the source tag, then the tag name would be identical. This is especially important so that all messages and alerts are included.

Add Multiple Tags from a Collector Using Historian Administrator

About this task

This topic describes how to add multiple tags from a collector using Historian Administrator. You can also add tags using the Web Admin console.
Note: When you add a tag, do not enter a leading space or a trailing space in the tag name.

Procedure

  1. Select the Add Tags From Collector link in the Tag Maintenance page.
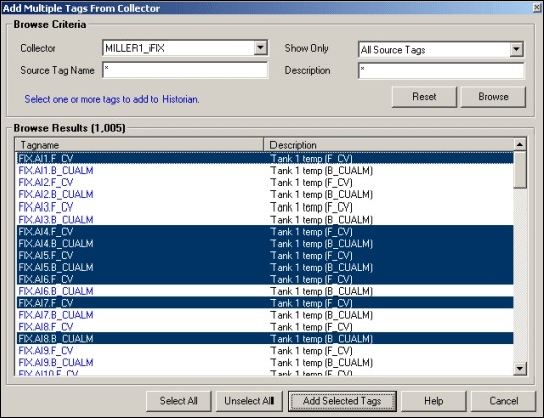
    The Add Multiple Tags from Collector window appears.


  2. Select a collector from the Collector drop-down list.
    Note: If you add tags from a File collector, the file you import specifies the collector to which the tags are assigned. Those tags are then returned by a browse of the specified collector. It is also possible to leave the assignment blank. If the file does not specify a Collector Name for a tag, the tag is added with no collector name.

    You cannot browse a Calculation collector through the Add Tags From Collector window in Historian Administrator.

  3. In the Show Only field, select either All Source Tags or Source Tags Not Collected.
    If you select the second option, the browse returns only the tags that are not currently included for collection.

    If a Historian tag name is different from its source address tag name, the source tag is displayed in the returned list even if you browse the collector using the Show Source Tags Not Collected criterion. Collection on the same source address using a unique tag name is allowed.

  4. In the Source Tag name and Description fields, you can optionally enter masks for the browse, using standard Windows wildcard characters.
  5. Select Browse to initiate the search or Reset to start over.
    The browse returns a list of tags, as shown in the following figure. In the Historian Non-Web Administrator, a tag that is currently collected appears in black type. A tag that is not currently collected appears in blue type.


Adding Uncollected Tags from a Collector

Procedure

  1. Select the required tags. Selecting a tag selects its tag name and description.
    you can select:
    • a single tag by selecting on the name of the tag.
    • multiple tags by pressing the Ctrl key and selecting the tags.
    • a contiguous group by selecting the first tag, pressing the Shift key, and selecting the last tag of the group.
    • all tags by selecting Select All at the bottom of the page.
    To unselect all tags, select Unselect All.


  2. Select Add Selected Tags. The selected tags are added to the Historian Tag Database.
    The Tag Maintenance page appears. The lower left portion of the page displays a list of all tag names added to the Historian Tag Database.

Add Tags from a Collector Using the Web Admin Console

About this task

This topic describes how to add tags from a collector using the Web Admin console. You can also add tags using Historian Administrator.
Note: When you add a tag, do not enter a leading space or a trailing space in the tag name.

Procedure

  1. Select the plus sign in the Tag page.
  2. Select Add Tags from Collector.
    The Add Tags from Collector window appears.
  3. Select the collector from the Collector name list.
    For collectors with hierarchical browsing, expand the folder to select the desired tags. The > symbol indicates that you need to navigate further within the folder.
  4. Enter the Source Tag Name or select Browse.
    The list of available tags is displayed.
  5. Select tags.
    You can select a single tag and or select multiple tags. To select a series of tags, press and hold the Shift key and select the series.
  6. Select Add to add the tags. To add all the tags, select Add All.
  7. Select Preview to preview the selected tag details.
  8. Select Add Selected Tags to add the selected tags from the collectors.

Adding Tags for Collectors with Hierarchical Browsing

About this task

Procedure

  1. Select the plus sign in the Tag page.
  2. Select Add Tags from Collector.
    The Add Tags from Collector window appears.
  3. Select the collector from the Collector name list.
  4. Enter the Source Tag Name or select Browse.
    The list of available tags is displayed.
  5. Select tags.
    You can select a single tag and or select multiple tags. To select a series of tags, press and hold the Shift key and select the series.
  6. Select Add to add the tags. To add all the tags, select Add All.
  7. Select Preview to preview the selected tag details.
  8. Select Add Selected Tags to add the selected tags from the collectors.

Manually Adding Tags

Typically, you add new tags to the Historian by browsing the data source or by bulk importing a group of tags with the Excel Add-In tool. Occasionally, you may need to add a single tag manually. You can add tags manually:
  • for creating a calculation tag.
  • for holding values that are added using the Excel Add-In or custom SDK application.
  • for testing purposes.

For example, if you are currently not connected to a collector, the browse is slow, or is not supported, and if you want to configure tags associated with that collector, you can add them manually.

When adding a tag manually, you must manually configure the fields for the tag that the Add Tag Manually window does not include. For instance, when you add a tag manually, the Data Type field does not automatically populate after you select a Source Address. You must manually set the data type from the Collection section after you add the tag. Use caution when selecting the data type. If you select the wrong data type, you most likely will get incorrect data or you could even lose data. It does not use the collector default settings, such as those for archive and collector compression, as it would with the browse and pick.

Add a Tag Using Historian Administrator

Before you begin

  1. Add an instance of the collector that you want to use to collect the tag data.
  2. Create a data store in which you want to store the tag data.

Procedure

  1. Access Historian Administrator.
  2. Select Tags > Add Tag Manually.
    The Add Tag Manually window appears.

  3. Enter values in the available fields as described in the following table.
    Field Description
    Collector Name Select the collector that you want to use to collect data of the tag.
    Source Address Enter the
    Tag Name Enter a name for the tag.
    Data Store Select the type of the data store in which you want to store the tag data.
    Data Type Select the data type of the tag. If you select MultiField, the User Def Type Name field is enabled.
    User Def Type Name For a tag of the multi-field data type, select the data type of the tag that you have defined.
    Is Array Tag Select this check box if the tag stores an array of data.
    Time Resolution
    Time Adjustment
    Important: If you manually add a Server-to-Server tag, ensure that you set the Time Adjustment field for the tag to the Adjust for Source Time Difference option, after you add the tag. The Time Adjustment field is located in the Advanced section in the Tag Maintenance page. This field only applies to Server-to-Server tags that use a polled collection type.
  4. Select OK.
    The tag is added.

Add a Tag Using the Web Admin Console

About this task

The dynamic collector update feature ensures that any modifications done to the tag configuration do not affect all the tags in a collector. Only the tags that stop data collection will record zero data and bad quality without restarting the collector. In other words, the tags that do not stop data collection do not record bad data samples to the collection.

Whenever you add tags, delete tags, or modify certain tag properties, the following collectors reload only the modified tag(s) without restarting the collectors:
  • OPC Collector
  • iFIX collector
  • Calculation collector
  • Simulation Collector
  • Server to Server Collector
  • PI Collector
  • PI Distributor

For a tag to stop and restart the collection without restarting the collector, you must enable the On-line Tag Configuration Changes option in the Advanced section of the Collector Maintenance page. By default, the On-line Tag Configuration Changes option is enabled.

If you disable the On-line Tag Configuration Changes option, any changes you make to the tags do not affect collection until after you restart the collector. To restart the collector, you must stop and start the collector service or executable. Restarting the collector stops and restarts the tag(s) collection and records bad data samples to the collection.

All the collector configuration changes done within a 30 second time frame are batched up to let you update/modify a small set of tags at a time to collect the modified data faster.

Note: It is recommended that you disable the On-line Tag Configuration Changes option while updating large sets of tags at the same time, and restart the collector after modification.

Follow these steps to add a new tag manually from the Web Administrator:

Procedure

  1. Select the link in the Tag Details page and select Add Tags Manually.
    The Add Tag window appears.
  2. Select a collector from the drop-down list in the Collector Name field.
    This associates the new tag with a specific collector.
  3. Enter the Source Address and Tag Name in the appropriate fields.
  4. Select the data store in the Data Store field.
  5. Select a Data Type from the drop-down list.
  6. For fixed string data types only, enter a value in the field adjacent to the Data Type field.
  7. Select Seconds, Milliseconds, or Microseconds in the Time Resolution field.
  8. Select the Is Array Tag option, if the tag is an Array Tag.
  9. Select Add to add the tag.
    Important: If you manually add a Server-to-Server tag, ensure that on the Tag Maintenance page Advanced tab, you set the Time Adjustment field to Adjust for Source Time Difference , after you add the tag. Note that, this field only applies to Server-to-Server tags that use a polled collection type.

Add a Source Address Using the Web Admin Console

Procedure

  1. Select a collector from the drop-down list in the Collector Name field.
    This associates the new tag with a specific collector.
  2. Enter the Source Address or select the Browse button.
    The Add Tags from Collectors window appears.
  3. Select the tag you want to associate to source address. You can select only one tag.
  4. Select OK.
    The source address of the tag will be added.

Copy a Tag

About this task

If you want to create a copy of an existing tag with all the same properties, use the Copy Tag function. Copy Tag works only for individual tags. You cannot copy multiple tags at once.

Procedure

  1. To copy a tag using Historian Administrator:
    1. Select a tag to copy from the tag list.
    2. Select the Copy Tag link in the Tag Maintenance page.
      The Copy Tag window appears.
    3. Type a new tag name.
    4. Select OK to copy the tag and all the associated tag properties.
  2. To copy a tag using the Web Admin console:
    1. Select the Copy Tag icon in the Tag page.
      The Copy Tag window appears.
    2. Type a new tag name.
    3. Select OK to copy the tag and all the associated tag properties.

Search for Tags

Procedure

  1. To search for tags using Historian Administrator:
    1. In the Tag Maintenance page, select the Search Historian Tag Database link.
      The Search Historian Tag Database window appears.

    2. Enter a tag search mask in the Tag Mask field, using * and ? wildcard characters.
      You can search for a description instead of a tag by entering a mask in the Description field.

      If you leave both fields blank, the search returns all tags.

    3. Select the name of the collector in the Collector field.
    4. Enter the maximum number of tags the search should return.
      If you leave this field blank, your search will return all the tags available in the Historian Tag Database.
    5. Select OK.
      The Tag Maintenance page appears.
      Note: Prior to performing any maintenance, it is recommended to adhere to the accepted practice of performing a backup of your Historian archive. It is also recommended that you use the Excel Add-In to export your tag configuration for all tags. It is recommended that you export tags associated with each collector on a separate worksheet.
    6. If you want to change the default tag properties, select the name of the tag.
    7. Enter the properties of the tag in the appropriate fields.
    8. Select Update to save your entries.
      CAUTION: Multi-select and property change will affect all selected tags. Changing the collector type for the Calculation and Server-to-Server tags will result in a loss of the calculation formula.
  2. To search for tags using the Web Admin console:
    1. Select Advanced Search in the Tags page.
      The Advanced Search window appears.
    2. In the Step 1 section, select the tag criteria from the list.
    3. Enter or select the Tag Criteria Value.
      If you leave the fields blank, the search returns all the available tags.
    4. Select Add Criteria and choose Collector Name as criteria.
    5. Select the collector from the list.
    6. Select Find Tags.
      All the tags that satisfy the query criteria are displayed in the Step 2 section.
    7. Select the tags and select Apply to return the list of tags to the parent Tags page.
    8. If you want to change the default tag properties, select the name of the tag from the list and edit the properties in the Tag Editor section.
    9. Select Update to save your entries.
      CAUTION: Multi-select and property change will affect all selected tags. Changing the collector type for the Calculation and Server-to-Server tags will result in a loss of the calculation formula.

Remove Tags Using Historian Administrator

About this task

Deleting a tag only removes it from the browse list; the data remains intact in the Archive and can be queried by tag name. It is recommended that you export your tag configuration before and after tag modifications.

Procedure

  1. To remove a tag using Historian Administrator:
    1. On Historian Administrator Main page, select the Tags link on the toolbar.
      The Tag Maintenance page appears.
    2. Select the name of the tag you want to remove.
      To remove multiple tags:
      • Select a tag to highlight it.
      • Select multiple tags by pressing the Control key and selecting the individual tags.
      • Select contiguous tags by pressing the Shift key and selecting the first and last tags of the sequence.
    3. Select the Delete button.
      The Delete Tag window appears.
    4. Select either Remove Tag from System or Stop Data Collection and select OK.
      If you want to stop collection temporarily and resume collection later for a specified time, you can disable collection for that tag instead. To do this, select the tag on the Tag Maintenance page, select Collection, and then select the Disable option for the Collection field.
  2. To remove a tag using the Web Admin console:
    1. On Historian Administrator Main page, select the Tags link on the toolbar.
      The Tag Maintenance page appears.
    2. Select the name of the tag you want to remove.
      To remove multiple tags:
      • Select a tag to highlight it.
      • Select multiple tags by pressing the Control key and selecting the individual tags.
      • Select contiguous tags by pressing the Shift key and selecting the first and last tags of the sequence.
    3. Select the Delete button.
      The Delete Tag window appears.
    4. Select either Remove Tag from System or Stop Data Collection and select OK.

Browse a Data Source for New Tags

Before you begin

To browse for new tags, your collector must be running. If it is not running, start the collector.

About this task

The most common way to add tags to an Historian Database is to browse the data source for new tags.
Note: Performing large tag browses in Historian Administrator may cause your session to time out. Use the browse filter criteria to return a smaller list. In the Non-Web Administrator, if your OPC server supports hierarchical organization of your tags, see Adding Tags for Collectors with Hierarchical Browsing to speed browse sessions.

Procedure

  1. To browse for new tags using Historian Administrator:
    1. Open the Historian Non-Web Administrator.
    2. Select the Collectors link from the toolbar.
      The Collector Maintenance page appears.
    3. If you have multiple collectors listed, select a collector from the Collectors list.
    4. To browse for new tags from your data source, select Add Tags at the bottom of the page.
      The Add Multiple Tags From Collector window appears.


    5. In the Show Only field, select either All Source Tags or Source Tags Not Collected.
      If you select the second option, the browse returns only the tags that are not currently included for collection.

      If a Historian tagname is different from its source address tagname, the source tag is displayed in the returned list even if you browse the collector using the Show Source Tags Not Collected criterion. Collection on the same source address using a unique tagname is allowed.

      A check mark beside a tag indicates that the tag is currently being collected. Absence of a mark indicates that the tag is not currently being collected.

    6. In the Source Tagname and Description fields, you can optionally enter masks for the browse, using standard Windows wildcard characters.
    7. Select Browse to initiate the search or Reset to start over.
      The browse returns a list of tags, as shown in the following figure. In the Historian Non-Web Administrator, a tag that is currently collected appears in black type. A tag that is not currently collected appears in blue type.


      See also Add Multiple Tags from a Collector Using Historian Administrator.

  2. To browse for new tags using the Web Admin console:
    1. Open the Historian Web Administrator.
    2. Select the Collectors link from the toolbar.
      The Collector page appears.
    3. If you have multiple collectors listed, select a collector from the Collectors list.
    4. To browse for new tags from your data source, go to the Tags page from the Configuration page.
    5. Select Add Tags at the bottom of the page and select Add Tag from Collector.
      The Add Tags from Collector window appears.
    6. Select single or multiple tags, select on Add Selected Tags button.

About Configuring Collector Options

If you are using Historian Administrator, configure collector options as follows:
  • Start at the Collector Maintenance page in Historian Administrator. You can access the Collector Maintenance page in several ways:
    • Select the Collectors link in any of the major pages in Historian Administrator.
    • Select the collector name in the Collectors section of Historian Administrator Main page. This displays the page with the specific collector already selected.
The Collector Maintenance page lists all connected collectors at the left of the page. The right-side displays parameter values, in several tabs, for the collector you select by selecting on a name in the list.
  • To make a change in a configurable parameter, enter the value in the appropriate field and select Update. For more information, refer to Historian Administrator.
If you are using the Web Admin console,
  • Go to the Collectors page. This displays the list of available collectors and their status. You can edit the collector configurable parameters.
  • From the Collector Maintenance page or the Collector page, select the various tabs to display parameters of various types for the specific collector you have selected.

    For more information, refer to Historian Web Administrator Help.

    .

About Collector Redundancy

Historian includes support for collector redundancy, which decreases the likelihood of lost data due to software or hardware failures. Implementing collector redundancy ensures that collection of your data remains uninterrupted. Collector redundancy makes use of two or more collectors, gathering data from a single source. For more information, refer to the Collector Redundancy.

Note: Use Polled tags only as watchdog tags.

Collect Vendor Attributes

About this task

Data sources are often customized to include information specific to a site's installation in the form of vendor attributes. This customization adds data not covered by the OPC or OPCAE specifications and may or may not require storage in the Historian Archive. As a result, Historian Administrator provides a means to specify which vendor attributes will be collected from any given data source. A maximum of 10 vendor attributes can be collected.

Procedure

  1. To collect vendor attributes using Historian Administrator:
    1. In the Historian Administrator Main page, select the Collectors link in the toolbar.
      The Collector Maintenance page appears.
    2. Select Configuration.
    3. To collect all vendor attributes from the data source, select All.
    4. To collect up to 10 selected vendor attributes from the data source:
      1. Select the Selected option.
      2. Select Add to add a vendor attribute to collect from the data source.

        The Vendor Attributes window appears.

    5. In the Vendor Attribute field, enter the vendor attribute you wish to collect from the data source and select OK.
      The vendor attribute appears in the list box on the Collector Configuration page.
    6. To remove a vendor attribute, select it in the list box and select Remove.
    7. Select Update to apply your changes.
  2. To collect vendor attributes using the Web Admin console:
    1. In the Historian Dashboard, select the Details button in the Collectors section.
      The Collect Statistics window opens.
    2. Select the Configure button.
      The Collector Configuration page appears.
    3. To collect all vendor attributes from the data source, select All.
    4. To collect up to 10 selected vendor attributes from the data source:
      1. Select the Selected option.
      2. Select Add to add a vendor attribute to collect from the data source.

        The Vendor Attributes window appears.

    5. In the Vendor Attribute field, enter the vendor attribute you wish to collect from the data source and select OK.
      The vendor attribute appears in the list box on the Collector Configuration page.
    6. To remove a vendor attribute, select it in the list box and select Remove.
    7. Select Update to apply your changes.

Collector Spare Configuration

Spare configuration enables you to add additional configurations to tag. You can add additional configurations using the Spare 1 to Spare 5 fields in all collectors except in Server to Server collector, Server to Server Distributor collector and OSI PI distributor.
  • In case of OSI PI distributor, data is read from the Historian tag displayed in the Tag Source Address field and sent to the OSI PI tag name displayed in the Spare 1 field. To control the source and destination tags, change the Tag Source Address and Spare 1 field. You can add or update configurations in Spare 2 to Spare 5 fields.
    Note: Do not add or update any configurations to Spare 1 field from Excel Add-In, Trend Client, Web Admin console or Historian Administrator.
  • In case of Server to Server and Server to Server Distributor collectors, you can add or update Spare 1 to Spare 4 fields, but the Spare 5 field is used only for internal purposes.
    Note: Do not add or update any configurations in the Spare 5 field from Excel Add-In, Trend Client, Web Admin console or Historian Administrator as the data may get corrupted or over written.