 CIMPLICITY
Database Logger Defaults for Alarm, Event, Status Log, and Application Logs
You can specify a single global ODBC data source that will be used when logging to Alarm, Event, Status Log, and Application database files.
The Default Alarm Connection section is displayed when you select the Database Logger: A&E & App option in the Project Properties dialog box.
When you configure each table, you can choose to use these defaults or you can specify an ODBC data source that is unique for that table.
In the Logging Properties dialog box, select the Default Alarm Connection tab.
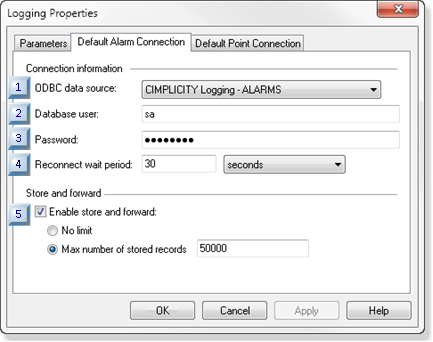
1. ODBC data source.
2. Database user.
3. Password.
4. Reconnect wait period.
5. Enable store and forward.
6. Additional information that may be needed.
ODBC Data Sources
Issues that apply to the ODBC data source for alarm, event, application, point and group point logs include the following.
- ODBC Data Source on 64-bit System
- ODBC Connection to SQL Server 2012 using Windows Authentication
- Database to Database Information
ODBC Data Source on 64-bit System
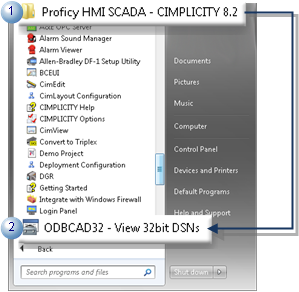
- From the CIMPLICITY Start menu, expand All Programs>HMI SCADA - CIMPLICITY on the Windows start menu.
- Click ODBCAD32 - View 32bit DSNs.
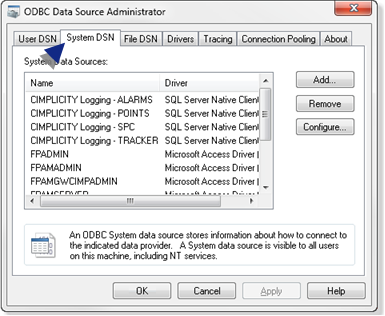
- From the ODBC Data Source Administrator opens, select the DSN tab. The System Data Sources will be listed.
- Click the Start button on the Windows task bar.
- Enter the following in the Command Line field: c:\windows\syswow64\odbcad32.exe
- Press Enter. The ODBC Data Source Administrator opens.
- Select the DSN tab. The System Data Sources will be listed.
- Select from available options or configure an existing or a new ODBC data source.
- Select from the one or more Microsoft Access (As-Is product) or SQL Server options in the drop down menu. Basic options include:
- CIMPLICITY Logging - Alarms Logs data to the cimplog.mdb file in the ARC directory of your CIMPLICITY project.
- CIMPLICITY Logging - Points Logs data to the pointlog.mdb file in the ARC directory of your CIMPLICITY project.
- Configure an existing or add a new ODBC data source.
- Click the ODBC Data Source button
 to the right of the ODBC data source field. The ODBC Data Source Administrator opens.
 - Select the System DSN tab.
- Configure the new ODBC data source based on the data source procedures. Consult Microsoft documentation.
- Close the ODBC Data Source Administrator.
- Select the new ODBC data source from the drop down menu.
ODBC Connection to SQL Server 2012 using Windows Authentication
The NT AUTHORITY/SYSTEM role must have administrative privileges for the Database Logger to connect to ODBC. Beginning with SQL Server 2012 NT AUTHORITY/SYSTEM does not have administrative privileges by default. The privilege needs to be granted in the Microsoft SQL Server Management Studio.
- Open the Microsoft SQL Server Management Studio.
- Expand Security>Logins in the Object Explorer left-pane.
- Right-click NT AUTHORITY\SYSTEM.
- Select Properties on the Popup menu. The Login Properties - NT AUTHORITY\SYSTEM dialog box opens.
- Select Server Roles in the Login Properties ??- NT AUTHORITY\SYSTEM dialog box left pane.
- Check sysadmin in the right-pane.
- Save your changes; close the Microsoft SQL Server Management Studio.
The Database Logger should be able to connect to ODBC using Windows Authentication. Consult Microsoft documentation for additional details.
Database to Database Information
Information needed varies from database to database. In general if you are connecting to:
- A Microsoft Access database, you may be prompted for a file name. Microsoft Access (As-Is product) does not fully support the long point IDs or alarm messages that were introduced in CIMPLICITY V9.0. Consult Microsoft documentation for details about maximum character support.
- A SQL Server, you may be prompted for a database name.
- An Oracle database, you may be prompted for a Server ID. Enter the Alias Name for the Oracle database in this field.
If the Data Logger is unable to connect to the selected database, validation fails.
Database user
User who will connect to the selected database driver. A database user name is required if you are connecting to a SQL Server. Make sure that the name is a valid database user name.
Password
Password needed to connect to the selected database driver. A password is required if you are connecting to a SQL Server. Make sure that the password is a valid database password.
Reconnect wait period
The amount of time that the Database Logger waits between reconnect attempts when the connection to the database is lost.
Enter a value from 0 (continuous retries) through 24 hours. Default: 30 seconds.
Enable store and forward
Check Enable store and forward to enable the ALARM_LOG table perform store and forward options:
| Option | Check if you want: |
|---|---|
| No Limit | The Database Logger to store an unlimited number of records when its connection to the database is down. The number of records actually stored is determined by the amount of time the connection is lost and by the amount of free disk space you have. |
| Max number of stored records | To select the number of records the Database Logger will store when its connection to the database is down. Enter a number between 1 and 4294967285. |
Additional information that may be needed
Information needed varies from database to database. In general if you are connecting to:
- A Microsoft Access database, you may be prompted for a file name.
- A SQL Server, you may be prompted for a database name.
- An Oracle database, you may be prompted for a Server ID. Enter the Alias Name for the Oracle database in this field. If the Data Logger is unable to connect to the selected database, validation fails.
The Database Logger validates your entries. You will be prompted if additional information is required to connect to the database.


