 CIMPLICITY
Step 2. Create an Order
About this task
Note: Order data will almost always be entered through .xml files; it is likely that CimView will never be used to create a new order. However, CimView does offer the capability.
Procedure
-
Click Create Order on the Order Management Menu.

The DATA_ENTRY.cim screen opens.
-
Select options in the following sequence to create the order.
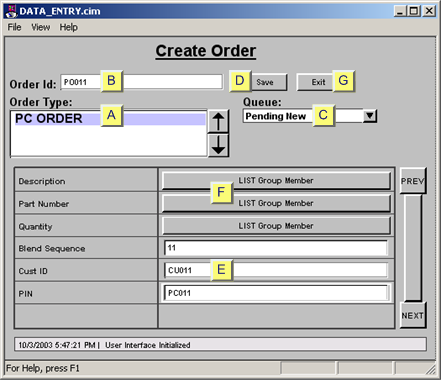
Option Description A Order Type Corresponds to the item type in PRT and TADB. The Order type that you select is placed in the item type category in PRT and TADB. When you make a select a message will ask you if you are sure. Click OK to continue. B Order Id Becomes the Item ID in PRT and the SQL database. Important: This number must be unique. Note: The number may also be an attribute of the selected order. C Queue Places the order in the queue for the specified region. Options are: Accepted New New order that can go to production. Pending New New order on hold. Rejected New New order that will not be produced. Accepted Update Order with changes to an existing order that have already been approved for production. Pending Update Order with changes to an existing order waiting for approval, rejection or return. Rejected Update Update request is rejected. Master Blend It is not advisable to create orders for the Master Blend or Plant Blend regions. Plant Blend New New order that has not been evaluated. Update Order with changes to an existing order that have not been evaluated. Up Return If there is more than one POMS project or plant, this queue holds orders that do not belong in the current POMS project and need to be rerouted D Save Saves the new order in both PRT and the TADB database. Note: A message asks for confirmation. Click Ok to save the entries. E Attribute Fields Attributes that are in Normal groups. All fields that do not allow NULLS must be filled in. F List Group Member buttons Clicking any Attribute List button opens LIST_EDIT.cim, the Attribute List screen, on which you can enter list attribute values. G Exit Closes the DATA_ENTRY.cim. Create order screen. Returns you to the POMS_MAIN.cim.


