 CIMPLICITY
2.3. Use the Grid to Position Controls within a Dialog Box
About this task
Note: Dialog units represent increments of the font (8 point Helvetica) in which the Dialog Editor creates dialog boxes.
| Unit | Represents an increment equal to: |
| X | 1/4 of the font. |
| Y | 1/8 of the font |
Procedure
-
Specify the following.
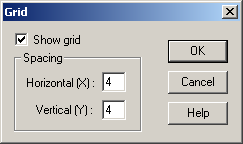
Option Description Show grid Displays or hides a grid on the dialog box. Check Displays the grid. Clear Hides the grid. Horizontal (X) Space between horizontal grid marks. The higher the number the further apart the grid marks. Vertical (Y) Space between vertical grid marks. The higher the number the further apart the grid marks. Important: The X and Y settings entered in the Grid dialog box remain in effect regardless of whether you choose to display the grid.
Results
The Dialog Editor displays or hides the grid with the settings you specified.
With the grid displayed, you can line up the crossbar on the mouse pointer with the dots on the grid to position controls precisely and align them with respect to other controls.


