 Web HMI
Get Started with Workflow and Web HMI
When using Workflow, follow these steps to display interactive task lists in Web HMI Runtime for the first time.
- The administrator integrating Workflow must have the same credentials in both the Web HMI server and the Workflow server.
- The task lists using HTML5 forms were created in Workflow to appear in the Web HMI Task List Card.
- The time is synchronized among the servers being used.
- Install Workflow 2.6 and Web HMI on different servers.
- In the Workflow server, do the following:
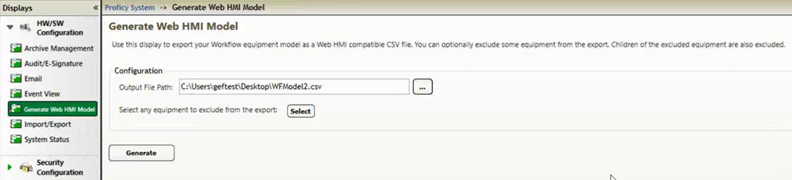
- After creating the Workflow equipment model, you must convert it to the required .cvs file format before importing it to Web HMI. This model also includes the Workflow server information. To convert the model, navigate to , as seen in the following image.
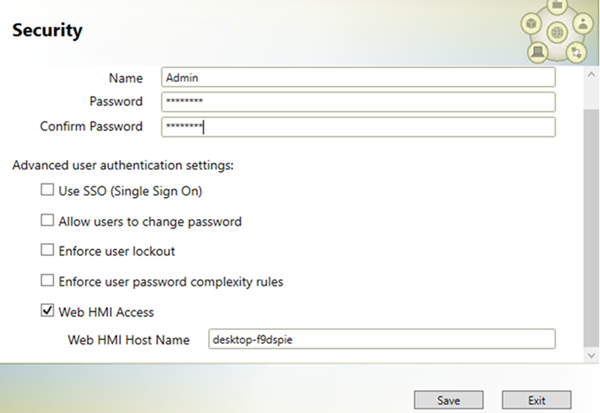
- Set up access to the Web HMI server by selecting the Web HMI Access checkbox, and then entering the Web HMI Host Name in , as seen in the following image.
- After creating the Workflow equipment model, you must convert it to the required .cvs file format before importing it to Web HMI. This model also includes the Workflow server information. To convert the model, navigate to , as seen in the following image.
- In the Workflow server, export the certificate required to communicate with the Web HMI server and clients by following these steps:
- Select .
- In the Export Folder box, enter the path or navigate to the location in which to export the .zip file containing the certificate.
- In the Password box, enter a password to secure the exported certificate, and to use when placing the certificate in a trust store.
- Select Save.
A .zip file named ExtensionServerCertificates.<WorkflowServerName>.zip is created with the ProficySelfSignedCA certificate. You must place this certificate in the trust store of the Web HMI server and each Web HMI client, as explained in the following step.Note: Mobile iPad devices also require the ProficySelfSignedCA certificate, and have specific instructions to install this certificate. See Install Workflow Certificate in iPad Clients. - Place the Workflow
ExtensionServerCertificates.<WorkflowServerName>.zip file in the Web HMI server and each Web HMI client, and then follow these steps to add the certificate to each one of their trust stores:
- In the Web HMI Administration environment, do the following:
- Import the Web HMI model file created in step 2a to Web HMI by navigating to , as explained in Import the Model.
- Verify the Workflow server information was imported to Web HMI in , as explained in Set Up Data Source Servers.
- In Application Assembler, set up a few user accounts for testing purposes.
- In the Web HMI Runtime environment, do the following:
- Verify Web HMI is connected with the Workflow server. If not connected,
 appears in the main navigation bar.
 - Verify tasks are assigned to the correct users within the equipment or process context. The number of tasks assigned to a user appears next to the task list icon in the main navigation bar. For example,
 indicates there are two tasks for a user.
- Verify Web HMI is connected with the Workflow server. If not connected,