Steps to Install iFIX
The steps that follow outline how to install the iFIX software from the product installation using the default settings. Be sure to run the iFIX install as an Administrator. When installing choose to install and register the local instance of Configuration Hub. Be sure to write down the client ID and client secret you enter during the install, you will needs this later when you install Historian!
Note: The log file for the iFIX install is named iFIX65_SETUP.log. The log for the Configuration Hub portion of the install is named iFIX 6.5_ConfigHubMSI.log. Both logs appears in your Windows folder. These log files can be used to troubleshoot any issues that occur during install.
Install Steps
To install the iFIX software:
- Log in to Windows with Administrator privileges. (You must be an Administrator to install iFIX.)
- Double-click the iFIX_v6.5_English.iso file to open the install media.
- From the install media, right-click the InstallFrontEnd.exe file and select Run as Administrator to start the installer. A message may appear with a security warning. If it does, select Run to proceed. Important: Be aware that if you do not already have .NET 4.6.1 installed and you choose to install iFIX, the .NET 4.6.1 install will run first. After it installs, you will be prompted to restart your computer. After the restart, the iFIX install continues. The install media must be available or connected to the target machine the entire time for the install to finish.
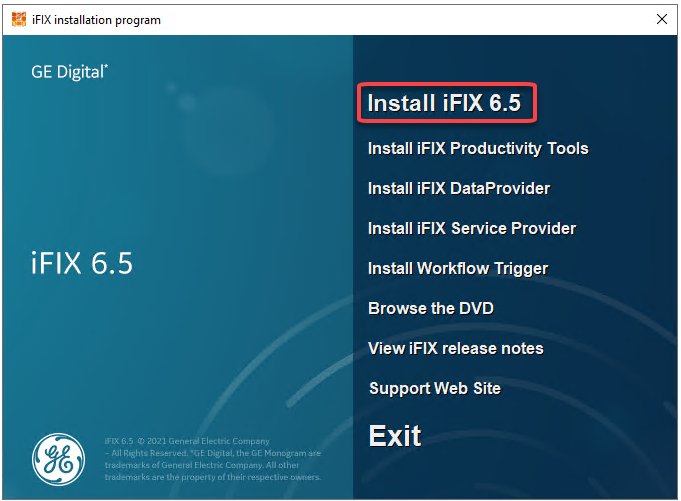
- Click the Install iFIX 6.5 link.
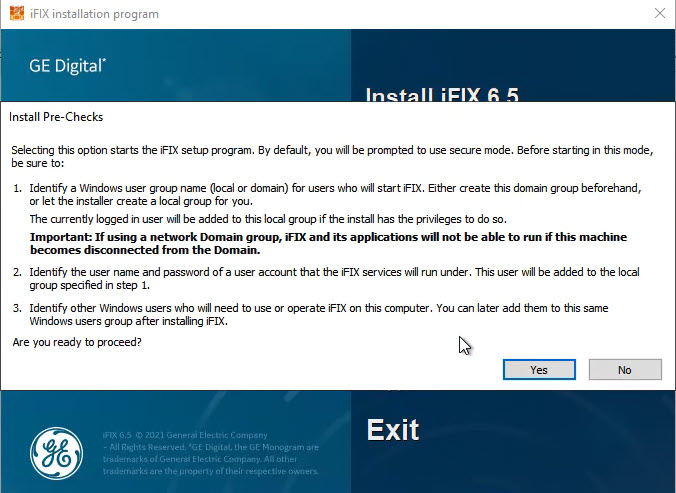
- Read the install Pre-Checks dialog box, and click Yes to proceed.
 Tip: If you see this message during the iFIX installation, you will need to install a Microsoft update before you can continue: “A necessary Windows security update for the Universal C Runtime component is missing on this computer. Please install the latest Windows updates and then install iFIX. For details, check the New Features section of the IPIiFIX.chm found in ReleaseNotes folder on this install media.” Install the Microsoft Update, KB2999226, and then try installing iFIX again. To install KB2999226, you may need to install other updates first. For Windows Server 2012 R2, you must have KB2919442 and then KB2919355 installed before installing KB2999226. For Windows 8.1, you just need KB2999226.
 - When an informational message box appears, click OK to proceed. Note: If a previous version of iFIX already resides on your computer when you try to install the latest version of iFIX, a message box appears during the installation suggesting that you upgrade your existing iFIX install. It is recommended that you elect to upgrade iFIX when this message appears. By following the upgrade process, iFIX installs to same folder where your previous version existed. For example, if you have iFIX installed to the C:\Dynamics folder, when you upgrade, the newer version of iFIX installs to the C:\Dynamics folder. After the iFIX upgrade completes and you restart iFIX, your SCU file is upgraded automatically, and the original file is backed up with a .^CU extension.
- When the Welcome screen appears, click Next to continue. The license agreement screen appears.
- Click I accept the terms of the license agreement and then click Next. The Setup Type screen appears.
- Leave the default of Typical selected, which installs iFIX, Configuration Hub, and the Electronic books (e-books), and then click Next. The Choose Destination Location screen appears.
- Leave the default path, and click Next to continue. The Ready to Install Program screen appears.
- Click Install. The progress of the installation displays on screen as the files are copied.
- Wait as iFIX installs. After a few minutes, a Firewall setting message appears.
- Click Yes to enable iFIX through the Windows firewall. The install continues. The next screen that appears is for Configuration Hub: the Install and Register with Configuration Hub screen.
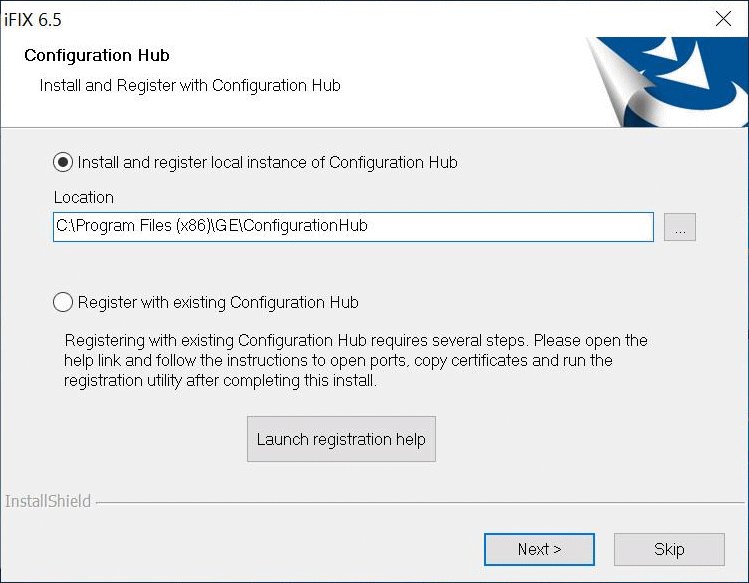
- Select the Install and register the local instance of Configuration Hub option. The Register with Configuration Hub screen appears.
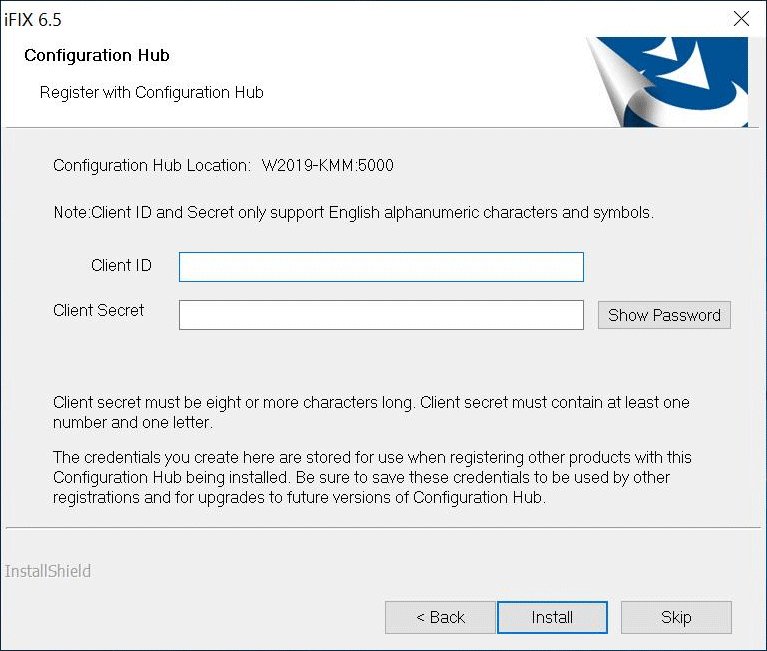
- Enter a Client ID and Client secret. The client secret must be eight or more characters long and must contains at least one number and one letter. Note: Only English alphanumeric characters values and the following symbols are supported in the client ID and client secret fields: "-><~!@#$%^&*?|"Important: Be sure to take note of the values you enter in these fields. You need this information to register, update, or unregister Configuration Hub. For example, you would need the client ID and client secret if you want to configure a remote Configuration Hub.
- Click Install to install the Configuration Hub option. When the installation and registration completes, the iFIX Configure Wizard dialog box appears.
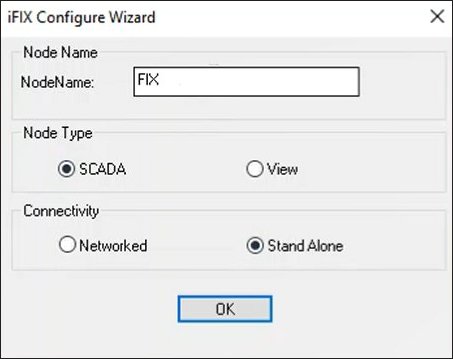
- Leave the Node Name as FIX, the default. (If you were using multiple SCADA servers on the same network, you'd probably want to consider giving it a different name. But, since we are installing everything on the same server, you do not have to change this value.)
- For the Node Type, select SCADA.
- For the Connectivity Type select Stand Alone, and then click OK. Tip: If you wanted to enable other iClient (view) or other SCADA nodes to readily connect, you would select Networked.
The install continues and the iFIX Install Mode screen appears.
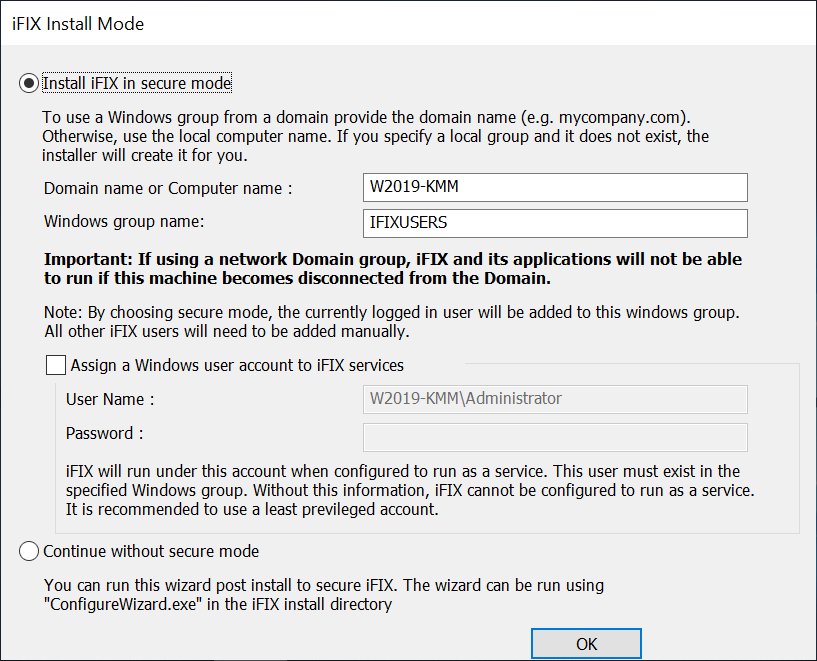
- Leave the Install iFIX in secure mode option selected (the default). Note: You can optionally select the "Continue without Secure Mode" option, but it is not recommended for security purposes.
- For the Domain or Computer Name, leave the local computer name (the default).
- Be aware that when using the network domain group, iFIX and its applications will not be able to run if this machine becomes disconnected from the domain.
- If you specify a local group and it does not exist, the installer will create it for you. By choosing secure mode, the currently logged in user will be added to this Windows group. All other iFIX users will need to be manually added.
- For the Windows group name, leave the default of IFIXUSERS.
- Leave the other options unselected (the default), and click OK.
- When a message box appears requesting that you view the release notes, click Yes.
- Close the release notes after you finish reviewing them to resume the install. The Install Complete screen appears.
- Select Finish to restart your computer.
- Check if there are any required Service Packs or SIMs to install for iFIX on the GE Support web site, and install them.
- If you are using iFIX on a Domain, in a client/server networking configuration, update the HOSTS file with the name of the iFIX SCADA Server, to ensure the highest reliability for connectivity. This update must be done on the server and all clients, as the contents of the HOSTS file should be identical on each node (client and server) in your TCP/IP network. If your iFIX SCADA Server node name is different from the computer name where iFIX is installed, you also need to add this name to each HOSTS file.
Tip: For more information on the HOSTS file see below:
- You can find the HOSTS file in the C:\WINDOWS\system32\drivers\etc folder.
- Depending upon your permissions, you may need to copy this file to another folder, edit it, and then copy it back to the etc folder after your edits are complete.
- Use a text editor such as Notepad to edit the HOSTS file. To prevent Notepad from automatically adding a .TXT file extension when you save the file, in the Save as Type field, select “All Files.”
- An example entry in the HOSTS file is as follows: 198.212.170.4 SCADA01. If SCADA1 was the iFIX SCADA Server node name, but the computer name where the iFIX SCADA Server was installed was AREA1, you would need to add a second line to the HOSTS file for AREA1: 198.212.170.4 AREA1.
- If you do not know the TCP/IP address of the SCADA computer, run the IPCONFIG command on the SCADA Server.
- Be sure to update the HOSTS file on the SCADA Server and each iFIX Client that you install.
- The same, identical entries should appear in the HOSTS file for the iFIX SCADA Server and each iFIX View node (Client) on your network.
