 Operations Hub
Install Operations Hub
This topic describes how to perform step-by-step installation of Operations Hub.
- Ensure that the machine on which you want to install Operations Hub meets the System Requirements.
- Use a machine that does not host any applications that are bundled with Operations Hub.
- Run a Windows update (including security updates).
- Use a host name that contains up to 24 characters and any of the following characters:
- Alphabetic characters
- Numeric characters
- Minus
- Period
- Ensure that you have administrative privileges to the machine on which you want to install Operations Hub.
You can also install Operations Hub in unattended mode.
-
Run the Operations Hub installation DVD,
and then select Install GE Operations Hub.
The welcome screen appears.
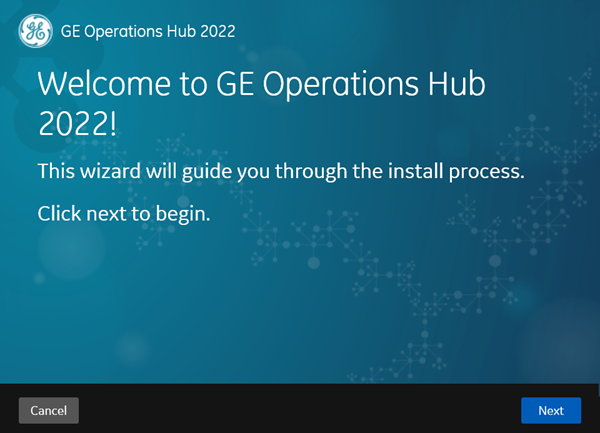
- Select Next.The license agreement screen appears.
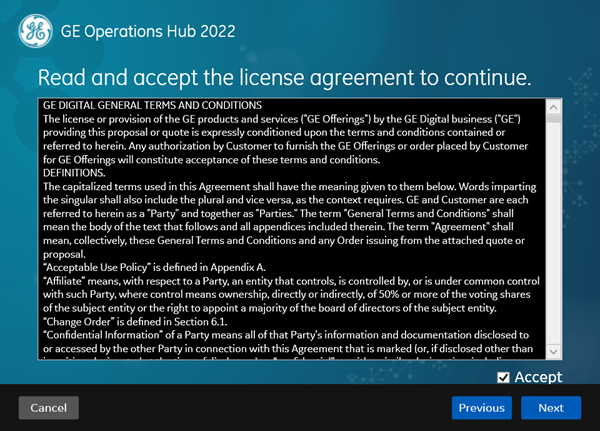
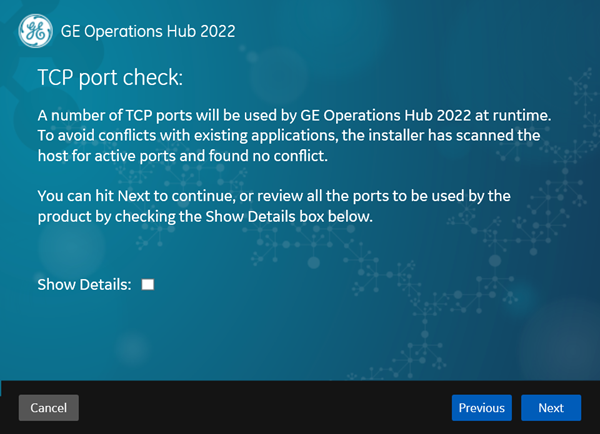
- Select the Accept check box, and then select Next.The TCP port screen appears to check whether the ports chosen for Operations Hub are available.
-
To review or change the ports for Operations Hub, select the
Show Details check box.
The TCP port assignments screen appears with a list of ports used by the various components in Operations Hub.
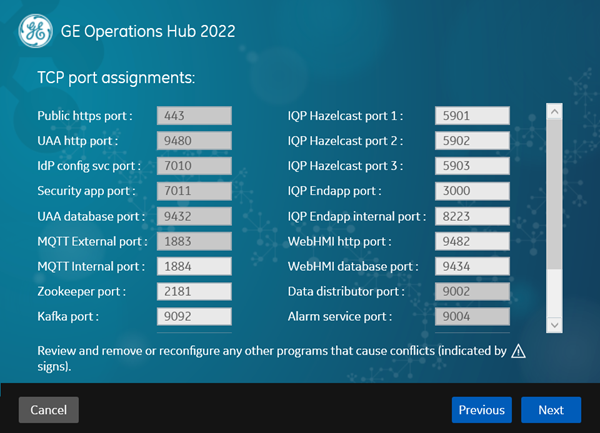 Note: Use care when changing port numbers to avoid conflict with an existing application. Generally, a port number higher than 1023 should be assigned, since ports 0 to1023 are well known ports typically already assigned on Windows systems for different purposes.
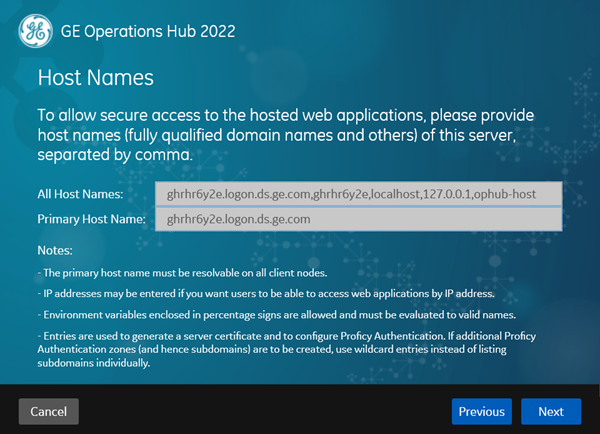
 - If needed, modify the port numbers, and then select Next.The Host Names screen appears populating default host name values.
-
Enter the details as follows:
Field Description All Host Names Machine details to access Operations Hub following the install. Choose from: - Fully qualified domain name (FQDN)
- host name
- IP address
Note:- If you want to provide more than one of the aforementioned values, use a comma to separate them.
- If you want to add the Fully Qualified Domain Name (FQDN) after completion of the install, the safest way to apply the FQDN is to uninstall without purge, and then reinstall with the FQDN in the Host Names screen.
Primary Host Name This field remains in a disabled state. It is updated with the first value from All Host Names. - Select Next.The Proficy Authentication Service screen appears.
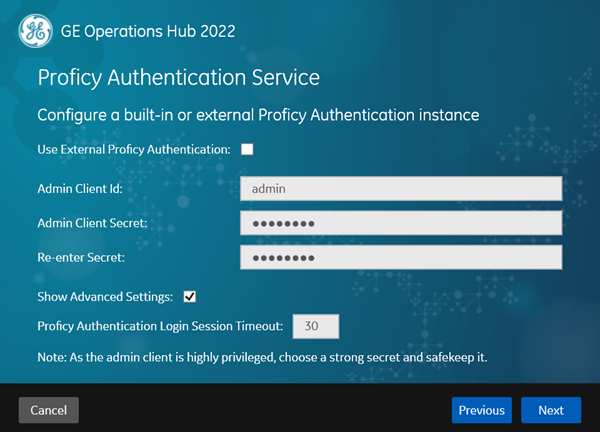
-
If you want to use the Proficy Authentication (UAA) service that is integrated
with Operations Hub, then enter the
following details.
Field Description Admin Client Id The client Id to log in to the Proficy Authentication application. Admin Client Secret The client secret to log in to the Proficy Authentication application. - Client secret should be at least 8 characters, containing at
least:
- one upper case
- one lower case
- one numeric
- one special character
- Client secret cannot contain the ampersand (&) or percent (%) special characters.
Re-enter Secret Verifies and confirms the client secret. Use External Proficy Authentication Select the check box if you want to use an external Proficy Authentication service. Show Advanced Settings Select the check box to reveal the option to set login session timeout. Proficy Authentication Login Session Timeout Enter the idle time for a login session in minutes. After expiry of the idle time, you must log in to the application again to resume working. - Client secret should be at least 8 characters, containing at
least:
-
If you choose to use an external Proficy Authentication service, then enter the
details as follows:
Field Description Proficy Authentication Base URL URL of Proficy Authentication (UAA) service. Note:- If referencing Historian 7.x UAA, then use a URL
similar to this:
https://historian7x:8443/uaa. If referencing Historian 8.x or later, then use a URL without port number. For example:https://historian8x/uaa. - Historian 7.x requires a different port than
Historian 8.x or later. For Historian 7.x, the
default port to connect to Proficy Authentication
is
8443. For Historian 8.x or later, the default port to connect to UAA is443. - If the ports were customized, then use the selected port.
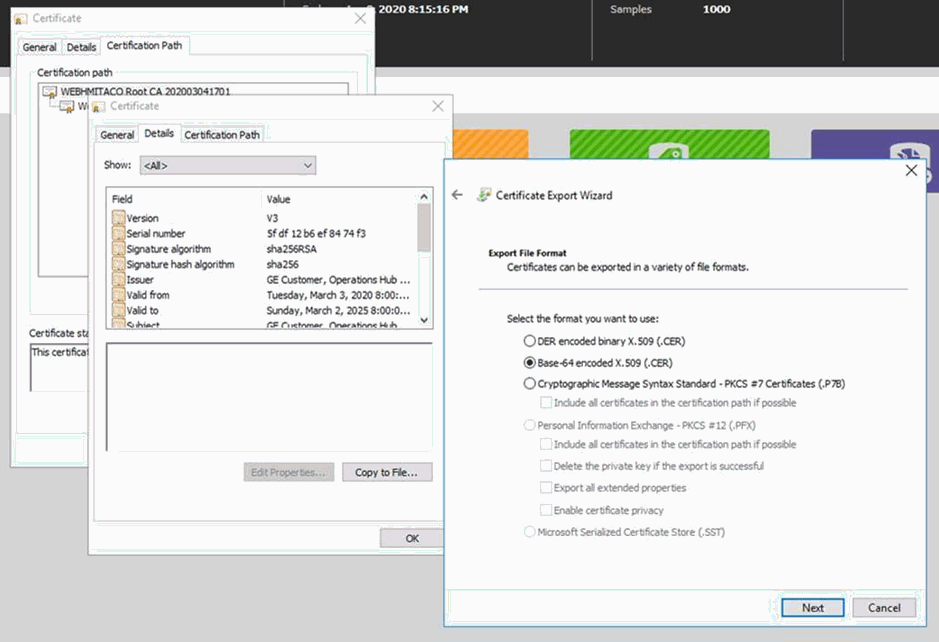
Admin Client Id ID of the administrator account of the Proficy Authentication client. Admin Client Secret Client secret of the administrator account. Proficy Authentication certificate file The path to the certificate file used by the Proficy Authentication service. Note:- If provided, the certificate file must be a
.pemfile for the root issuer (not the Proficy Authentication server certificate). - Export the root certificate from Proficy
Authentication Service, and save using the Base 64
option (as shown in the following figure). Then,
rename the exported
.cerfile to.pemso you can use it here in Operations Hub. - After completion of install, this certificate should also be imported into Trusted Root Certification Authorities certificate store on client machines, to suppress warnings given by browsers such as Chrome.
- If referencing Historian 7.x UAA, then use a URL
similar to this:
-
Select Test to test the connection to the external
Proficy Authentication instance based on the provided details.
These are some of the possible messages you may encounter when testing the connection.
Issue Warning Resolution Invalid credentials
401 Unauthorized.
Check the admin client ID and admin client secret provided to the External Proficy Authentication URL.
No certificate
The test will pass, but the user is requested to provide the Proficy Authentication root issuer’s certificate.
Provide the Proficy Authentication root issuer certificate file in the install.
Invalid certificate
Test succeeds but the certificate is not used- error reported if bad certificate used.
Provide the correct Proficy Authentication root issuer certificate file in the install.
Incorrect case sensitivity in URL or host name has a mismatch
Test succeeds but changes are required due:
- External Proficy Authentication server name resolution.
- Actual mismatch with the Proficy Authentication base
URL and the issuer Uri in the
uaa.ymlfile.
Make sure the issuer Uri in the
uaa.ymlfile and the Proficy Authentication Base URL match exactly.Error connecting to External Proficy Authentication
External Proficy Authentication server name resolution issue.
Check to make sure the External Proficy Authentication is running. Check to make sure the issuer Uri in the
uaa.ymlfile and the Proficy Authentication Base URL match.Error negotiating TLS connection
The issuer Uri in the
uaa.ymlhas just the host name while the user provides an FQDN in the Proficy Authentication base URL.This error happens either while testing the user entered Proficy Authentication Base URL or when testing the issuer Uri. The error message will indicate what issue is. The root cause is due to either the name in the Proficy Authentication base url or the issuer URI name under testing can not be authenticated by the certificate provided.
Again, make sure the issuer Uri in the
uaa.ymlfile and the Proficy Authentication Base URL match exactly.Note:- To locate the
uaa.ymlfile on the Historian machine, go to the following folder:C:\ProgramData\GE\Operations Hub\uaa-config\uaa.yml. Find the issuer:uri: https://<YourHistorianServerName>/uaa. - The install is not blocked from proceeding without the corrections from the previous table. However, there will be some runtime errors which may require an administrator to reconfigure. See the following scenarios for Historian 7.x and Historian 8.x or later.
For Historian 8.x or Later: If Proficy Authentication URL in the Operations Hub install does NOT match with the Historian 8.x or later UAA URL, then you receive an
Issue not
                            trusted
error when attempting to import a model. Examples of Proficy Authentication URLs used during the Operations Hub install may be a URL with a Fully Qualified Domain Name (FQDN) or one that includes a port number such as:https://z840his2019:443/uaa. If there is a mismatch, change Historian's UAAuaa.ymlfile so the issuer URI matches with that in the certificate. If Historian 8.x or later is installed with a Fully Qualified Domain Name (FQDN), then utilize the FQDN when specifying the external Proficy Authentication URL. For example:http://histFQDN/uaa.If Historian 8.x or later is installed with a host name like
historian8, then utilize the host name when specifying the external Proficy Authentication URL. For example:http://historian8/uaa.Basically, the issuer URI in the
uaa.ymlfile and the Proficy Authentication Base URL must match exactly. This will ensure the Operations Hub Administrator user is able to login successfully.For Historian 7.x: If Proficy Authentication URL in the Operations Hub install does NOT match the Historian 7.x UAA URL, then you receive an
Issue not trustederror when attempting to import a model. To resolve this:- Get the external Proficy Authentication URL that you entered during
install. For example,
https://historian7:8443/uaa. - On the Historian machine, access the yaml file located here:
C:\Program Files\GE Digital\UAA\uaa.yml. - Modify the
uaa.ymlto add the following lines at the end of the file:issuer: uri: https://historian7:8443/uaa
historian7, then it is recommended to use the external Proficy Authentication URL ofhttps://historian7:8443/uaaduring the Operations Hub install. In this case, the Operations Hub Admin user is created correctly, and avoidsinvalid redirect URLerror. -
Select Next.
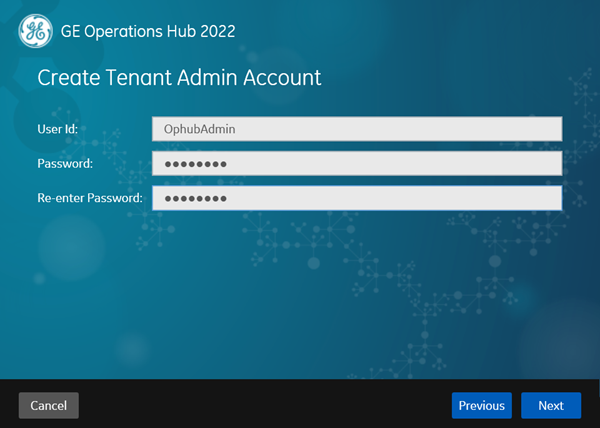
The Create Tenant Admin Account screen appears.
-
Enter the following details, and then select Next.
Field Description User Id User ID of the administrator account for Operations Hub. When you provide the tenant user ID, the following conditions apply: - If you are installing Operations Hub for the first time, do not provide StudioAdmin as the tenant user ID because it is used by Operations Hub.
- If you want to use a shared Proficy Authentication to work with Operations Hub, do not provide the user ID of an existing user of the Proficy Authentication instance. If you do so, the installation fails.
- If you are reinstalling Operations Hub, do not provide the tenant user ID that you previously provided. This is because even if you purged the data while uninstalling Operations Hub, the user account, along with the groups and privileges assigned to the user, still exists in the Proficy Authentication instance.
Password Password for the administrator account. Re-enter Password To confirm, re-enter the password for the administrator account. The Select Drive for Programs and Data screen appears.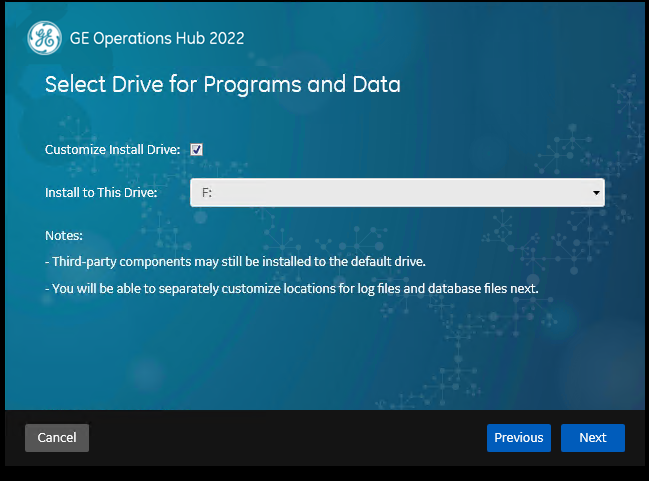
-
If you want to choose a different drive to install, select the
Customize Install Drive check box.
A list of available fixed hard drives on your system appears on the install screen. This screen appears only when more than one fixed hard drive is available on the host machine.
-
Select the drive where you want to install, then select
Next.
The Customize Log Files and Postgres Data Locations screen appears.
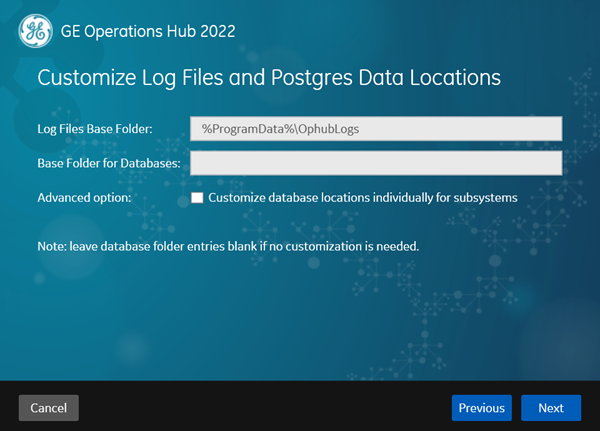
-
Enter the following details, and then select Next.
Field Description Log Files Base Folder The path to the log files generated by Operations Hub. By default, the value in this field is %ProgramData%\OphubLogs.Base Folder for Databases The path to the base folder for the Proficy Authentication, Operations Hub, and WebHMI databases. If you want to use the default folder, leave this field blank. Otherwise, enter the path to the folder that you want to use. Customize database locations individually for subsystems Select the check box if you want to use different folders for each database. Proficy Authentication Database Folder This field appears only if you have selected the Customize database locations individually for subsystems check box. Enter the database folder that you want to use for Proficy Authentication. If you want to use the default folder, leave this field blank. IQP Database Folder This field appears only if you have selected the Customize database locations individually for subsystems check box. Enter the database folder that you want to use for Operations Hub. If you want to use the default folder, leave this field blank. WebHMI Database Folder This field appears only if you have selected the Customize database locations individually for subsystems check box. Enter the database folder that you want to use for WebHMI. If you want to use the default folder, leave this field blank. The Install Dataflow Editor screen appears.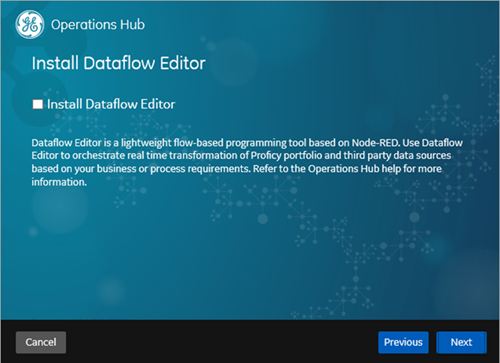
- Select the Install Dataflow Editor check box if you want to install the tool along with Operations Hub.
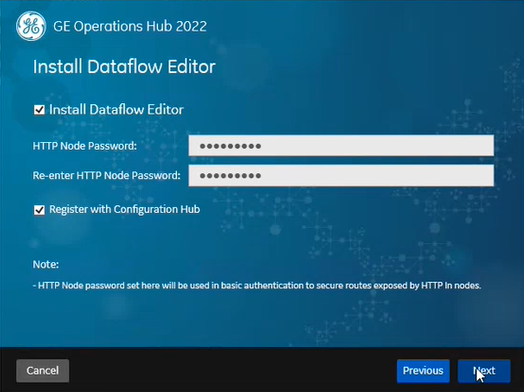
-
Enter the following details, then select Next.
Field Description Http Node Password Password to secure the Dataflow Editor http node. Re-enter Http Node Password Verifies and confirms the password. Register with Configuration Hub Select the check box if you want to register Dataflow Editor with Configuration Hub. Before registering, make sure that security authentication source is configured for Configuration Hub. If you choose to register later, refer to Manually Register Dataflow Editor with Configuration Hub.
If you choose to register with Configuration Hub, the Configuration Hub Information screen appears.
-
Enter the following details:
Field Description Base URL Base URL of Configuration Hub container service, such as https://chhost:5000/container-svc/.Client Id Identifier of a client that has permission (authority) to register with Configuration Hub. Client Secret Client secret that can authenticate the client. 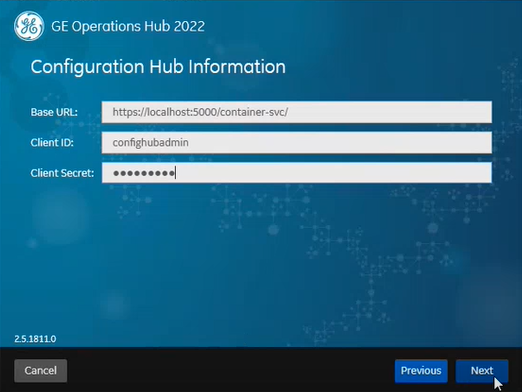
-
Select Next.
The ready to install screen appears.
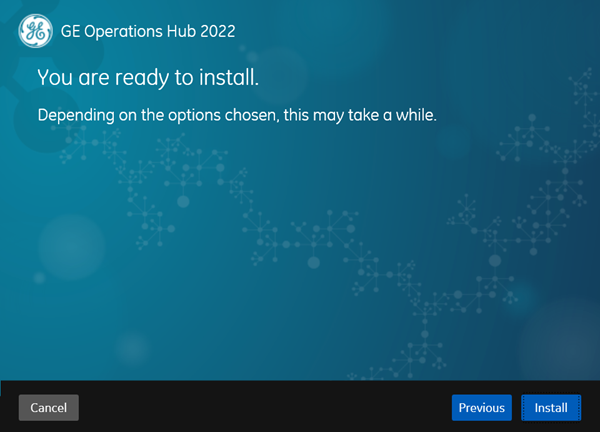
- Select Install.
- It is recommended that you restart your computer following an upgrade of Operations Hub if Plant Applications and Operations Hub coexist on the same resource.
- After upgrading to Operations Hub
2.0, you will notice the IQP designer uses
app_nameinstead ofapp_idin its URLs. - If upgrading from 2.0 to 2.1 or later, restart the WebClient services to
allow the Plant Applications Web Client to connect successfully to
Operations Hub.
- If using Enterprise WebClient version, restart the Docker service.
- If using Standard WebClient version, restart the GE PlantApps WebClient Master Control service.
- Remember to clear your browser cache after upgrading to a newer version of Operations Hub.
- If a firewall is running on the server, configure the firewall to make sure
the public https port used by Operations Hub Public is not blocked.
Typically, the port is
443, but can be a different value that you have selected or that was changed to avoid a conflict. If you are not sure of the port number, the shortcut (URL) placed on the desktop should contain it.
- Install the Certificate on your Clients (on each client that you will use to access Operations Hub ).
- Log in to Operations Hub.
- Install Site Administration Addon.