Repeater
A repeater is a widget that is used to repeat the content layout for each item in a list returned by a query. For example, if a query returns a list of assets, the repeater can display the state of multiple parameters associated with each asset type using a combination of different widgets.
- You can create a dashboard-type application that monitors multiple assets at the same time.
- You can use different layouts and styles for each widget in the repeater to match the data type of an asset parameters and to enhance visibility.
- The layout of the content only needs to be defined once in the designer and it will be repeated for each item in the list that you want to monitor.
- The content that is repeated is automatically updated when the underlying query is updated (for example, new assets are added or the list of assets is updated by means of conditions in the query).
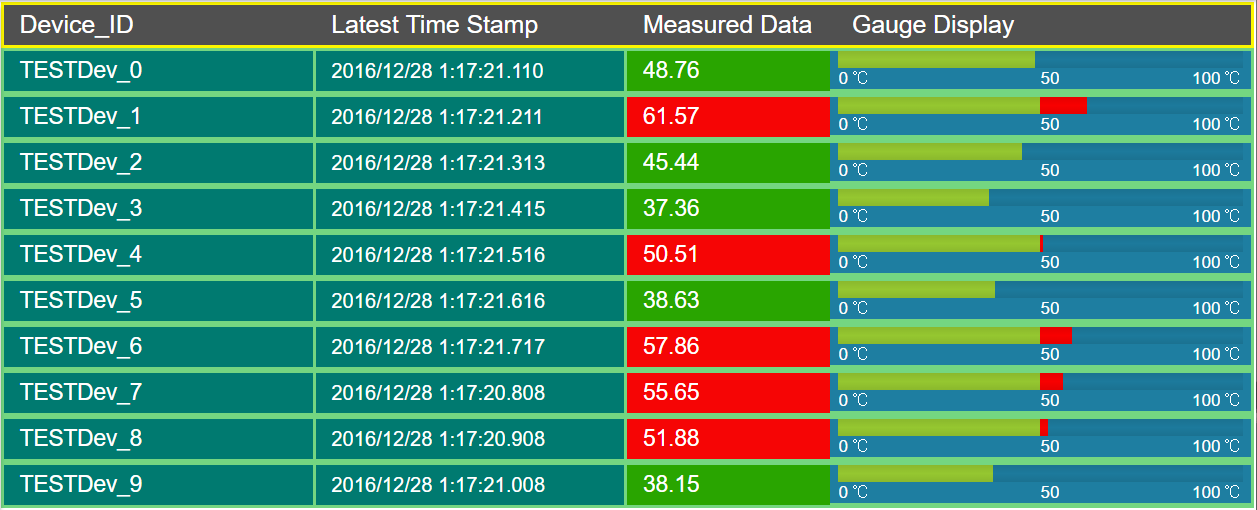
For example, if an entity stores the temperature recorded by assets, you can use a repeater to display not only the temperature recorded by each device, but also a gauge to indicate whether each value is in the acceptable range, as shown in the following image.
Repeater Settings
| Setting | Description | ||||||||||||||||||||||
|---|---|---|---|---|---|---|---|---|---|---|---|---|---|---|---|---|---|---|---|---|---|---|---|
| Flow | Identifies the query to use to fetch data displayed in the repeater. | ||||||||||||||||||||||
| Multi-select | This setting is used in combination with a map or a graph widget. If you select this check box, a check box appears in each row of the repeater in the application, allowing the user to select which items should appear on the map or the graph. By default, this check box is cleared. | ||||||||||||||||||||||
| Checked | If you have configured the Multi-select setting, this setting indicates the initial state of the check box in each row of the repeater in the application. By default, this check box is cleared. If you select this check box, all the check boxes in the application are selected. | ||||||||||||||||||||||
| Action | Identifies the action that should be performed when the repeater is selected. For example, suppose you want to allow the application users to select an asset, and then retrieve more information about the asset. In that case, select Set global value, and then select the global variable that stores the asset ID. The value set in this global variable is then used as an input to another query to retrieve data about the asset. You can add multiple actions. | ||||||||||||||||||||||
| Load <number> rows at a time | Identifies the number of rows that should appear by default in the repeater. By default, the value in this box is 10. If you select this check box, the Paging and "Load more" button options appear.
| ||||||||||||||||||||||
| Item Horizontal Alignment | Identifies the number of repeater instances that will appear horizontally next to one another before moving to the next row. For example, suppose you want to display the following information in the repeater.
|
Using a Repeater for a Basic Operation
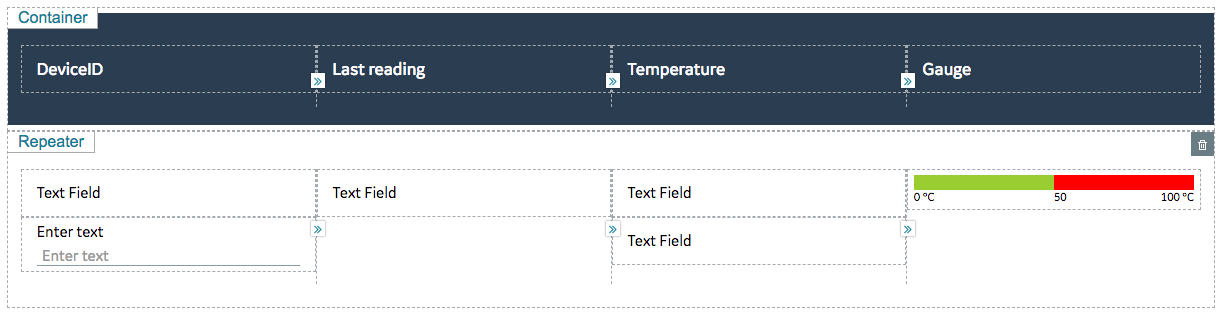
Suppose you want to use a repeater to display temperature recorded by multiple sensors, which is stored in the M2M_data entity. In addition to displaying the temperature, you can use a gauge widget in the repeater to highlight whether the temperature is in the acceptable range, as shown in the following image.
- Create the following queries:
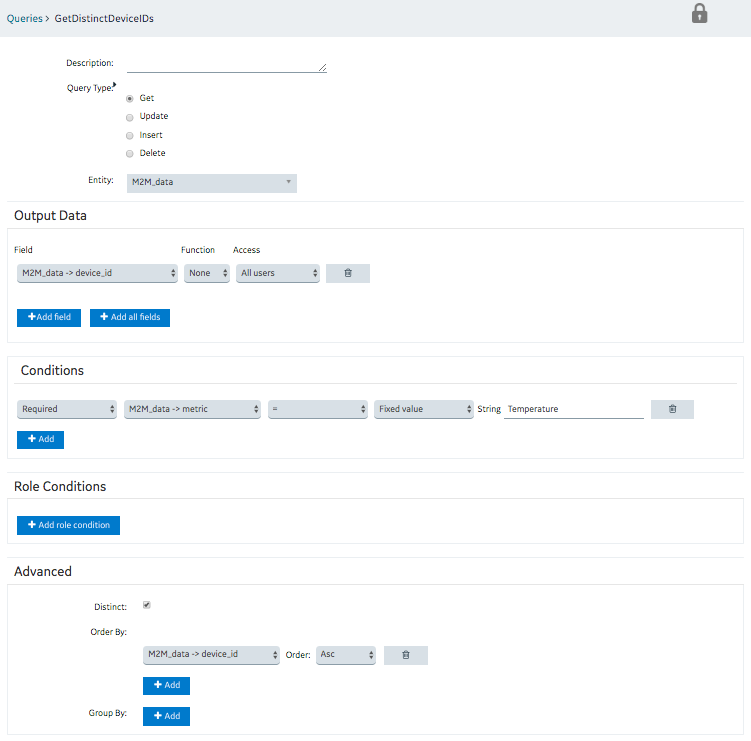
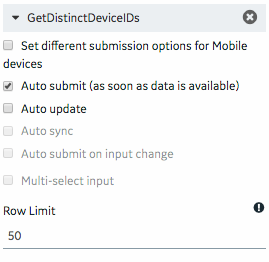
- GetDistinctDeviceIDs: To fetch a distinct list of device IDs from the M2M_data entity. Enter or select values as shown in the following image.
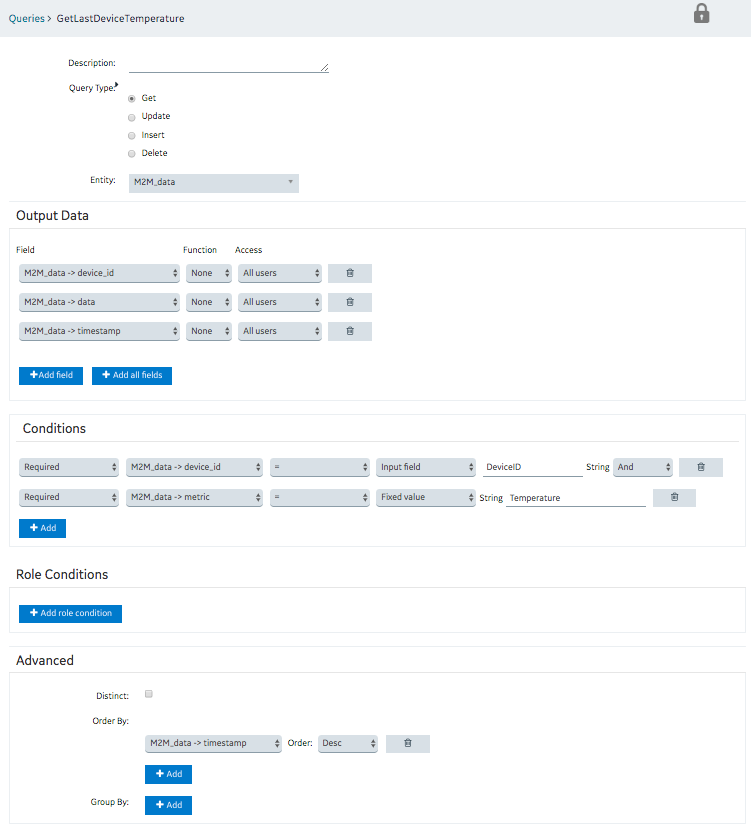
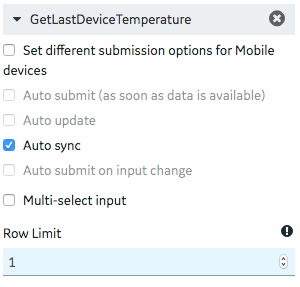
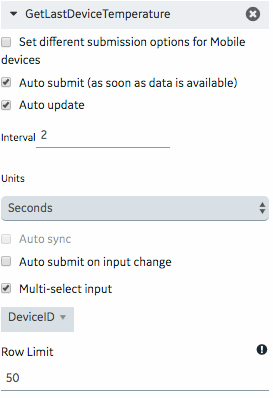
- GetLastDeviceTemperature: To fetch the measurement time (that is, time stamp) and the measured value of the temperature for each device. Enter or select values as shown in the following image.
- GetDistinctDeviceIDs: To fetch a distinct list of device IDs from the M2M_data entity. Enter or select values as shown in the following image.
- Create an application, and then add a page.
- Add a container to the page for the heading row, and perform the following steps:
- Split the container into four columns.
- In each column, add a header widget to contain the column headings.
- Specify the following column headings:
- Device ID
- Last Reading
- Temperature
- Gauge
- In the Visual section for each heading, select the Custom Colors check box, and in the Color box, select the white color.
- In the Visual section, select the Custom Colors check box, and in the Background Color box, select the dark blue color.
- Add a repeater for the data rows, and perform the following tasks:
- Split the repeater into four columns.
- In the first column, add a text widget and an input widget.
- In the second column, add a text widget.
- In the third column, add two text widgets.
- In the fourth column, add a gauge widget.
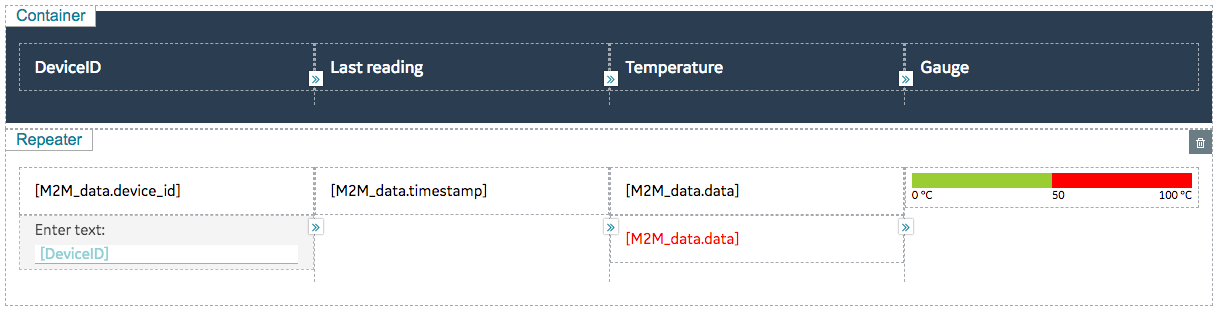
The widget appears as shown in the following image.
- Select PAGE DATA, and then perform the following steps:
- Add the two queries that you have created.
- For the GetDistinctDeviceIDs query, configure the settings as shown in the following image.
- For the GetLatestDeviceTemperature query, configure the settings as shown in the following image.
- In the REPEATER PROPERTIES section, in the Flow box, select the query GetDistinctDeviceIDs.
- In the PAGE DATA section, from the the GetDIstinctDeviceIDs query, drag M2M_data.device_id to the text widget and the input widget in the first column of the repeater.
- In the INPUT WIDGET PROPERTIES section, select the Disabled and Hidden check boxes.
- In the PAGE DATA section, from the GetLastDeviceTemperature query:
- Drag DeviceID to the input widget in the first column of the repeater.
- Drag M2M_data.timestamp to the text widget in the second column of the repeater.
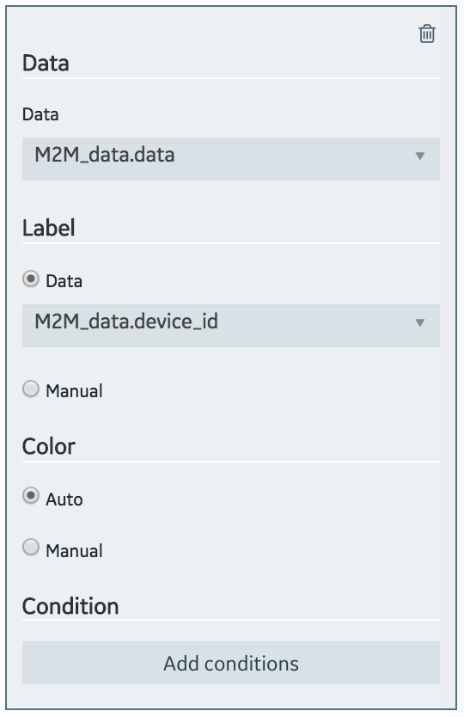
- Drag M2M_data.data to the two text widgets in the third column and the gauge widget in the fourth column of the repeater.
- Select the text widget in the second column, and in the TEXT PROPERTIES section, in the Format box, select DateTime.
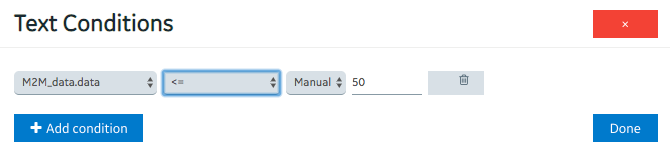
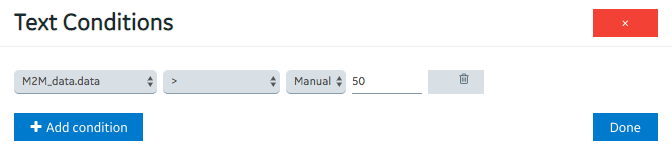
- Select the first text widget in the third column, and in the TEXT PROPERTIES section, select Add Conditions, and then specify values as shown in the following image.
- Select the second text widget in the third column of the repeater, and in the TEXT PROPERTIES section, perform the following steps:
- In the Visual section, select the Custom Colors check box, and then in the Color box, select red.
- Select Add Conditions, and then specify values as shown in the following image.
- Select the gauge widget in the repeater, and in the GAUGE PROPERTIES section, perform the following steps:
- Delete two of the color sections.
- In the Start Position and Label boxes for the remaining color section, enter 50.
- In the Maximum box, enter 100.
- In the Units box, enter degrees Celsius. Tip: If you want to enter °C, you can copy it from a Microsoft Word document.
The repeater widget appears as shown in the following image.
- Save the application, and preview it.
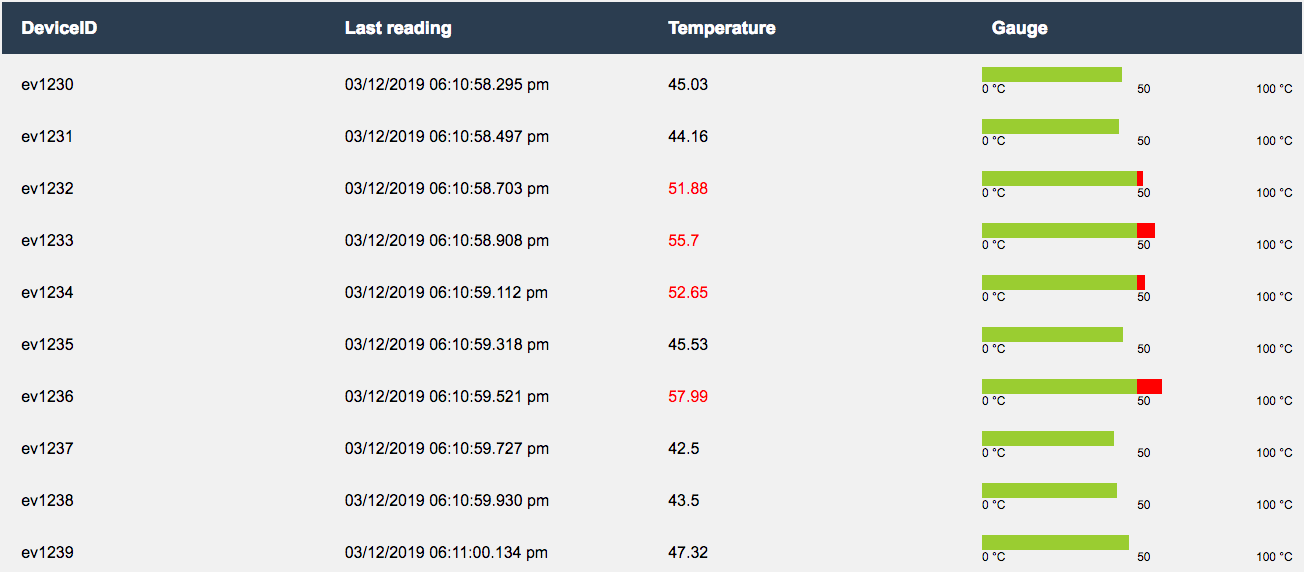
The application appears as shown in the following image.
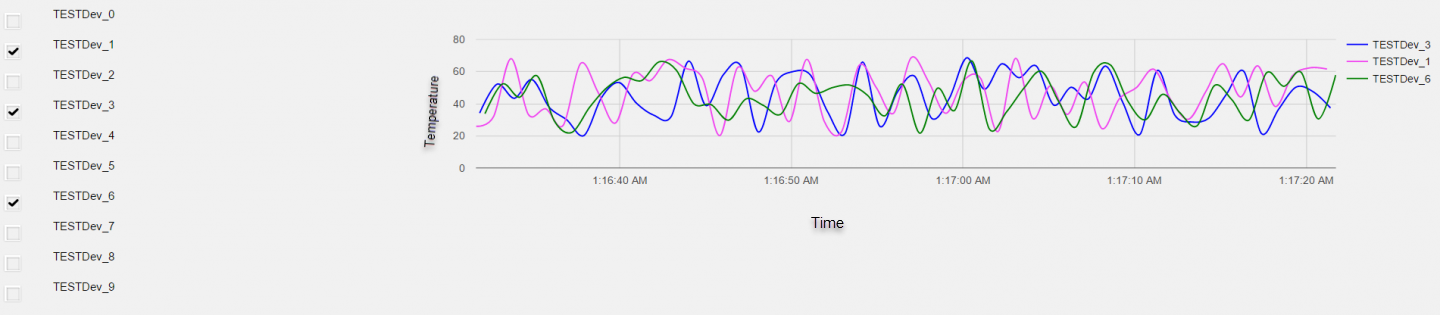
Using a Repeater for a Multi-Select Operation
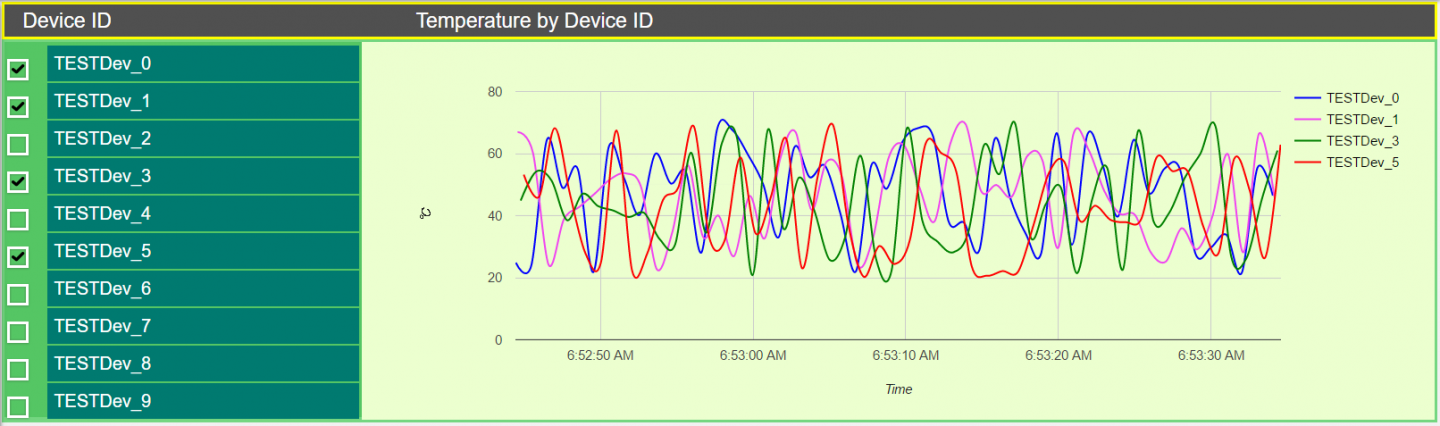
Suppose you want to use a repeater to plot a trend graph of temperature recorded by selected devices. You want to allow application users to select the devices whose temperature you want to plot in real time, as shown in the following image.
- Create the following queries:
- GetDistinctDeviceIDs: To fetch a distinct list of device IDs from the M2M_data entity. Enter or select values as shown in the following image.
- GetLatestDeviceTemperature: To fetch the measurement time (that is, time stamp) and the measured value of the temperature for each device. Enter or select values as shown in the following image.
- GetDistinctDeviceIDs: To fetch a distinct list of device IDs from the M2M_data entity. Enter or select values as shown in the following image.
- Create an application, and then add a page.
- Add a container with six columns.
- Except for the first column, merge the other five columns.
- Add a repeater and a graph widget to the container, and add a header widget to the repeater, as shown in the following image.
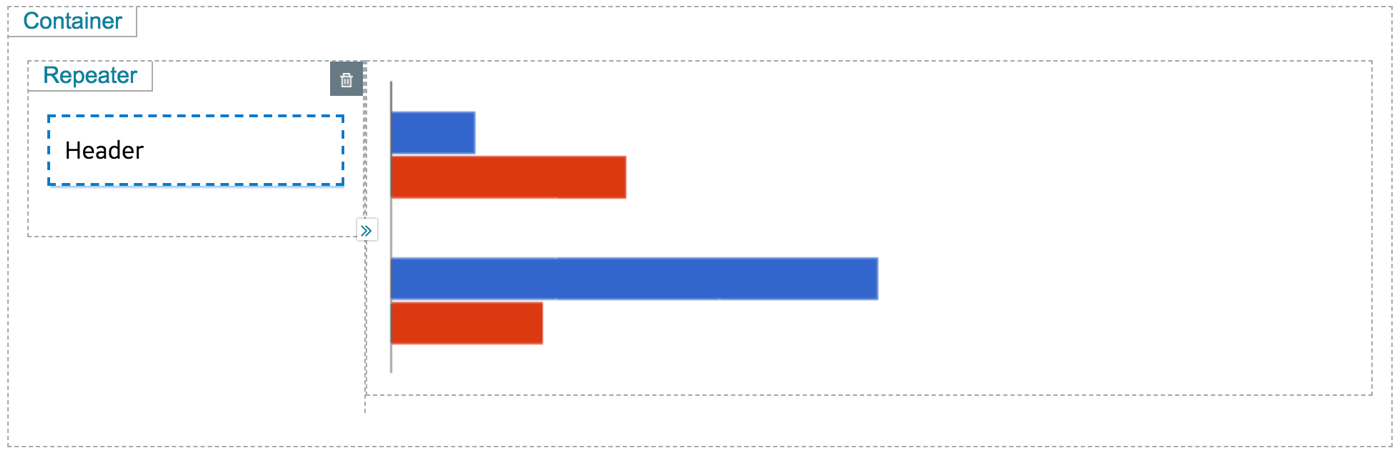
- The repeater provides a list of devices that the application users can select.
- The graph plots the temperature recorded by the selected devices.
- Select PAGE DATA, and perform the following steps:
- Add the two queries that you have created.
- For the GetDistinctDeviceIDs query, configure the settings as shown in the following image.
- For the GetLatestDeviceTemperature query, configure the settings as shown in the following image.
- In the REPEATER PROPERTIES section, in the Flow box, select the query GetDistinctDeviceIDs, and then select the Multi-select and Checked check boxes.
- In the GRAPH PROPERTIES section:
- In the Type box, select Lines.
- In the X-axis Data box, select M2M_data.timestamp from the GetLatestDeviceTemperature query.
- In the X-axis Label box, enter Time.
- In the Y-axis Label box, enter Temperature.
- In the Data box, select M2M_data.data from the GetLatestDeviceTemperature query.
- In the Label box, select M2M_data.device_id from the GetLatestDeviceTemperature query.
- In the GRAPH PROPERTIES section, in the Responsive subsection, set the height to 50 percent.
- Select the header widget, and then in the HEADER PROPERTIES section, select Data, and then select M2M_data.device_id from the GetDistinctDeviceIDs query.
- Select PAGE DATA, and then perform the following steps:
- For the GetDistinctDeviceIDs query, point to the row containing M2M_data.device_id, and then select
 . This will create a global variable for the ID.
 - For the GetLatestDeviceTemperature query, drag the input DeviceID to the global variable that you have created.
- For the GetDistinctDeviceIDs query, point to the row containing M2M_data.device_id, and then select
- Save the application, and preview it.
The application appears as shown in the following image. You can use the check boxes to display or hide the temperature curve for each device.