Have You Seen Historian Lately?Click here to check out all the new features in the latest version.
Supercharge your GE solution! Download a free trial of Proficy Operations Hub, CSense analytics, and more. Learn more about the Proficy 2022 releases, by signing up for one of our upcoming events.
You must install Historian Alarms and Events on the same machine as the data archiver.
If you have chosen to connect Historian to a remote SQL server, the following conditions must be satisfied:
The Historian Alarm Archiver service must be run on a user account that has privileges to log in to the SQL server using Windows authentication.
The default backup path, which you can set on the Archive page, must be a shared directory that is accessible to both the Historian Data Archiver and the remote SQL server. It is recommended that this shared directory be placed on the same computer as the Historian Data Archiver service.
Procedure
Run the InstallLauncher.exe file.
Select Install Alarms and Events.
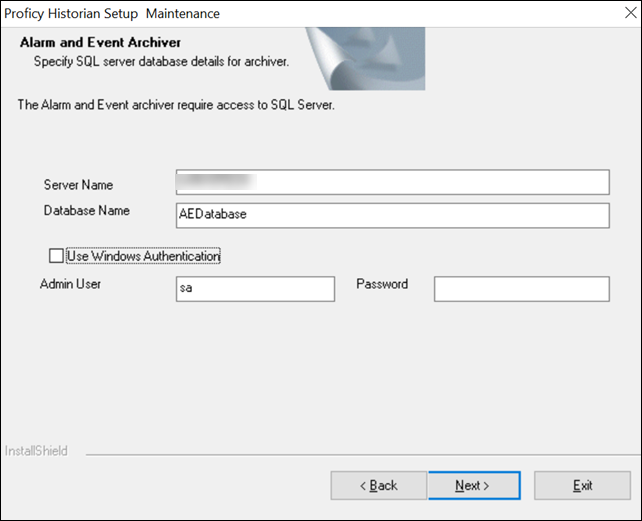
The Alarms and Events Archiver page appears.
If needed, change the values in the Server Name and Database Name fields to provide the name of the SQL server and the name of the database where the alarms and events data is archived.
If you want to use the SQL server credentials, clear the Use Windows
Authentication check box, and then enter the SQL server login
credentials in the Admin User and
Password fields. If you want to use Windows
authentication, select the Use Windows Authentication
check box. When you do so, the Admin User and
Password fields are disabled.
Select Next.
When prompted to restart your system, select Yes.
Historian Alarms and Events is installed in the following folder: <installation
drive>:\Program Files\Proficy\Proficy
Historian\x86\Server, and the following registry path is created:
HKEY_LOCAL_MACHINE\SOFTWARE\WOW6432Node\ Intellution,
Inc.\iHistorian\Services\AlarmArchiver
To verify that the Alarms service has started, access the Services window, and check the status of the Historian Alarm Archiver service.
If the Startup Type field is set to
Automatic, the service is started automatically when
the system is started or restarted.
 Historian