 CIMPLICITY
Configuration User Interface
Procedure
-
Select or clear the Enable Server check box.
Be aware that enabling the OPC UA server uses more system resources and has impact on CIMPLICITY performance. This option is disabled by default.
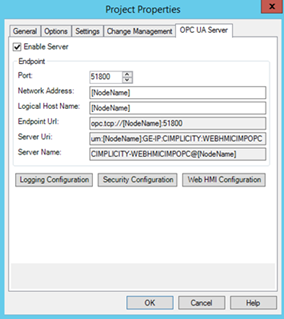
UA Endpoints Configuration
-
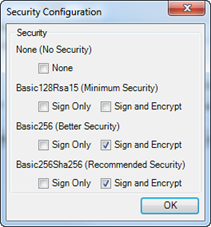
From the OPC UA Server tab of the Project Properties dialog box, click Security Configuration to open the Security Configuration dialog box.
-
In the Host Name and Port fields, enter the name of the Web HMI server and the port. If Web HMI is on the same server as CIMPLICITY, the Host Name field is automatically populated with the server name and port data. If you have installed Web HMI on a different server, replace the existing information with the correct server name and port.

-
When you receive the Connection succeeded message, click OK. If you receive a failure message, check and correct the Web HMI server name and port data, then try again.
Logging Configuration
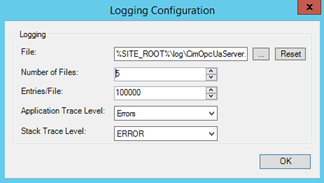
The logging UI enables you to modify the following nodes in ServerConfig.xml:
- UaAppTraceMaxEntries: The number of lines per log file (range is from 1-500000)
- UaAppTraceMaxBackup: The number of files for log backups (range is from 1-255)
- UaAppTraceFile: Location of the log file to be used
- UaStackTraceLevel: Possible values NONE, ERROR, WARNING, SYSTEM, INFO, DEBUG, CONTENT, ALL
- UaAppTraceLevel: Possible values NoTrace, Errors, Warning, Info, InterfaceCall, CtorDtor, ProgramFlow, Data
Note the following:
- You can enter a path to a log file manually. In this case, the file will be generated by the OPC UA SDK automatically, given the proper permissions, and the path to the file will be created. If the file cannot be created for whatever reason, no log file will be used during runtime. You can also enter "%SITE_ROOT%\log" as a directory prior to the file if you would like the log file to be placed in the project's "log" directory.
- The Reset button sets the path of the log file to the last saved path.
- The trace levels (log levels) are ranked in the list by ascending log level; in other words, ERROR will create fewer log entries than ALL for the Stack Trace Level.
- These changes are made visible in ServerConfig.xml when you click OK on the Project Properties dialog box (not when you click OK on the current dialog box).
Refer to the Troubleshooting section for more information about Trace Levels.


