CIMPLICITY
Step 3. Configure an Alarm String Index Set
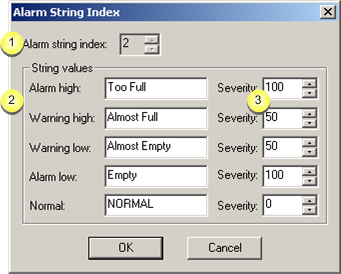
| 1 | Alarm string index |
| 2 | String values |
| 3 | Severity |
| 4 | Example 1 |
| 5 | Example 2 |
1. Alarm String Index
Alarm string identification.
- New alarm string sets
The next available number displays in the Alarm string index field when the alarm string is created. The field is read/write.
If the default number is changed, the new alarm string index number:
- Must be from 1 to 99 and
- Cannot conflict with an existing Alarm String Index.
- Existing alarm string sets
The Class ID field is read-only for previously created alarm string sets.
The index number is selected for an alarm to associate an alarm string set with that alarm.
2. String Values
Values for each of the following fields can contain up to 16 characters.
Alarm high
Warning high
Warning low
Alarm low
Normal
The value you enter for an alarm string index:
- Corresponds to Normal and Alarm State levels in the Alarm Class Configuration dialog box.
- Displays on the Alarm tab in the Point Properties dialog box when the string index is selected.
-
Displays when specified as
%STATEin a point's alarm message when the point is in the related alarm state.
3. Severity
A number from 1 through 1000. The higher the number the more severe the alarm is considered. CIMPLICITY treats more severe alarms with a higher priority.
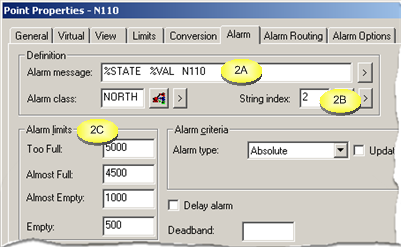
This example shows how the alarm string value for alarm string index 2 displays in the Alarm Viewer Message field.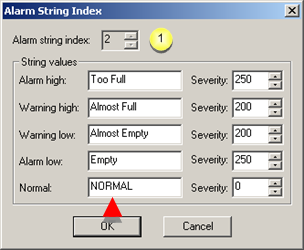
| 1 | String values are entered in the Alarm String Index dialog box. | |||||
| String field | Value | |||||
| Alarm high | Too Full | |||||
| Warning high | Almost Full | |||||
| Warning low | Almost Empty | |||||
| Alarm low | Empty | |||||
| Normal | NORMAL | |||||
 |
||||||
| 2 | A | %STATE in the Alarm message displays the string values for the selected alarm string set. | ||||
| B | String index 2 is selected. | |||||
| C | Alarm limit fields correspond to the selected string index values. | |||||
| String Value | Alarm Limit | |||||
| Too Full | Too Full | |||||
| Almost Full | Almost Full | |||||
| Almost Empty | Almost Empty | |||||
| Empty | Empty | |||||
 |
||||||
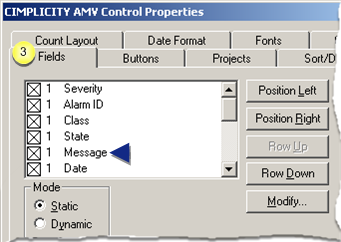
| 3 | Message is selected as a field in an Alarm Viewer configuration.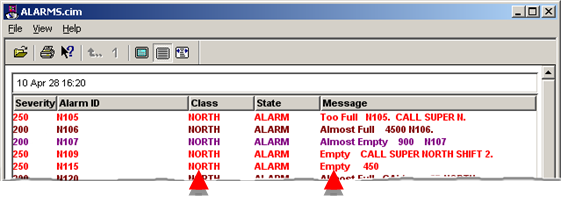 The Alarm Viewer displays the alarm string values for every point that includes |
|||||
This example shows configurations for the Alarm String 2 index severity displays in the Alarm Viewer.
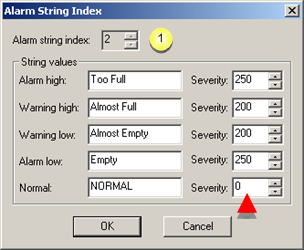
| 1 | An alarm severity is entered for each string value in the Alarm String Index dialog box.
|
|||
| String value | Severity | |||
| Too Full | 250 | |||
| Almost Full | 200 | |||
| Almost Empty | 200 | |||
| Empty | 250 | |||
| NORMAL | 0 | |||
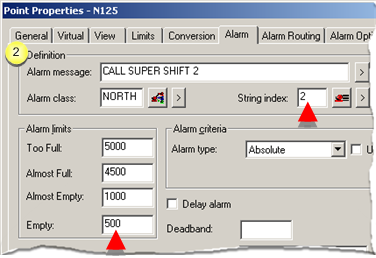
| 2 | The selected string index is 2.
The alarm limits fields correspond to the string index 2 values. The fields inherently include the severity levels defined for the alarm string set. |
|||
| String value | Alarm limit | |||
| Too Full | Too Full | |||
| Almost Full | Almost Full | |||
| Almost Empty | Almost Empty | |||
| Empty | Empty | |||
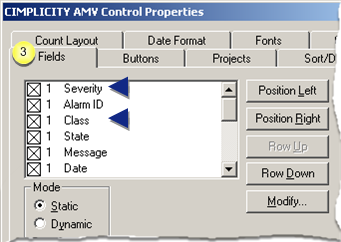
| 3 |
Class and Severity are selected as fields in an Alarm Viewer configuration.
|
|||
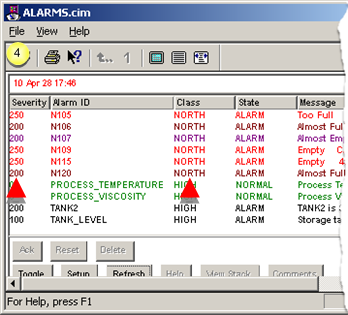
| 4 | The Alarm Viewer displays the class and severity.
|
|||
| Class | NORTH | |||
| Severity | Value corresponds to each level. | |||
| Severity value | Corresponds to | |||
| 275 | HiHi and LoLo | |||
| 200 | Hi and Lo | |||
|
Note: Foreground and background colors for each alarm correspond to the alarm class configuration.
|
||||