Query Creation
About Creating Queries
When you initiate the query creation process, you can choose to select the query sources (entity and relationship families) and query columns (family fields) using either of the following options:
- Design workspace: Provides a visual representation of a query, and lets you manually add sources, criteria, and links.
- SQL workspace: Provides a workspace into which you can directly enter SQL code to build a query. The SQL View is intended for more advanced Query users.
About Running Queries
Queries are available in many places throughout Predix Essentials. In some cases, you might create a query manually and save it for future use. In other cases, you might run a query that another user constructed or that is delivered with the baseline content.
When you run a query, you will see the results in the Results workspace, which will make it obvious that you are looking at query results. For example, if you open a query from the Catalog or select a dashboard hyperlink that references a stored query, the results will be displayed on the Results workspace.
In other cases, however, you might run a query and see the results in a different format on a different screen. In these cases, you might not realize that you are looking at query results. Inspection Management, for example, provides a customized workflow that allows you to execute queries that return specific information, such as equipment that can have bundle inspections. In addition, searches provide a customized form where you can search the database for records in families that meet specific criteria. In other words, performing a search is simply another way of querying the database to return a subset of records.
When a query is created, it can be configured to return raw data stored in the database or reformatted data. This means that you might run different queries that return the same data in different formats. In addition, queries can be configured to prompt you for information before returning any results.
Queries are not stand-alone tools; they can be incorporated throughout Predix Essentials.
About Saving Queries
After you create a query, you can save it so that you or other users can access it later. Queries are saved as Catalog items to the Predix Essentials Catalog.
Details
After a query has been saved to the Catalog, whenever you make changes to it, you will need to re-save the query to retain your changes.
Saving a query is similar to saving any other item to the Catalog, but consider the following query-specific considerations:
- When you save a query while viewing the Design or the SQL workspace, any saved personal or Super User grid layout will be discarded. The default layout will be saved and used the next time any user runs the query.
- If you save a query with invalid SQL syntax, an error will appear, pointing to the location of the problem within the SQL code.
- Links to queries whose names contain special characters may not function correctly. For example, the following issues result from using double quotation marks ("), the pound symbol (#), or angle brackets (<>):
- If a query name contains double quotation marks (") and you send a link to the query to an email recipient or the desktop, selecting the email link or the desktop shortcut will open the New Query window instead of the saved query.
- If a query name contains the pound symbol (#) and you send a link to the query to an email recipient or the desktop, selecting the email link or the desktop shortcut will cause Predix Essentialsto display a message that the query cannot be loaded.
- If a query name contains angle brackets (<>) and you send a link to the query to an email recipient, selecting the email link will cause Predix Essentialsto display a message that the query cannot be loaded. If a query name contains angle brackets and you send a link to the query to the desktop, the shortcut will function correctly.
- Depending on your query privilege settings, you may need to run the query before you can save it.
- To save a Super User grid layout for a query, you must use the Save for All Users option on the shortcut menu in the results. The save options on the Common Tasks menu will not save the current layout for all users, even if you are logged in as a Super User at the time you save the query.
About SQL Code
If you are familiar with SQL syntax, then instead of designing the query, you can enter SQL code directly and run the query to view the results.
SQL Details
Predix Essentials supports the use of Oracle schemata and SQL server databases, both of which can be queried using SQL statements. While the same basic SQL code can be used to query either type of database, there are some differences in the syntax that is supported by each database server. Therefore, Predix Essentials uses a proprietary version of SQL that is constructed automatically and translated at runtime by the system into the SQL syntax that is appropriate for the type of database you are using. We call this form of SQL Meta-SQL.
In most cases, Meta-SQL syntax is the same as standard SQL syntax. This means that in most cases, you can type the SQL syntax that you are familiar with. If, however, you use functions that are specific to one database server (e.g., Oracle), when you run the query on a different database server (e.g., SQL Server), an error appears, and you will be unable to run the query and view its results until you correct the SQL code.
In other words, when you type SQL code directly and select  , the following events occur:
- Predix Essentials reads the syntax and determines whether or not it is valid Meta-SQL.
- Predix Essentials translates the Meta-SQL into SQL that can be interpreted by SQL Server or Oracle, depending on the type of database you are using.
- SQL Server or Oracle executes that translated code and returns results to Predix Essentials.
- The query results appear.
Throughout the Predix Essentials documentation, we use the term SQL when referring to the SQL code that appears when you select SQL in the content header.
All tasks that you can perform when designing a query write Meta-SQL code that can be viewed when you select the SQL tab. Not all SQL code that you enter directly, however, can be interpreted by the Design workspace. This means that in some cases, you can write SQL code that will cause the Design workspace to be unavailable. If you write a query using SQL code and want other users to be able to modify the query design, first try to access the Design workspace to make sure that it is available before saving the query.
Specific instructions for writing SQL code are beyond the scope of this documentation. Where appropriate, we provide guidelines and suggestions for how to write SQL expressions and use SQL functions, but this documentation does not contain comprehensive SQL code explanations.
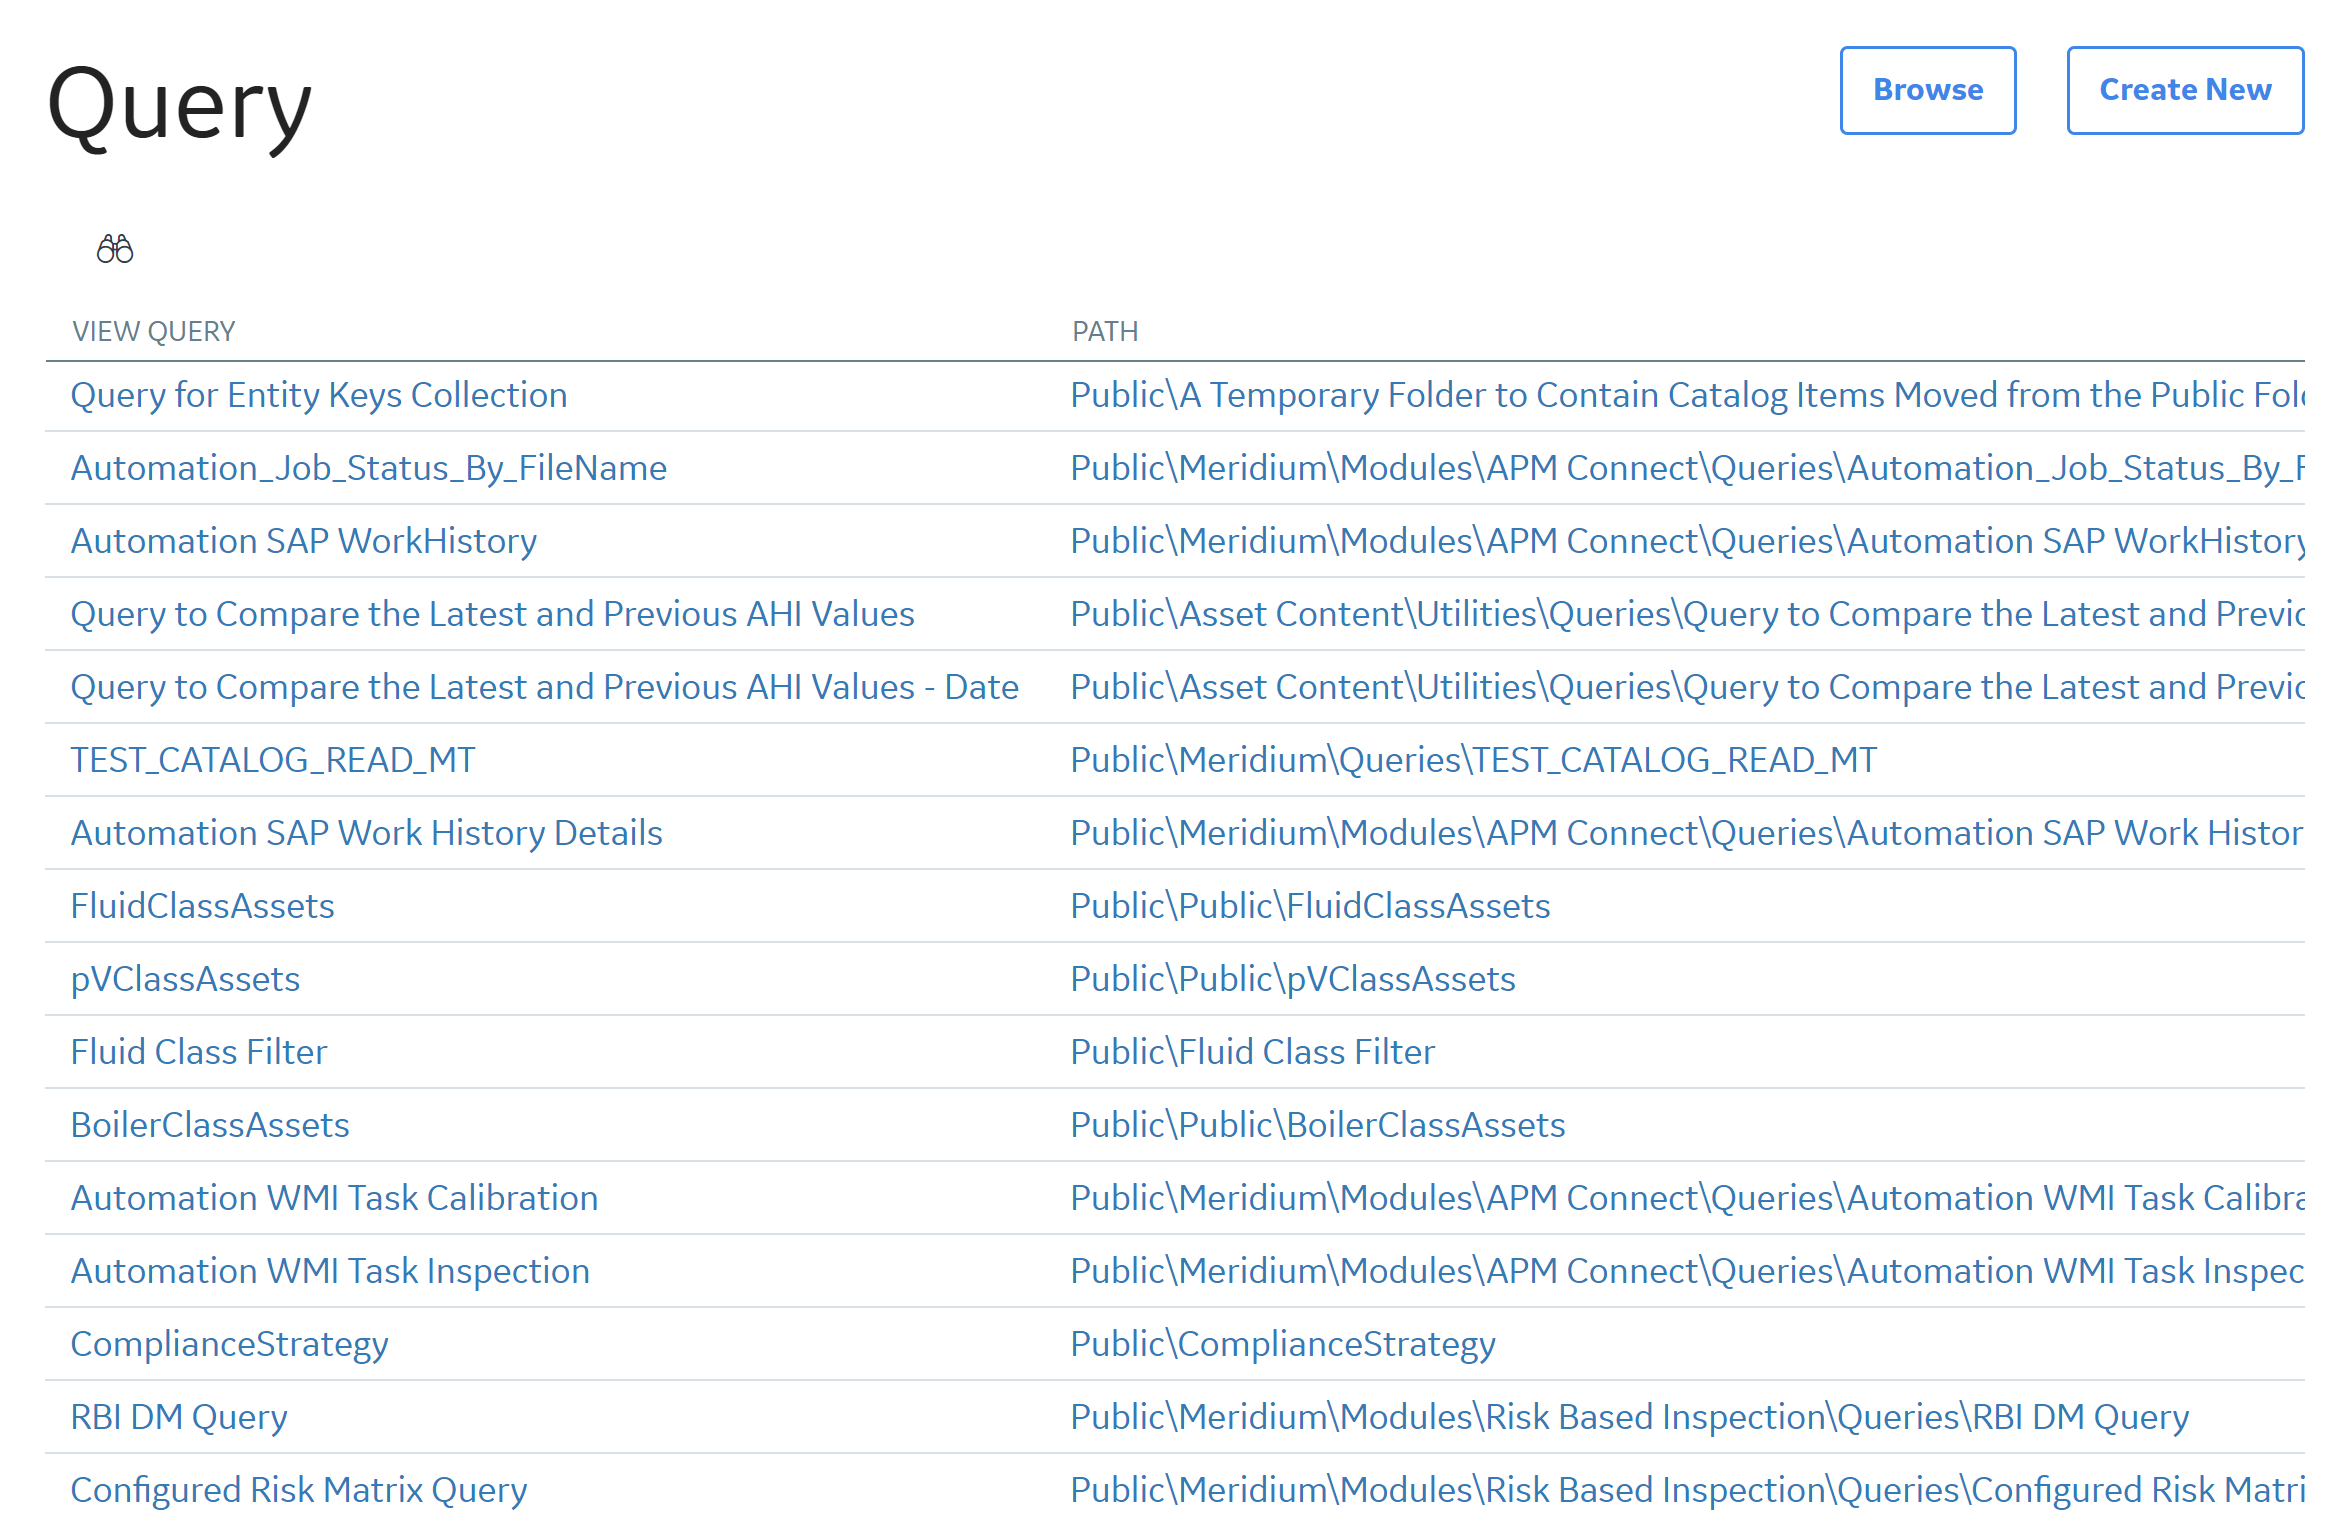
Access the Query Page
Procedure
The Query page appears, displaying a list of queries.
 ) button.
Access the Design Workspace
Procedure
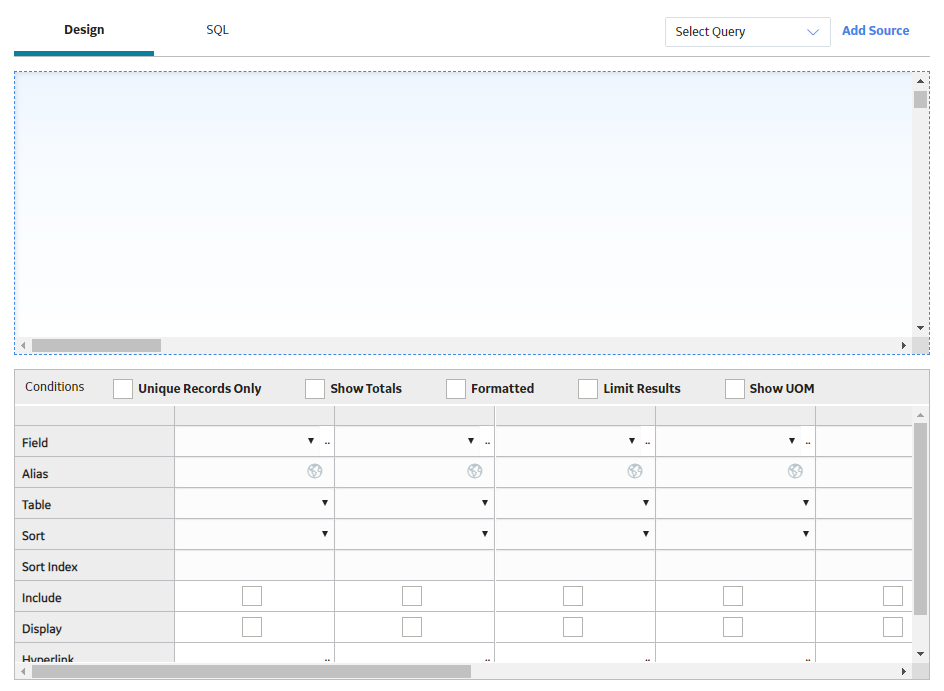
- To access the Design workspace for a new query, perform the following steps.
- In the upper-right corner, select Create New.
The Design workspace appears, and the Select a Family or Query window is active, where you can add sources to the design canvas. After adding a source, you can use the design canvas to add fields to the grid in the Conditions section and to add criteria to the query.
- In the upper-right corner, select Create New.
- To access the Design workspace for an existing query, perform the following steps.
What To Do Next
Access the SQL Workspace
Procedure
- To access the SQL workspace for a new query:
- To access the SQL workspace for an existing query:
Modify a Query
Procedure
Modify the Query Type
About This Task
Procedure
Include or Exclude a Field in the SQL Code
Before You Begin
When you create a query, all the fields that you added are selected by default to be included in the SQL code. In some cases, you might want to add a field to the grid in the Conditions section so that you can define criteria for that field without including it in the SQL code.
For example, you might want to configure a query that returns all Pumps installed on a certain date. You could add the Pump ID field and the Asset Installation Date to the query, define criteria to limit the Asset Installation Date to a certain date, and then exclude the Asset Installation Date. This would increase performance and still return the records you are interested in viewing.
About This Task
Procedure
Results
- When you clear the Include check box for a field, the Display check box for that field is automatically cleared. Fields can be displayed in the results only if they are also included in the SQL code.
- If you exclude a field from the SQL code, you must define content in the Criteria cell, the Sort cell, or the Total cell in that column for the field to be saved with the query code. In other words, if the field is not included in the query, it must be included in the SQL code in some other way to be saved with the query. Otherwise, when you open or run the saved query, the excluded field will not be displayed in the Design, Results, or SQL workspaces.
Create a Crosstab Query
Procedure
- After you have made your selections, in the page heading, select to run the query and confirm that it returns the appropriate results, and then save the query.
Create an Update Query
About This Task
Procedure
- On the Target Query Source window, select a source from the sources on the canvas, and then select Add. If the query contains more than one query source, the query sources that you do not select are removed automatically from the design canvas.The Conditions section is updated to include the following rows:
- Field
- Table
- Update To
- Criteria
- Or
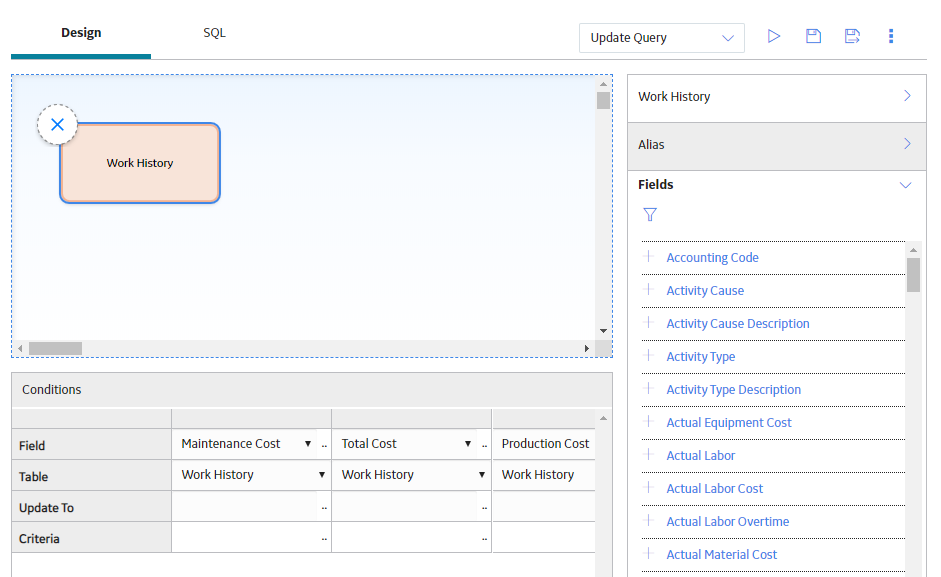
- In the page heading, select .A dialog box appears, indicating how many records will be updated by the query.
Create an Append Query
Procedure
- In the Families list, select the target family or the family to which you want to append records, and then select Add.The Target Source link appears in the page heading. You can select this link to modify the target family.
The Conditions section is updated to include the following rows:
- Field
- Alias
- Table
- Sort
- Sort Index
- Append To
- Criteria
- Or
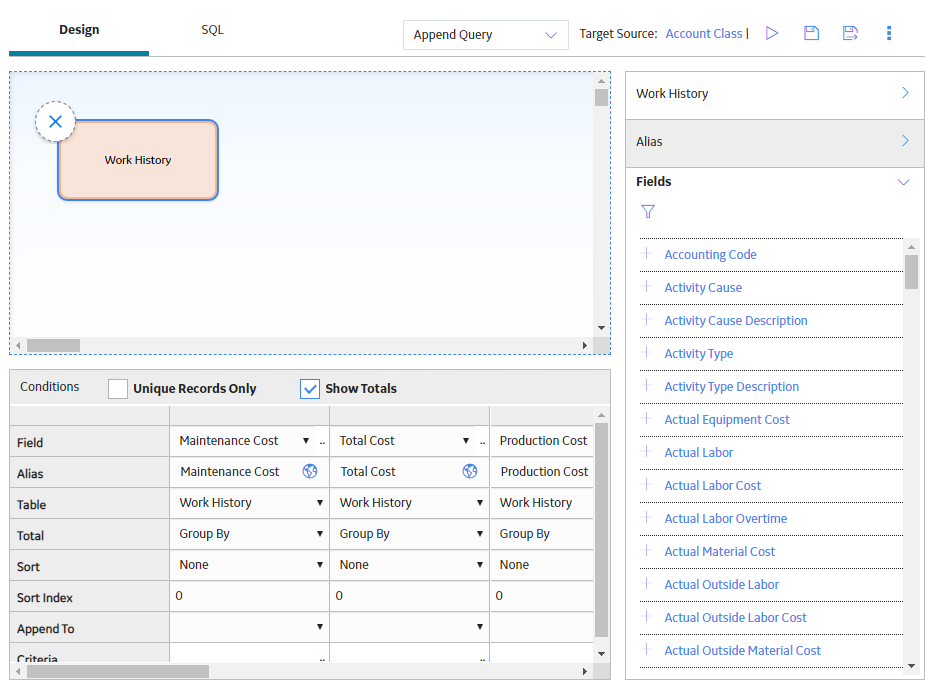
- To run the query, in the page heading, select . Confirm that it returns the appropriate results, and then save the query.
Create a Delete Query
Procedure
- On the Target Query Source window, select a source from the sources on the canvas, and then select Add. If the query contains more than one query source, the query sources that you do not select are removed automatically from the design canvas.
The Conditions section is updated to include the following rows:
- Field
- Table
- Criteria
- Or
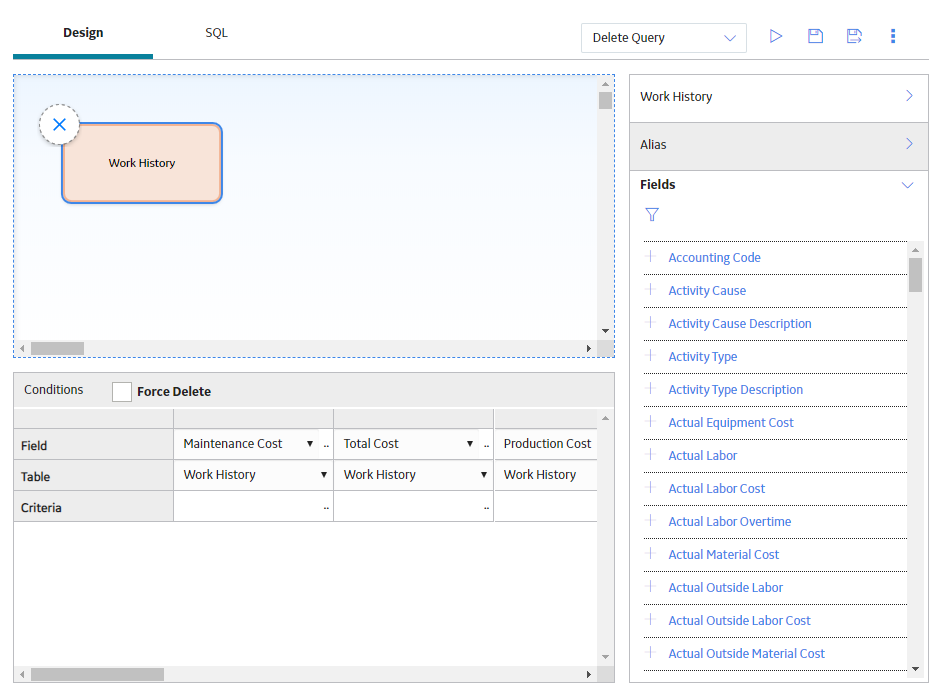
- In the page heading, select .A dialog box appears, indicating how many records will be deleted by the query.
Run a Query
Procedure
- In the workspace heading, select .The query results appear in the Results workspace.
What To Do Next
Save a Query
Procedure
- In the page heading, select
 . If the query has already been saved, any changes that you have made will be saved to the same Catalog folder with the existing Catalog item properties. If the query has not yet been saved, the Save As window will appear. The following instructions assume that you are saving the query for the first time. If you are viewing a previously saved query and you want to save a copy of the current query with a different name or to a different location, you can select
  , and then use the following instructions to complete that task. The process is the same as saving a query for the first time.