Manage Key Performance Indicators (KPIs)
Overview of Key Performance Indicators (KPIs)
KPIs are metrics that an organization can use to monitor their performances. Every KPI should be linked directly to a business goal. If the variables within a metric are performing successfully, a business goal can be attained for a company. Likewise, if certain variables within the metric are not performing successfully, a company may fall short of its business goal. By closely tracking the variables within a KPI, the problem areas can be assessed and targeted, and efficient areas can continue to improve.
- Developing a set of metrics that reflect the objectives of the company in delivering outputs. These metrics will be aligned with business unit objectives and KPIs within each relevant perspective.
- Developing indicators of processes and activities that measure drivers and enablers of performance and point to action.
About Viewing the Details of a Key Performance Indicator
The Key Performance Indicator (KPI) details page displays the values that are recorded for a KPI, indicating where the actual value falls within the defined limits by using the dial chart or bullet chart. It also show how the values have changed over time by using the trend-line chart.
On this page, you can see the following details of a KPI:
- Name: Displays the name of the selected KPI.
- Last Modified On: Displays the date when the last scheduled update was run on the KPI and the name of the person who created or updated the KPI. This field is updated when:
- You manually update the KPI by selecting Update Measures.
- An automatic schedule is run based on the schedule defined for the KPI in the Schedule, Alerts and Privileges section.
- More Information: Displays links to all the associated Scorecards. The Scorecard name appears as a link that you can select to view the Scorecard details.
- Description: A description of the KPI.
- Dial chart button (
 ): Displays the KPI values in dial chart format. The dial chart indicates the level of success for the organizational performance. The dial chart also displays the current value of a KPI and the percentage change from the previous value. The colors of the dial chart indicates the following values:
- Red: Below the critical value
- Yellow: Between the target value and critical value
- Light Green: Between the target value and stretch value
- Dark Green: Above the stretch value
- Bullet Chart button (
 ): To change the dial chart format to a bullet chart format, select the bullet chart button (
 ). Note: You can add a KPI as a dashboard widget either in dial chart or bullet chart format. For more information, see the Dashboards documentation.
 - History: Displays the KPI results in a trend line chart, for a set period of time. You can view the data for specific period of time by selecting a time period in the Zoom section or by using the trend line slider provided below the graph. When you hover or tap on the datapoints on the trend-line, it provides an indication of where each value falls within the determined range.
- Tabular View button (
 ): You can change the trend line format to grid format by selecting the tabular view button (). The tabular view displays the Date and Value/Score columns. The table provides the date and the history of the measures for the selected time period. To change the tabular format to trend-line format, select the line view button ().
 - Sub-Indicators: Displays the list of sub-indicator KPIs that are assigned to the current KPI. The sub-indicator KPIs appear in tile format and the name of the sub-indicators appear as a link. On selecting the sub-indicator KPI name, the details page for the sub-indicators KPI appears.Note: If you update a parent KPI, all other KPIs in that hierarchy will also be updated.
About Updating Measurements
- Update the measurement of the KPI with the current value.
- When KPIs updated by schedule job cross the threshold value, an event is triggered and notifications are sent to the associated email addresses. The user receives notification according to their subscription to the alert condition.
For example, you might have a trigger that is evaluating based on schedule, but that sends notifications only when the KPI value reaches the highest of its defined ranges.
About Automatically Updating Measures
KPI measurements can be updated automatically according to a schedule. You can define the desired schedule for each KPI via the Schedule, Alerts, and Privileges section, which you can access from the KPI design page.
Scheduled updates are typically performed on KPIs built from Analysis Services or Queries, or aggregated from sub-indicators. To avoid confusion and eliminate the possibility of reviewing and analyzing out-of-date information, you should schedule an update of KPI measurements at the same time that measurements are scheduled to be taken. For example, if you are going to collect measurements on the first day of each month, you should also schedule the updates to run on the first day of each month.
KPIs can be scheduled for automatic updates one time or on a recurring basis. The following table describes the schedules by which you can configure the KPI measurements to be updated.
| Frequency | Example |
|---|---|
| Every x minutes from start time or after last occurrence. | Every thirty minutes from the start time. Every thirty minutes after the last update. |
| Every x hours from start time or after last occurrence. | Every one hour from the start time. Every one hour after the last update. |
| Every x number of days from start time or after last occurrence. | Every two days from the start time. Every two days after the last update. |
| Every x day from start time or after last occurrence where you define the day of the week. | Every third day from the start time. Every third day after the last update. |
| Every x month from start time or after last occurrence. | Every three months from the start time. Every three months after the last scheduled update. |
| Every x year from start time or after last occurrence. | Every two years from the start time. Every two years after the last scheduled update. |
About Specifying Limits for a KPI
When you create a KPI for a piece of equipment, you will specify the limit values for the KPI. The limits that you specify define a performance range for the KPI based on your expectations for the equipment. The actual performance of the equipment will be evaluated based on this range. For example, your monthly water bill could be a Key Performance Indicator of the plumbing system in your home. This means that, based on your expectations, a high water bill (i.e., the Actual value) could indicate leaks in your system, and a low water bill should indicate a leak-free plumbing system.
The KPI limit range is essentially a scale from Worst to Best, and the limit values are essentially thresholds within that range. The following image shows the KPI ranges and where the limit values that define these ranges appear. When measurements are taken, the Actual value may fall between or equal the limit values, which indicates how well the equipment is performing (e.g., If the Actual value falls between the Target and Stretch Limit values, the KPI is in the Target-Stretch range).
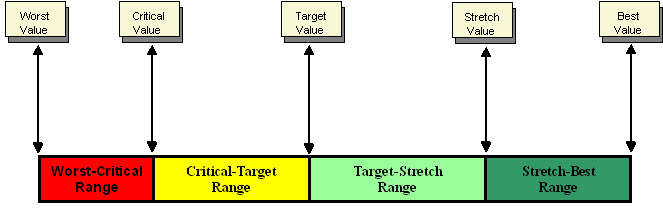
The limit values may vary depending on what you want to measure. For example, if you create a KPI based on your monthly water bill, the range values will be measured in dollars, and your Best value would be a low number (e.g., $30.00), while your Worst Value would be a high number (e.g., $300.00). In another case, the KPI may be based on a water heater, which would require that Best value to be a high number, and the range to be measured in degrees Fahrenheit.
To continue with the water bill example, the monthly cost for water usage in your home would be the key indicator of the overall performance of the equipment involved in the plumbing system. A high water bill might indicate that the usage of water is high, that there is a leakage in a pipe, that a piece of equipment is malfunctioning, or all of the above. The KPI should serve as the first step in tracking the performance of the system.
How Number Formats Are Applied to KPIs
- Alert Value
- Best value
- Critical Value
- Stretch Value
- Target Value
- Worst Value
In other words, these fields contain rules that will apply any number formatting that has been defined. Because this feature is implemented via baseline rules, the number format will not be applied if you have defined custom rules for any of these fields.
About KPI Scores
-
(Actual Value – Worst Value)/(Best Value – Worst Value)
If the Best Value > Worst Value
-or-
- (Actual Value – Best Value)/(Worst Value – Best Value)
If the Best Value < Worst Value
The closer the score is to 1.0, the higher the strength of the Actual Value.
Scores are useful when comparing measures whose values cover a wide range. It becomes difficult to work with such vastly different numbers, but working with scores allows you to compare relatively close numbers. For example, when comparing ten Actual Values that range from 20 to 500, the gap is almost too large to manage. When you compare the scores of the measures, however, you only have to examine numbers between 0.0 and 1.0, thus making it easier to make comparisons and conclusions.
The score is calculated using the Actual Value, Best Value, and Worst Value of the current KPI, as indicated in the specified equations. In case of Data Source Type as Manual, Analysis Services, and APM Query, when Show Score Only is selected, the Actual Value is calculated to display the score.
By using the Show Score Only check box on the KPI design page, you can choose to view a KPI score instead of Actual, Target, Critical, and Stretch Values in the trend-line chart and dial sections of the KPI details page.
In case of a KPI with Data Source Type as Aggregate, the Aggregate Score only option is available in the KPI designer page. Only the Score will be displayed for that KPI by aggregating scores of its sub-indicators using the selected aggregation function (i.e., Average, Weighted Average, Minimum, or Maximum).
Access the KPI Details Page
About This Task
Procedure
- In the Key Performance Indicator section, select the KPI that you want to view.Note: To search for a specific KPI, you can select
 , and then enter the name of a KPI.The KPI details page appears as <KPI_Name>, where <KPI_Name> is the name of the selected KPI. This page displays the details for the selected KPI.
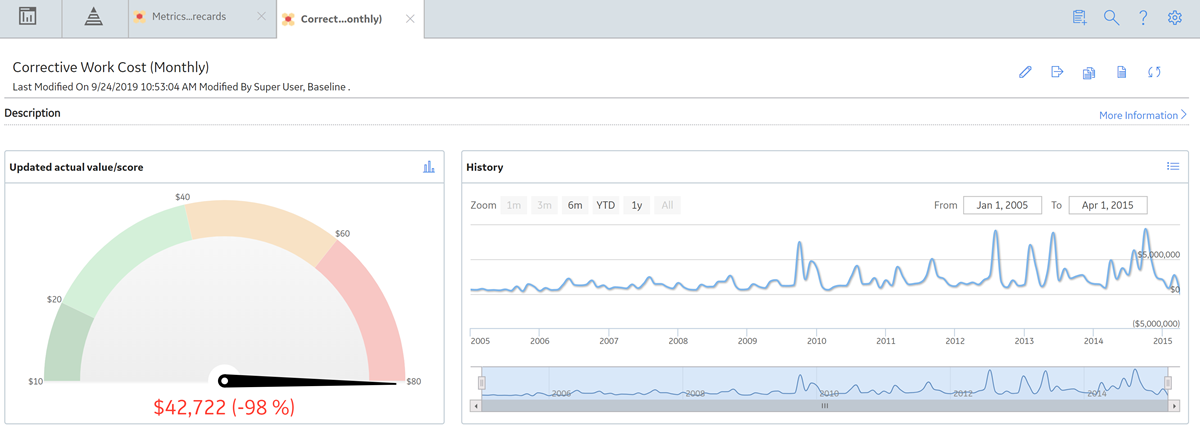
For the sub-indicator, the KPI details page will contain the hyperlinked name of the parent KPI above the KPI name. You can use this hyperlink to navigate to the parent KPI.
Note: When you search for a KPI by using , the KPI will appear on the KPI details page. This is because the KPI details route #metrics/kpi-viewer/{ENTY_KEY} is specified in Families Managed by Product Module in Configuration Manager for the KPI family.
Access the KPI Design Page
About This Task
When you create a new KPI, the New KPI page appears displaying an empty form where you can enter the details of a KPI. When you save the KPI, the page name changes to the KPI name.
Procedure
- Select
 .
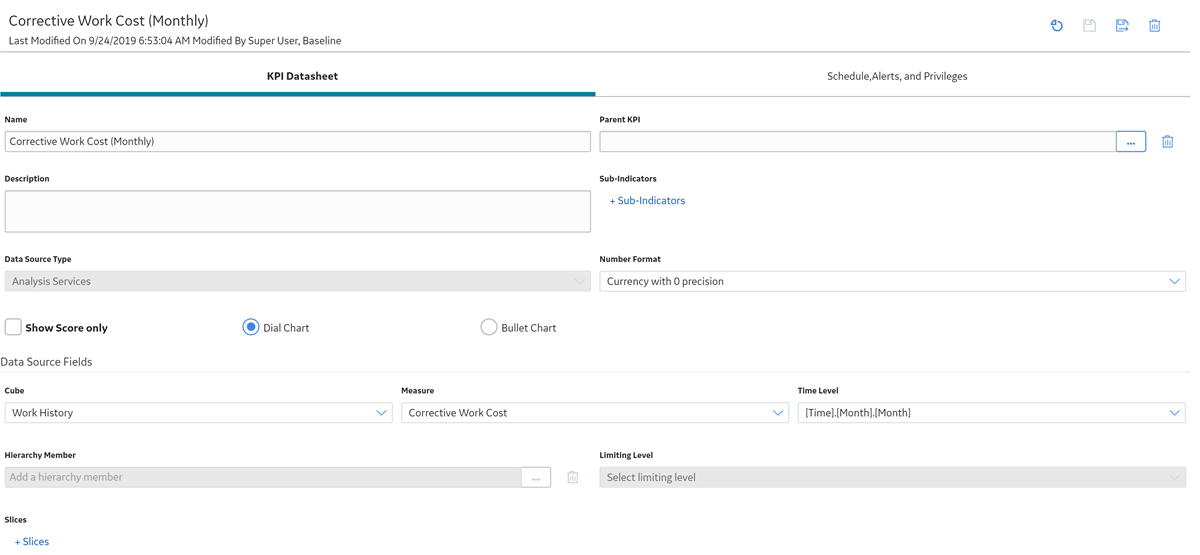
.The KPI design page appears, displaying the name of the selected KPI. The KPI design page contains two sections, , KPI Datasheet, and Schedule, Alerts, and Privileges where you can provide or modify the details of a KPI.
- If needed, modify the values in the
KPI Datasheet
and Schedule, Alerts, and Privileges sections, and then, to save your changes, select
 .
. - If needed, select
 to view the details page for the KPI.
The KPI details page appears.
What To Do Next
Access the Associated Pages for a KPI
About This Task
If you need to add the associated pages to a KPI, you can do so by accessing the KPI family and the Associated Pages functionality of Configuration Manager.
Procedure
- In the right side of the page, select
 .The Associated Pages pane appears. The Associated Pages hierarchy contains links to associated pages. In the hierarchy, when a
 appears next to an associated page name, it can be expanded to view the sub pages.
Access Reference Document for a KPI
Procedure
- Select
 .The Reference Documents window appears.Tip: For more information, refer to the Reference Documents section of the documentation.
Create a KPI
Before You Begin
- You must have the privilege to create a KPI.
Procedure
- In the Key Performance Indicator section, select
 .The New KPI page appears, displaying the KPI Datasheet section.
 - Select .The name of the KPI appears on the page, indicating that the new KPI is created and saved. The new KPI name also appears in the Key Performance Indicators section of the Metrics and Scorecards page.
KPI Datasheet
The KPI Datasheet section contains fields where you can provide the basic information such as KPI Name, Parent KPI, Description, and so on. The following table provides information about the fields in this section.
| Field | Data Type | Description | Behavior and Usage |
|---|---|---|---|
| Actual | Number | Displays the type of aggregation that you want to use for calculating the Actual Value. |
This is a required field. This field appears in the Data Source Fields section when you select the Data Source Type as Aggregate. In all these fields, you can select any of the following calculations:
|
| Add Measures | N/A | Displays the table where you can provide the values. |
This field appears in the Data Source Fields section when you select the Data Source Type as Manual. This field displays a table with following columns :
|
| Aggregate Score only | N/A | If you want a normalized score to be calculated from sub-indicators, select the Aggregate Score Only check box. The aggregated score will be calculated and displayed depending upon the aggregation type selected in Actual field in the Data Source Fields section. |
This field appears in the Data Source Fields section when you select the Data Source Type as Aggregate. If you have selected the Aggregate Score only check box, then you need to determine the function used to calculate the score value in the Data Source Fields section. |
| Best value | N/A | The optimal output level. | This field appears in the Data Source Fields section when you select the Data Source Type as APM Query. This field lists all the columns that contains number value. You can either select the value in these fields or provide the value in the Limit section. This value is used to calculate the normalized score that is assigned to the KPI when it is created. |
| Bullet Chart | N/A | Displays the KPI in bullet chart format. | This field appears in the Data Source Fields section. By default, the dial chart is selected. However, you can select this option to display the KPI in a bullet chart format in the KPI details page. |
| Critical | Number | Displays the type of aggregation that you want to use for calculating the Critical Value. | This field appears in the Data Source Fields section when you select the Data Source Type as Aggregate. You can either select the value in these fields by using the drop-down list box or provide the value in the Limits section. In any of the cases, you must provide value to the Actual field. In all these fields, you can select any of the following calculations:
|
| Critical Value | Number | The value that indicates that the KPI is not reaching its potential target. | This field appears in the Data Source Fields section when you select the Data Source Type as APM Query. This field list all the columns that contains number value. You can either select the value in these fields or provide the value in the Limit section. |
| Data Source Type | N/A | Contains the list of data sources that can be assigned to this KPI. | The values for a KPI measurement are pulled from a specified data source. You can create KPI by using the following options.
Depending upon the data source that you select, the related fields appear. |
| Dates | Date | Specify the date for the actual values. | This field appears in the Add Measures section when you select the Data Source Type as Manual. You can select the dates by using Note: The dates must be unique. You must not enter two values for the same date. |
| Description | Text | Provide a brief description of the new KPI. | In this field, you can provide the description about the KPI. |
| Dial Chart | N/A | Displays the KPI in dial chart format. | This field appears in the Data Source Fields section. By default, this option is selected and the KPI appears in a dial chart format in the KPI details page. |
| Limit | N/A | Specifies the range of limits for a KPI. | You can provide the values manually in this section. The
Limits
section contains the following fields:
|
| Limiting Level | N/A | The level to which you want to view the KPI. | This field appears in the Data Source Fields section when you select the Data Source Type as Analysis Services. The value in this field depends on the value that you select in the Hierarchy Member list. When you select a hierarchy member and its limiting level, the KPIs are created for every level and member in the Limiting Level. For example, If you select Country as the hierarchy member and City as the limiting level, then the KPIs are created for each state and cities in that selected country. |
| Measurement Date | Date | Contains a list of only Date fields from the query. | This field appears in the Data Source Fields section when you select the Data Source Type as APM Query. In the Measurement Date list, you select a field from the query that represents the measurement date. |
| Measurement Value | Number | The measure that you want to use for the KPI. | This field appears in the Data Source Fields section when you select the Data Source Type as APM Query. This field is enabled only when you select a query. This is a required field. |
| Name | Character | Specify the name of the KPI that you want to create. | This is a required field. |
| Number Format | Number | The format for the numeric values. | This field appears when you select the Data Source Type as Analysis Services, APM Query, and Aggregate. You can choose the following number formats:
|
| Parent KPI | N/A | Contains the list of KPIs that can be assigned as parent KPI to this new KPI. | If the KPI should function as a sub-indicator for another KPI, then in the Parent KPI list, select the parent KPI for which this KPI will be a sub-indicator. |
| Query | N/A | The query from which you want to extract the data. | This field appears in the Data Source Fields section when you select the Data Source Type as APM Query. You can select the query from the Catalog folder. |
| Show Score Only | N/A | If you want only a score to be calculated for the KPI, select the Show Score Only check box. The actual value will not be populated. | Via the Show Score Only check box on the KPI design page, you can choose to view a KPI score instead of Actual, Target, Critical, and Stretch Values in the Dial chart, trend-line chart and tabular view of the KPI details page. |
| Slices | N/A | The slice members that can be used to further filter KPI data. | This field appears in the Data Source Fields section when you select the Data Source Type as Analysis Services. You can add slices by selecting + Slices. The Add to Slice window appears displaying all the dimensions. You can select a dimension member from the list. |
| Stretch | Number | A much higher quantitative measurement than a Target Value, demanding breakthrough performance for achievement. | This field appears in the Data Source Fields section when you select the Data Source Type as Aggregate. You can either select the value in these fields by using the drop-down list box or provide the value in the Limits section. In any of the cases, you must provide value to the Actual field. In all these fields, you can select any of the following calculations:
|
| Stretch Value | Number | A much higher quantitative measurement than a Target Value, demanding breakthrough performance for achievement. | This field appears in the Data Source Fields section when you select the Data Source Type as APM Query. This field list all the columns that contains number value. You can either select the value in these fields or provide the value in the Limits section. |
| Sub-Indicators | N/A |
Contains the list of KPIs that can be assigned as the sub-indicator KPIs. | You cannot assign the KPI that is already assigned to another parent KPI. |
| Target | Number | A quantitative measurement of a performance metric that is to be achieved by a given time. | This field appears in the Data Source Fields section when you select the Data Source Type as Aggregate. You can either select the value in these fields by using the drop-down list box or provide the value in the Limits section. In any of the cases, you must provide value to the Actual field. In all these fields, you can select any of the following calculations:
|
| Target Value | Number | A quantitative measurement of a performance metric that is to be achieved by a given time. | This field appears in the Data Source Fields section when you select the Data Source Type as APM Query. This field list all the columns that contains number value. You can either select the value in these fields or provide the value in the Limit section. |
| Time Level | N/A | The period for which you want to view a KPI result. | This field appears in the Data Source Fields section when you select the Data Source Type as Analysis Services. This is a required field. You can select the Time Level list to select a time level, such as year, semester, quarter, month, week or day. The time level appears in the format: Dimension/Hierarchy/Level. |
| Values | Number | Displays a text box where you can provide the actual values. | This field appears in the Add Measures section when you select the Data Source Type as Manual. To delete a row, select |
| Worst Value | N/A | The output value that should be strictly avoided. | This field appears in the Data Source Fields section when you select the Data Source Type as APM Query. This field list all the columns that contains number value. You can either select the value in these fields or provide the value in the Limit section. This value is used to calculate the normalized score that is assigned to the KPI when it is created. |
 .
.Schedule, Alerts, and Privileges
The Schedule Alerts and Privileges section contains fields that allows you to set the schedule, alerts, and privileges for the KPI. The following table provides information about the fields in this section.
| Field | Data Type | Description | Behavior and Usage |
|---|---|---|---|
| Alerts | N/A | The alert options for the KPI. Note: To receive the alerts, you must configure the smtp server.
| The Alerts
section contains the following fields:
|
| Privileges | N/A | The privileges that you can grant to a user or group on accessing a KPI. | You can set privileges to a User or a Group to do the perform the following operations on a KPI:
|
| Schedule | N/A | The time period for a KPI update. Note: If one of the KPIs you selected is part of a hierarchy, a message will appear stating that the schedule for the selected KPI is defined at the root level in the hierarchy of KPIs. |
Note: You can add a schedule for a KPI only after saving the KPI.
The summary of the KPI schedule that you have defined in the Edit Schedule window appears in the Schedule section. Note: You can view the schedule status log for a KPI in the Schedule Logs page of the Operations Manager.
To create or edit a schedule for a KPI, you can select the
. The Edit Schedule window contains the following fields:
|
 ) : You can add a list of email recipients by selecting the Add Recipient button. The
  .
. Create a Copy of a KPI
About This Task
Procedure
- In the upper-right corner of the page, select
 .Copy of <Label> page appears, where <Label> is the name of the KPI that you have selected. If needed, modify the Name box, and then select.
View a KPI Score
Procedure
- Select .
- Select to view the KPI.The KPI is displayed on the KPI details page and only the score is displayed on the trend-line chart, tabular view, and dial chart. Note that if the Show Score Only check box is not selected, the trend-line chart, tabular view, and dial display the actual values for the given time period.
Update the Measures of a KPI
You can manually update the KPI measures that are being displayed on the KPI details page.
Before You Begin
Procedure
- In the upper-right corner of the page, select
 .The KPI details page displays the updated measure for that KPI.
Export a KPI
About This Task
Procedure
- In the upper-right corner of the page, select
 to export the KPI in .PDF file format.The .PDF file appears.
Delete a KPI
Procedure
- In the upper-right corner of the page, select
 .The Delete KPI dialog box appears.