SIL Validation
About Safety Integrity Level (SIL) Validation
Safety instrumented systems and each instrumented function within that system must be tested to ensure that those systems is functioning to the standards for which they are designed. A proof test consists of a set of steps that you need to perform to test safety instrumented systems and instrumented functions. The conditions under which the test is conducted should represent the normal conditions under which the system is intended to operate.
Depending on the group of equipment or devices that make up a safety instrumented system, you will want to define a set of test steps that apply to a given group of equipment or devices. In other words, you will need to define one set of test steps that you can reuse when you test similar systems.
Creating Records in Proof Testing
For each proof test that you want to conduct, you should create at least one record in each of the following families:
- SIS Proof Test Template : Stores details about a given proof test, including the steps that need to be performed. For each unique set of test steps that exists, you will need to create one SIS Proof Test Template to store those details.
- SIS Proof Test Template Detail : Stores the details on each specific step that needs to be performed for the test. These records are linked to SIS Proof Test Templates through the Has Template Detail relationship. You should create one SIS Proof Test Template Detail for each step that is required for that test.
- Inspection Task : Stores the details of the proof test task, which specifies the schedule for the proof test. These records are linked to the asset on which you will perform the proof test and to the Proof Test through the Has Task relationship. After you perform the proof test and the Proof Test that is linked to the asset is closed, the Proof Test Task is updated automatically to reflect the date on which the proof test was performed and the next date on which the proof test is due for that asset. Proof Tests Tasks are also created in Asset Strategy Management (ASM) after you promote a Recommendation to ASM.
- SIS Proof Test : Stores details about a proof test that you perform, including the test results. When you create an SIS Proof Test, you will need to specify the SIS Proof Test Template that contains the details about the proof test you want to perform. When you select the SIS Proof Test Template, one Functional Test Detail will be created for each SIS Proof Test Template Detail that is linked to the SIS Proof Test Template. For each proof test that you want to perform, you will need to create one SIS Proof Test. You can, however, reuse SIS Proof Test Templates.
You can think of the SIS Proof Test Template and SIS Proof Test Template Details as the specifications for how the test should be performed, and the SIS Proof Test and Functional Test Details as a record of the test occurring.
Steps Involved in Conducting a Proof Test
To conduct a proof test, you will need to complete the following steps:
- Define the proof test steps that need to be performed for a given safety instrumented system by creating one Proof Test Template for each type of test that will need to be performed. Creating an SIS Proof Test Template includes linking SIS Proof Test Template Details to the SIS Proof Test Template.
- Create one SIS Proof Test, which serves as a record of the test event and stores the results of that test.
This topic provides details on SIS Proof Test Template and SIS Proof Tests. For details on how these families participate in the SIS Management data model, see the SIS Management data model.
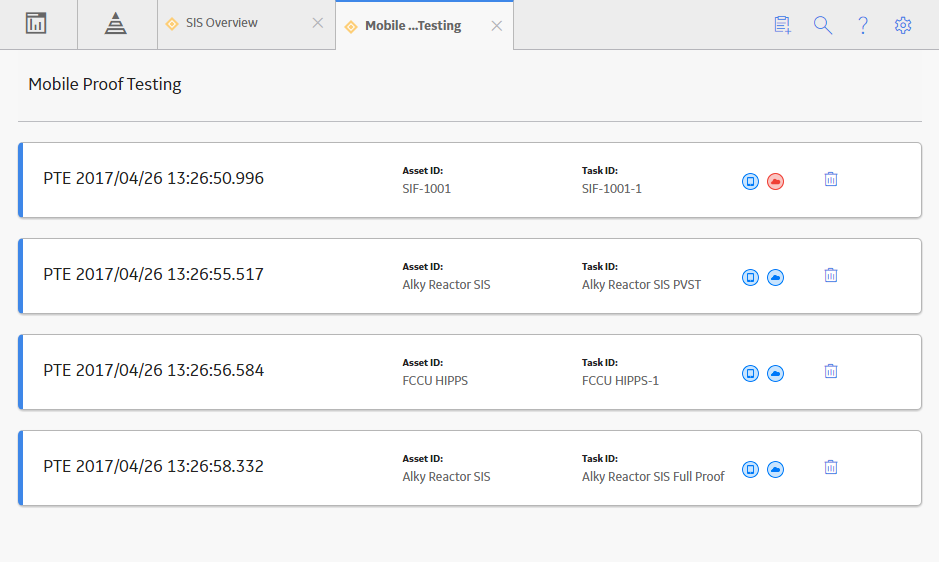
About Mobile Proof Tests
You can use Mobile Proof Testing on the GE Digital APM mobile application to run test procedures and collect proof testing data using mobile devices, such as a tablet. You can record values for the Proof Test and create recommendations (e.g., a maintenance follow-up) for the proof test, directly from the mobile device even if the mobile device is disconnected from the network.
When you download a Proof Test Task for offline access, on the Mobile Proof Testing page, the  icon appears on the downloaded Proof Test Task, indicating that the Proof Test Task is downloaded to the mobile device that you will use for recording values for the Proof Test.
About Synchronizing Mobile Proof Tests
When you reconnect the mobile device to the network, the values that you recorded in the Proof Tests and the Recommendations that you created are uploaded automatically to the GE Digital APM database.
The color of the  icon that appears on the upper-right corner of the Proof Test in the Mobile Proof Testing page, indicates the status of synchronization. The icon changes to one of the following:
-
 : Indicates that the synchronization is completed successfully. The values that you recorded in the Proof Test and the associated Recommendations are uploaded to the database.
 -
 : Indicates that the synchronization failed. When you select , a message appears, describing the error that has caused the synchronization to fail. The error may be either in the Proof Test or in the Recommendation.
On successful synchronization, GE Digital APM copies the values in the Proof Tests that you executed in the mobile device to the corresponding Proof Tests in the database. You can access these Proof Tests from the SIS Management module.
GE Digital APM system creates copies of the Recommendations that you created in the mobile device, and then links them to the Instrumented Functions with which the Proof Test Tasks are associated. The images attached to the Recommendations that you created for the Proof Test appear as Reference Documents in the Recommendations created for the Instrumented Function.
Safety Integrity Level (SIL) Validation Workflow
This workflow provides the basic, high-level steps for performing an SIL validation. The steps and links in this workflow do not necessarily reference every possible procedure.
Performing an SIL Verification includes the following steps:
- Create a Proof Test Template, which stores the details of the pass/fail criteria and error limits.
- Create a Proof Test Task, which stores the schedule for the task.
- Perform the proof test.
- Create a Proof Test.
- Apply the Proof Test Template and the Proof Test Task to the Proof Test.
- In the Proof Test record, provide the results of the proof test that you have performed.
- The GE Digital APM system performs the error calculations and provides the pass/fail results.
Access the SIL Validation Page for an Instrumented Function
Before You Begin
- You can access the SIL Validation page only if you are a member of one of the following Security Groups:
- MI SIS Administrator
- MI SIS Engineer
- MI SIS User
Procedure
- In the workspace, select the SIL Analysis tab.
The SIL Analysis section appears, displaying a list of SIL Analyses.

- Select the SIL Analysis that is linked to the Instrumented Function for which you want to perform SIL validation.
The SIL Analysis Summary section appears.

- In the left pane, select the Instrumented Function for which you want to perform SIL validation.
The datasheet for the Instrumented Function appears.

- In the workspace, select the SIL Validation tab.
The SIL Validation section appears, displaying a list of the Proof Test Templates linked to the Instrumented Function.

Access the SIL Validation Page for a Logic Solver
Before You Begin
- You can access the SIL Validation page only if you are a member of one of the following Security Groups:
- MI SIS Administrator
- MI SIS Engineer
- MI SIS User
You can perform the various tasks on this page based on the privileges granted to these Security Groups.
Procedure
- In the workspace, select the SIL Analysis tab.
The SIL Analysis section appears, displaying a list of SIL Analyses.
- Select the SIL Analysis that is linked to the Logic Solver for which you want to perform SIL validation.
The SIL Analysis Summary section appears.
- Select the Logic Solver for which you want to perform SIL validation.
The datasheet for the Logic Solver appears.

- In the workspace, select the Validation tab.
The Validation section appears, displaying a list of Proof Test Templates linked to the Logic Solver.

Access a Proof Test Template
Procedure
- Select the Proof Test Template that you want to access.
The datasheet for the Proof Test Template appears.

- In the upper-right corner of the datasheet, select
 .
.The changes made to the Proof Test Template are saved.
Note: The changes made to the Proof Test Template does not affect the Proof Tests that have used the template prior to modifications.
Create a Proof Test Template
Procedure
- In the upper-right corner of the workspace, select
 .
.A blank datasheet for the Proof Test Template appears.

- In the upper-right corner of the datasheet, select .
The Proof Test Template is created.
What To Do Next
Change the State of a Proof Test Template
About This Task
Procedure
- In the upper-right corner of the datasheet, select the button that indicates the current state of the Proof Test Template. For example, if the current state of the template is Development, select the Development button.
A menu appears, displaying a list of operations that you can perform on the template to change its state.

- Select Manage State Assignments.
The State Assignments window appears.

Generate a Report of the Proof Test Template
Procedure
- In the upper-right corner of the section, select
 .
.The Proof Test Template report is generated. You can print, save, or export the report, or attach it to an email.
Delete a Proof Test Template
Procedure
- In the upper-right corner of the section, select
 .
.A confirmation message appears, asking if you really want to delete the Proof Test Template.
Access a Proof Test Template Detail
Procedure
- In the workspace, select the Details tab.
The Details section appears, displaying a list of Proof Test Template Details linked to the Proof Test Template.

- Select the Proof Test Template Detail that you want to access.
A datasheet for the Proof Test Template Detail appears.

Create a Proof Test Template Detail
This topic describes how to create Proof Test Template Detail. You can also copy one or more Proof Test Template Details.
Before You Begin
Procedure
- In the workspace, select the Details tab.
The Details section appears, displaying a list of Proof Test Template Details linked to the Proof Test Template.
- In the upper-right corner of the section, select Add New.
A blank datasheet for the Proof Test Template Detail appears.

Copy a Proof Test Template Detail
This topic describes how to create Proof Test Template Detail by copying an existing one. You can also create a Proof Test Template Detail using a blank datasheet.
Before You Begin
Procedure
- In the workspace, select the Details tab.
The Details section appears, displaying a list of Proof Test Template Details linked to the Proof Test Template.
- In the upper-right corner of the section, select Add Existing.
The Search window appears.

- In the upper-right corner of the window, select
 .
.A list of Proof Test Template Details appears.

Delete a Proof Test Template Detail
Procedure
- In the workspace, select the Details tab.
The Details section appears, displaying a list of Proof Test Template Details linked to the Proof Test Template.
- Next to the Proof Test Template Detail that you want to delete, select .
The Delete Template Details dialog box appears, asking you to confirm that you want to delete the Proof Test Template Detail.
Access a List of all Proof Test Tasks
This topic describes how to access a list of Proof Test Tasks linked to all the SIL Analysis in SIS Management. The tasks that are listed here are created either in SIS Management or in Asset Strategy Management.
Procedure
- In the workspace, select the Proof Test Tasks tab.
The Proof Test Tasks section appears, displaying a list of Proof Test Tasks.

- In the upper-right corner of the datasheet, select .
The changes made to the Proof Test Task are saved.
Access a Proof Test Task Linked to a Logic Solver
About This Task
This topic describes how to access a Proof Test Task that you have created for a Logic Solver either in SIS Management or in Asset Strategy (after promoting a Recommendation to ASM).
Procedure
- In the workspace, select the Tasks tab.
The Proof Test Tasks section appears, displaying a list of Proof Test Tasks.

- Select the Proof Test Task that you want to access.
The datasheet for the Proof Test Task appears.

- In the upper-right corner of the datasheet, select .
The changes made to the Proof Test Task are saved.
Access a Proof Test Task Linked to an Instrumented Function
About This Task
This topic describes how to access a Proof Test Task that you have created for an Instrumented Function either in SIS Management or in Asset Strategy (after promoting a Recommendation to ASM).
Procedure
- In the workspace heading, select the Proof Test Tasks tab.
The Proof Test Tasks section appears, displaying a list of Proof Test Tasks.

- Select the Proof Test Task that you want to access.
The datasheet for the Proof Test Task appears.
- In the upper-right corner of the datasheet, select .
The changes made to the Proof Test Task are saved.
Create a Proof Test Task
This topic describes how to create a Proof Test Task for an Instrumented Function or a Logic Solver using a blank datasheet.
Procedure
- In the workspace, select the Proof Test Tasks tab.
The Proof Test Tasks section appears, displaying a list of Proof Test Tasks for the Logic Solver or the Instrumented Function.
- Select , and then select Create New Task.
The New Proof Test Task page containing a blank datasheet for the Proof Test Task appears.

- Select .
The Proof Test Task is created.
What To Do Next
- Perform the proof test, and create a Proof Test Event to store the results.
Assign an Existing Proof Test Task
This topic describes how to assign an existing Proof Test Task for an Instrumented Function or a Logic Solver.
Procedure
- In the workspace, select the Proof Test Tasks tab.
The Proof Test Tasks section appears, displaying a list of Proof Test Tasks for the Logic Solver or the Instrumented Function.
- Select
 , and then select Assign Existing Task.The Search window appears.
 - Select .A list of Proof Test Tasks appears.

Download Proof Test Task For Offline Access
Before You Begin
Procedure
- In the workspace, select the Proof Test Tasks tab.
The list of proof test tasks appears.
- In the upper-right corner of the section, select
 .
. The Assign Template for Download window appears.

Results
- The Proof Test Task that you downloaded appears on the Mobile Proof Testing page.
Modify Offline Datasheets for Proof Test And Template Details
About This Task
You can modify datasheets only if you are a Super User or a user with administrative privileges.
Procedure
- Modify Offline Proof Test Forms
- On the Configuration Manager page, select Family Management.
The Family Management page appears, displaying the list of already existing families. The Home family is selected by default. In the left pane, below the Home tab, all of the families in the hierarchy appear in alphabetical order. Note that you cannot change the order of the families. You can expand a family hierarchy by selecting the
 button in the tab for that family.
- Select
 and enter SIS Proof Test.
The search results appear in the left pane.
- Select the SIS Proof Test family, select the Datasheets tab, and then select Manage Offline Forms.
The Proof Test offline page appears.

- In the upper-right corner of the datasheet, select .
A confirmation message appears, indicating that the form saved successfully.
- On the Configuration Manager page, select Family Management.
- Modify Offline Proof Test Details Forms
- On the Configuration Manager page, select Family Management.
The Family Management page appears, displaying the list of already existing families. The Home family is selected by default. In the left pane, below the Home tab, all of the families in the hierarchy appear in alphabetical order. Note that you cannot change the order of the families. You can expand a family hierarchy by selecting the
button in the tab for that family.
- Select and enter Functional Test Detail.
The search results appear in the left pane.
- Select the Functional Test Detail family, select the Datasheets tab, and then select Manage Offline Forms.
The Functional Test Detail Offline page appears.

- In the upper-right corner of the datasheet, select .
A confirmation message appears, indicating that the form saved successfully.
- On the Configuration Manager page, select Family Management.
View the Error Log for Offline Proof Test Task
Procedure
- In the workspace, select the Proof Test Tasks tab.
The Proof Test Tasks section appears, displaying a list of Proof Test Tasks.
- In the upper-right corner of the section, select .
The Assign Template for Download window appears.

- On the left navigation menu, select Integrity, and then select Mobile Proof Testing.
The list of downloaded proof test task appears, displaying the status of the synchronization.
- Select the icon, to view the error log of the respective proof test task.Note: The icon appears only if there is an error in the downloaded proof test task.
Delete a Proof Test Task
About This Task
This topic describes how to delete a Proof Test Task either from the SIS Management Overview page or from the list of tasks that are linked to a Logic Solver or an Instrumented Function.
Procedure
- Select the check box that corresponds to the Proof Test Task that you want to delete, and then in the upper-right corner of the section, select .
The Delete Proof Test Task(s) dialog box appears, indicating that deleting the Proof Test Task will also delete the related records.
Access a Proof Test
Procedure
- In the SIL Validation workspace, select Proof Test.
A list of Proof Tests appears.

- Select the Proof Test that you want to access.
The datasheet for the Proof Test appears.

- In the upper-right corner of the datasheet, select .
The changes made to the Proof Test are saved.
Create a Proof Test
This topic describes how to create a Proof Test for an Instrumented Function or a Logic Solver.
Before You Begin
- Create a Proof Test Template.
- Perform the proof test.
Procedure
- In the SIL Validation section, select Proof Test.
A list of Proof Tests appears.
- In the upper-right corner of the workspace, select .
A blank datasheet for the Proof Test appears.

- In the upper-right corner of the datasheet, select .
The Proof Test is created.
Apply a Proof Test Template and a Proof Test Task to a Proof Test
Before You Begin
About This Task
Procedure
- In the upper-right corner of the datasheet, select .
The Proof Test Task and the Proof Test Template are linked to the Proof Test.
Results
- A Functional Test Detail is created for each Proof Test Template Detail. These Functional Test Details are listed in the Details section. Each row in this grid corresponds to each step in the Proof Test as specified in the template.
What To Do Next
- Perform the Proof Test, and enter the readings for each step in the corresponding Proof Test Detail. The GE Digital APM system then calculates the error values and provides the results of the proof test.
Generate a Report of the Proof Test
Procedure
- In the SIL Validation section, select Proof Test.
A list of Proof Tests appears.
- In the upper-right corner of the section, select .
The Proof Test report is generated. You can print, save, or export the report, or attach it to an email.
Close a Proof Test
This topic describes how to close a Proof Test for an Instrumented Function or a Logic Solver.
Before You Begin
- Create a Proof Test Template.
- Perform the proof test.
- Create a Proof Test.
Procedure
- In the SIL Validation section, select the Proof Test tab.The Proof Test section appears, displaying a list of proof tests.
- Select the proof test that you want to close.The SIS Proof Test datasheet appears for the selected proof test.

- Select .Your changes are saved, and the proof test is closed.Note: After the proof test is closed, the fields in the SIS Proof Test datasheet will be disabled.
Delete a Proof Test
Procedure
- In the SIL Validation section, select Proof Test.
A list of Proof Tests appears.
- Select the check box that corresponds to the Proof Test that you want to delete, and then select .
A confirmation message appears, asking if you really want to delete the Proof Test.