 Historian
OSI PI Collector
OSI PI Collector Overview
The Historian OSI PI Collector gathers data samples from an OSI PI data server and stores the corresponding data entries in the Historian Server or Predix Cloud. Data can be gathered directly from the OSI PI Data Archive v3.2 or greater via the OSI PI AOSI PI v 1.3.4 or greater. This collector supports a distributed model, where the PI Data Server, the Collector, and Proficy Historian are installed on different machines.
The OSI PI Collector must be installed on the same computer as the OSI PI Data Archive. The OSI PI collector uses unsolicited collection, whereby changes to the OSI PI archives are detected, and are forwarded to the Historian server. The collector is intended to duplicate raw samples from the OSI PI Data Archive in an Historian data archive. You can specifically request the collector to transfer values from the OSI PI snapshot cache (as seen in the previous version of OSI PI Collectors), however, it is recommended to transfer the values directly from the PI archives to the Historian archives.
One OSI PI collector can collect data from a single OSI PI data archiver. To collect from multiple OSI PI data archives to an Historian archive, you must configure multiple OSI PI collectors.
Features
| Feature | Capability |
|---|---|
| Browse Source For Tags | Yes* |
| Browse Source For Tag Attributes | Yes |
| Polled Collection | No |
| Minimum Poll Interval | N/A |
| Unsolicited Collection | Yes |
| Time Stamp Resolution | milliseconds or seconds |
| Accept Device Time stamps | Yes |
| Floating Point Data | Yes |
| Integer Data | Yes |
| String Data | Yes |
| Enumeration Data | Yes |
| Binary Data | No |
| Array Data | No |
| Enumeration Sets | Yes** |
| Collector Status Outputs | Yes |
| Python Expression Tags | Yes |
**- The OSI PI Collector can also be used to automatically handle updates of digital states in Historian as enumerated sets without restarting the PI Collector. Consult the topic on Configuring Auto-synchronization of Digital States for details.
**- If digital states are renamed or deleted in the PI Collector, the corresponding enumerated sets in Historian are not automatically renamed or deleted without a restart of the PI collector. Unused enumerated sets cannot be automatically deleted, because the PI server does not notify the PI collector about rename or delete activity. However, the situation can be reconciled with certain manual steps. Consult the topics Renaming Digital States and Deleting Digital States for details.
**- In some instances, OSI PI Digital tags which are created as enumerated tags in Historian can contain values from the PI System digital set, rather than their assigned digital set. In these instances the System digital values will be reflected as 0 with BAD quality in Historian.
Before You Begin
Software Requirements
- OSI PI Data Archive (version 3.2\3.3\3.4)
- OSI PI v1.3.4 or greater
- OSI PI SDK (About PI-SDK) v1.4.2 or greaterNote: The OSI PI SDK is required for running OSI PI Collector, however, the OSI PI SDK does not ship with Historian. If the OSI PI SDK is not installed, the OSI PI Collector will not start. If you install the OSI PI Collector on a machine that does not contain your PI Server, be sure to install the OSI PI SDK on the machine with the OSI PI Collector.
- Historian 3.0 or greater
- OSI PI AF Server version 2015 R2 SP1 or greater
- OSI PI Data Archiver v 3.4.380 or greater
- OSI PI AF SDK 2.7.0 or greaterNote: The OSI PI AF SDK is required for running OSI PI Collector or PI Distributor, however, the OSI PI AF SDK does not ship with Historian. If the OSI PI AF SDK is not installed, the OSI PI Collector or PI Distributor will not start. If you install the OSI PI Collector or PI Distributor on a machine that does not contain your PI Server, be sure to install the OSI PI AF SDK on the machine with the OSI PI Collector and the PI Distributor. PI SDK is no longer supported with the 7.0 SP5 version of the PI Collector. If you are using the OSI PI Collector or PI Distributor from the 7.0 SP5 (or greater) installer, the PI AF SDK or greater is now required.
The PI AF Software Development Kit (PI AF SDK or AFSDK) is installed with the PI AF Client and provides programmatic access to PI Server data (PI Data Archive and AF).
- About-PI SDK utility
Hardware Requirements
There are no additional hardware requirements for the OSI PI Collector or PI Distributor.
Configuring the OSI PI Data Archive
By default, no specific configuration is required for the OSI PI Data Archive to allow the OSI PI Collector to collect data and archive it to the Historian Server or Predix Cloud. However, a user with read permissions must be configured in the OSI PI data server for the OSI PI Collector.
Upgrading and Using the PI Snapshot Collection
In some scenarios you may wish to run the collector in the same way as in the previous versions (Pre-6.0) of PI Collector. For example, you may upgrade from an older version of the collector and still want to retain the existing, original behavior.
If this is not the case then you do not need to configure anything and may skip this section.
Use the following steps where you want to retain the existing original behavior.
- Run the Registry Editor (regedit.exe).
-
Navigate to
HKEY_LOCAL_MACHINE\SOFTWARE\Intellution,
                        Inc.\iHistorian\Services\PICollector
. -
In the case of a 64-bit system this may be found at
HKEY_LOCAL_ MACHINE\SOFTWARE\Wow6432Node\Intellution, Inc.\iHistorian\Services\PICollector - If you have multiple collectors, each would have to be configured to allow for snapshot operation, and the key would be the name of the other collector.
-
Locate the registry key name
General5. -
Change it from
ArchivetoSnapshot. -
Restart the Historian PI Collector service from the Windows
services control panel.
The latest log file will indicate that the collector is using the snapshot database for collection. Refer to OSI PI Collector Troubleshooting, for information about tracing operational issues with the OSI PI Collector log files.
- Access Historian Administrator.
- Select the Collectors page.
- Select the OSI PI Collector.
- Select Configuration.
-
In the Data Source field, enter the data source as
snapshot.
OSI PI Collector Configuration
This section describes details about how to configure an OSI PI Collector.
Configuring the OSI PI Collector
Procedure
- Start Historian Administrator.
- Select the Collectors page.
- Select the OSI PI Collector instance you wish to configure.
- If the collector is not listed in the available collectors list, you must start the collectors manually from the Windows Service Control Panel to register it.
- Configure the OSI PI Collector's General options.
- (Optional) Enter a description for your OSI PI Collector.
- (Optional) In the Computer Name field, enter the host name of the computer your collector is running on.
- (Optional) If you want to change the default settings for memory usage and free disk space, change the values in the Memory Buffer Size and Minimum Free Space fields.
-
Configure the OSI PI Collector-specific options.
- Configure the default collection options.
- Configure the collector's advanced settings.
- To delay collection when the collector starts up, enter a value into the Delay Collection at Startup (sec) field.
OSI PI Collector-specific Field Descriptions
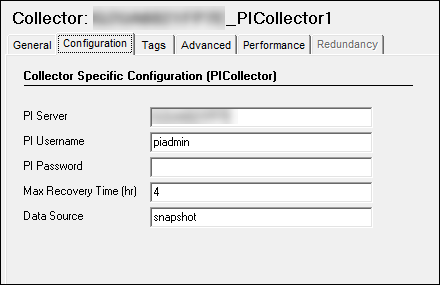
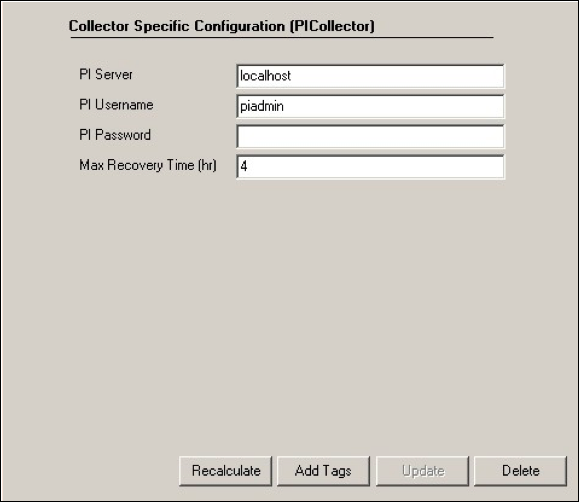
The following figure shows the OSI PI Collector configured to collect data from an OSI PI archive on localhost, logging in as the piadmin user. It is also configured for a maximum recovery time of 4 hours.
The following table describes the OSI PI Collector-specific configuration fields.
| This field... | Indicates... |
|---|---|
| PI Server | The name of the computer that OSI PI is running on. This should match the server entry in the OSIsoft About PI-SDK utility. |
| PI Username | The user name required to connect to the OSI PI Data Archive. PI trusts are not supported and an explicit PI user must be set. |
| PI Password | The password required to authenticate with the OSI PI Data Archive. If no password is configured for the OSI PI user, this field can be left blank. |
| MaxRecovery Time (hr) | The Maximum Recovery time in hours. |
Tag Attributes Available in Browse
| Historian Tag Browse Attribute | OSI PI Tag Attribute |
|---|---|
Browse Source Address | Tag |
Description Property | Descriptor |
Engineering Unit Description | Engunits |
Hi Engineering Units | Zero+span |
Lo Engineering Units | Zero |
When entering tags manually, it is important to match the Historian tag data type with the data type of the OSI PI tag. See OSI PI Collector and Distributor Supported Data Types.
Regardless of how you add tags to Historian, you should match the timestamp resolution. If your OSI PI tag is using timestamps with milliseconds, then configure your Historian tag to store timestamps with millisecond resolution as well.
The OSI PI distributor reads data from the Historian tag displayed in the Tag Source Address field, and sends it to the OSI PI tag name displayed in the Spare 1 field. To control the source and destination tags, change the Tag Source Address and Spare 1 fields.
Configuring Recovery Mode
About this task
The default recovery time available is 4 hours. You can disable recovery mode by setting the Maximum Recovery Time to 0 hours.
To configure a maximum recovery time:
Procedure
- Start Historian Administrator.
- Access the Collectors page.
- Select OSI PI Collector.
- Select Configuration.
- In the Maximum Recovery Time (hr) field, enter a Maximum Recovery Time, in hours. If this field is left blank, the Maximum Recovery Time will be set to 4 hours.
OSI PI Collector and Distributor Supported Data Types
| OSI PI Tag Types | Recommended Historian Data Type |
|---|---|
INT32 | Single Integer, Double Integer |
FLOAT16, FLOAT32 | Float |
FLOAT64 | Double Float |
PISTRING | Variable String |
DIGITAL | Single IntegerThe accompanying digital states are transferred from OSI PI into Historian upon initialization of the collector. |
Data Quality Mapping
Data quality mapping from Historian to OSI PI Data Archive is restricted to good/bad. OSI PI's subtypes are not currently mapped by Historian.
OSI PI Collector - Notes
- Time Stamps Not Modified by Historian
- The Historian OSI PI collector does not modify the time stamps placed on data samples by the OSI PI Data Archive. As a result, if your system clocks are not synchronized on both your OSI PI Data Archive server and Historian server, it is possible that Historian may receive data samples in the future or in the past.
- PITimestamp Data Type not Supported
- The
PITimestampdata type is not supported by the OSI PI Collector. If you attempt to collect a tag with thePITimestampdata type, an error will be logged and the value will not be collected. - PI Digital States/Enumerations
- Upon manual startup of the OSI PI collector (that is, a restart via the services control panel), the PI Digital States are imported into Historian. When enumeration tags are subsequently configured (digital tags in OSI PI), the matching enumeration is set as well and data will then be matched against the enumeration. For a PI digital tag, we create a Historian enumerated tag and for a PI digital set. If the PI tag contains values from its enumerated set, then it values are written correctly in the Historian tag. But, in some special cases, the PI tag may contain values from a special set (System set). Historian does not support these values as we cannot assign two enumerated sets to one tag. In these cases, the values are written as
0- Bad quality.Note: To update the enumerations, see Configuring Auto-synchronization of Digital States. - Connecting to an OSI PI Collective
- The Historian PI Collector has the ability to connect to an OSI PI Collective (PI redundancy). This allows data to be moved to Historian to prevent data loss.
Starting and Stopping the OSI PI Collector
About this task
The OSI PI Collector runs as a Windows service and can be controlled through the Services control panel. You must have Administrator rights to access the Services control panel.
To Modify the OSI PI Collector Service:
Procedure
Configuring Auto-synchronization of Digital States
Auto-synchronization with the SynchInterval Registry Key
The Historian OSI PI Collector allows transferring digital sets from the PI Server to Historian as enumerated sets. The digital sets from the PI Server are transferred to Historian not only during collector startup but also with the frequency of the Synch Interval.
Auto-synchronization of digital states can be configured with the SynchInterval Registry Key. The frequency at which the OSI PI Collector fetches the digital set from the PI server to Historian is determined by the value configured for this key, which is specified in minutes.
Values for the SynchInterval Registry Key
The default value of this key is 0, which indicates there is no synchronization of the digital set.
Set this registry key to a value greater than 0 if you want the OSI PI Collector to automatically fetch the digital set from the PI Server to Historian.
10. - The collector must be restarted to apply the change in the value of this registry key.
- This key is available for all Historian Collectors, but it is functional only in the OSI PI Collector.
- Digital sets from the PI Server are transferred to Historian only during collector startup.
Renaming Digital States
If digital states are renamed in the PI Collector, the corresponding enumerated sets in Historian are not automatically renamed without a restart of the PI collector. Unused enumerated sets cannot be automatically deleted, because the PI Server does not notify the PI collector about rename activity.
When a digital state is renamed, a new enumerated set is created. There will therefore be two enumerated sets for the same digital set, one of which has the old name and one of which has the new name. The old enumerated set is redundant as it will not get any data if no tag is assigned to it. The tag association is also lost.
- Manually assign the new enumerated set to the applicable tag in Historian. It will then be synchronized to represent the data for the renamed digital state.
- Go to the Historian VB admin and delete the unused enumerated set at the Historian side.
PHsite1.PumpStatus in Historian is assigned to Tag1:
| PI Server | Historian |
|---|---|
Site1.PumpStatus | PHSite1.PumpStatus |
ON= 0 | OFF= 0 |
OFF= 1 | ON= 1 |
If the digital state Site1.PumpStatus is renamed to SiteLodha.PumpStatus, a new enumerated set PHSiteLodha.PumpStatus is created at the Historian side.
The old enumerated set on the Historian side PHSite1.PumpStatus will not show any data, but it will exist redundantly inside Historian.
To address this:
- Manually assign
Tag1(applicable tag in Historian) toPHSiteLodha.PumpStatus. - Go to the Historian VB admin and manually delete the old enumerated
PHSite1.Pump Status.
Deleting Digital States
If digital states are deleted in the PI Collector, the corresponding enumerated sets in Historian are not automatically deleted without a restart of the PI collector. Unused enumerated sets cannot be automatically deleted, because the PI server does not notify the PI collector about delete activity.
- Go to Historian Administrator and delete the unused enumerated set at the Historian side.
PHsite1.PumpStatus in Historian is assigned to Tag1: | PI Server | Historian |
|---|---|
Site1.PumpStatus | PHSite1.PumpStatus |
ON= 0 | OFF= 0 |
OFF= 1 | ON= 1 |
If the digital state Site1.PumpStatus is deleted, then the enumerated set PHSite1.PumpStatus remains at the Historian side.
- Go to Historian Administrator and delete the
PHSite1.PumpStatusenumerated set, on the Historian side.
OSI PI Collector Troubleshooting
Tracing Operational Issues with OSI PI Collector Log Files
The OSI PI Collector generates logs during initialization, configuration, and general operation. These can be found in the general logging folder ([Historian Data folder]\LogFiles). Log files for the OSI PI Collector begin with PICollector and have a sequence number for each collector restart.
- Configuration of the collector.
- Initialization and connection to the OSI PI server.
- Addition and removal of tags.
- Reconnection and recovery of data.
OSI PI tags cannot be browsed, collector logs indicate SDK connection issues
The OSI PI server used must be an entry in the About-PI SDK utility. If there is an issue with collecting tag information and/or enumeration information, please confirm that the OSI PI server that is set in the collector configuration has an entry in the About PI-SDK, and that it is accessible from the About PI-SDK utility.
OSI PI Collector overrun problems - missing blocks of values, or is missing values
If the OSI PI Collector is unable to maintain updates from the OSI PI archiver and therefore is missing values, you may experience overrun problems. An overrun occurs when the data source is changing tag values faster than the collector collecting values, which causes it to consistently remain behind the archiver updates. If this is the case then the collector is running against the hardware and/or network limits and you may consider partitioning the tags into two or more sets, each with independent collectors.
Startup issue when data source is Snapshot
Historian OSI PI Collector fails to start as a service when you enter Snapshot as the Data Source in the Configuration section of the collector.
- Open command prompt as Administrator.
- Navigate to the location where Historian installed.
- Navigate to the path
Program Files (x86)\GE Digital\Historian OSI Pi Collector\Server - Enter the following command:
ihPiCollector.exe
                    noservice
The Collector starts from the CLI interface.


