 Historian
Migrating Classic Historical Data
About Migrating Classic Historical Data
Historian supplies a utility that allows you to migrate your existing Classic Historian data (used in iFIX) into your Historian database. Before migrating your Classic Historian data, plan your migration thoroughly. Refer to Plan Your Migration for more information.
Migrating Classic Historian Data to Your Historian Database
About this task
To migrate Classic Historian data into the Historian:
Procedure
- In Classic Historian, select the Historian Migration Button, shown in the following figure, to open the Historian Migration Utility.

Migrating Classic Historian 10 Character L24 Files
Comparing Classic Historian Data Plots and Historian Plots
- The sample pens match, but the plot of the average value differs. Classic Historian computes the average during the ???next??? period and Historian computes the average over the ???previous??? period.
- Classic Historian also records the minimum/maximum value from raw data values, whereas Historian uses interpolated values to compute the minimum/maximum value.
- Historian uses interpolated value because Historian works with compressed data. When you work with compressed data, interpolated values let you project what the likely minimum/maximum values were during a given time interval that includes few raw data values due to compression.
Configuring Classic Migration Options
Procedure
- Open the Migration Options window, by selecting Configure Options from the Options menu in the Historian Classic Migration Utility.
Figure: Classic Historian Migration Options window 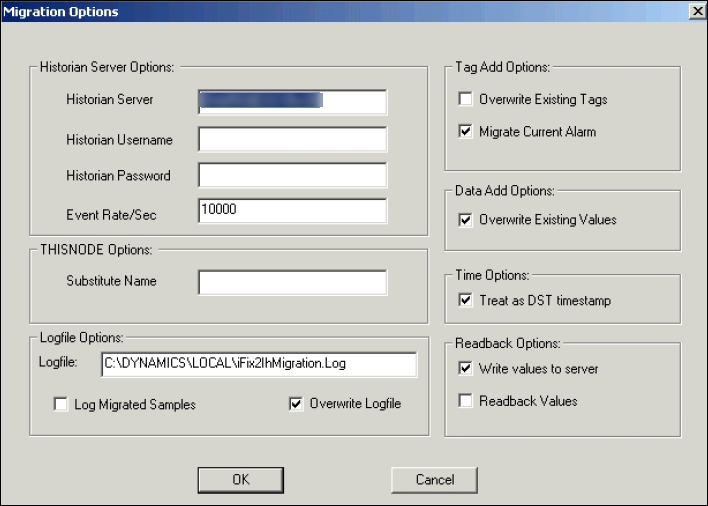 The Classic Historian Migration Tool automatically detects the default server and displays the default migration options.
Historian Server Options
Allows you to set up your server information, limit or expand the application processing time, and input any needed security information. The Historian Server Options include:
| Field | Description |
|---|---|
| Historian Server | The default server (set during installation). If you do not want to write data to the default server, enter the desired server in this field. |
| Historian Username and Password | If you have created and established Security Groups in your Historian Security Environment, you may need to enter the user name and password here. By default, if you do not supply any information, the current logged in user will be used in security checking. For more information about Historian Security, refer to Implementing Historian Security chapter of the Getting Started manual. |
| Event rate/sec | Allows you to limit the amount of server load caused by the Migration Utility. By reducing the Events/rate per second field in the Migration Options window, you can allocate more time to real time collection. The default rate is 10,000. For more information, refer to Limit Processing Load on Server During Migration. |
THISNODE Option
Specifies the Node name to use if you are migrating data collected using THISNODE. The utility automatically defaults to the name of the local iFIX node. If you want to change the Node name, enter a different Node name in this field.
Tag Add Options
Allows you to set the following options:
| Field | Description |
|---|---|
| Overwrite Existing Tags | Selecting this option allows Historian to replace certain tag properties if the tags already exist in the Historian tag database. |
| Migrate Current Alarm | Whether or not the Migration Utility creates a tag and migrates the Current Alarm of each data sample (B_CUALM). Classic Historian paired the B_CUALM tag inside another tag and counted it as one. If this is enabled, the Historian Classic Migration Utility will separate these tags and add them both to the tag database.Important: If you wish to migrate alarms and events data from iFIX to Historian, use the iFIX Alarms and Events
collector Migration Tool. For example: The Classic Historian Tag: FIX.TAG1.F_CVwill convert to the Historian Tags: FIX.TAG1.F_CV,FIX.TAG1.B_CUALMNote: If you clear the Migrate Current Alarm check box, the Current Alarm tags are not created and the alarm information is not transferred into Historian. |
| Data Add Options Overwrite Existing Values | Whether or not the Classic Migration Utility overwrites existing values that have the same timestamp as the values being migrated in an active Historian database during migration. |
| Time Options Treat as DST Timestamp | Whether the migration should consider Daylight Savings Time (DST) when determining a UTC timestamp for migrated data. The timestamps are converted to UTC time by adjusting the time based on the local computer time zone offset and DST setting. For more information, refer to Managing Daylight Savings Time. |
Logfile Options
Allows you to configure the following options:
| Field | Description |
|---|---|
| Logfile Location | Modify the default location of the iFIX2IhMigration.LOG file. |
| Log Migrated Samples | Create a log file of all raw samples migrated. This will cause all the values, timestamps, and qualities to appear in the log file. Important: Selecting this option significantly slows the performance of historical data migration. |
| Overwrite Logfile | Set whether or not the log file gets overwritten with each migration. By default, there is one log file (iFIX2IhMigration.LOG) that is overwritten each time you migrate data. Clearing this option causes the Historian Classic Migration Utility to append to the log file each time you migrate data. |
Readback Options
Allows you to set the following options:
| Field | Description |
|---|---|
| Readback Values | Immediately read back samples after they are written. This verifies that the migration was successful. All samples that were written, including bad data quality and shutdown markers, are read back. Important: Selecting the Readback Values option puts additional load on the archiver and can slow the migration process. If samples are not found during the readback, the Migration Utility sends a message to the migration log file (\dynamics\local\ifix2ihmigration.log). It does not stop the migration. |
| Write Values to Server | The data writes and tag adds are written to the Archiver. If you want to perform a readback-only migration, clear this option and select the Readback Values option. This allows you to select a specific Classic historical file and perform a readback to confirm that all samples in the Classic file exist in Historian. If samples are not found during the readback, the Migration Utility sends a message to the migration log file (\dynamics\local\ifix2ihmigration.log). It does not stop the migration. |


