Configure the OPC UA HDA Server Settings
Before you begin
- Install the OPC UA HDA server.
- Install an OPC UA client that you want to use with the OPC UA HDA server.
Procedure
-
Run the ihistopcuahdaserverconfigtool.exe file as an
administrator. This file is located in the following folder:
<installation drive>:\Program Files\GE Digital\Historian OPCUA
HDA Server
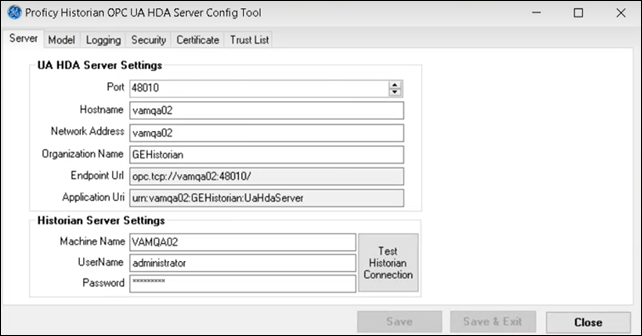
The Proficy Historian OPC UA Server Configuration window appears.

-
Provide values in the available fields as described in the following
table.
Field Description Port Enter the TCP port number on which you want the OPC UA HDA server to run. By default, the value in this field is 48010. Hostname Enter the host name of the machine on which you have installed the OPC UA HDA server. Network Address Enter the DNS name or IP address of the machine on which you have installed the OPC UA HDA server. The network address must be the computer name or an IP address, as this represents how OPC clients will locate the OPC UA HDA server. Organization Name Enter the name of the organization that is deploying the OPC UA HDA server. Endpoint Url Identifies the network endpoint that the OPC clients use to communicate with the OPC UA HDA server. This field is disabled and populated with a value in the following format: opc.tcp://<network address>:<port>/. Application Url Identifies a unique identifier for the OPC UA HDA server. This field is disabled and populated with a value in the following format: urn:<host name>:<organization name>:HDAServer). Machine Name Enter the name of the machine on which Historian is installed. UserName Enter the username to connect to the Historian server. Password Enter the password to connect to the Historian server. -
Select Model.
The Model section appears.
-
If you want to access the Historian model using an OPC UA HDA client:
-
Select Logging.
The Logging section appears.
-
If you want to enable logging, select the Logging
Enabled check box, and then provide values as described in the
following table.
Field Description Default Value Valid Values No of Log Files The maximum number of log file backups that you want to retain. 5 1 to 100 Max Entries per Log file The maximum number of lines that you want in the log file before it is backed up and a new log is created. 100000 1000 to 1000,000,000 Optimize Log Output Indicates whether the log output is buffered before it is saved to disk. False - True
- False
Application Trace Level The level of trace information that you want the OPC UA HDA server to log. Error - None
- Error
- Warning
- Info
- Debug
Stack Log Level The level of trace information that you want the OPC UA HDA stack to log. Error - None
- Error
- Warning
- Info
- Debug
Log File Path The path of the log file. You can provide a folder other than the default one; the log file will be created in that folder. <installation drive>:\ProgramData\GEDigitalUA\logs\UaSdkCppBundleSource/HDAServer.log -
Select Security, and provide values as described in the
following table.
Field Description Allow secure communication with data privacy (SignAndEncrypt) If you select this option, all communication is kept private, and the OPC clients are authenticated. Allow secure communication without data privacy (SingOnly) If you select this option, all communication is visible, but the OPC clients are authenticated. Allow communication with no security (None) If you select this option, a certificate is not used for communication between OPC clients and the OPC UA HDA server. This option is not recommended; you can use it only in a non-production environment. Basic256Sha256 This policy is acceptable and more likely to be supported by older versions of the OPC UA HDA clients. Aes128Sha256RsaOaep This policy is secure and is faster than the most secure policies. However, older versions of the OPC UA HDA clients do not support it. Aes256Sha256RsaPss This policy is the more secure one. However, older versions of the OPC UA HDA clients do not support it. Basic128Rsa15 This policy has theoretical problems and is not recommended. Basic256 This policy has known vulnerabilities and must not be used unless absolutely necessary. - Restart the OPC UA HDA Server service.