Important: You do not have the latest version of CIMPLICITY! You are missing out on the newest capabilities and enhanced security. For information on all the latest features, see the CIMPLICITY product page. For more information on upgrades, contact your GE Digital sales agent or e-mail GE Digital Sales Support. For the most up-to-date documentation, go here.
4.1. Add: Root Object
About this task
Important:
The root configuration object can be edited after it is added to the navigation tree. However, it cannot be deleted; children can be deleted.
The root configuration object does not display during runtime when a cascade menu style is used.
Do any of the following to add the root configuration object.
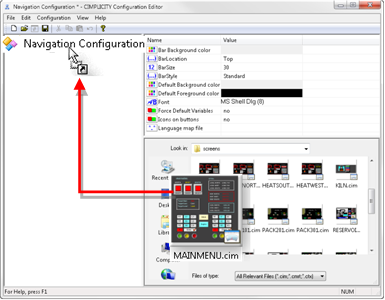
Configuration: Add a root node.
Runtime examples: Navigation node.
Configuration: Add a Root Node
Drag and Drop a Screen
Note: Dragging and dropping a screen speeds up configuration when the node will use an Overlay action type, which is one of three available action types.
Procedure
Select a screen in the Navigation Configuration window lower right pane.
Drag the screen to the Navigation Configuration Editor left-pane.
Important: This method is useful for the Standard and Tree bar styles. When a Cascade style is used, the Root node does not display on a Cascade style Navigation bar, so a screen that is selected for an Overlay action cannot be accessed.
The screen file name displays as the node name.
(Optional) Rename the node name.
Select the root node.
Do one of the following.
Right-click the name; select Rename on the Popup menu.
Select Edit>Rename on the Configuration Editor menu bar.
Press F2 on the keyboard.
The name can now be edited.
Type in the name that should display on the menu bar.
Result: The node will now display on the Navigation menu bar; the screen that will display is automatically entered in the Overlay parameters Screen name field.
Use Menu Items
Select Navigation Configuration in the Navigation Configuration Editor left-pane.
Do one of the following.
Right-click the selected Navigation Configuration or Children icon ; select Add Configuration Object on the Popup menu.
Click Edit>Add Configuration object on the Navigation Configuration Editor menu bar.
An Add Configuration Object dialog box opens.
Enter the following.
Field
Description
Name
Name that will display on the Navigation Menu bar.
Type
The Navigation Node is the object that a user will click on to perform the selected root node action.
Icon
An icon can be selected from the icon drop down list to represent the node.
The icon selection will depend on your system's specifications and whether or not you use custom icons.
Default
Notes
The default icon for a node may be different, based on your system's icon list..
The Navigation bar configuration can specify whether or not an icon will display or if an image will display.
Click OK.
Results
The Add Configuration Object dialog box closes; The name that was entered displays as the root node name in the Navigation Configuration window left pane.
Note: When the root is added using the Add Configuration Object dialog box, an action type and specifications required for that action type will have to be entered before the navigation configuration can be saved with no errors.
Runtime Examples: Navigation Node
The bar style determines whether or not the Navigation object will display during runtime.
Cascade bar styles.
Tree bar style.
Cascade Bar Styles
A navigation bar specifies the following.
A
BarStyle
Cascade Tabs (top-left)
B
Root Node Name
ROOT
A
ROOT does not display during runtime.
B
First level child nodes display as the first menu items.
Note: If the Navigation bar includes Quick Launch objects, they might display before the child nodes.
Tree Bar Style
A Tree bar contains a root object, named OVERVIEW.
A
BarStyle
Tree
B
Root Node Name
OVERVIEW
A
OVERVIEW displays as the tree's first node.
B
Objects on the tree display in the order they are listed in the Navigation Configuration Editor.