 Webspace
Load Balancing and High Availability
Load Balancing
Load balancing is a technique used by the Relay Server to spread the work for the Webspace Server across two or more Dependent Servers. A Relay Server provides centralized control over one or more Dependent Servers. Relay Servers maintain client connections and distribute Webspace sessions across a set of load balanced Dependent Servers.
Load balancing:
- Allows Webspace sessions to be distributed across multiple dependent application servers.
- Is needed when the server resource requirements for a deployment exceed the capacity of a single server computer.
- Is done automatically and is transparent to the user.
The goals of load balancing include:
- Optimal resource utilization.
- Maximized throughput.
- Minimized response time.
Supported Architectures
| Scenario | Webspace Server Type and Count | License Type and Count |
|---|---|---|
| 1 | Single Webspace Server | One (1) Single Webspace Server |
| 2 | Load Balanced Application. Requires two (2) Dependent Servers and one (1) Relay Server |
|
| 3 | Load Balanced + High Availability. Requires two (2) Dependent Servers and two (2) Relay Servers |
|
Load Balancing Requirements
- The Webspace Server must be installed on each of the servers in the configuration (on the Relay Server and each Dependent Server), along with IIS or Apache HTTP Server.
- Applications (iFIX or CIMPLICITY) are installed on Dependent Servers.
- Webspace Clients cannot connect directly to Dependent Servers – only Relay Servers.
- Each Dependent Server should be configured the same, with the same installed software, settings, and install locations. In other words, all software, pictures, and network access must be the same on each dependent application server in your configuration.
- Dependent Servers do not need to be located on the same network as their associated Relay Server.
- When using a Relay Server, the Web Server must reside on the same network as the Relay Server.
- Users are authenticated on Dependent Servers.
- iFIX View nodes cannot connect directly to Dependent Servers.
Server Selection
When a client connects to a Relay Server, the Relay Server attempts to start a session on the Dependent Server (host) that has the lowest number of running sessions as a percentage of the maximum number of sessions allowed for the server.
If the session fails to start on the selected server, the Relay Server successively attempts to start the session on other available servers until it finds one that can support the session.
If there are no available servers (for instance, if the number of running sessions on All Hosts equals the maximum number allowed), the following message is displayed to the user: You are already running as many sessions as you are allowed.
Otherwise, if the session cannot be started on any of the available dependent application servers, the following message is displayed to the user: Webspace failed to launch the Program Window for your session. The problem is explained in your System Administrator's log file.
In a Relay Server configuration, Webspace checks the maximum sessions settings on the Relay Server and its Dependent Servers. The maximum sessions value on the Relay Server is the maximum number of sessions that can be run concurrently on all Dependent Servers assigned to that Relay Server. To modify the Maximum sessions on this server setting, open the Webspace Administrator on the Dependent Application Server, and on the Host Options dialog box, select the Session Startup tab.
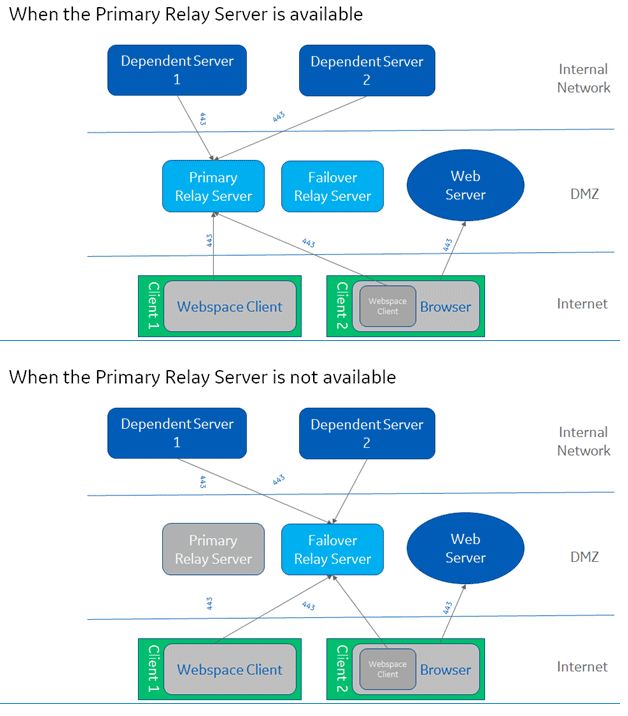
Load Balancing and High Availability
Adding High Availability to a Load Balanced solution means adding a second Relay Server designated as the Failover Relay Server. A Failover Relay Server can be configured using the Webspace Admin Console. Relay Servers know about each other, and all Clients and Dependent Servers know about each Relay Server. If a client fails to reach the Relay Server, it will attempt to reach the Failover Relay Server.
Requirements:
- Two (2) Dependent Servers each with full Client Count.
- Two (2) Relay Servers, one designated as Backup License.
- The clients can’t connect directly to the Dependent Servers, so Dependent Servers do not need a web server running on them.
- The Relay Server and the Failover Relay Server are configured to accept connections on port 443 because many corporate firewalls and proxy servers do not allow connections to Webspace’s default port, 491. Webspace’s clients support proxy tunneling, which allows them to tunnel Webspace’s protocol over port 443.
- Since browsers also use port 443 to securely download the Webspace web pages over HTTPS, the web server must be on a different computer than the Relay Servers.
Relay Server Configuration
A Relay Server is a Webspace server that provides centralized control over one or more Webspace servers. Relay Servers maintain client connections and distribute Webspace sessions across a set of load-balanced servers. Relay Servers appear in the Webspace Admin Console on the first level of the list of All Hosts as nodes with one or more Dependent Servers.
After configuring a server to run as a Relay Server with one or more Dependent Servers, Webspace load-balances client connections and ensures that sessions start successfully. If a session fails to start on the selected server, the Relay Server selects another server and tries again until it finds one that can support the session.
When using a Webspace Relay Server in a standalone configuration (for Load Balancing Only), you must modify the command line (for iFIX) using the Webspace Admin Console. This modification is necessary because when the Relay Server is standalone, it cannot determine the default SCU path necessary to get the Webspace client to start correctly. You can also use the Relay Server in a high availability setup as well.
To configure a Webspace Server to operate as a Relay Server:
- From the Webspace Admin Console, select the server from the list of All Hosts.
- On the Tools menu, click Host Options.
- Click the Configuration tab.
- Select the Relay Load Balancer option.
- Click OK. A message box appears indicating that the change will not take effect until the Proficy Webspace Application Publishing Service has been restarted.
- Click OK.
- From the Control Panel, stop and restart the Proficy Application Publishing Service from the Services option.
To configure a Dependent Host:
- From the Webspace Admin Console, select the server from the list of All Hosts.
- On the Tools menu, click Host Options.
- Click the Configuration tab.
- Select the Application Host option.
- Under Application Host, select the Dependent Host option.
- In the Relay Load Balancer Address field, enter the name or IP address of the Relay Server. The fully qualified name or IP address of the Relay Servers must be provided on Dependent Server, otherwise an error dialog appears, and you will not be able to set the Relay Servers.
- Click OK. A message box appears indicating that the change will not take effect until the Proficy Webspace Application Publishing Service has been restarted.
- Click OK.
- From the Control Panel, stop and restart the Proficy Application Publishing Service from the Services option. When the Proficy Application Publishing Service is restarted, the Dependent Server will appear beneath the Relay Server in the Webspace Admin Console's list of Proficy Webspace servers.
To start the Webspace client in a standalone configuration:
- From the Webspace Admin Console main window, click the Applications tab.
- From the list of applications that appear, select iFIX.
- Click Properties. The Application Properties dialog box appears.
- In the Command Line Options box, change the startup parameter.
High Availability Configuration
Configuring high availability requires configuration on both the Relay Server and Dependent Server.
To set up high availability on each Relay Server:
- From the Webspace Admin Console, select the server from the list of All Hosts.
- On the Tools menu, click Host Options. The Host Options dialog box appears.
- Click the Session Shutdown tab.
- In the Disconnected sessions terminate section, select the After option, and make sure the session shutdown has the disconnect set for longer than 10 minutes. This will allow sessions to connect back if there is a failover. An immediate disconnect will take away the session if a failover situation occurs.
- Click the Configuration tab.
- Select Application Host Manager.
- Click Relay Load Balancer.
- Click OK. A message box appears indicating that the change will not take effect until the Proficy Webspace Application Publishing Service has been restarted.
- From the Control Panel, stop and restart the Proficy Application Publishing Service from the Services option. When the Proficy Application Publishing Service is restarted, the Dependent Server will appear beneath the Relay Server in the Webspace Admin Console's list of Proficy Webspace servers.
To configure Dependent Hosts to support high availability Relay Servers:
- From the Webspace Admin Console, select the server from the list of All Hosts.
- On the Tools menu, click Host Options. The Host Options dialog box appears.
- Click the Session Shutdown tab.
- In the Disconnected sessions terminate section, select the After option, and make sure the session shutdown has the disconnect set for longer than 10 minutes. This will allow sessions to connect back if there is a failover. An immediate disconnect will take away the session if a failover situation occurs.
- While still in the Host Options dialog box, click the Configuration tab.
- In the Application Host area, under Dependent Host, in the Relay Load Balancer Address field, type the name or IP address of the primary and backup Relay Server you already configured in the edit field. The primary and backup Relay Server names or IP addresses must be separated by a semicolon. For example: RS_Server1;RS_Server2. The fully qualified name or IP address of the Relay Servers must be given on Dependent Server, otherwise an error dialog appears, and you will not be able to set the Relay Servers.
- Click OK. A message box appears indicating that the change will not take effect until the Proficy Webspace Application Publishing Service has been restarted.
- From the Control Panel, stop and restart the Proficy Application Publishing Service from the Services option. When the Proficy Application Publishing Service is restarted, the Dependent Server will appear beneath the Relay Server in the Webspace Admin Console's list of Proficy Webspace servers.
To start a Webspace browser session in a high availability setup:
Use the following examples with the server and reconnect parameters.
http://RS_Server1/ProficyWebspace/iFIX.html?&host=RS_Server1;RS_Server2&autoreconnect=5where RS_Server1 is the name of the primary Relay Server, and RS_Server2 is the name of the backup Relay Server.
http://RS_Server1/ProficyWebspace/CIMPLICITYScreenName.html?&host=RS_Server1;RS_Server2&autoreconnect=5 where RS_Server1 is the name of the primary Relay Server, and RS_Server2 is the name of the backup Relay Server.
To start a Windows Desktop Client in a High Availability Setup:
Use the –h command line argument with the address of the primary Relay Server, followed by a semi-colon, followed by the address of the failover Relay Server. Use the following examples with the host server and reconnect parameters.
"C:\Program Files (x86)\Proficy\Proficy Webspace\Client\Proficy.exe" -h RS_Server1;RS_Server2 -autoreconnect=5 -c -a iFIXwhere RS_Server1 is the name of the primary Relay Server, and RS_Server2 is the name of the backup Relay Server.
"C:\Program Files (x86)\Proficy\Proficy Webspace\Client\Proficy.exe" -h RS_Server1;RS_Server2 -autoreconnect=5 -c -a CimView where RS_Server1 is the name of the primary Relay Server, and RS_Server2 is the name of the backup Relay Server.
Tips for Specifying Relay Server Names
- Specify the addresses of the primary and failover relay servers using either their IP addresses (if SSL is not used) or their fully-qualified domain names (FQDNs). When using the IP addresses, if SSL is used, the common names of the SSL certificates on the primary and failover relay servers must match the fully-qualified domain names of the computers.
- When dependent hosts and/or client computers reside in a different domain (or domains) than the relay servers, it is generally advisable to reference the relay servers via their FQDNs. Otherwise, dependent hosts and client computers may be unable to resolve the addresses of the relay servers.
Relay Server Support
The following table outlines the Relay Server support.
| Mode | Relay Server | Relay Server and Dependent Server in Different Domains | Failover Relay Server | Failover Relay Server and Dependent Server in Different Domains |
|---|---|---|---|---|
| TCP (using IP Addresses or Host Names) | Supported | Supported | Supported | Supported |
| Encrypted (Host Names only with Strong Encryption) | Supported | Supported | Not Supported | Not Supported |