OIDC Federated Authentication
OIDC Federated Authentication
OpenID Connect (OIDC) is a simple identity layer built on top of the OAuth 2.0 protocol. It enables clients to verify the identity of an end-user based on the authentication performed by an authorization server or identity provider (IdP) and obtains basic profile information of an end-user in an interoperable REST-like manner.
OpenID Connect allows one or more relying parties (RP) or clients to delegate user authentication to an OpenID Provider (OP) or authentication servers. The OpenID Provider authenticates users and provides claims to relying parties. These claims are user attributes such as first and last name, email address, and department. As a result, relying parties are freed from the need to run a login process, and users have fewer credentials to manage.
OIDC implements authentication as an extension of OAuth 2.0 protocol, it provides information about the end-user in the form of id_tokens. The id_token is a signed data structure that contains authenticated user attributes that are encoded as a JSON Web Token (JWT). In addition to identifying the end-user, or subject, the id_token also identifies the token issuer and client application to which the token was issued.
- Simple to integrate with applications.
- Works harmoniously with a wide variety of applications
- Offers features and security options that meet enterprise requirements.
- Uses JWTs for portability and support for a range of signature and encryption algorithms
OIDC Implementation in UAA
OIDC implementation in UAA facilitates the users by reducing the number of passwords and other credentials that they have to manage during the authentication process. You can configure UAA as an Open ID Identity Provider or Identity Provider to authenticate with another instance of UAA.
The following diagram shows the OIDC flow in UAA.
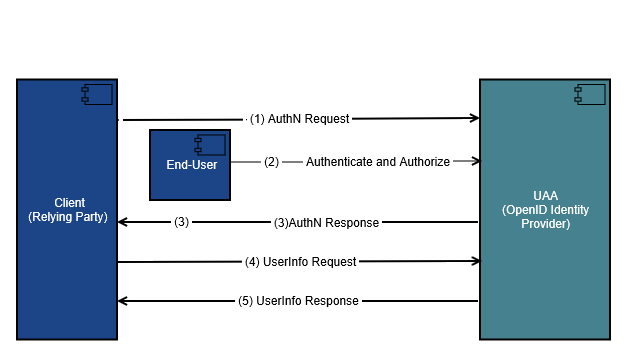
- The Client (Relying Party) sends a request to the UAA or any configured External OpenID Identity Provider.Note: In the above flow, we have shown UAA as the OpenID Identity Provider, you can also configure other external identity providers such as Google or your Company SSO.
- The UAA authenticates the end-user and obtains authorization. User logs in using a web browsers and enters login credentials for authentication.
- UAA returns an ID Token and an Access Token. The AuthN response is a redirect to the client application (if configured).
- The client sends a request with the Access Token to the user info endpoint in UAA.
- UAA returns claims (data) about the end-user.
Relying Party (Client Information)
The relying party or the client is usually your web or mobile application. You must secure the following Client information for OIDC configuration.
| Fields | Values |
|---|---|
| Client ID | oidc_client_idOAuth 2.0 Client Identifier valid at the Authorization Server (OpendID Providers). |
| Client Secret | oidc_client_secretOAuth 2.0 Client Identifier secret. |
| Authorized Grant Types | authorization_codeWhen you use the authorization code grant type, the client directs the resource owner to UAA, which in turn directs the resource owner back to the client with the authorization code. |
| Redirect URI | The URL to which a user is redirected to after logging in at the OpenID Provider. requires unauthenticated access.https://*.<Identity Provider UAA base url>/login/callback/*
|
| Scopes | Include the openid scope in your client application. |
| Authorities | Include the openid authority in your client application. |
OIDC Federated Authentication Scenarios Supported in UAA
- UAA to UAA OIDC Federated Authentication
- UAA to Company SSO Authentication
- UAA to Trusted External Identity Provider Authentication
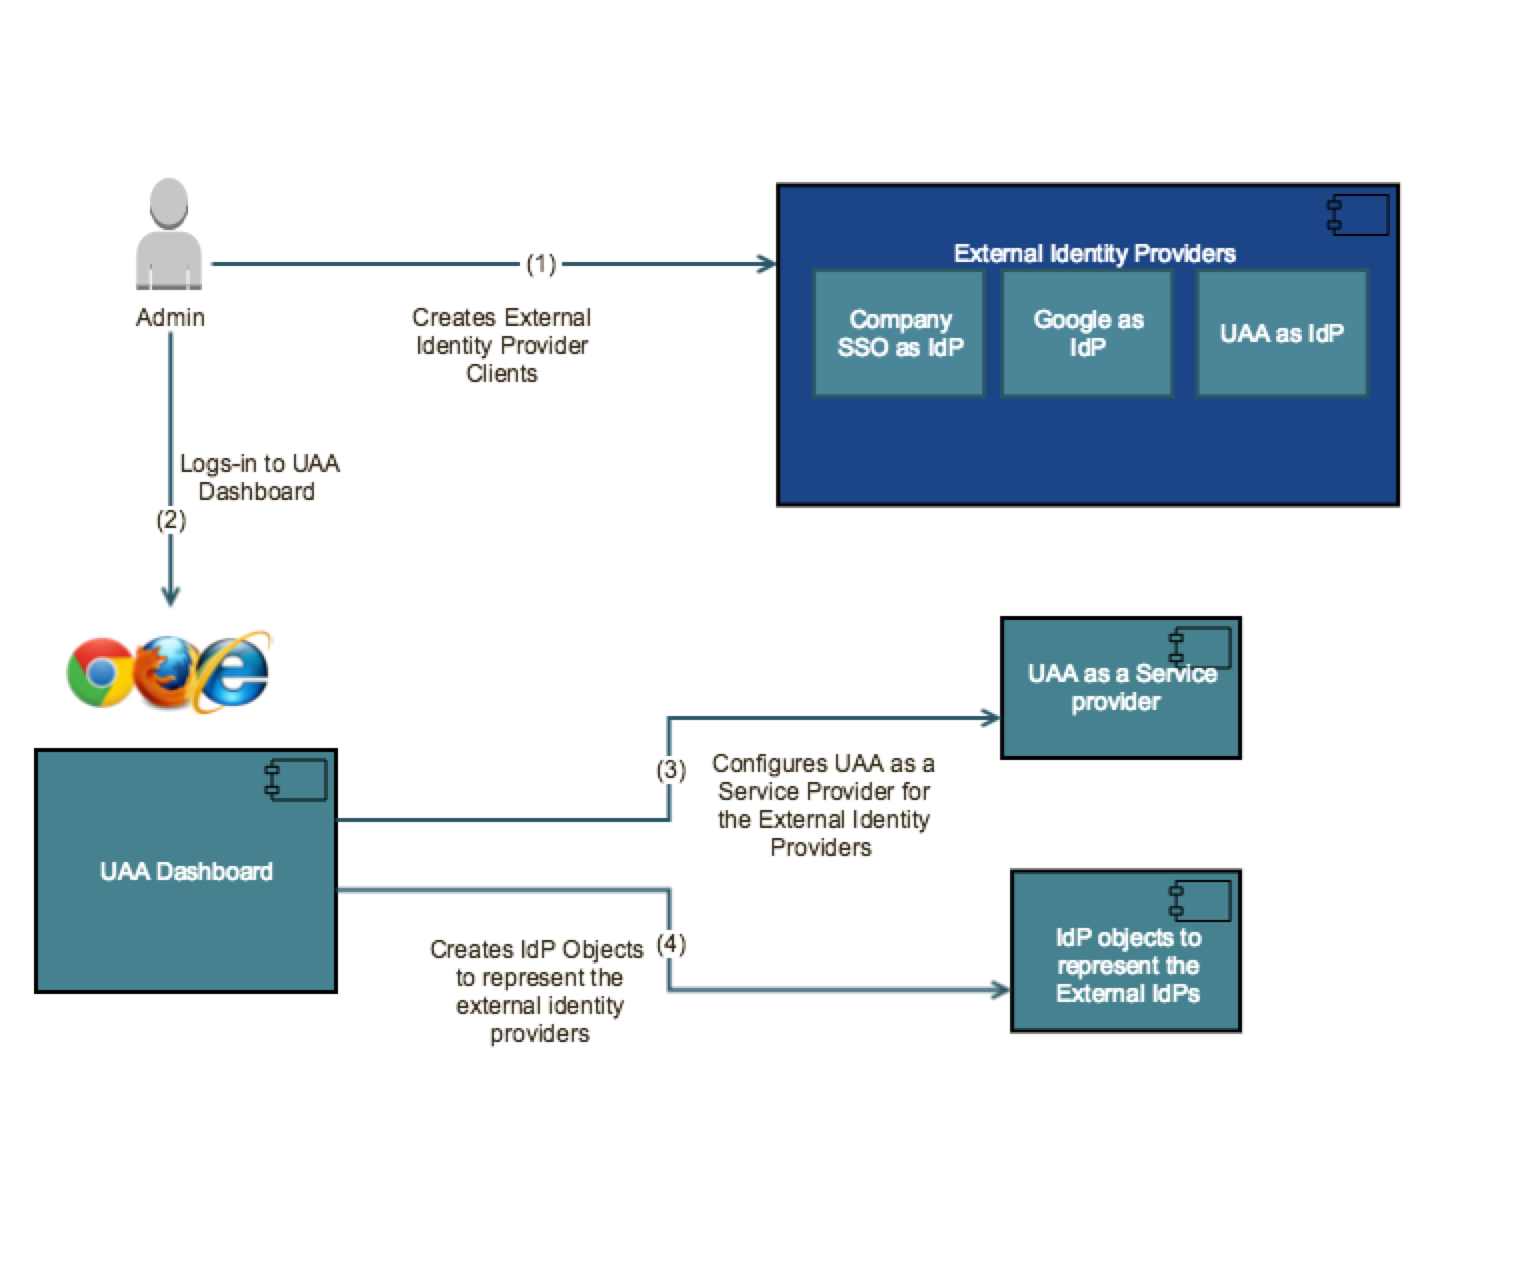
- Creates external identity provider clients for OIDC federated authentication.
- Logs-in to the UAA dashboard.
- Creates UAA service provider for external identity providers.
- Creates IdP objects to represent the external identity providers.
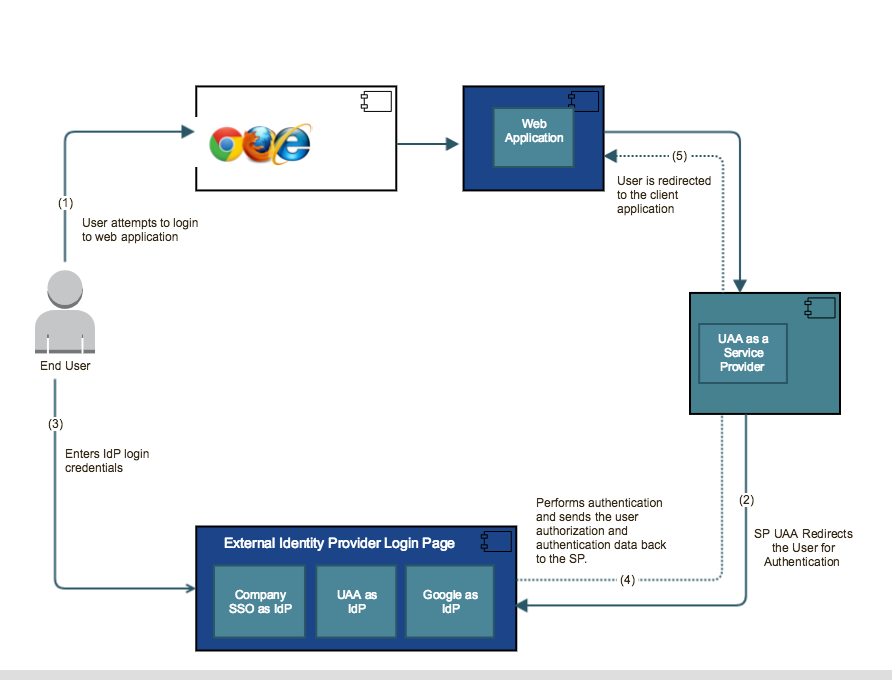
- User attempts to login to the web application and is directed to UAA service provider.
- UAA service provider redirects the user to external identity providers for authentication.
- User logs in to the External identity and enter the IdP login credentials. The external identity providers perform authentication and sends the user authorization and authentication data back to the UAA service provider. UAA generates access and id tokens based on user authentication.
- User is redirected to the client application after the authentication is completed.
UAA to UAA OIDC Federated Authentication – You can configure OIDC federated authentication between two instances of UAA, and designate one as the identity provider (IdP) and the other as the service provider (SP) to allow the UAA service provider users to redirect to UAA identity provider for authentication. UAA (SP) instance acts as the server that receives the authentication and authorization data while the UAA (IdP) acts as the server that receives the authentication request, performs user authentication, and sends the authentication and authorization data back to the SP. See uaas-oidc-federated-authentication.html#task_qw1_d1s_ycb for details on configuring UAA as a Service Provider.
openidand any other scopes specific to your Company's SSO configuration that when UAA exchanges the authorization code for Company SSO token, the token includes required attributes for user authentication. You must set up your Company SSO as the allowed provider for your IdP client. See uaas-oidc-federated-authentication.html#task_hyh_qcq_vcbUAA to Trusted External Identity Provider – You can also configure an OIDC compliant external identity provider such as Google to perform user authentication with UAA as the service provider (SP) to allow the users to redirect to the external identity provider for authentication. When Google is set up as an external OIDC federated identity provider, users can log in using their Google account credentials. UAA (SP) must be set up with the required openid and email scopes so that when UAA exchanges the authorization code for Google IdP token, the token includes required attributes for user authentication. You must set up your Google IdP client before configuring UAA as the service provider for OIDC federated authentication. See uaas-oidc-federated-authentication.html#task_vss_53t_ycb
Configuring UAA as a Service Provider for OIDC Federated Authentication
About This Task
Before You Begin
- Create your external identity providers and secure the required client information for authentication. If you are configuring OIDC federated authentication between two instances of UAA, see uaas-oidc-federated-authentication.html#task_gw4_5hc_4cb.
- Log In to Predix.io and go to the Console view.
- Create or select a UAA instance that you want to configure as your identity provider.
The Client Management form represents your Client application, you can use the information in the Client Management form to verify your Redirect URIs or other client specific information.
Procedure
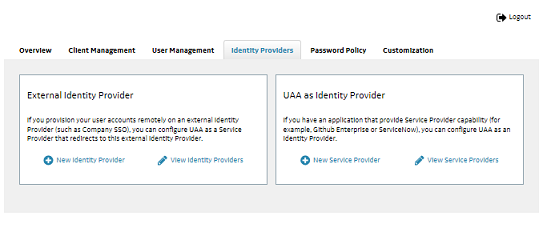
- Click on the Identity Providers tab, navigate to External Identity Provider section and then click on the New Identity Provider.Example:
Example
What To Do Next
Configuring UAA as an OIDC Identity Provider
About This Task
Before You Begin
- Select or create a UAA instance that you want to set up as your IdP.
Procedure
- Open your UAA (IdP) instance and add the New User information in the User Management tab.Ensure that the following information is entered and saved in the New User form.
Field Description Regular User Choose this option to set up local users in your UAA. The Regular User is not configured through an external Identity Provider (IdP). Shadow User Choose this option to create a local user in UAA corresponding to the user defined in your external IdP. The Shadow User option is useful if you need to whitelist users to authenticate only a subset of users setup in your identity provider. To set up individual shadow users, ensure that the option to create shadow users is not selected while configuring a new IdP.
User Name Specify the user name. If you are setting up a shadow user, this value must match the user name defined in your IdP. Email Specify the email address. If you are setting up a shadow user, this value must match the user name defined in your IdP. Password Specify the password. An administrator can set password policies to define the permitted structure of the password. For more information, see create-pswd-policies.html#task_gdk_f43_fx. This option is not required if you are setting up a shadow user.
Active Select this option to allow your Regular or Shadow user to login. Verified Select this option to indicate that this Regular or Shadow user is a verified user. Example:
- Navigate to Client Management tab and click on Create Client information.Ensure the following information is added to the Client form
Fields Descriptions Client ID Specify a name for the OAuth2 client you are creating. Authorized Grant Types authorization_code When you use the authorization code grant type, the client directs the resource owner to UAA, which in turn directs the resource owner back to the client with the authorization code.
Client Secret Specify the password. It is important that you keep a note of this password. If lost, this password cannot be retrieved. Confirm Client Secret Reenter the client secret. Redirect URI Specify a redirect URI to redirect the client after login or logout. UAA uses the value of Redirect URI for /oauth/authorizeand/logoutendpoints.Scopes Scopes are permissions associated with a Client to determine user access to a resource through an application. Add the openidanduaa.resourcescopes.Note: For OIDC configuration, UAA (IdP) clients must have theopenidscope.Example: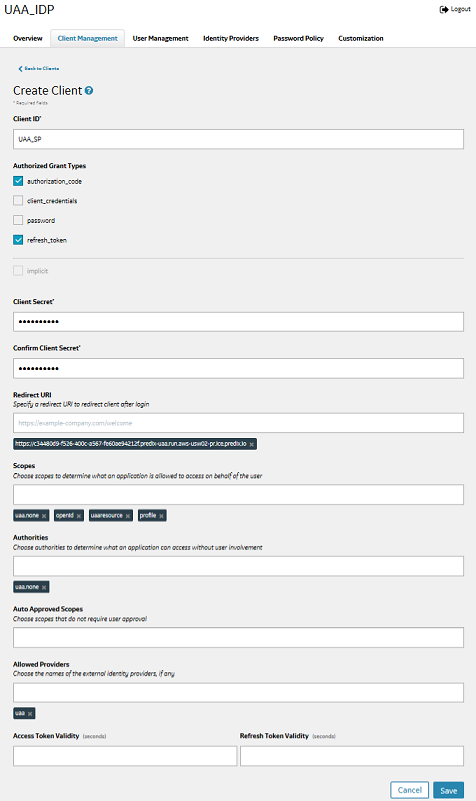
What To Do Next
Verifying UAA to UAA OIDC Configuration
Before You Begin
- Redirect URI for the UAA(IdP)
- User credentials (username, email, and password) for the user that you created with OpenId scope in UAA(IdP). See Configuring UAA to UAA OIDC Federated Authentication
Procedure
- Enter the Redirect URI link for the UAA(IdP) in your browser.A UAA login screen displays with the Link Login Text that you entered for your IdP login.Example:
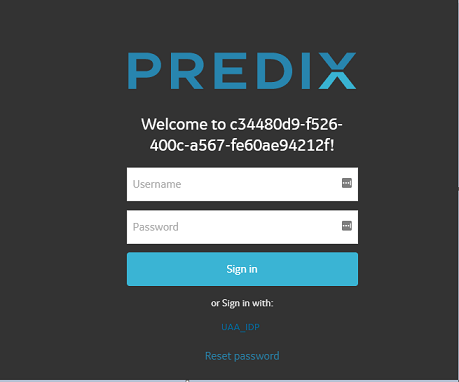 If the Login Link Text (UAA_IDP in the above example) matches the text that you entered in the UAA_SP's Identity Provider Form for the IdP login, it confirms that the OIDC configuration is completed successfully.
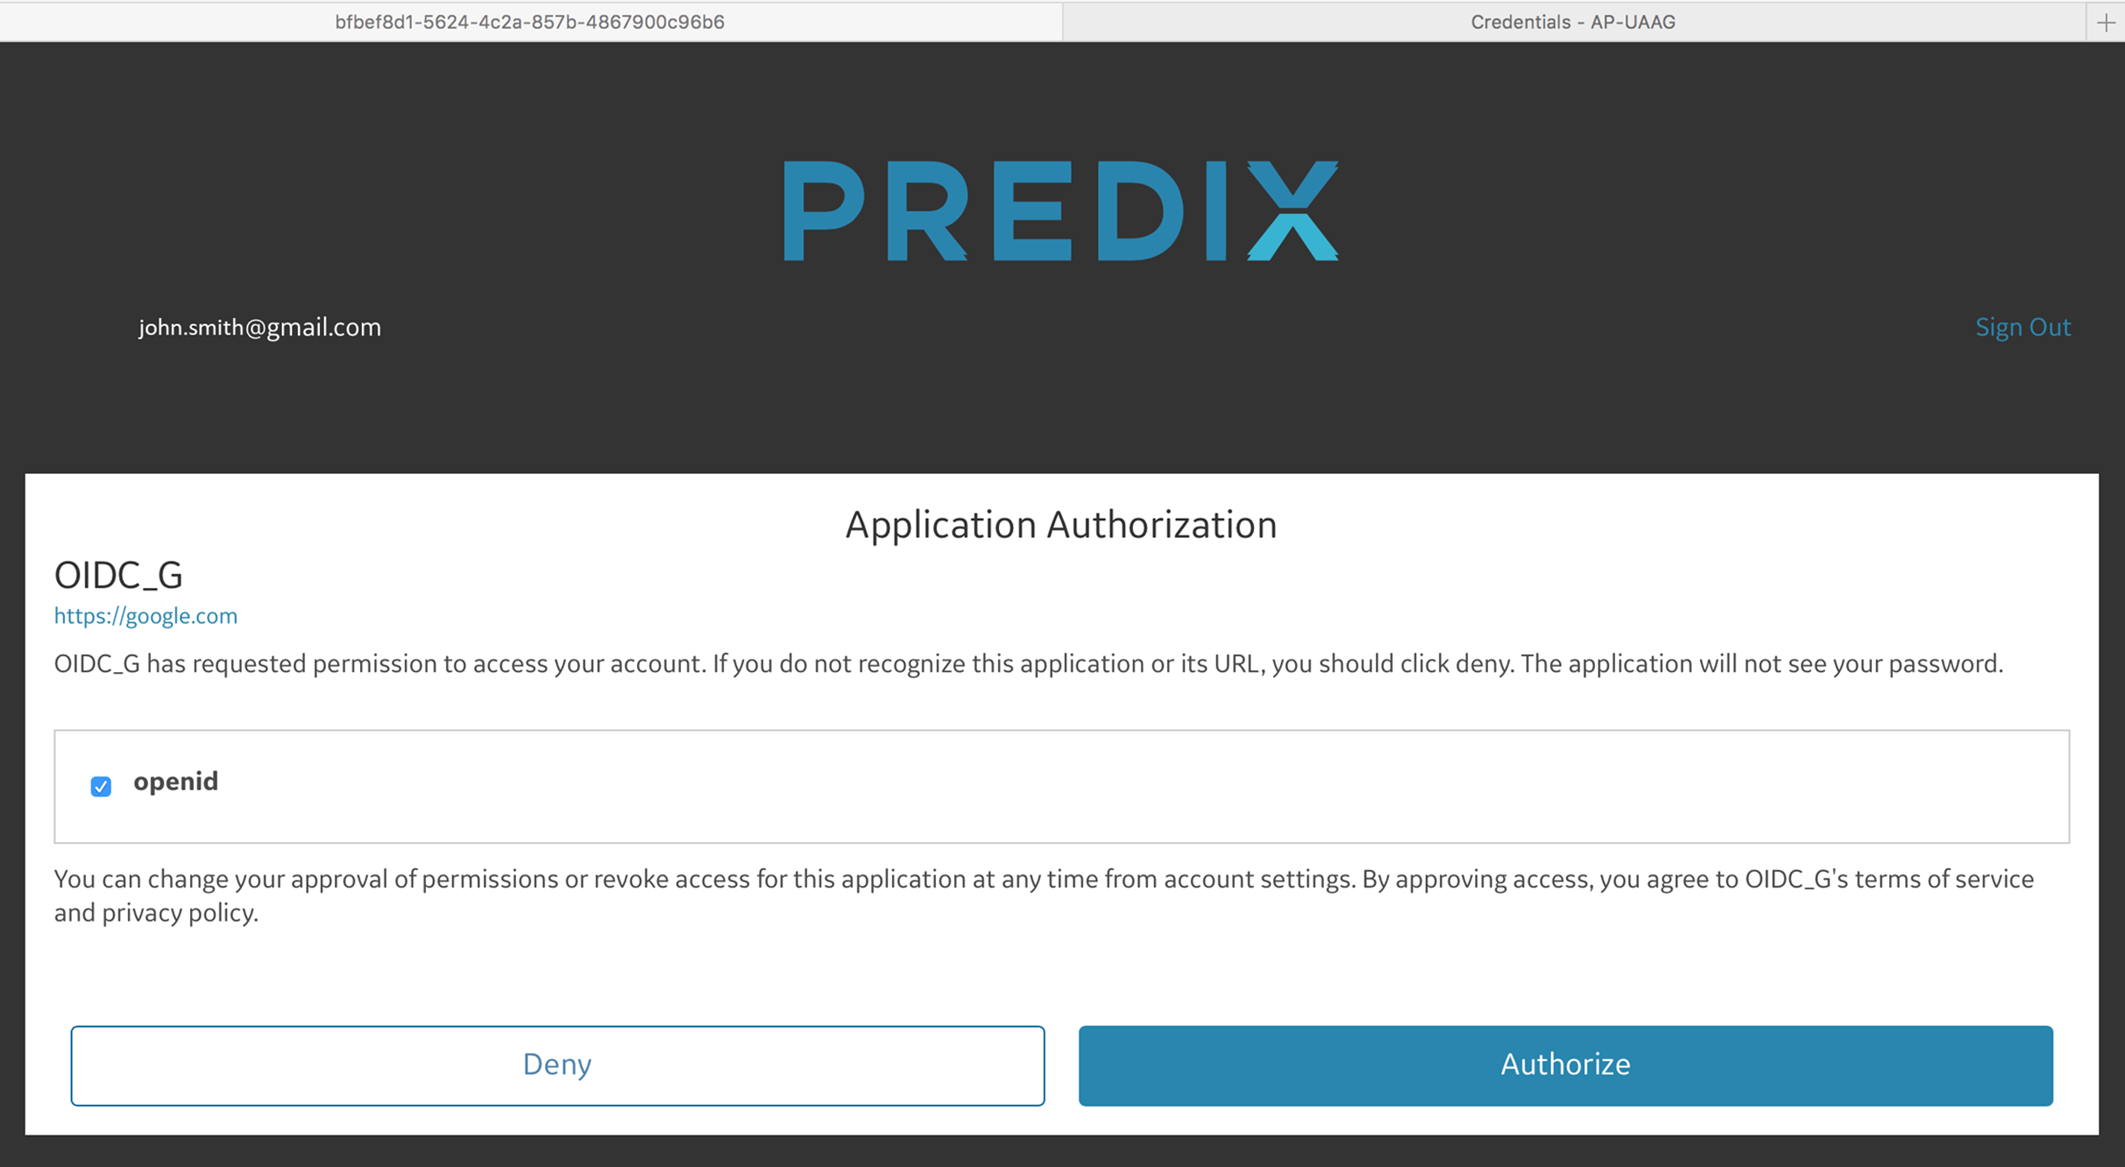
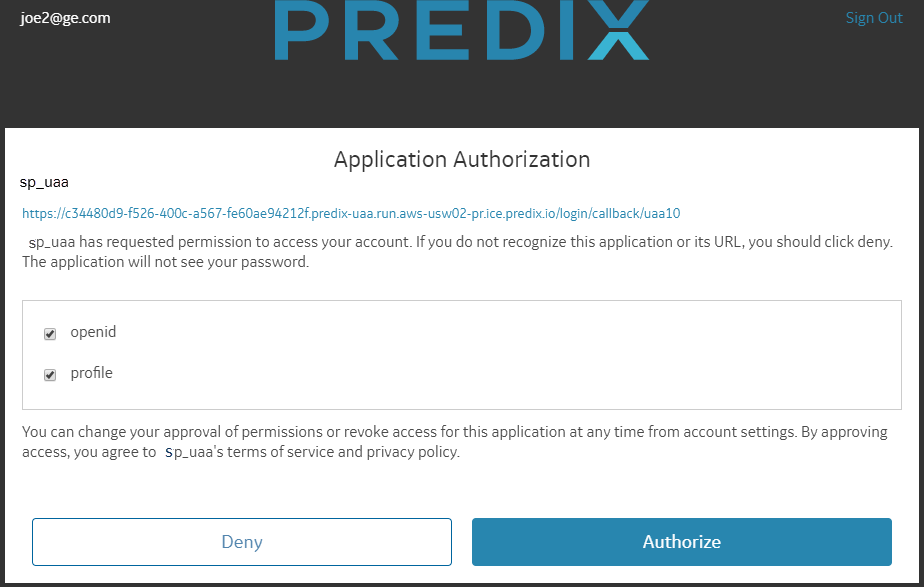
 - Click on the Login Link Text, you are redirected to the IdP login page. You can enter your user credentials (email/username and password) that you created in UAA_IdP.On successful login, the Application Authorization window displays. You can choose to Authorize or Deny access to your application.Example:
Example: Configuring UAA SP for OIDC Authentication Using Company SSO IdP
About This Task
Before You Begin
- Create the Company SSO identity provider information.
- Create or select a UAA instance that you want to configure as the SP for your Company SSO IdP.
Complete the following procedure to configure Company SSO as the external identity provider.
Procedure
- Click on the Identity Providers tab, navigate to External Identity Provider section and then click on the New Identity Provider.Example:
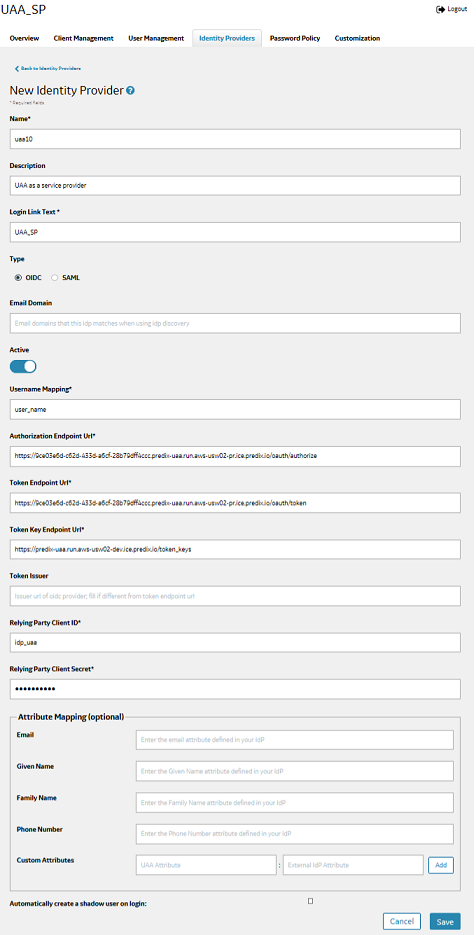
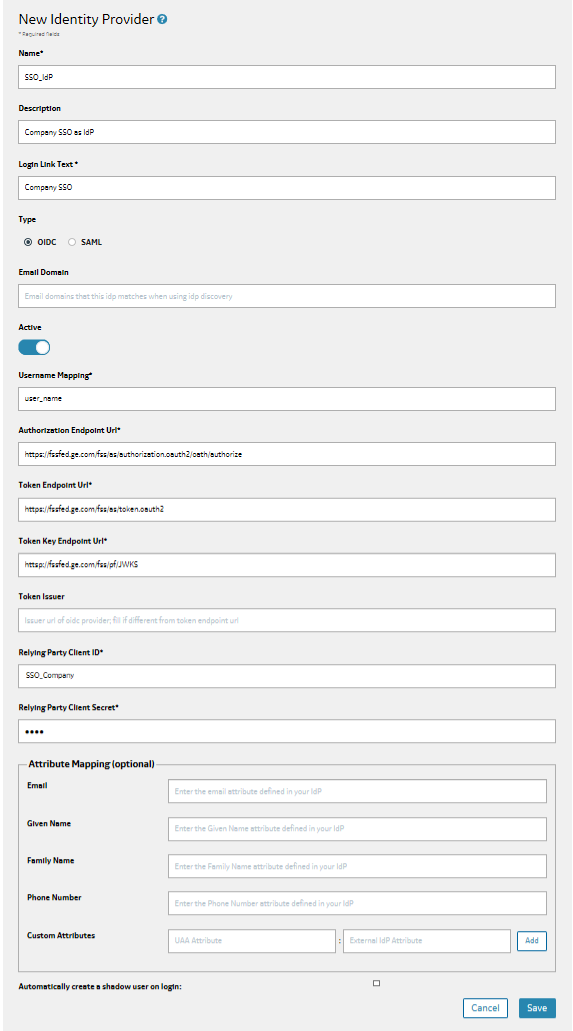
- In the New Identity Provider form, specify the following information :
Field Description Name Specify the name of your IdP. Description (Optional) Specify a short description for your IdP. Login Link Text Specify the login text that you want to display for your IdP. Type Select OIDC as the type. Email Domain (Optional) Specify the email domain that UAA can use to identify the identity provider if you have configured more than one identity provider. Active Select this option to set the IdP as active. Username Mapping Specify the username attribute defined in your IdP. Username mapping is a required field to map
user_nameattribute (a unique identifier associated with a user) with a specific user from the IdP.Note: You must ensure that the OIDC attribute mapped touser_nameis unique for each user.Although OIDC specification guarantees a unique
subattribute for each user in the ID token, your OIDC provider may choose to provide a more suitable username attribute in a human-readable format.Authorization Endpoint Url Specify the authorization endpoint for OIDC token. Token Endpoint Url Specify the token Url for OIDC authorization code. Token Key Endpoint Url Specify the token Url for retrieving an OIDC token with an authorization code. Token Issuer Specify the Url of your OIDC provider. Relying Party Client ID Specify the OIDC provider Client id. Relying Party Client ID and Client Secret are checks to match the client ID and client secret stored in the authorization server before issuing an authorization token.
Relying Party Client Secret Specify the OIDC provider client secret. Attribute Mapping (Optional) Specify the user attributes and any custom attributes specific to the user. Attribute Mapping allows you to propagate user's name attribute along with any other stored user information such as email addresses, first or last names etc., from the identity provider (Company SSO) to the service provider (UAA). These attributes along with any other stored user information are shared with applications via the OpenID tokens.
Automatically create a shadow user on login Select this option only if you want to create a local user in UAA corresponding to each user defined in the identity provider that you are configuring. You must manually create the local users when this option is set to a false value. Setting a false value allows an admin to control which users from an IdP can have access. In other words, admin can whitelist certain users to grant access to them.
Setting this option to a truevalue grants access to any user from the federated IdP.
Example:Note: In the following example we have used these Urls:https://fssfed.ge.com/fss/as/authorization.oauth2as the Authorization End-point Urlhttps://fssfed.ge.com/fss/as/token.oauth2as the Token End-point Urlhttsp://fssfed.ge.com/fss/pf/JWKSas the Token Key End point Url.
- Navigate to Client Management tab in the same UAA instance and click on Create Client information.Ensure the following information is added to the Create Client form
Fields Descriptions Client ID Specify a name for the OAuth2 client you are creating. Authorized Grant Types authorization_code When you use the authorization code grant type, the client directs the resource owner to UAA, which in turn directs the resource owner back to the client with the authorization code.
Client Secret Specify the password. It is important that you keep a note of this password. If lost, this password cannot be retrieved. Confirm Client Secret Reenter the client secret. Redirect URI Specify a redirect URI (Url of your Company SSO) to redirect the client after login or logout. UAA uses the value of Redirect URI for /oauth/authorizeand/logoutendpoints.The Redirect URI for this client is the link to the application that the user is trying to use. Once authentication is successful, UAA sends the application user back to the application.
Scopes Scopes are permissions associated with a Client to determine user access to a resource through an application. Add the openid,user_attributes, andprofilescopes.Note: Depending upon your Company's SSO setup, the scopes may vary for your configuration. Consult with your Company SSO administrator or any related documentation to include the required scopes.Allowed Providers Select the OpenID Connect identity provider that you created. For this example, we created a provider name,“ SSO_IdP” in Step 2.
Example:Note: In the following example, we have used the Predix.io Url (https://www.predix.io/) as our Redirect URI.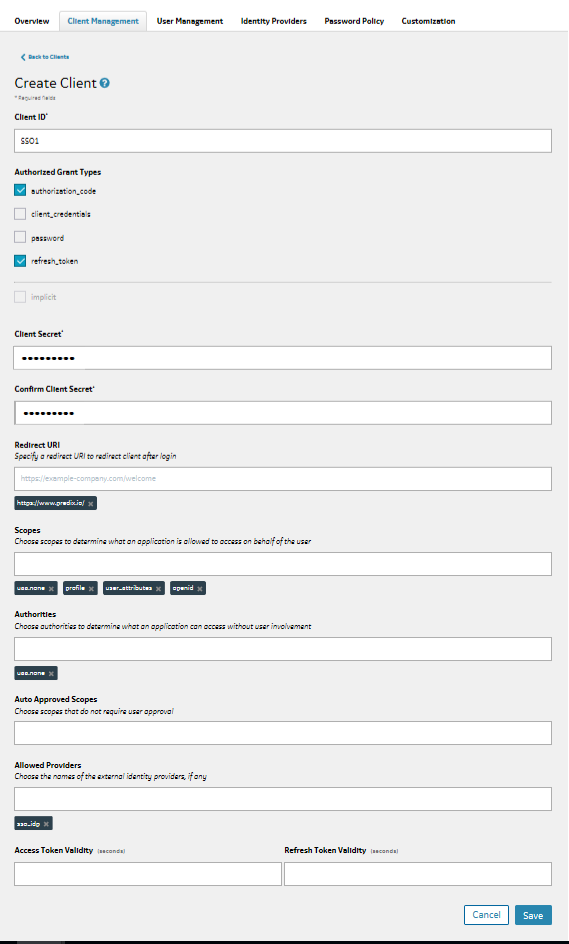
Example: Verifying Company SSO as an OIDC IdP Configuration
Before You Begin
Ensure that you have your UAA service provider instance link handy. Your UAA instance link must be in this format, https://<uaa_zone_id>.<uaa_url>/login.
Procedure
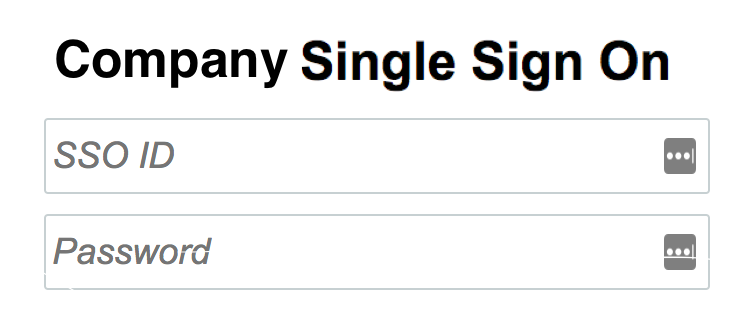
- Open a new browser and enter the UAA instance link that you had configured for Company SSO IdP. Example:
https://9cc6b706-a76f-49d0-9d31-589d81db3792.predix-uaa.run.aws-usw02-pr.ice.predix.io/loginA UAA dashboard login screen displays with the Link Login Text that you entered for your IdP login.
Example:
- Click on the Login Link Text (“Company SSO” in the above example) link and login. You are redirected to your Company SSO login page, where you can enter your SSO credentials and back to UAA before you finally land on the Redirect URI page specified in your UAA (SP) settings.
Example: Configuring UAA to Google IdP OIDC Federated Authentication
About This Task
Follow these steps to set up your Google IdP Client:
Setting Up Google IdP Client Information
Procedure
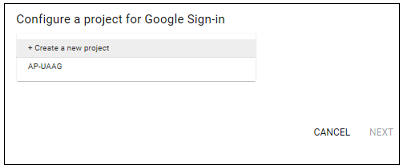
- Create a new project in Google Sign-in for Websites. If you already have a project you can skip this step and select your project.Example
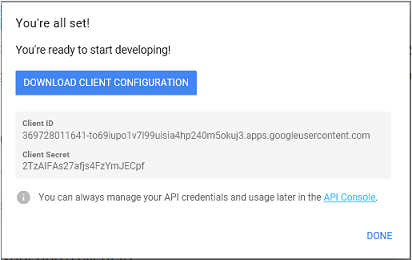
- Download and save the Client ID and Client Secret for your Google IdP client. This is your relying party client ID and secret. You will need this information when you configure UAA as a service provider.Example
Configuring UAA as an SP for OIDC Authentication with Google IdP
About This Task
The following example shows how to configure UAA as a service provider for Google identity provider.
Before You Begin
- Configure your Google IdP client information as outlined in the Setting Up Google IdP Client Information section.
- Download and save the Client ID and Client Secret for your Google IdP client. You will need this information to configure UAA as a service provider.
Procedure
- Click on the Identity Providers tab, navigate to External Identity Provider section and then click on the New Identity Provider.Example:
- In the New Identity Provider form, specify the following information :
Field Description Name Specify the name of your IdP. Description (Optional) Specify a short description for your IdP. Login Link Text Specify the login text that you want to display for your IdP. Type Select OIDC as the type. Email Domain (Optional) Specify the email domain that UAA can use to identify the identity provider if you have configured more than one identity provider. Active Select this option to set the IdP as active. Username Mapping Specify the username attribute defined in your IdP. Username mapping is a required field to map
user_nameattribute (a unique identifier associated with a user) with a specific user from the IdP.Note: You must ensure that the OIDC attribute mapped tousernameis unique for each user.Although OIDC specification guarantees a unique
subattribute for each user in the ID token, your OIDC provider may choose to provide a more suitable username attribute in a human-readable format.Authorization Endpoint Url Specify the authorization endpoint for OIDC token. Token Endpoint Url Specify the token Url for OIDC authorization code. Token Key Endpoint Url Specify the token key endpoint Url for token verification. Token Issuer Specify the Url of your OIDC provider. Relying Party Client ID Specify the OIDC provider Client id. Relying Party Client ID and Client Secret are checks to match the client ID and client secret stored in the authorization server before issuing an authorization token.
Use the Client ID that your downloaded and saved in Step 2 of the Setting Up Google IdP Client Information section.
Relying Party Client Secret Specify the OIDC provider client secret. Use the Client Secret that your downloaded and saved in Step 2 of the Setting Up Google IdP Client Information section.
Attribute Mapping (Optional) Specify the user attributes and any custom attributes specific to the user. Attribute Mapping allows you to propagate user's name attribute along with any other stored user information such as email addresses, first or last names etc., from the identity provider (Google) to the service provider (UAA). These attributes along with any other stored user information are shared with applications via the OpenID tokens.
Automatically create a shadow user on login Select this option to create a local user in UAA corresponding to each user defined in the identity provider that you are configuring. Example:Note: In the following example we have used these Urls:https://accounts.google.com/o/oauth2/v2/authas the Authorization End-point Urlhttps://www.googleapis.com/oauth2/v4/tokenas the Token End-point Urlhttps://www.googleapis.com/oauth2/v3/certsas the Token Key End point Url.
Example: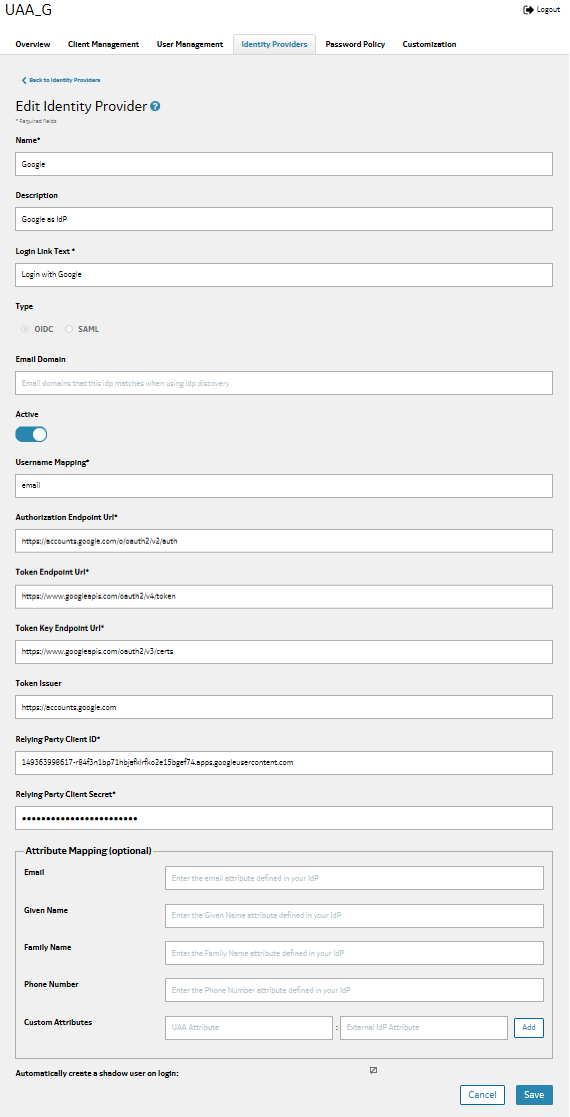
- Navigate to Client Management tab in the same UAA instance and click on Create Client information.Ensure the following information is added to the Create Client form
Fields Descriptions Client ID Specify a name for the OAuth2 client you are creating. Authorized Grant Types authorization_code When you use the authorization code grant type, the client directs the resource owner to UAA, which in turn directs the resource owner back to the client with the authorization code.
Client Secret Specify the password. It is important that you keep a note of this password. If lost, this password cannot be retrieved. Confirm Client Secret Reenter the client secret. Redirect URI Specify a redirect URI to redirect the client after login or logout. UAA uses the value of Redirect URI for /oauth/authorizeand/logoutendpoints.For example:
https://google.comScopes Scopes are permissions associated with a Client to determine user access to a resource through an application. Note:- For UAA to Google IdP OIDC configuration, you must include
emailscope in addition to theopenidscope
Allowed Providers Select the OpenID Connect identity provider that you created through the identity provider configuration. For this example, we created a provider named,“ Google” in Step 2.
Example: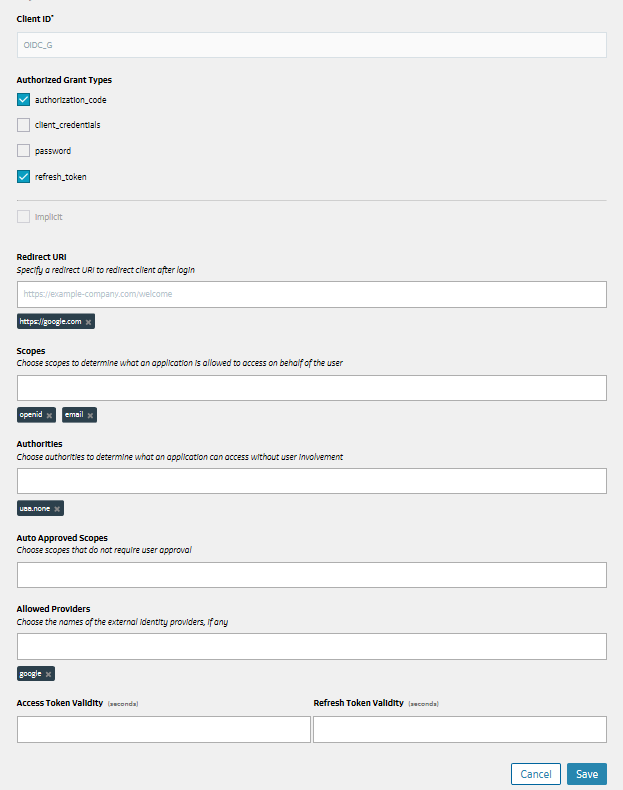
- For UAA to Google IdP OIDC configuration, you must include
What To Do Next
Example: Updating Google IdP for Required Scope
About This Task
email scope. This feature is not available through the UAA dashboard and you must use the uaac commands through your Terminal or Command Prompt to perform this task. Follow these steps to update the IdP using the uaac to include the email scope
Procedure
What To Do Next
Example : Verifying the Google IdP Configuration
Procedure
- You will be redirected to your Google account page. If you are not logged into your Google account. You will need to enter your google account credentials (email and password).Example
- On successful login, the Application Authorization window displays. You can choose to Authorize or Deny access to your application. Example